


PerniciousDuke
-
Content Count
28 -
Joined
-
Last visited
1 Follower
-

Male Nightingale Armor Skyrim - WIP
PerniciousDuke replied to PerniciousDuke's topic in Historical Reenactment
Check out this suit up video we made! *turn the subtitles on for costume description* -
Male Nightingale Armor Skyrim - WIP
PerniciousDuke replied to PerniciousDuke's topic in Historical Reenactment
Hahaha! Totally. Meme credit: Huntress Creations -
Male Nightingale Armor Skyrim - WIP
PerniciousDuke replied to PerniciousDuke's topic in Historical Reenactment
The first test fit went great! There's a couple little things we'd like to fix, but overall I'm very happy with how it turned ouy! Last edite -
Male Nightingale Armor Skyrim - WIP
PerniciousDuke replied to PerniciousDuke's topic in Historical Reenactment
Thanks @aven and @space dog but it's not done yet! 1. I have to restring the arms tighter then install snaps for forearm and shoulder armor. 2. Set snaps in cape so it stays in place. 3. Make leather straps to synch top of boots. 4. Sew knee armor in place. 5. Line armor with suede 6. Edge dye all leather 7. Seal all leather 8. And finish the bow! The bow is coming along though. Got this far today: Primered- Painted base coat- Dark walnut -
Male Nightingale Armor Skyrim - WIP
PerniciousDuke replied to PerniciousDuke's topic in Historical Reenactment
YinTx - the other site is also a forum (405th.com) and it's not going anywhere anytime soon. They are just updating the servers, they update once a month for a couple hours. I would host on this site if they had a bigger image capacity. I don't like the time it takes to resize them and the lower quality result. Sorry for the delay, but if you check back tomorrow they will all be crystal clear. -
Male Nightingale Armor Skyrim - WIP
PerniciousDuke replied to PerniciousDuke's topic in Historical Reenactment
Sorry for the long delay! I've been working at this suit a lot, but last weekend was most productive. Here's a super long post to make up for my absence. Update:Feeling rather frustrated at the moment. The orbital sander snagged the bow and broke it in two. Sean Anwalt the extra hardener did help cure the lower layer. I put in about 3x the normal amount.So instead of calling it quits I thought I would revamp myself by showing you guys more of what I've been up to.Gloves:I bought knuckleless gloves online. Cut 15mm squares of leather out. Butchered my belt. Installed the studs to leather and epoxies the leather over the rubber finger vents. Chest:I used Evakura's technique on 3d print finishing to clean up these accent pieces then painted with Black automotive Enamel. Epoxied them to leather that had snaps set in already. The part that holds the Crest also holds the weight of the cape so I had to make sure it was strong. First I sewed the straps in. These middle four are functional, keeping the center held to the sides.If I were to then sew the cover on in between these straps then you would see the exposed thread. Instead I had to punch holes and stitch through a spacer. (I'm sure there's a technical name for that.) It can be pretty hard to line up three sets of holes like that. It's very strong now.Arms:This took a lot longer than expected.The plan was to mummy wrap his arms from wrist to armpit. I bought Upholstery fabric because I liked the texture.I knew if we just cut strips then there would be a high chance they'd fray and unravel. So I opted to make them twice as wide and fold the over. Essentially making a tube. Little did I know this is no easy task for a novice sew-er person. And we needed 50 feet!First we cut at a diagonal. Apparently most cloth only has give in one direction like grain in wood. So cutting diagonally gives us the most versatility in our goal to wrap it around an arm and it will naturally want to curve up the arm. Then we used a Serger because we had one. Basically it's a single use sew machine that puts thread everywhere! And cuts the fabric as you go! The next part is a nightmare without this tool called a Fast Turner. To get the seam on the inside of the tube we have to turn the fabric. Using this metal tube and a wire with a hook on it the process takes about 20 seconds instead of 5 minutes doing it by hand. Then I had to roll the seam in my finger as I ironed the tube flat before we could sew the tubes together. We decided an angled seam between links would look better visually than a 90 degree one. Now we're left with these humps of a seem. To get the flattest look possible we snipped the center of them so each side could be ironed a different direction. Hand stitching using a curved needle we tacked the bands in a few places. We didnt want to fully sew in case the wrap was too tight or too loose for his arms. Helm:This is one of the only pieces I free handed the template and also contains a lot of detail so I thought I would show the process.Using screenshots from game and math to scale up I came up with this template: Sketched a design, transferred to leather, cut lines and hammered: Let dry two days on a WW2 helmet insert for the proper shape. I set snaps into folded canvas then hidden stitched that to three points on helm. Those keep the helm in place on the hood. But I still had the problem of the points getting bent out. So I took apart a bra to use the wire then epoxied it to the points. Now the wire fits through holes on the hood preventing the points from moving. Mask:I don't have many pictures here, but I'll tell you what I did. Similar template process to tooled as the helm. But the shaping was a little trickier since the chin needed to be folded two ways. Long story short, I used the ball on the back of a dining chair that was the perfect curve and just kept pressing it along the chin line.It worked, but the sides kept spreading out like wings so I cut a V shape on the underside of his chin. This worked and once dried I awled holes along the V and sewed it together.I sent snaps in it and the ski mask and I put a grommet in so that he could hang the mask on his body when not being worn.Cape:There was no preparing me for how hard this was going to be. My mom and I worked together for 7 hours and made 3 1/2 capes.We found a real wool poncho at goodwill for $4. I bought a table cloth as well for $2First we cut the table cloth the same shape/size as the wool poncho so we know what we're working with. We brainstormed shapes and proportions for the hood and cape. I first decided to cut away the front of the cape. This way he didn't have to worry about the cape falling forward covering up the armor. Then we tried to determine the shape of the hood which was really hard. We made Ken doll sized mocks ups to see what they looked like once sewn. After many revisions we had something to work with. The result of that weekend was worth it. -
Male Nightingale Armor Skyrim - WIP
PerniciousDuke replied to PerniciousDuke's topic in Historical Reenactment
Thanks man! Update: (do you guys mind these thumbnail pictures? Do they enlarge when you click on them?) Stitching leather is no joke. My hands feel like they're going to fall off and I've only connected 12 pieces. (Don't mind the rough edges. I will redye them, or paint them) I did manage to dye most of the pieces last night. Next challenge will be the chest. I think I'm happy with this set up: I also took a couple passes with my router to make a jig for wet forming the chest strips: -
Male Nightingale Armor Skyrim - WIP
PerniciousDuke replied to PerniciousDuke's topic in Historical Reenactment
-
Male Nightingale Armor Skyrim - WIP
PerniciousDuke replied to PerniciousDuke's topic in Historical Reenactment
You're telling me @spacedog I have 3" heel raises in my Spartan suit and I don't walk well for a week after a day in that costume. But people get so excited when they see me! Update: Starting up another Skyrim building weekend. I did some stitch tests... which one do you think I'm going to go with? (Hint: it's the one @YinTx recommended) -
Male Nightingale Armor Skyrim - WIP
PerniciousDuke replied to PerniciousDuke's topic in Historical Reenactment
https://www.tandyleather.com/en/product/economy-tooling-side-8-to-9-oz-3-2-to-3-6-mm -
Male Nightingale Armor Skyrim - WIP
PerniciousDuke replied to PerniciousDuke's topic in Historical Reenactment
Haha, yeah I'm not going to make my own boots. If you've ever cosplayed at an event for 8 hours you would know why. We did learn that faux leather is shiny because of a polishing process it goes through and that household products like rubbing alcohol can reverse the effects. Edit: I realized you might have been talking about the clear wrap and not the boots. Lol Update: So I needed to hold the leather on the mannequin to form it and my only thought was how saran wrap loves to cling to itself. So I wrapped the mannequin, put a piece on and wrapped more over top. One downside is satan wrap holds the moisture in so not only does it take longer, but there is a good chance of mold growing. Once a piece is half dry (8-12 hours) I take it off and try to prop it up somewhere else to finish drying. Something new I learned is that if the piece is not fully wrapped in saran while drying then the moisture will get sucked out of that one spot so fast that it creates what looks like a burn mark! Crazy! -
Male Nightingale Armor Skyrim - WIP
PerniciousDuke replied to PerniciousDuke's topic in Historical Reenactment
I'm still at it! I spent 5 evenings in a row tooling the leather on the floor and it threw my back out. :'( Today I moved the project to my parents and I am cooking again. Here's my current set up. Bought a new leather tool storage chest too! Current state of the suit: 24 of 34 pieces tooled and formed. I'll update with more detail after the weekend. Mannequins are fun! -
I cheated on the cribbage board holder. I bought a Tandy Texas Holdem card holder kit. And I just made my own design to say Cribbage. So my traveling cribbage board is just two decks of cards and a little pad of paper and pencil.
-
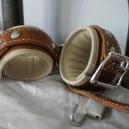
Yeah, it does look really good. Nice stitching. I like to line my sheaths with suede, helps with the snaps. For the hole punching chisel I find it easiest to only punch through one layer at a time. Once you have one layer done, use it as a template to punch through the next layer. What are you going to make next?
-
Male Nightingale Armor Skyrim - WIP
PerniciousDuke replied to PerniciousDuke's topic in Historical Reenactment
That is very interesting. I may give that a try tomorrow. Update: I was having trouble with my pieces coming out two different colors despite the same dying process: But, I figured out it was due to the heat gun. My first piece I heat gunned a little, then got dinner, then dyed. My second piece I heat gunned a lot. The heat closed the pores on the smooth side so that it wouldn't accept as much dye. I'm going to keep using the heat gun to speed up the forming process, but only on the rough side. Because of @jdole I looked into wet forming. I may not be able to make molds, but I tried my hand at a bone folder and I'm very pleased with the results! Several more hours and I've made some good progress: