


Deek
-
Content Count
22 -
Joined
-
Last visited
Posts posted by Deek
-
-
1 hour ago, CowboyBob said:I can see you oiled the pressure bar,how about the part you circled in red & at the top of the bar?When it sticks before you do anything try to tighten or loosen the foot pressure adjuster once in a while they aren't drilled straight & you might find a spot where it'll work w/o jamming.
There doesn't seem to be a position for the pressure adjuster screw where it doesn't jam up, and it still jams without the screw.
When taking apart the machine again today, trying the method Tequila mentioned above, I didn't see any burrs.
I also slid the piece that moves through that slot up and down and met no resistance.
But I noticed the walking foot was meeting some resistance when sliding it up and down by hand so I removed the "upper feed bar guide" from the "frame driving base", oiled it and put it back together (names are according to my parts manual)
This reduced the resistance but when I put it all back together and timed and recalibrated, the problem still persists. -
11 hours ago, CowboyBob said:It could be binding on the bracket behind the roller.loosen both screws alittle & lift the foot up & see if it helps,the roller just need to be barely touching it.
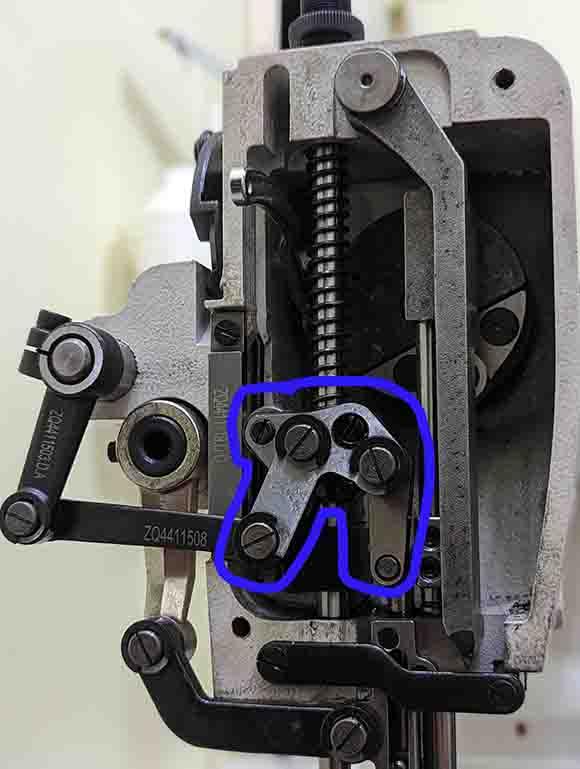
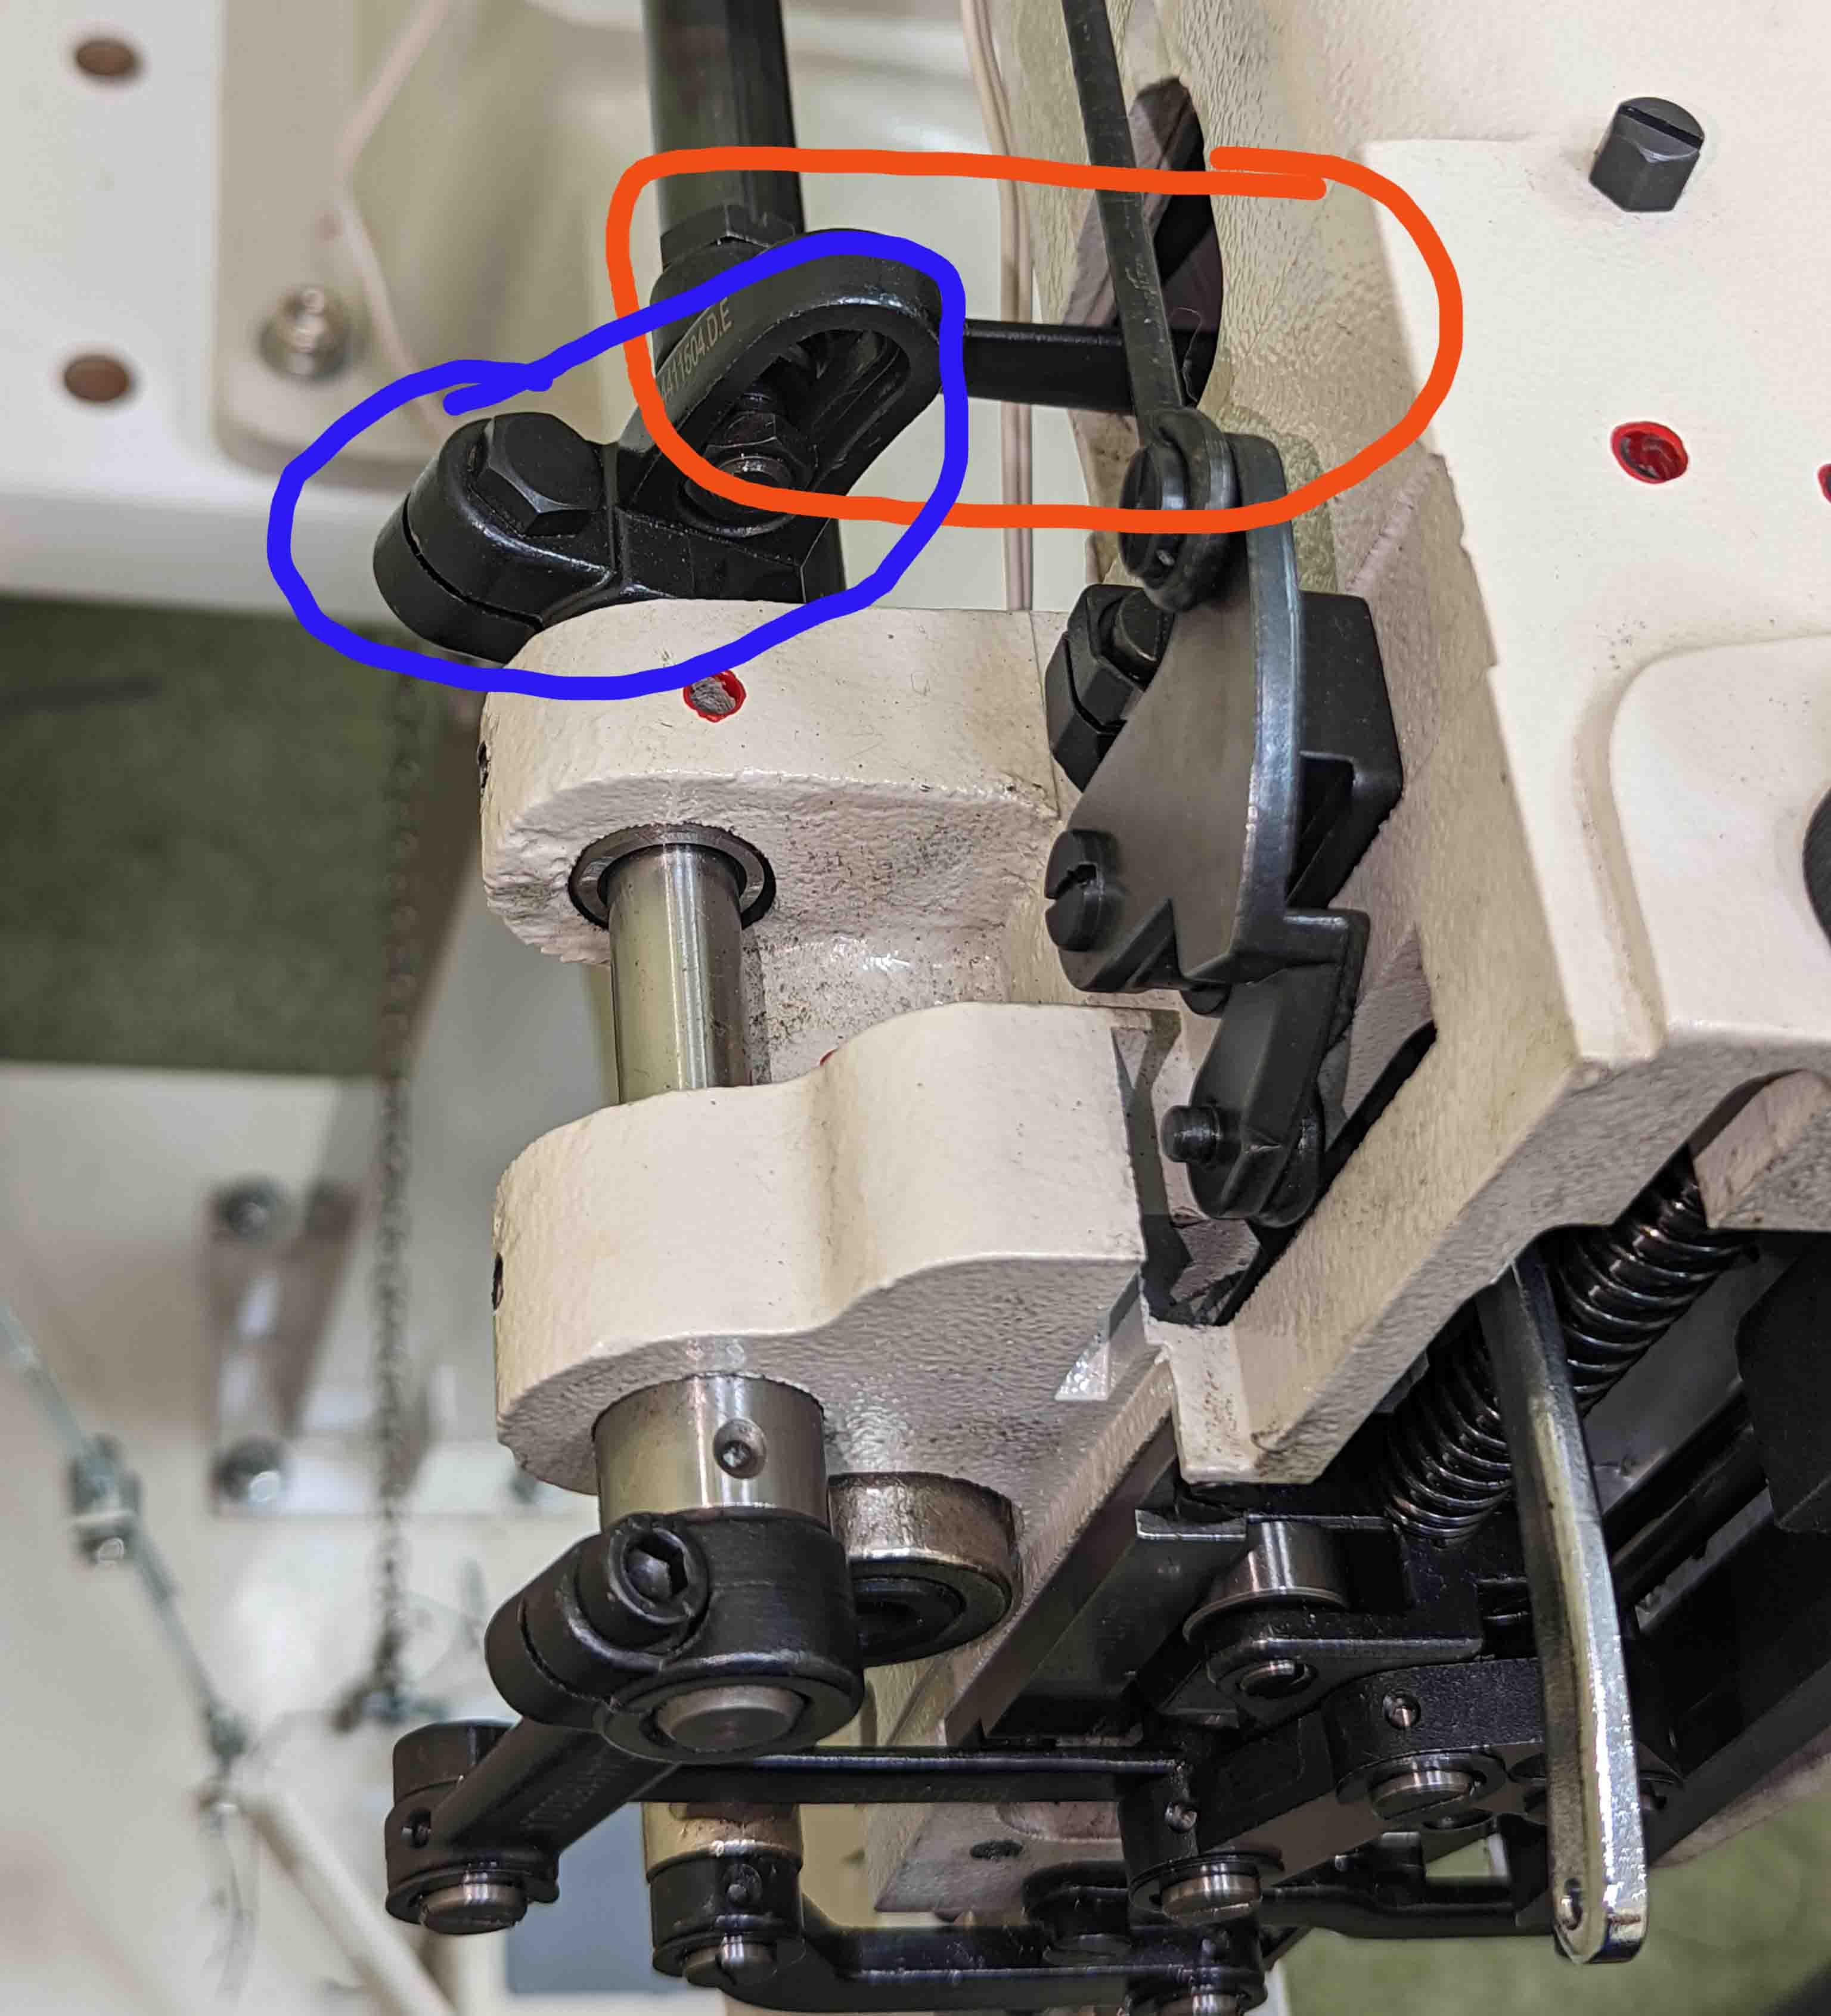
I think you are referring to the area circled in blue, it actually doesn't seem that the wheel contacts it at all during its travel, but I loosened it some more.
When I take it apart again I am going to check on this slot circled in red because I don't believe this machine came adjusted to with the presser foot travelling very high, and this issue only seemed to appear when I tried balancing the feet.
So there may be something going on there and I never noticed it until I attempted to balance them.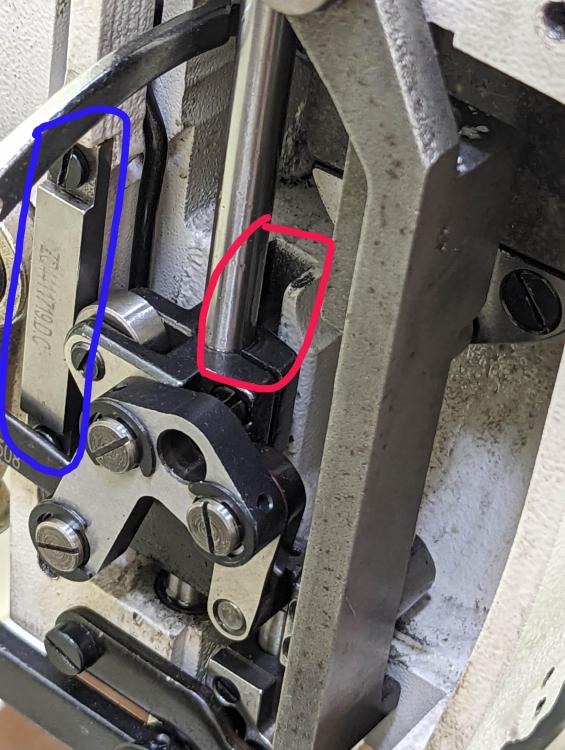 8 hours ago, CowboyBob said:
Another cause can be tightening the ring on the pressure foot adjuster,it's best tio leave it loose it can't back itself out.I think once in a while the paint is high in one spot when you tighten the ring & will cause it to bind.
I loosened it and it still happens, I took it out completely and noticed that when it starts to jam, the top of the presser bar that sticks out tilts towards that balance wheel side of the machine.
7 hours ago, Tequila said:All great advice, and I’m probably way off base with the next comment, but I thought I’d throw it out there. . When I look at the picture @Deek posted it reminds me of the linkage in a lever action rifle. Keeping with that thought if you have to take the linkage out again I’d look at the hinge points and where’s movement, see if there is a rough spot or burr that might be catching. It might be hard to see by eye, so get something soft like a dryer sheet or a Q-tip and run it across the surface, if there’s anything rough it’ll show up.
At this point I am open to try anything to get this thing working, I'll check this tomorrow or Monday.
-
8 hours ago, CowboyBob said:So is it sewing correctly now?
Still no sadly,
I took out the linkage entirely, checked for defects found none. (I've basically disassembled/reassembled the entire presser bar / walking foot assembly at this point, I'll check again, but I don't have very advanced measuring instruments, just a granite slab and digital calipers)
I got the presser foot to start lifting as the walking foot goes down again, but then it still jams once its maybe 1-2mm up , if I lightly tap the linkage with a rubber mallet it will begin the move again in spurts.
If I adjust it so the presser foot does not lift at all, then it does not jam, but then obviously it doesn't feed correctly.
The L shaped piece is very slightly bent or maybe unevenly flattened. I put it flat on a granite slab and pressed lightly on it and it wobbles the littlest big.
Visually I can barely even see the unevenness, so I don't think its the cause. But I've been wrong before. -
So after fussing with it some more today I have a few notes:
- I believe the other day I actually ended up adjusting the cam all the way around to where it originally was,
so it was probably in the correct position and that the walking foot is still supposed to continue to move down and this causes the presser foot to rise.- I took the presser bar out of the machine and rolled it on a granite slab to check if it was bent and then pushed it through the presser screw back and forth and met no resistance. I believe that neither of these parts are defective.
- It seems instead of lifting the presser foot after the walking foot goes down, instead all this linkage circled below seizes up.
I gave it a generous oiling after taking putting the presser bar back in, which helped notably, but I do not think this is a lubrication issue.
And when I lift the presser bar on the foot pedal, it unjams.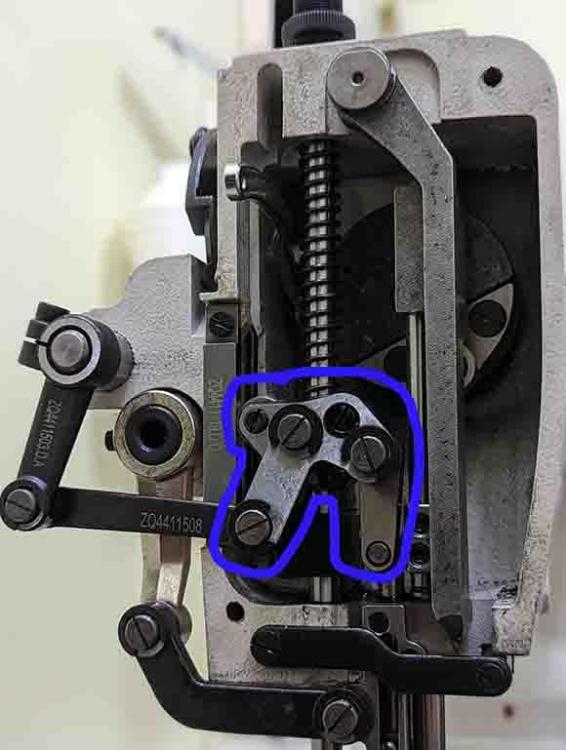
-
7 hours ago, CowboyBob said:You need to turn the cam on the topshaft that drive the rods you have circled in red & blue,loosen the 2-set screws & turn alittle @ a time if it gets worse you need to turn the cam the other way.
I have done this and got the lowest point on the walking foot to match up with when the needle reaches the needle plate level, however now I am getting a slightly bind whenever the needle is almost to its highest and lowest positions. (the whole machine creaks while I push it through, but doesn't stop stop completely. The needle bar and take up lever seem to vibrate the most as I push it through.)
Additionally I cannot get the presser foot to lift when the walking foot is down.
-
Machine: Ferdco Superbull 2500 (Juki 441 Clone, like the Cowboy 4500 and Cobra Class 4)
I bought the machine about 2-3 months ago new from Hoffman Bros., it hasn't really had any issues other than a slipping bobbin winder.
I had a binding issue a couple weeks ago and after some research I thought it was an eccentrically drilled presser foot pressure screw
(I think if this is the case, it caused this issue but I am not sure)Soon after the bind stopped (I don't remember if or how I fixed it)
A couple days ago I noticed my walking foot was traveling WAY higher than the presser foot and I was having issue traveling up layers of material.
So I watched Uwe's video
and this video:
After watching these, I attempted to fix the issue, but it revealed that the problem was much worse.
The walking foot wants to continue to move down after the needle is already on its way back up.
However the presser foot still starts to move up as it should, until it binds.I believe this is causing the whole machine to bind up as the presser foot continues to push down after hitting the feed dog
The needle to hook relationship is still correct
The walking foot moves backward with the feed dog as it should
The needle still travels backwards with the feed dog as wellI cannot figure out how to make it so the lowest point of the walking foots travel is when the needle reaches the needle plate.
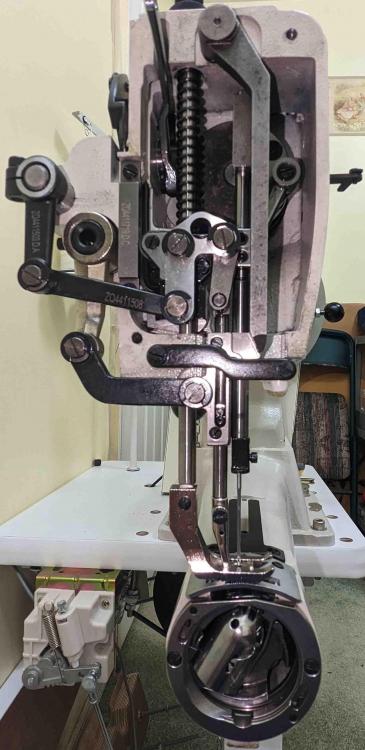
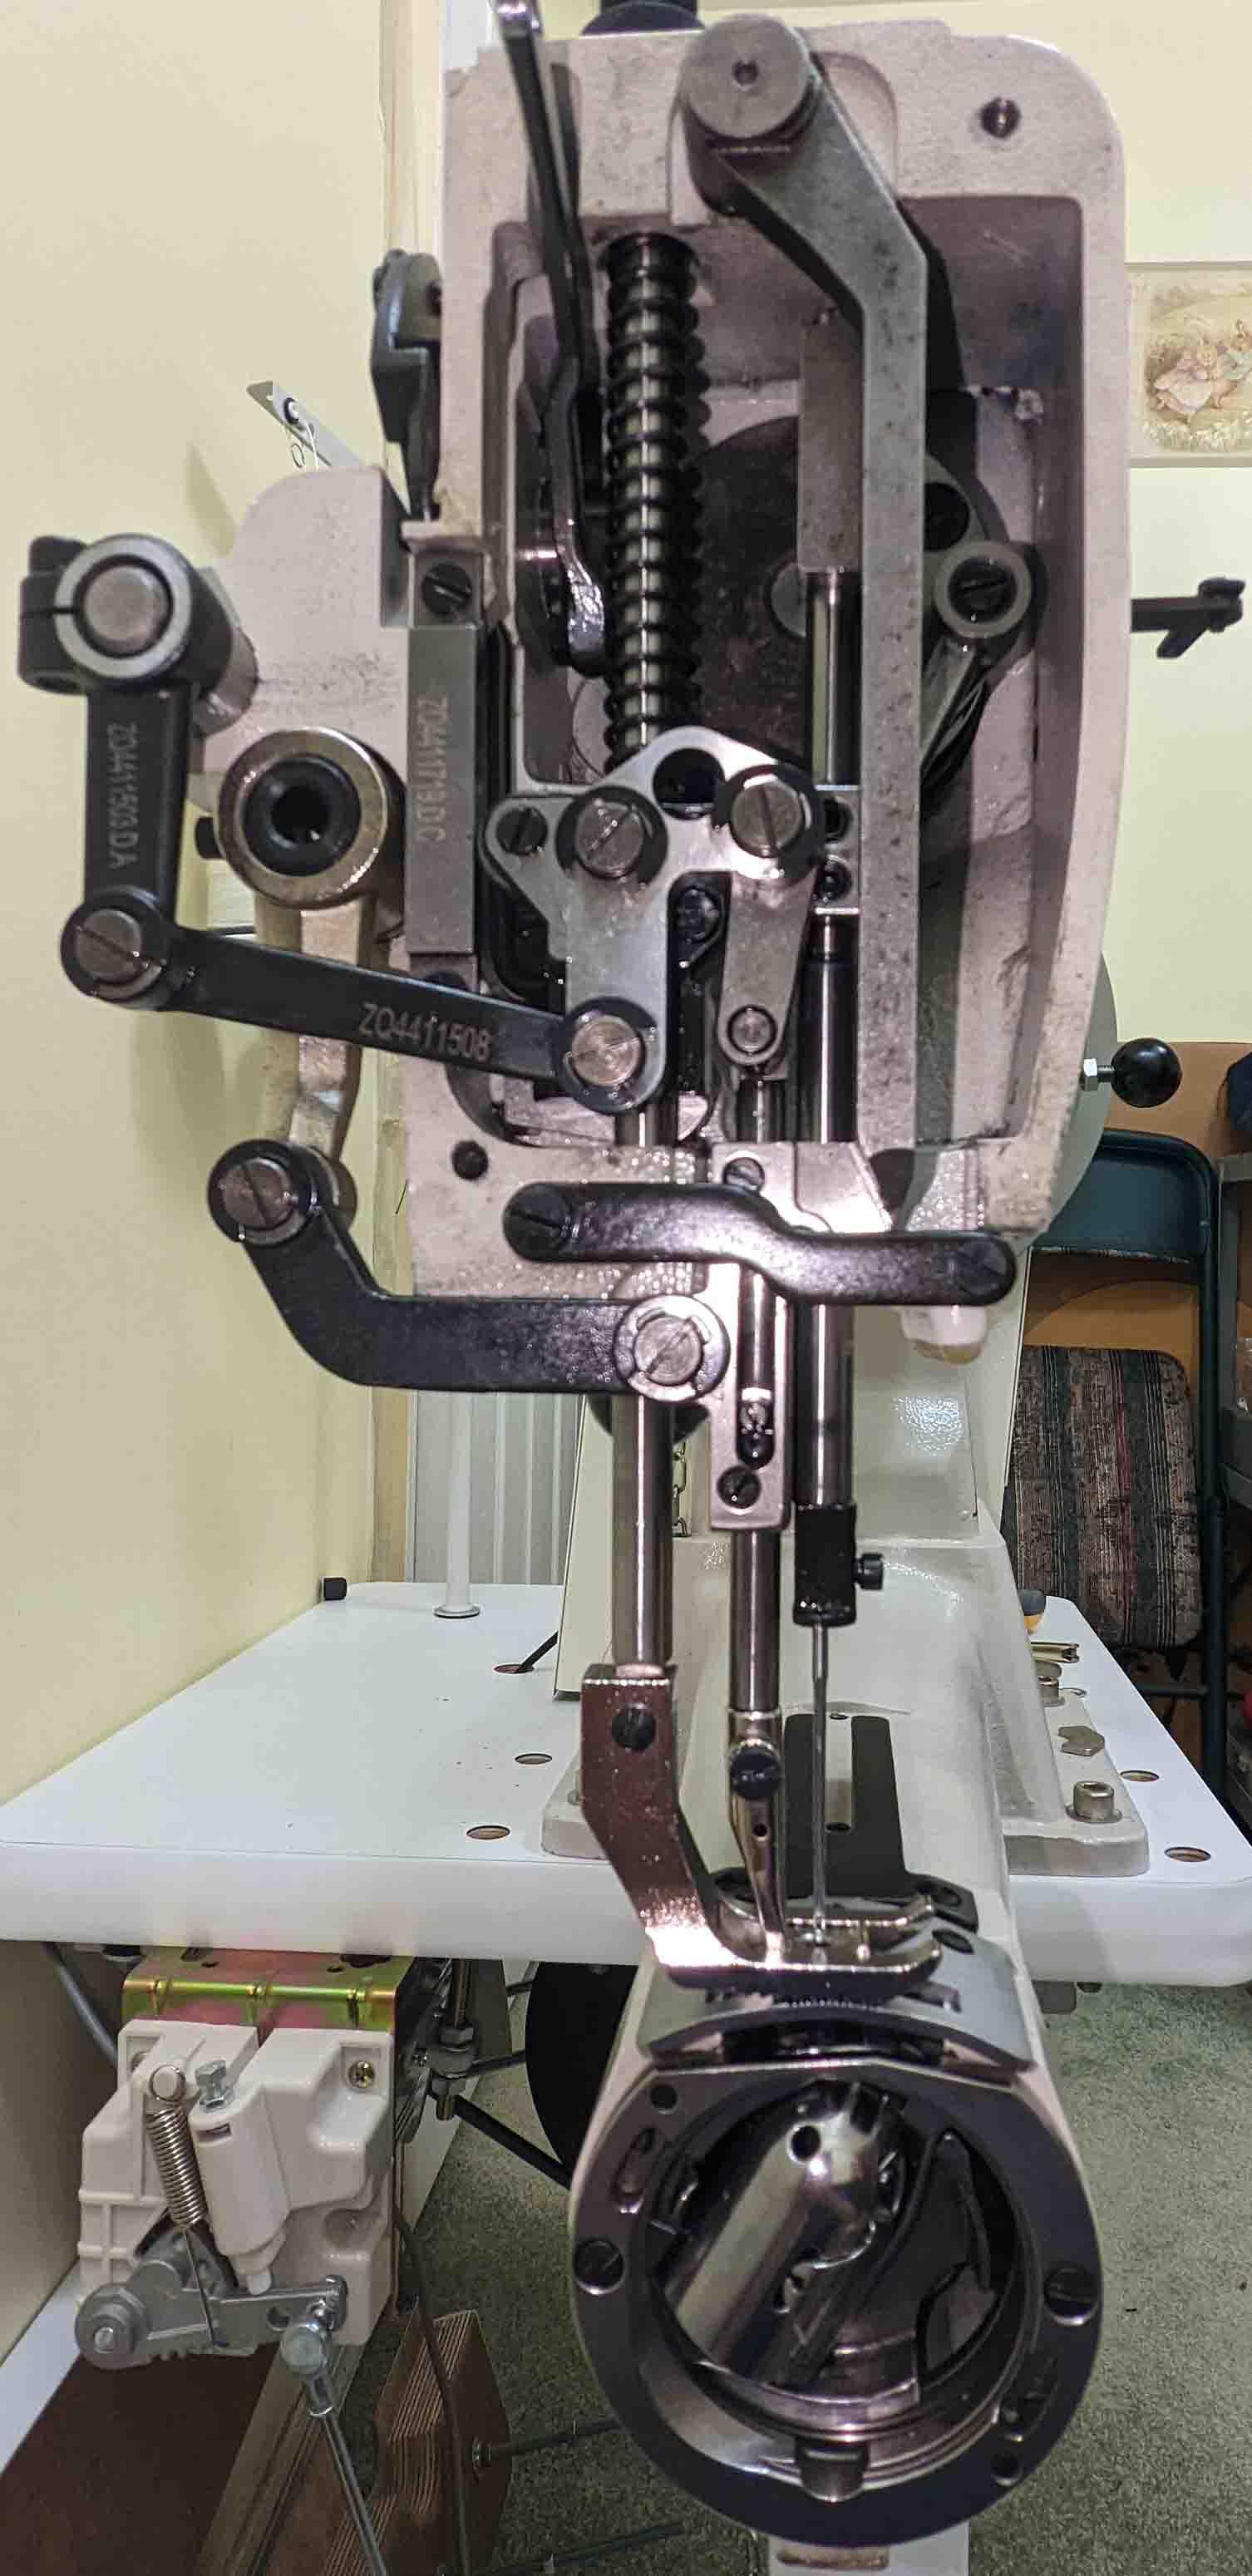
Photos:
The machine when the needle is at its lowest position
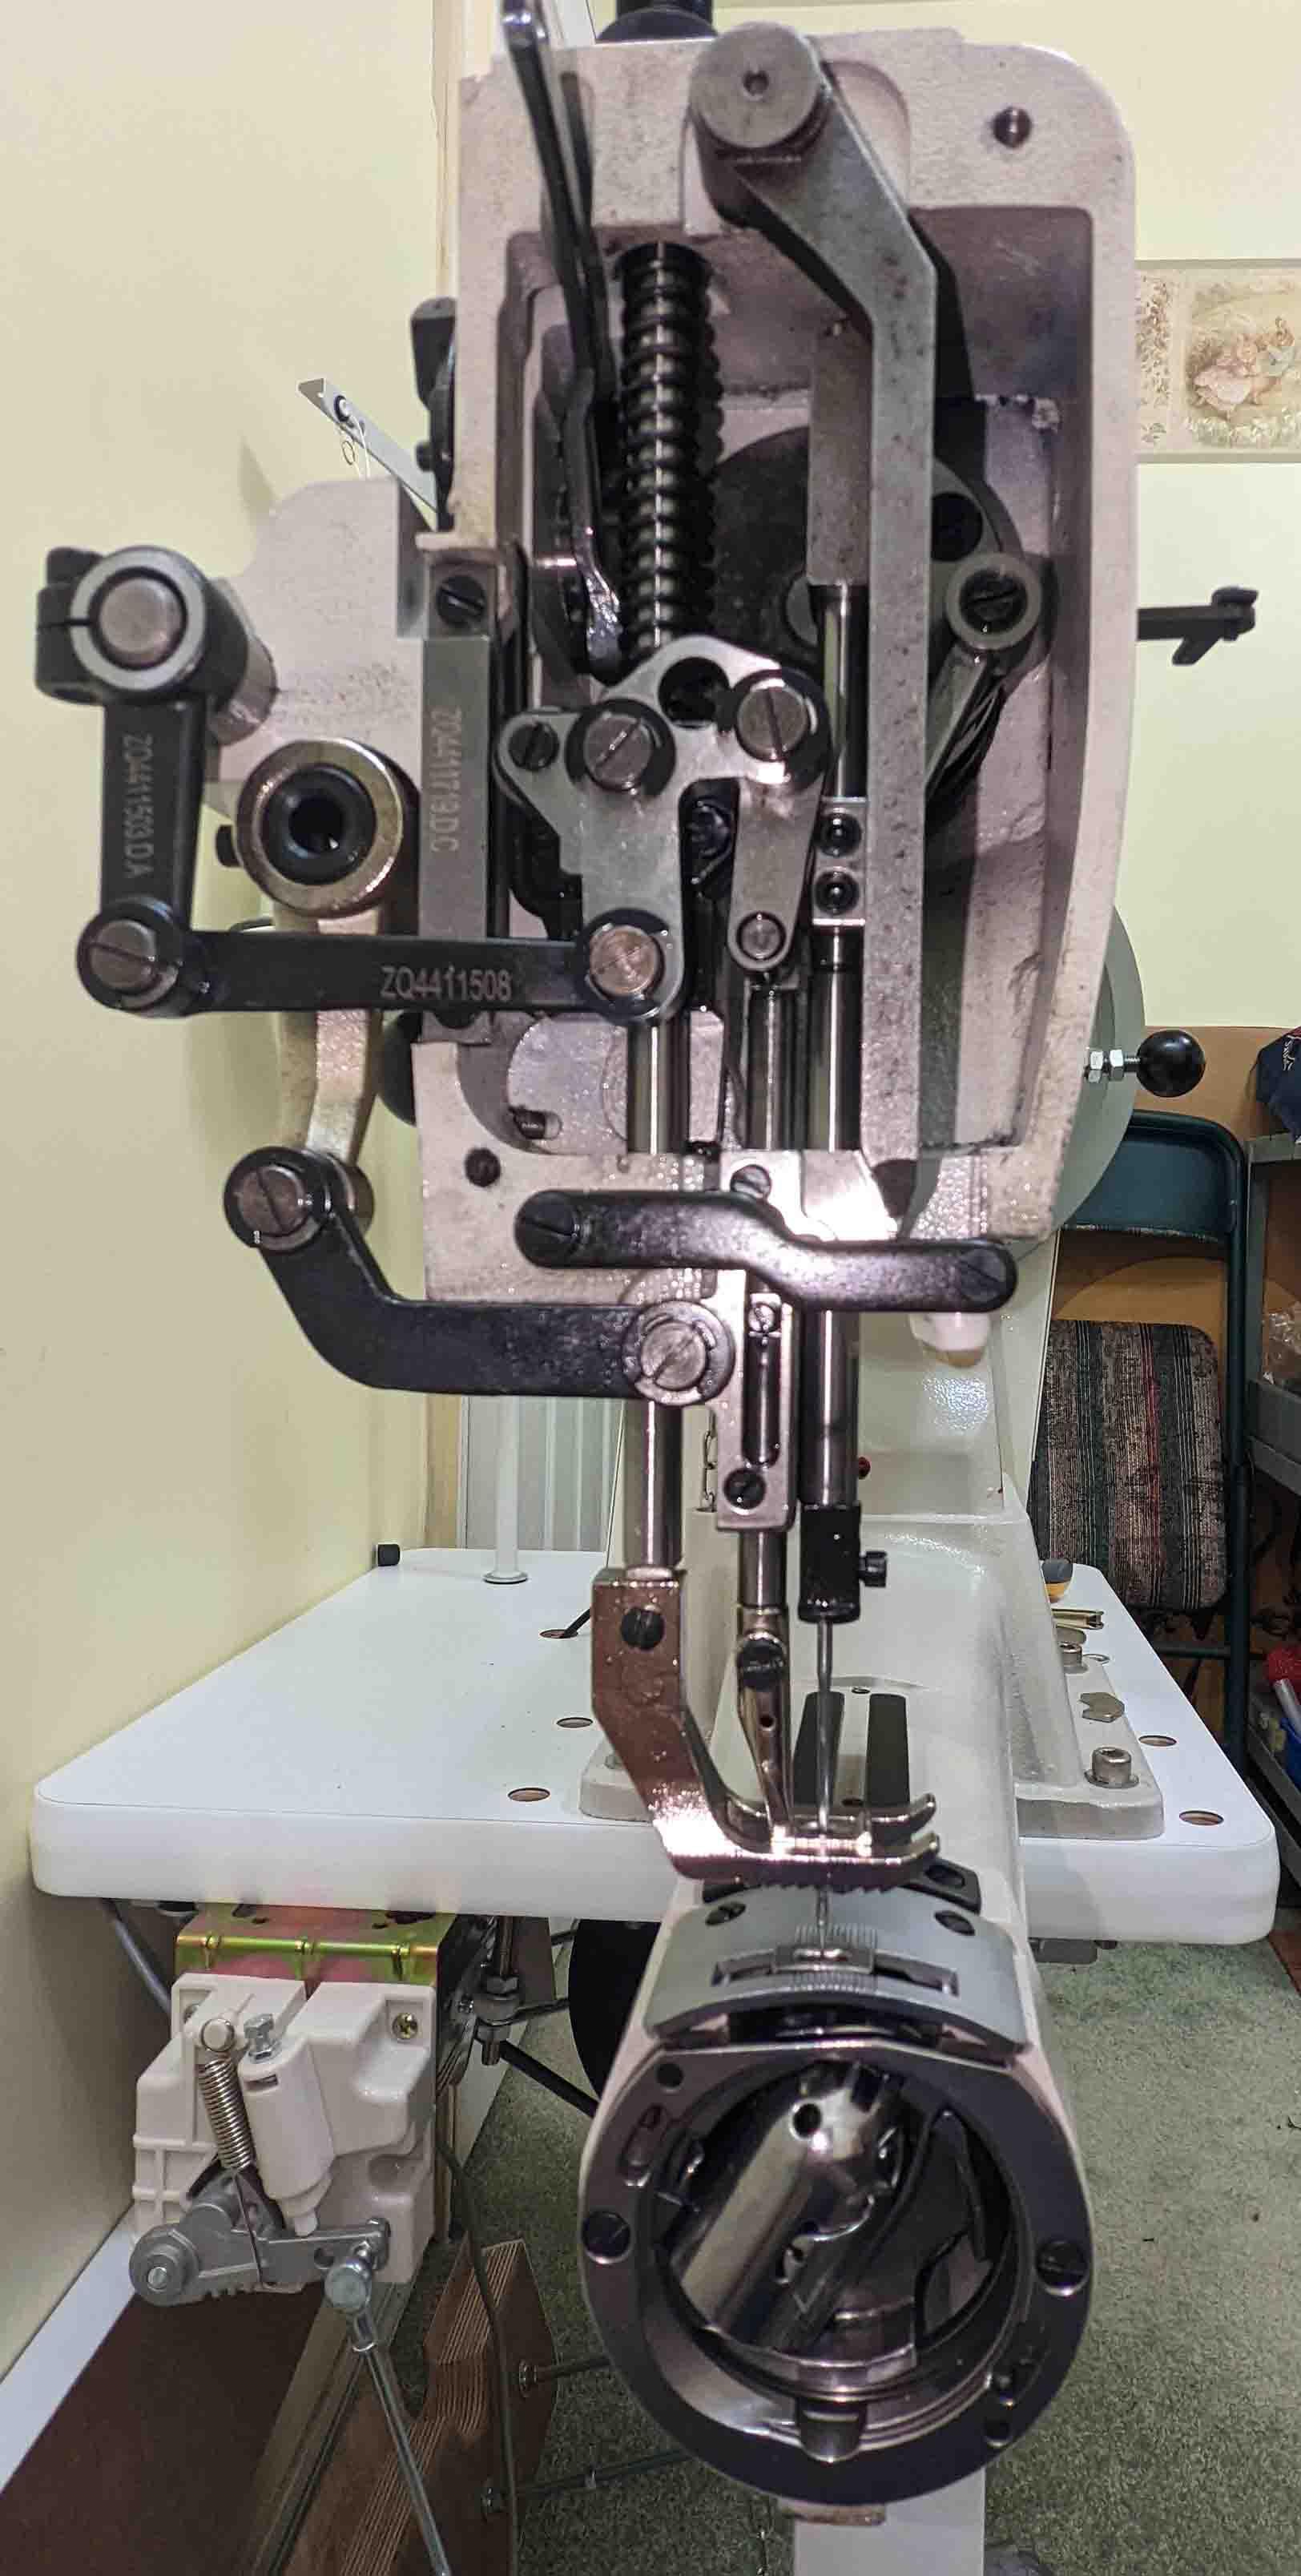
The machine when the needle is at its lowest position (presser foot lever raised)

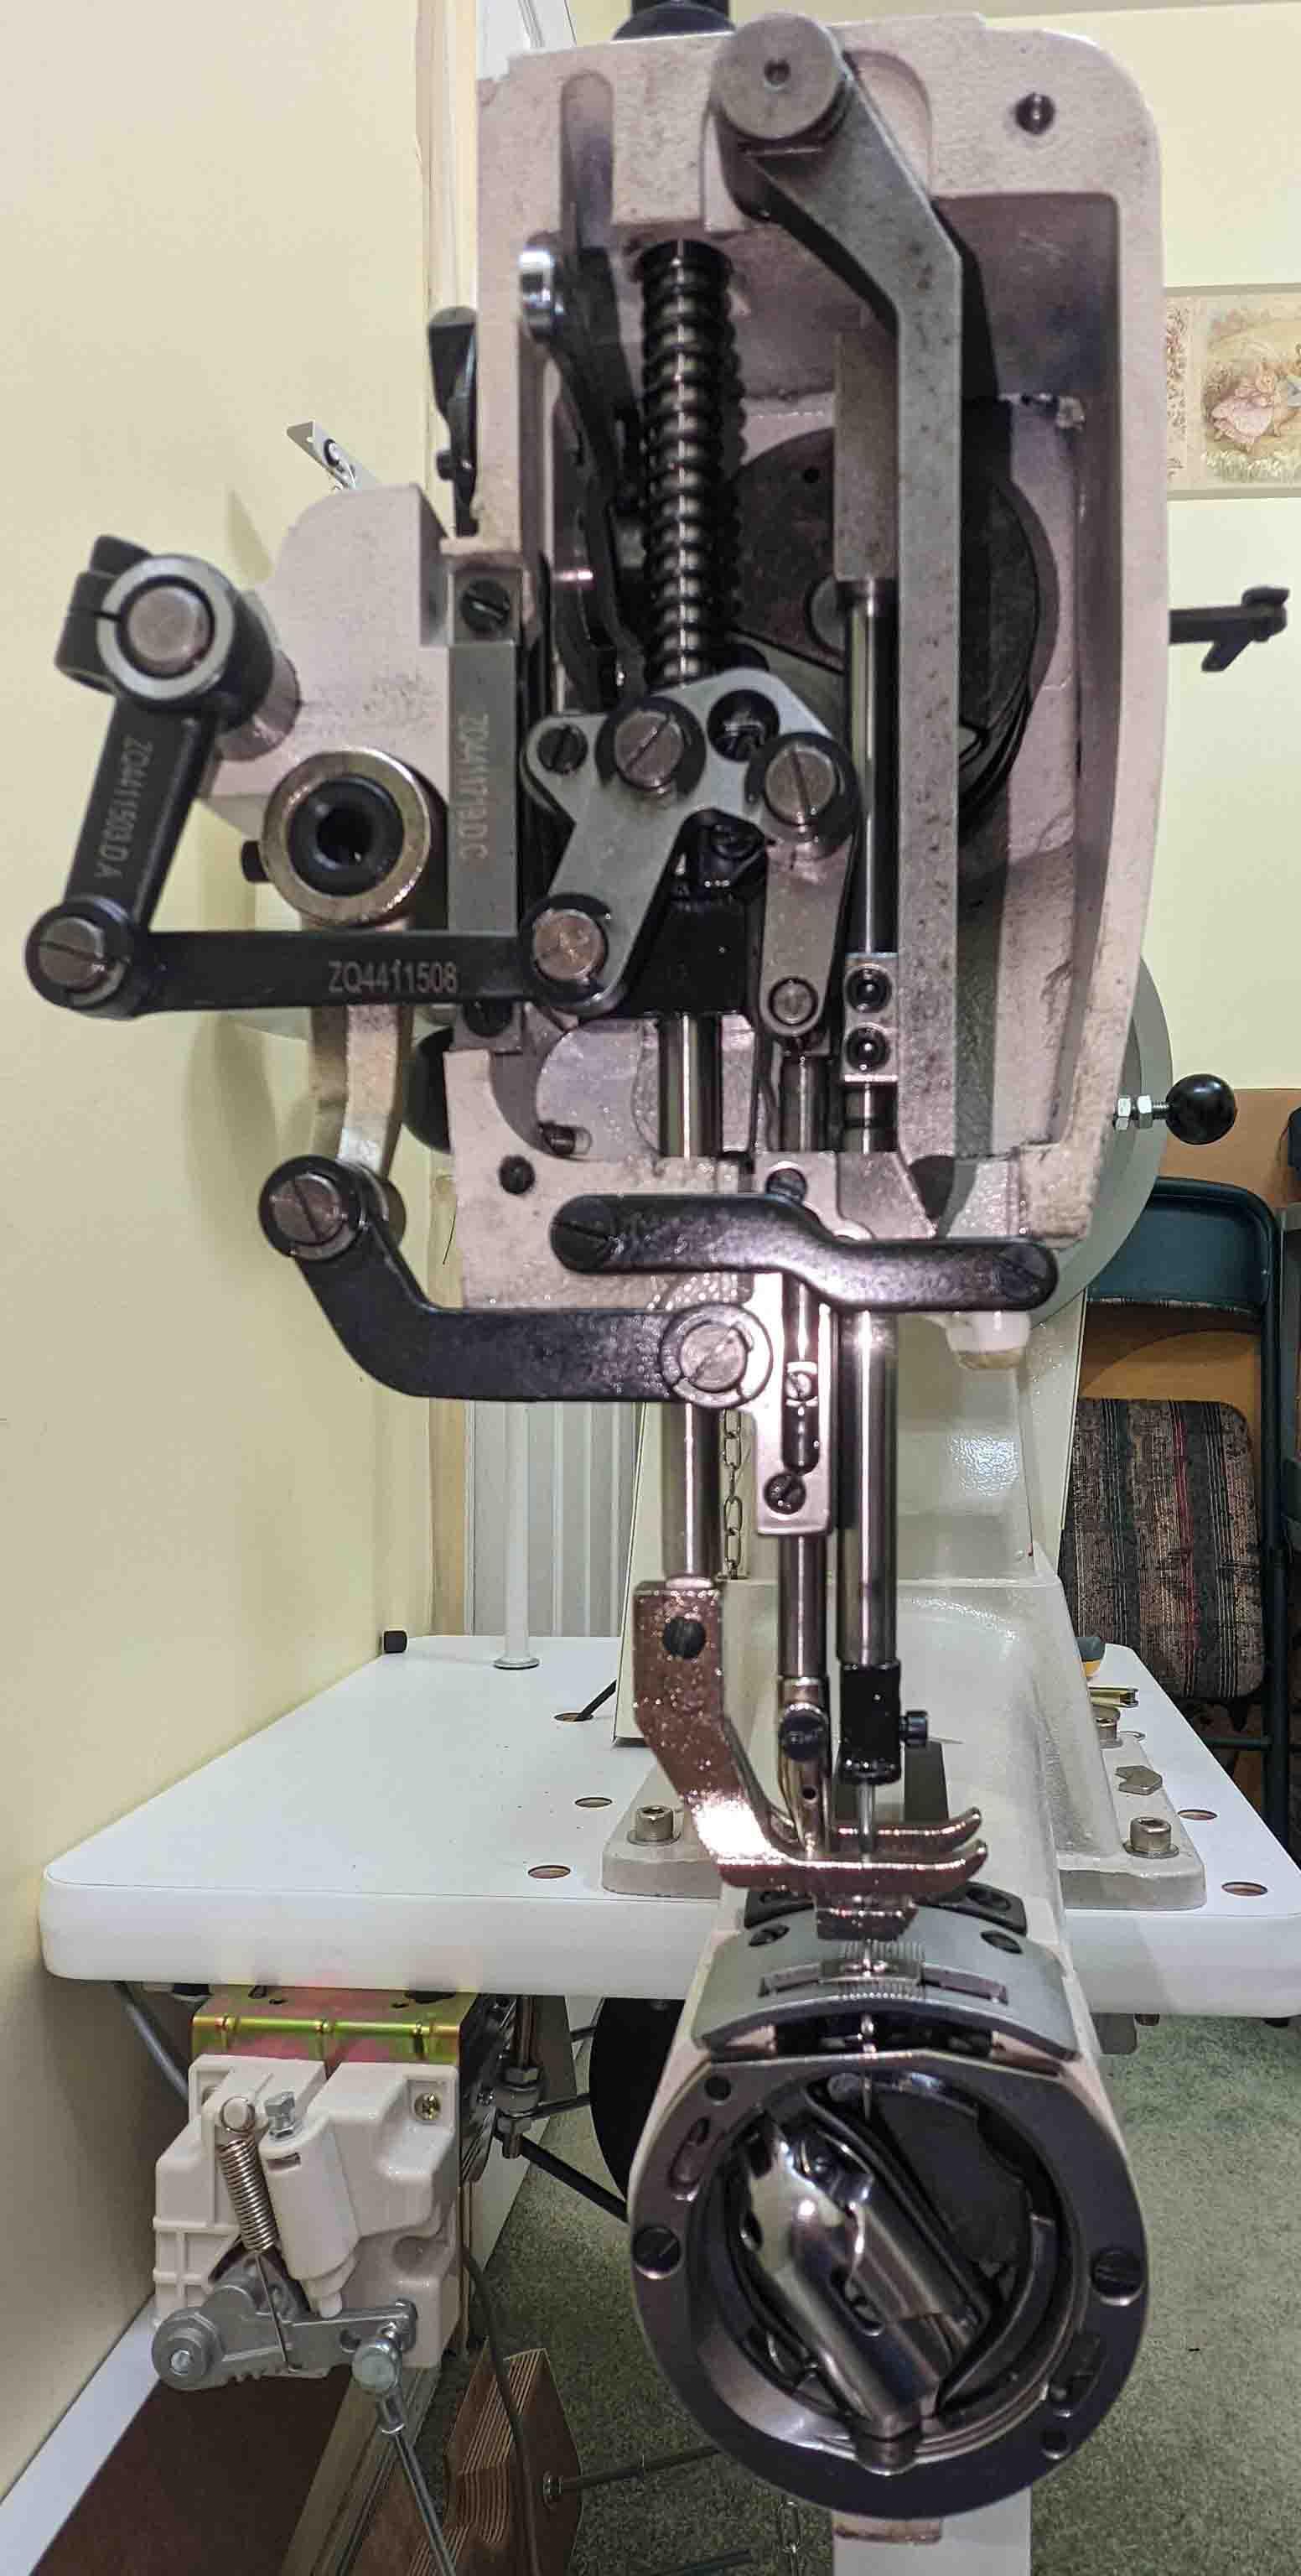
The machine when the walking foot is at its lowest position (presser foot lever is raised otherwise it would bind if I tried getting the walking foot to it's lowest position)
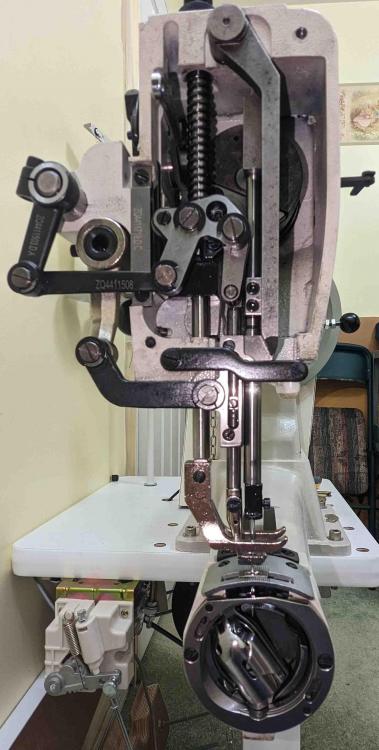
I believe the culprit is one of these two, but I don't want to move anything else around until I know for sure what the cause is.

-
On 3/27/2022 at 5:36 PM, JonWatts said:I'm not disputing your word, but I could find no specifics on their website regarding any machine comparable to a Pro 2000, or any pricing. If there is a machine in the same class for the same money as mine I will gladly adjust the price. These machines were definitely pricey when new, and the used price I set was based on what I paid new. I'm not going to hold out for an overinflated price, if that's the case. I just need to move this to a new home, it's only sitting idle now. Make me an offer.
About two weeks ago I was talking with Hoffman over the phone, they told me they bought Ferdco about 5 years ago (If I remember correctly) but they haven't advertised it much.
I ordered a new one, but wanted to make sure anybody buying used offers a fair price so they wouldn't feel jipped if they later learned the cost of a new one.
Comparably a brand new CB4500 (the same machine with a feed dog and all the accessories) is $3400 + Freight
Beautiful work by the way.
-
You can get a brand new one from Hoffman Brothers for around what you're asking.
-
Price lowered to $150
-
Price lowered to $150
-
Splitter is Sold.
-
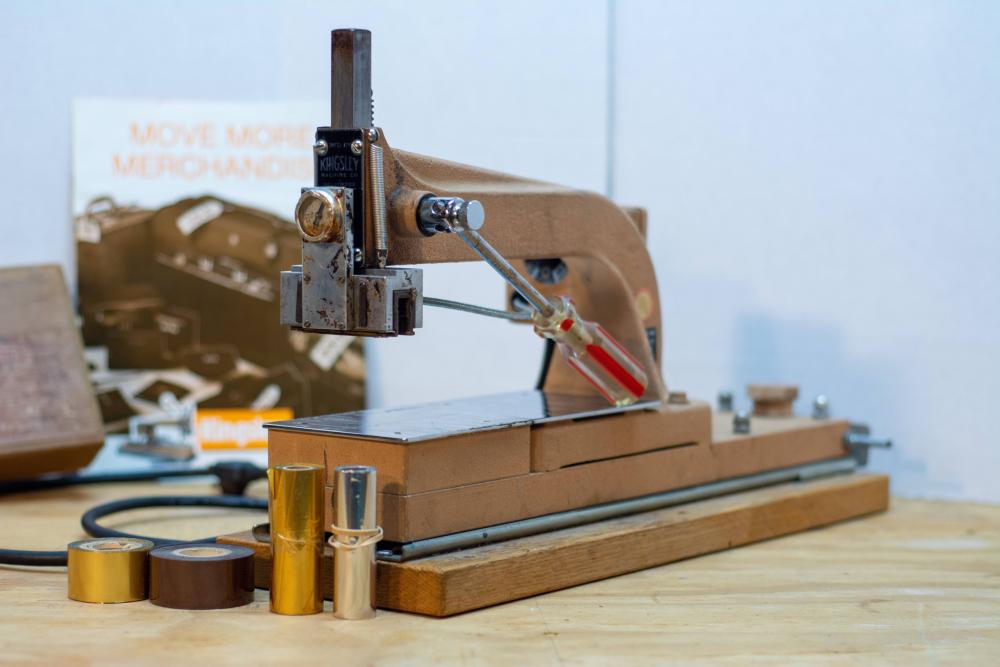
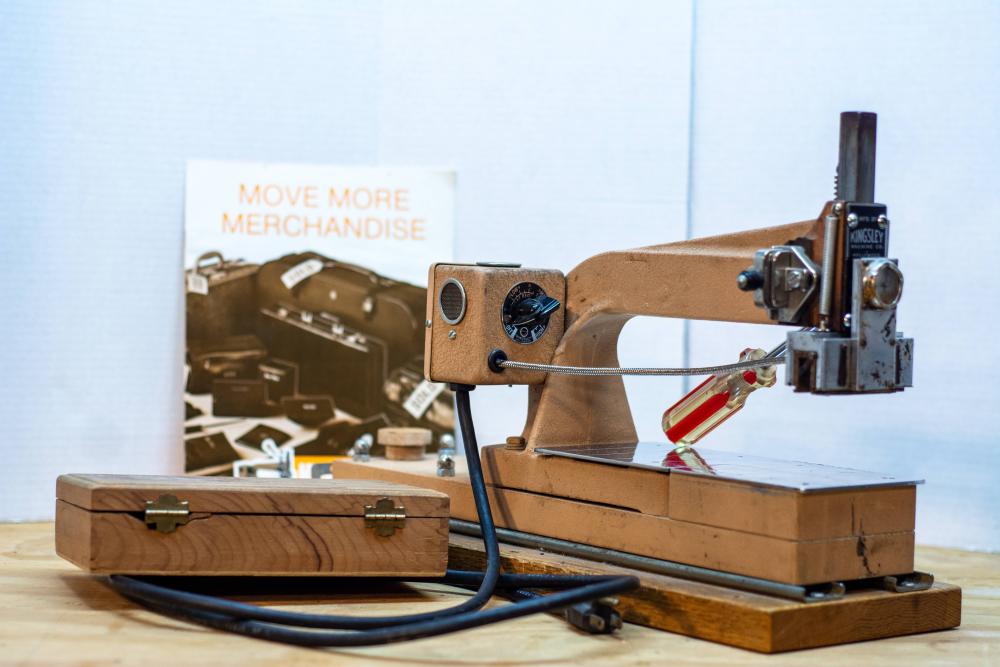
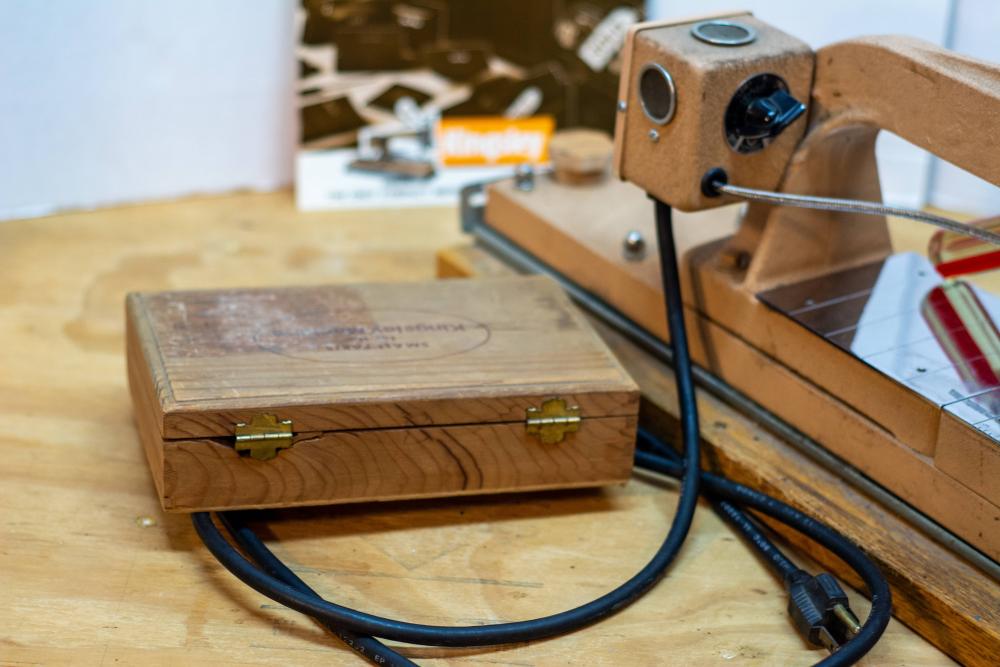
About this machine:
Compatible with most Kingsley accessories
This particular model was designed with luggage in mind, so it has a 9 1/2" deep throat.
It is also mounted on rails so it can slide out if you need to reach deeper into something.
The machine itself weighs around 30 lbsEverything works; ram, thermometer, heating element. (uses flat mica strip type heater)
The dial might have a few dead spots like most of these older machines, I just plug it into a wattmeter so I can see if it's not making contact and move it a little bit.
Maybe you could open it up and clean it? I haven't tried. It looks like a carbon contact that slides on a resistive perimeter to vary the resistance. Not sure what the technical term is
Note: the handle was replaced with a screw driver, it works just as well (if not better, it's much quieter).
Locking pin in the back (which allows it to slide forward off the base) was replaced, so it jiggles a little bit.Includes:
- The machine it self
- 4 types of foil (Matte Gold, Shiny Gold, Silver and Brown)
- Single Line Type Adapter (you will need to get a type holder as well)
- Kingsley Magazine / Brochure
- Vintage Kingsley "Small Parts" Box (broken hinge)Before you can use it you'll need a type kit, type holders and I would recommend a ruler guide.
$250, Local pickup in Middle Island, NY
or
Shipping estimates after the cost of making a wooden box for it:
- To LA, California: $100
- To Dallas, Texas: $90
- To Portland, Maine: $60
- To Alaska or Hawaii: Don't even think about it
I'd ship it FedEx Ground or Home DeliveryPhotos:

-
About this machine:
Compatible with most Kingsley accessories
This particular model was designed with luggage in mind, so it has a 9 1/2" deep throat.
It is also mounted on rails so it can slide out if you need to reach deeper into something.
The machine itself weighs around 30 lbsEverything works; ram, thermometer, heating element. (uses flat mica strip type heater)
The dial might have a few dead spots like most of these older machines, I just plug it into a wattmeter so I can see if it's not making contact and move it a little bit.
Maybe you could open it up and clean it? I haven't tried. It looks like a carbon contact that slides on a resistive perimeter to vary the resistance. Not sure what the technical term is
Note: the handle was replaced with a screw driver, it works just as well (if not better, it's much quieter).
Locking pin in the back (which allows it to slide forward off the base) was replaced, so it jiggles a little bit.Includes:
- The machine it self
- 4 types of foil (Matte Gold, Shiny Gold, Silver and Brown)
- Single Line Type Adapter (you will need to get a type holder as well)
- Kingsley Magazine / Brochure
- Vintage Kingsley "Small Parts" Box (broken hinge)Before you can use it you'll need a type kit, type holders and I would recommend a ruler guide.
$250, Local pickup in Middle Island, NY
or
Shipping estimates after the cost of making a wooden box for it:
- To LA, California: $100
- To Dallas, Texas: $90
- To Portland, Maine: $60
- To Alaska or Hawaii: Don't even think about it
I'd ship it FedEx Ground or Home DeliveryPhotos:
-
2 hours ago, diablomagik said:Would you be available Monday for me to come pick it up?
Yes I will. PM me so we can exchange contact info.
That is quite a drive from VA.
-
38 minutes ago, diablomagik said:Is this still available?
Yessir.
-
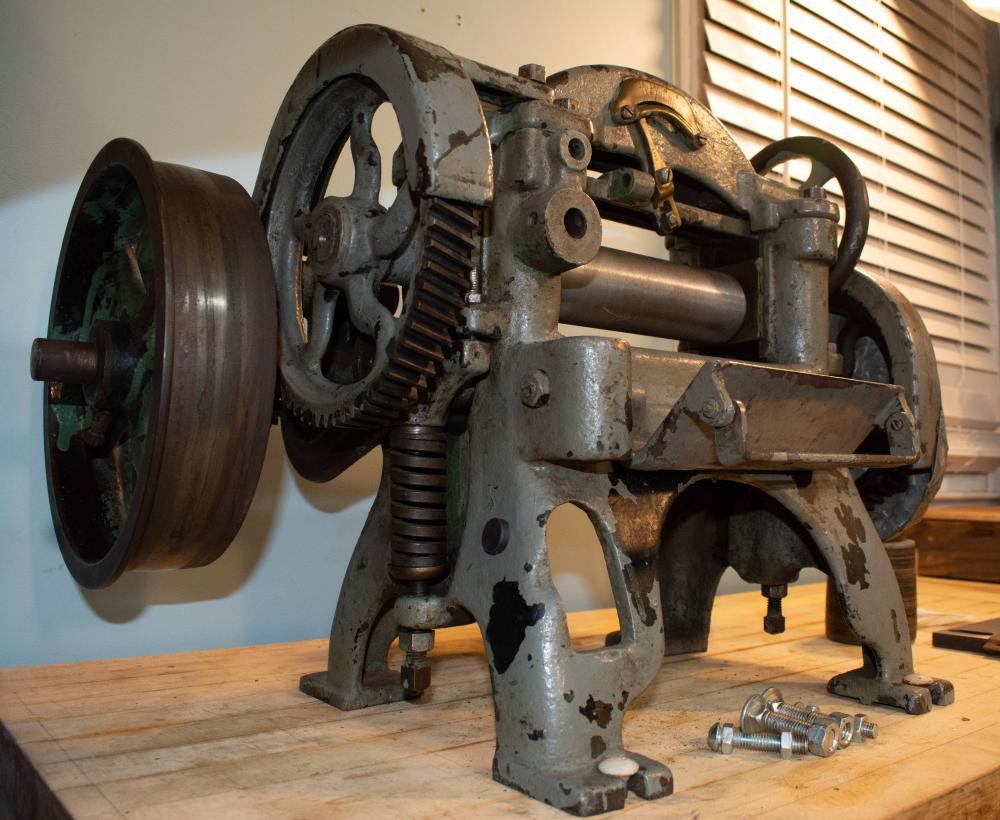
For repair/restoration, I don't have the time for this project.
Made by United Shoe Machinery Corporation probably between 1910-1940.Good for veg-tan, not so much chrome. Could probably use on heavy rubbers.
Will split up to 7 1/2" wide material.It needs to be stripped and repainted.
An arm of the height gauge is broken off, you'll need to solder or braze on a small piece of brass.
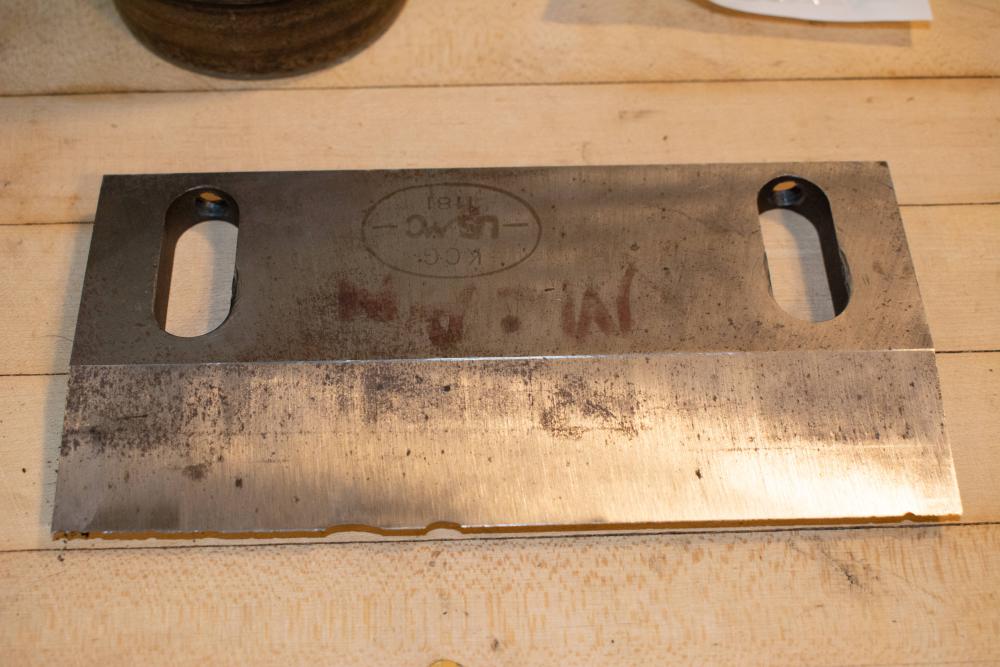
Otherwise, it's easy enough to just reset it by hand and read the gauge.Original USM blade. I also have the nuts and bolts for mounting the blade
Blade will need to be reground, see chips.Easy enough to turn by hand. You would calibrate it using the same principles as any other fixed blade splitter,
The blade is not mounted right now but I can show you where you would adjust it.If you want to motorize it:
I have the 2" pulley for connecting this machine to a motor.
You will need probably at least a 3hp motor.
I thought I had a 2" belt as well, if I find it before you pick it up I'll give it to you.On second floor, weighs near 300 lbs, you will need help.
I got it up by taking it apart and still needed help to get the main frame up.
It's a fairly simple assembly, you can video it when we disassemble it.
I wouldn't try picking this up in anything smaller than an SUV, even disassembled.I'd like to see pictures when you've got it fixed up!
Pick up in Middle Island, NY. $300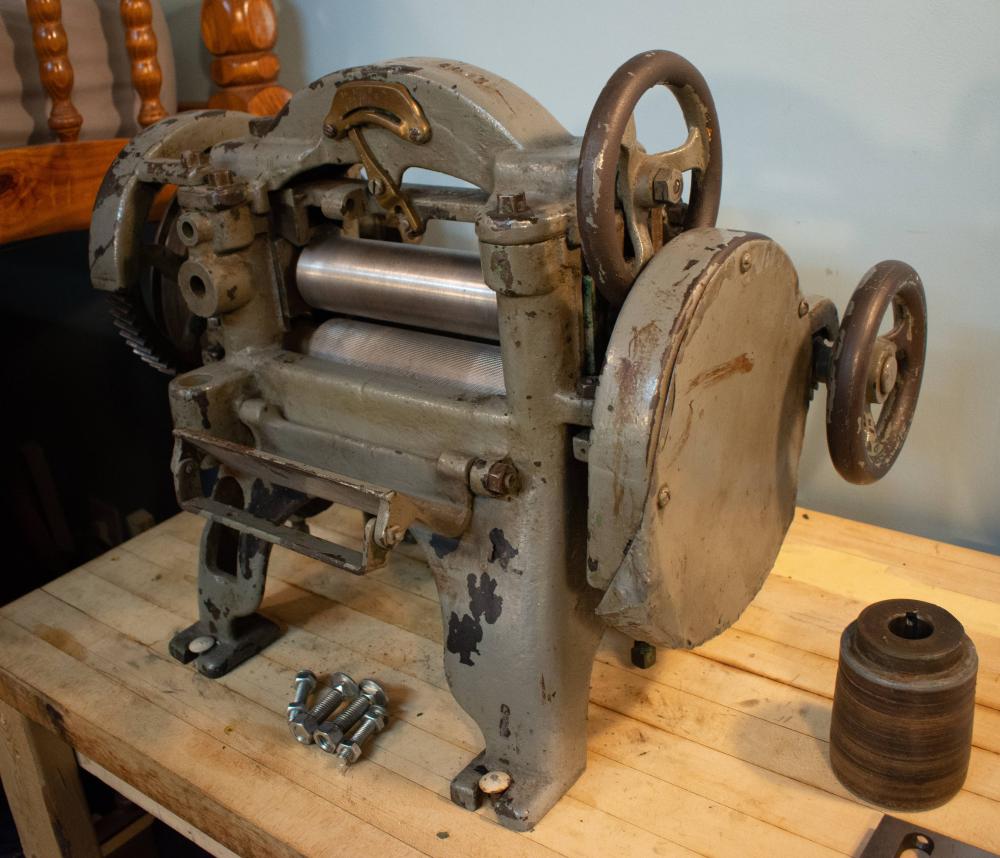

-
I don't have the parts but I found somewhere you can buy it online:
Foot Thumb screw: https://www.ronsew.com/vibrating-foot-bar-thumb-screw-50299-for-singer-111w/
111w Faceplate (you may also need the mounting thumb screw:https://www.ronsew.com/screw-200473/):
(Note: I have purchased one of these for my Singer 153w and I had to drill a new hole in it for the thumb screw, the one that came in it was in the wrong spot.)
Middle slide plate for Singer 112: https://www.ronsew.com/attachment-slide-plate-224144-singer-112-singer-212/
(I'm not sure if this is the one you meant.)
Ronsew.com has a $35 minimum order, so you probably have to find more parts you want to replace before ordering. They ship fairly quickly, but I'm not sure how long it will take to get to Norway.
I have found the best way to find parts for a machine is to google search "supsew (the name of the machine you are looking for)" and then download the pdf (from supsew.com) of the parts list and find the part I need.
Then I usually look up the part # on ronsew.com but sometimes you can find it on eBay or Amazon.
Here is the parts list for a singer 111w machine https://www.supsew.com/wpfb-file/singer-111w155-pdf/
-
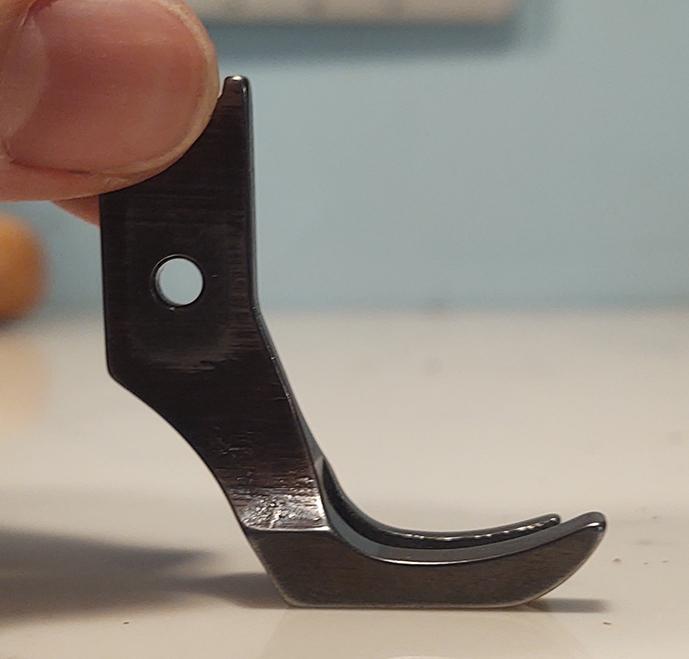
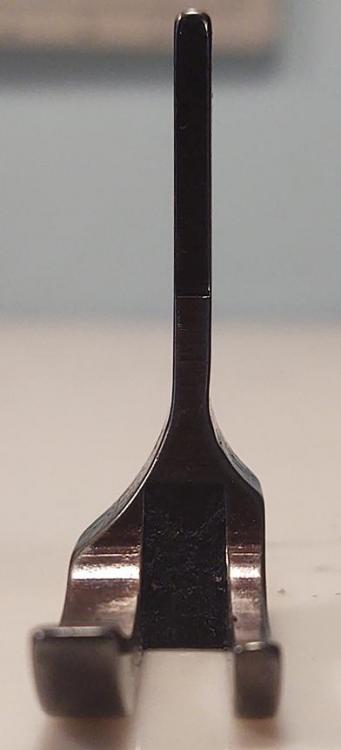
11 minutes ago, shoepatcher said:The u valley at the top of the foot can be ground out to help the foot sit flat. I have done it on occasion to poor fitting feet.
Likely I will have to do this, I'm just afraid I might ruin it. Thank you.
-
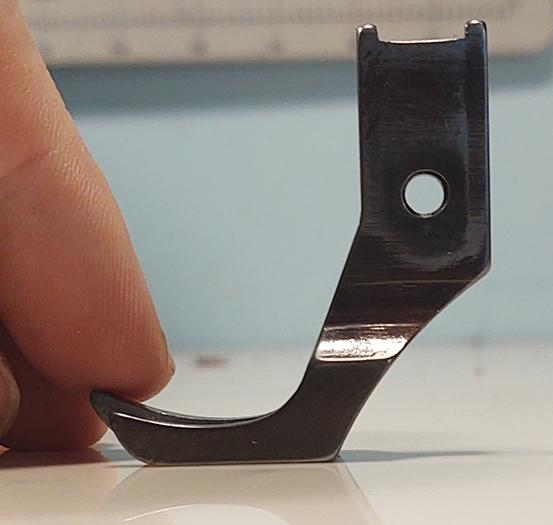
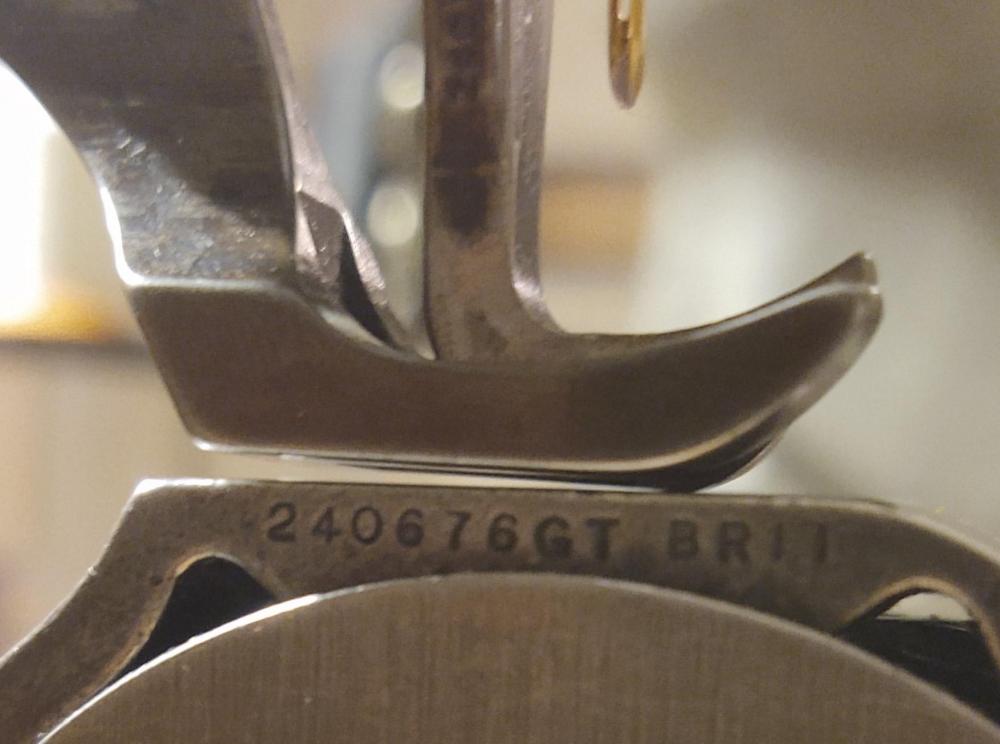
After loosening all the screws holding the presser bar and trying to push the foot flat with the needle plate, it is still only resting on the small toe although I was able to get it a little more straight.
Could it be the needle plate that is not flat? it looks like its been with the machine since the beginning.
I thought maybe the presser bar could be bent but it does not seem to have a problem traveling straight up and down through the hole.
What would be a good place to buy a new foot? I've bought all my other parts for this machine from Abel Thread Co, they seem to be good but I don't have enough experience to tell if they are quality or not.
There is a section of the bed casting that chipped off and was replaced with brazed material, which is where the needle plate rests, however the plate is flush with it.
-
13 hours ago, mk10 said:Are you sure that your foot isn't bent or poorly manufactured? Is it a Simanco or aftermarket?
It appears to be straight to me, it is likely after market though because I do not see any markings on i
2 hours ago, CowboyBob said:Looks like the right side of the foot got bent down,try to straighten it by bending it up.
It sits flat when it isn't in the machine, but it wobbles around a little when it is in the machine, not sure if this is normal
10 hours ago, Wizcrafts said:Lower the presser bar until the foot contacts the needle plate..
I will try this now and get back with whether it worked or not.
-
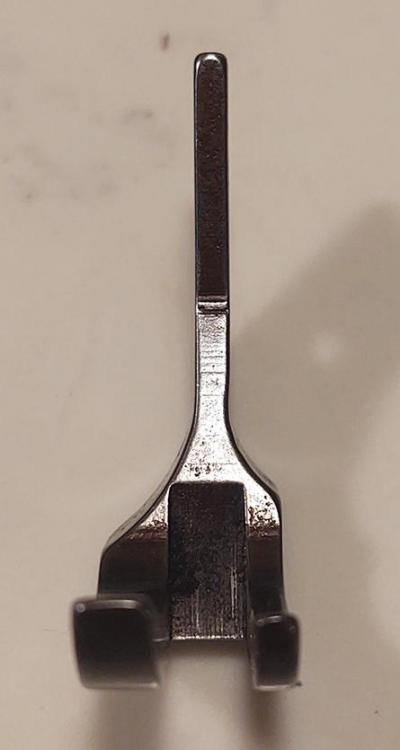
Recently got a Singer 153w103 that I've been fixing up (and boy it's been a project)
One of the issues I can't work out is why the presser foot is not sitting flat on the needle plate.
I believe this is what is causing the machine to pull the material to the left.
The presser foot was with the machine when I got it, so I am fairly sure it is intended for it.
I am also having an issue of what appears to be uneven tension every few stitches.
Would greatly appreciate any help with this, it feels like two steps forward one step back, but I guess that's just how you learn sewing machines.
.thumb.jpg.6407d03bfac0b8684d46d6fb8a848562.jpg)


.jpg.503c3d87e1c7063e40a13d70616c4ef0.jpg)
Feeding Issues with 441 Clone (Ferdco Superbull 2500)
in Leather Sewing Machines
Posted · Report reply
I will check this tomorrow morning.
I was told the mechanic at the company where I bought this should be back from vacation tomorrow as well, so I will give them a call and see if we can figure something out.
Machine is maybe 4-5 months old so it is still under the warranty.