


Colinml
-
Posts
29 -
Joined
-
Last visited
Colinml's Achievements
Member (2/4)
-
 Ha! I was ordering some buttero almost exactly the time you were typing this. Agree that it’s good stuff.
 -
Ah, ok. I'll look into that. In the meantime, my testing progressed a bit, and I discovered that, if I apply a little bit of neatsfoot oil to the cloth I'm using to buff off dye residue, it works much better to remove. AND, when I applied some Leather Balm with Atom Wax, there was no whiteish haze that I couldn't get out. The Balm is still a bit shiny for my taste, though. I did also do a sample of the neatsfoot buffed dye, and applied Bag Kote, and that is the look I'm going with for this project...almost flat. This combo results in almost zero rub off (really had to work at it to get a tiny bit on cloth). Chances are, I will not be doing much dyeing in the future, opting to just buy leathers pre-colored with through aniline, but, if I find myself dyeing again, I'll look for Satin Shene. Appreciate the input.
-
I'm assuming you mean Leather Sheen, as Satin Sheen is horse grooming spray. I've watched a demonstration of leather sheen and it's not the look I'm after. As for the white residue, to clarify, it doesn't really seem like physical residue, more like a coloration. I buffed the snot out of it and it still just looked kind of white-washed. I have resolene, leather balm, neatsfoot oil, tan kote, bag kote, mink oil, and carnauba creme. Of the ones mentioned above, resolene and tan kote are the looks I'm trying to avoid, tan kote being the worst. Bag Kote seems to dry completely matte, and doesn't look like a finish is applied, but I did not apply it to my test sample according to directions (when I did follow directions, it left streaks). Instead, I used a dampened makeup sponge and rubbed it in in circular motions. So, at this point I'm leaning toward Bag Kote, but I was wondering if just an oil would work to prevent dye rub off because that's the look I would prefer.
-
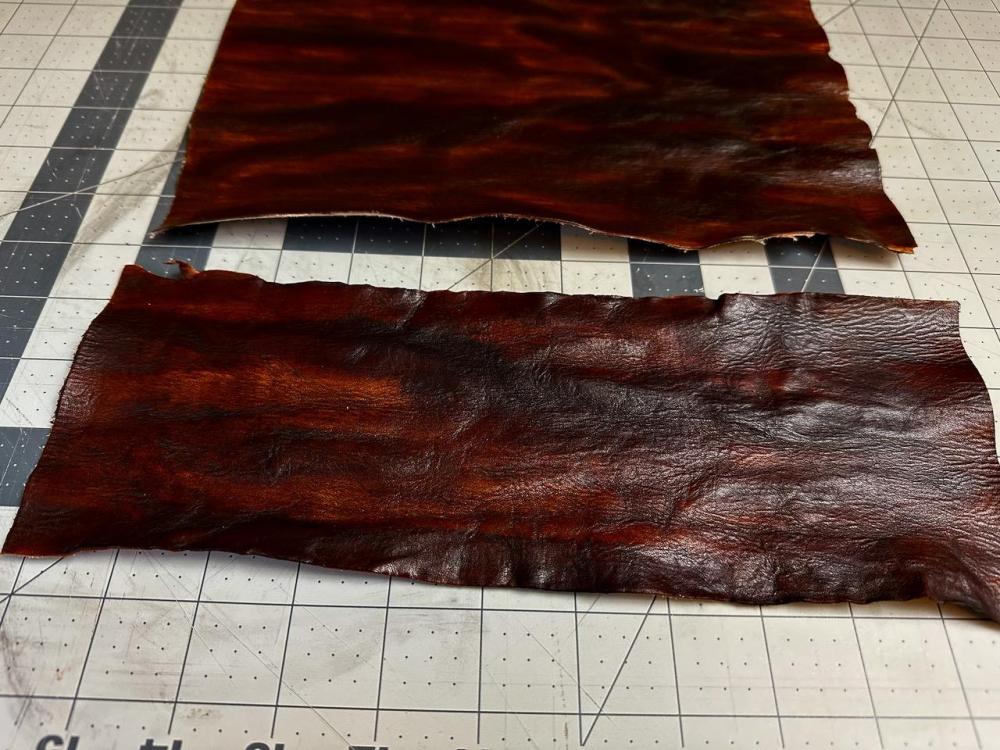
I'm playing around/experimenting with a technique I found in a book. These are thin veg tan (1mm) that I wetted and wrinkled, and then dyed (Fiebing's Pro Dye, dark brown), intentionally uneven. This will become the outside of a wallet. The book didn't mention sealer, unfortunately, so I'm trying to figure out what to use to prevent dye rub off. I initially tried Fiebing's Leather Balm with Atom Wax on a sample, but I noticed what appears to be wax settled into the tiny creases. It looks a bit like when you wax a car, but can't get the wax out of a trim part, whiteish residue. Also, overall blueish tint. Any suggestions for what would seal the dye without this whiteish residue issue? I prefer a matte finish that doesn't look like finish. Would an oil of some sort prevent dye rub off? I don't think waterproofing is an issue since it's a wallet, and won't be subject to weather.
-
Thank you. I've sort of back burnered this because I'm not quite to designing/patterning my own just yet. I've decided o make a few more purchased pattern projects to get some concepts into my brain, and then return to the project of creating my own pattern.
-
Yes, good point. I like your ostrich idea. Most of the common things used for lining seem to have the same cleaning problem...suede, etc. I just happened to have some shantung, and it's doubtful this first bag will even turn out, so no worries about customer satisfaction.
-
Thanks. I went ahead and ordered a few different types or reinforcement to experiment. Didn't see bontex, but I'll look into it.
-
At this point, I'm considering adding Decovil light to the top, chrome tan portions before sewing the bag together, keeping it out of the seam allowance. Then, something inside, maybe sandwiched between the bag and the drop in liner, that would form a U shape, going from the handle attachments down to floor of bag and bag up the other side. Then I would sew the handles through this, and also add rivets or feet to the bottom, also through this. The idea would be to spread the point load on the handles where they attach to the bag. The main question left for me is how to attach this U shaped material (whatever it is) in more places than just the rivets and the handle attachment points without having more sticking show on the outside of the bag. Maybe I just contact cement it? Maybe I could catch the top when I sew in the drop in liner? The bottom could loop under a floor of some sort.
-
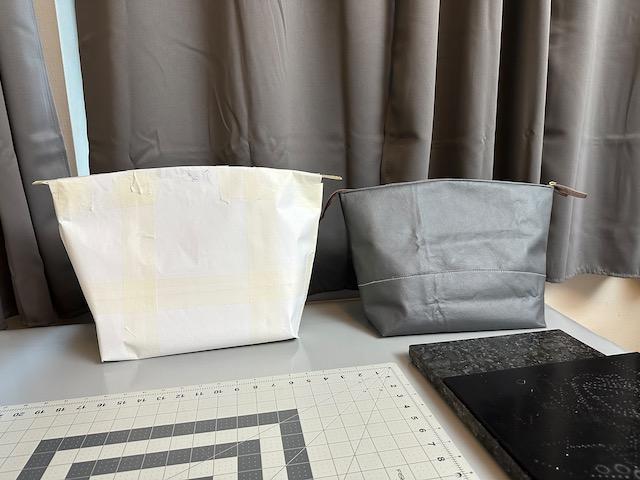
I'm working on a handbag design (see photo of rough mock up). The bottom section will be fairly substantial, but the top half will be chrome tan, about 1.5mm. I would like to reinforce the sides so the bag doesn't collapse when you set it down. I think this reinforcement will need to be pretty substantial, since there will be rolled leather handles. I've never done any of this before, so I'm not sure where to begin experimenting, and I have several questions. 1. This is a turned out construction. If I glue or fuse something to the inside of the bag, will this conflict with my construction approach? 2. If heavy reinforcement and turned out construction are incompatible, would it work to add the reinforcement to the drop in (shantung silk) liner instead? This liner will be added after the turnout. 3. What material makes sense? Again, never used any of this stuff. Decovil light? Salpa/leather board? Microfibra? Corraza? I will experiment first, of course, but, financially, it would be nice to narrow down the choices since, as the saying goes, I'm not made of money.

-
Thanks for the tips. I did some paper mock ups and then another rough mock up in cheap vinyl to work out the overall dimensions, but now I have a question about reinforcement. I guess I should start a different thread for that.
-
Yes, sorry, the final bag will be three pieces. I was trying to make my question less complicated. I guess I just have to print another batch and see.
-
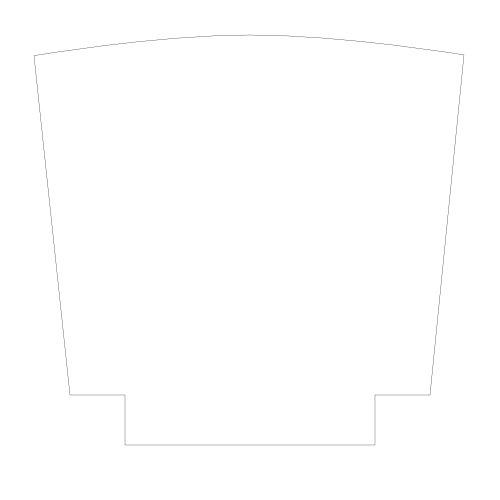
I'm trying to draw a pattern for a handbag, but I can't visualize what the piece would look like flat. The construction would be the ubiquitous turned out tote bag with box bottom. That's simple enough, but I want the bag to taper in two directions, so, from the front, the top is wider, but from the side, the bottom is wider. Please see my crude sketch. I've wasted a lot of printer paper already. Does the included photo titled "half pattern" seem like the right shape? Or does that leave it wide at the top in side view?

-
Just sitting here waiting for some dye to dry, and I was thinking about how I naively assumed that my woodworking skills would immediately transfer over to leather working. Admittedly, I retired quite a while back, so I am a bit rusty hand-eye wise, but, despite years of hand tool work, this is new and different, and difficult to do well. Basic skills, like keeping the knife perpendicular while cutting around curves are going to take some practice. And since the scale is smaller (I was a furniture maker), tiny mistakes are more evident in something the size of a wallet. Kind of discouraging, but also I like the challenge. Anyway, random thoughts. My dye is dry.
-
Hi Klara. Not too late. That was the method I first learned. Trying new things.
-
Ooh. I completely misread what you meant by single punch. I thought you were referring to not buying multiple sets, some round dent, some hole punches. In any case, the Wuta punches were cheap enough to buy both types (they have changeable tips) so I can experiment and find what works best for me. That was the main obstacle. I didn’t want to spend several hundred dollars on tools I would not end up using.
