ipswitch
-
Posts
13 -
Joined
-
Last visited
ipswitch's Achievements
Member (2/4)
-
Thanks for the insights! This machine came with a manual and a supply of needles, the biggest size being 140. I hadn't noticed that the manual mentions 140 is the limit, though looking again it seems like that's the case. Interesting because this machine also came with some thread that's heavier than what you could use with a 140 needle. I mention in an earlier post I found some 160 size needles, which seem like they fit without striking anything, though putting thread that heavy through the machine might have been too much, there was just a lot of tension even when the discs were slacked, so maybe I abandon the dream of using that thread for now. I'll have a closer look for burs where you mention, I don't think it's the cause of fraying since the last few adjustments I did seemed to have stopped the problem for now. I think you did spot something I need to fix though, that last guide for the thread before it gets to the needle doesn't look like the guides I'm seeing on other machines. I think it's improvised and may be a bit loose, that should be a cheap part to replace so I'll do that. Thanks again for the help! The machine is in better shape now, should be able to continue work with it.
-
OK, I think this should be the end of it - I removed the plate that the tension discs are on, cleaned it out (it was a bit dusty back there) and adjusted the screw that controls the amount of space between the tension discs when they're open. I loosened it, which should allow thicker thread to move through a bit easier. I think whoever was using this machine last was using much lighter thread than I was. I also set the upper tension incredibly low, to the point where the nut that tightens the upper tension disc was barely on. I had the tension set loose before, this is about as loose as it'll possibly go. Weirdly, that's fixed my problem regarding fraying thread and skipped stitches. And this is after I went back to a medium weight thread, it's not even the heavier stuff I was trying to use before. It makes me wonder if there's something weird about this set up, or wrong with the machine, because if I ever need to set the tension looser than it is now I can't. Anyway, it's enough to get me back to work. If anyone has any insights about this (maybe that's just how these machines are?) feel free to chime in. Hopefully this will save some trouble shooting time for anyone googling this issue in the future!
-
Still at it unfortunately - I've already gotten some really good advice, which I've followed, but I still haven't fixed my issue. I made sure the gears were placed properly, they're not too worn down and I don't think they're responsible for skipped stitches. I went through the service manual and everything looks ok as far as I can tell, one thing that caught my eye was the thread check spring - I set it properly for the material I'm using, I've just noticed it clicking and jumping around a bit. I actually recorded a couple videos of the machine running in hopes someone could take a look and spot something I haven't seen. Watching them again I can see the check spring clicking and moving in a weird way, which is maybe it's reaction to something else happening, or maybe that's where the problem originates from? I've got two videos of the machine / problem here, the first one HERE showing the bobbin and hook, the second one HERE showing the thread path and check spring. Something is snagging and causing skipped stitches and frayed thread. I can pull the thread through the machine easy enough and without damaging the thread, so I don't think I have any burs or sharp bits along the way. The fraying only happens when I'm actually making stitches. Thanks again if anyone has time to take a look, I really appreciate it!
-
Alright good news, I'm an idiot! While I was following the service manual it had me set the stitch length to 0 at one point... I knew it was going to be something like that. I forgot it was set like that and just thought I'd somehow borked the feed dogs or something. Thanks for joining me on this journey lol. Still have to put some things together and do some more tests.
-
Wheewwwww ok this keeps getting more interesting. Good news / bad news I guess. I went through the service manual and everything seemed to be in the right place and doing what it was supposed to be doing except for the placement of those gears. I moved the hook back by about 1mm since this bigger needle I'm using is actually hitting the hook, just barely but enough that it might have been an issue. Also moved the collar on the shaft next to the large gear so that it was up against the gear as outlined in the manual - it previously wasn't so this adjustment might help with skipped stitches I suppose. Here's the fun part - figuring I'd have better luck with those couple adjustments I put everything back together and now the feed dogs aren't moving!? I have the presser foot and walking toe moving up and down, no forward/back movement and no movement at all in the feed dogs underneath. I can't figure out how this could have happened, I didn't adjust anything except for the 1mm hook assembly move and the collar next to that big gear, neither of those parts seem to have anything to do with the feed dog movement. I must have done something. Going to slowly go through the manual again and see what I can figure out about these parts, I previously left them alone because they were moving properly. If anyone has a brilliant idea of what this might be, I'd love to hear it, otherwise I'll keep working my way through this manual.
-
Thanks nejcek74! I'd gone through a few versions of the 1245 owners manual, I actually didn't realize there was a service manual like this available - it makes sense, I'm kind of new to doing this level of work so I guess I thought the pro's just knew magically how to do it? I'm going through it carefully now, going to make some adjustments and test again.
-
Brilliant! Thanks kgg, I hadn't considered that. This thing got slammed around a lot when I was moving it so this is a good idea to check. Seems like moving that big gear is pretty simple, I'll give it a go and report back.
-
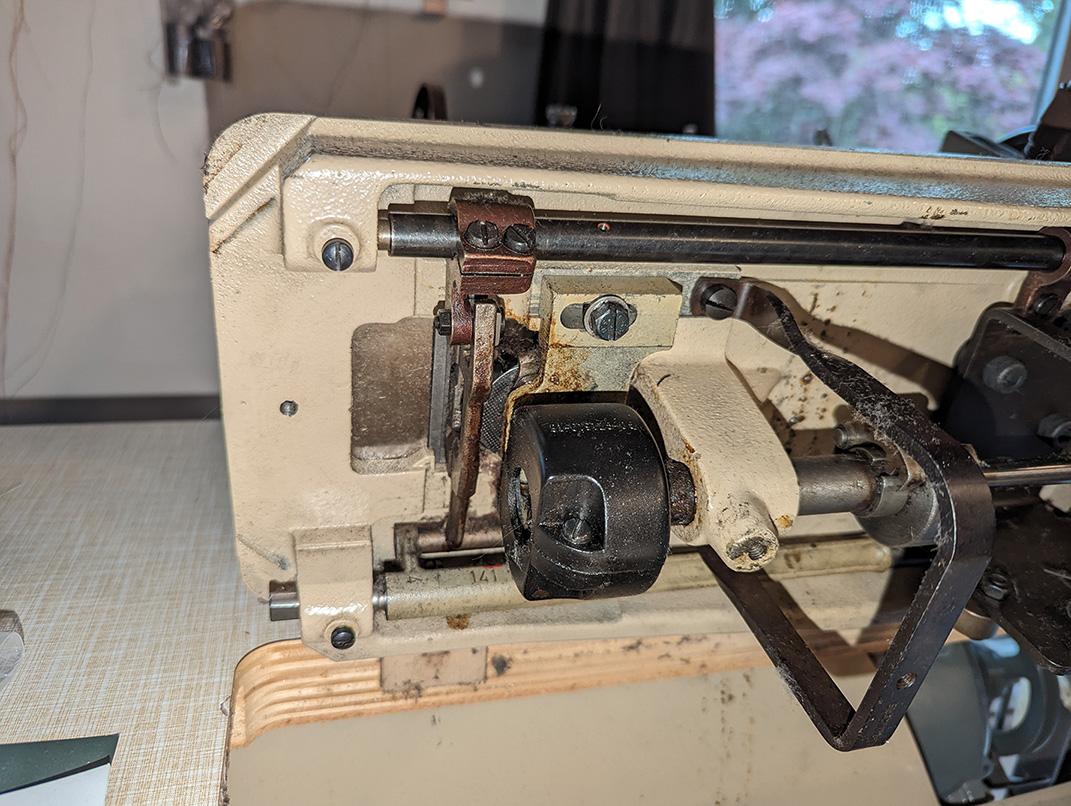
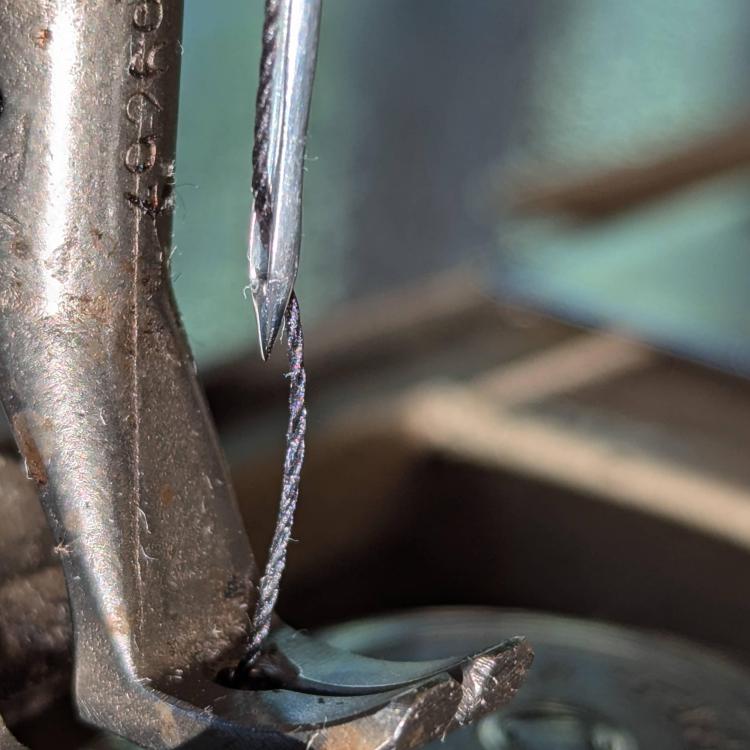
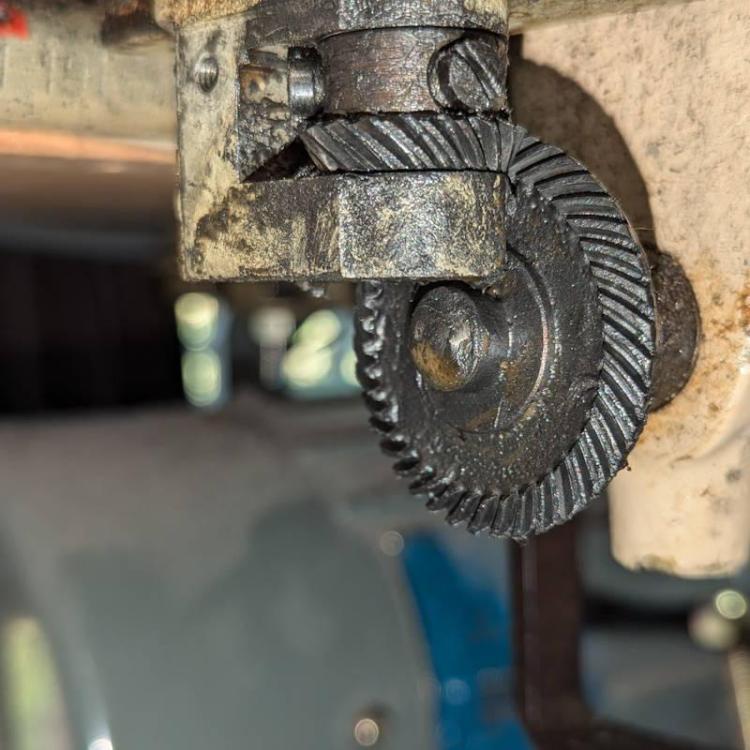
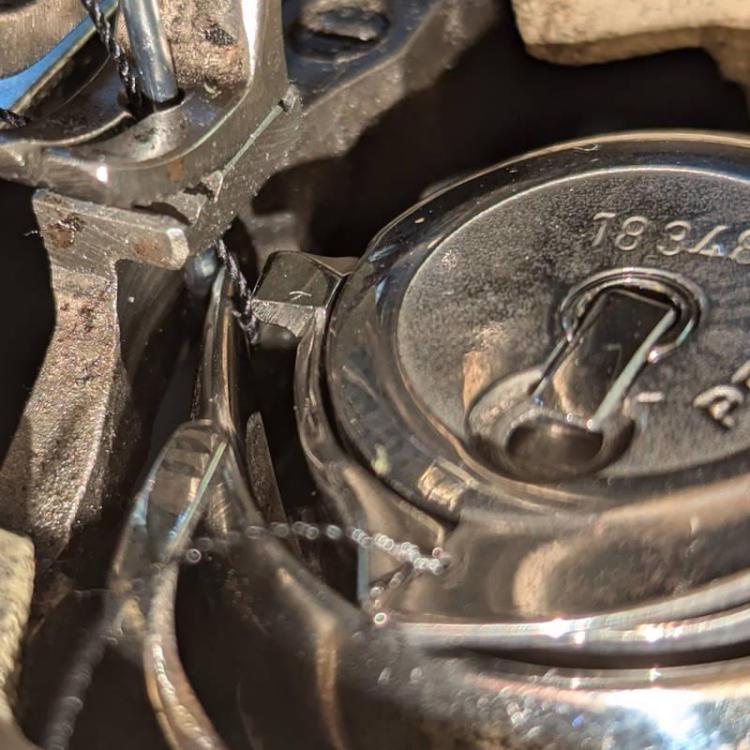
A few more images. We've got the gears on the underside, the two screws visible on that smaller gear on top are what I'm loosening to adjust the hook. There's a pic of the hook properly catching the top thread as the needle ascends. When I'm setting things up and moving parts slowly it all looks good to me. Harder to keep track of what's going on once I actually start doing some test stitches, I'll try to keep a closer eye on this for my next attempt. Also have a picture of the current needle (system 190 size 160). There's a chance it's a bit on the big side, 140 was too small. 150 is probably about right but I can't find any that size. No thread breaking or jamming so far from this needle/thread combo, but I start skipping stitches almost immediately and then the timing is screwed up. Again, it's quite hard to smoothly pull the thread through the machine, even when the tension discs are loose from the foot being up. I can do it, but it's kind of tough. I'm assuming that's the issue (best guess) but I also think this machine should be able to use this thread. I got this machine from an abandoned alterations department and it came with this thread so I assume they were using it somehow. I'll also do some testing with a lighter thread, which I could use if I have to, though I'd like to figure out what's going on here with the timing going out of whack so easily.
-
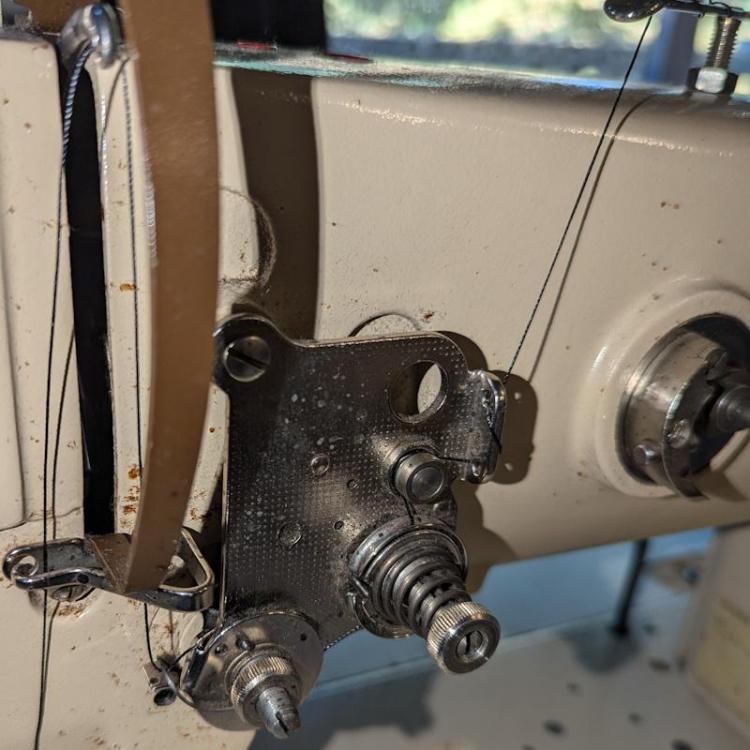
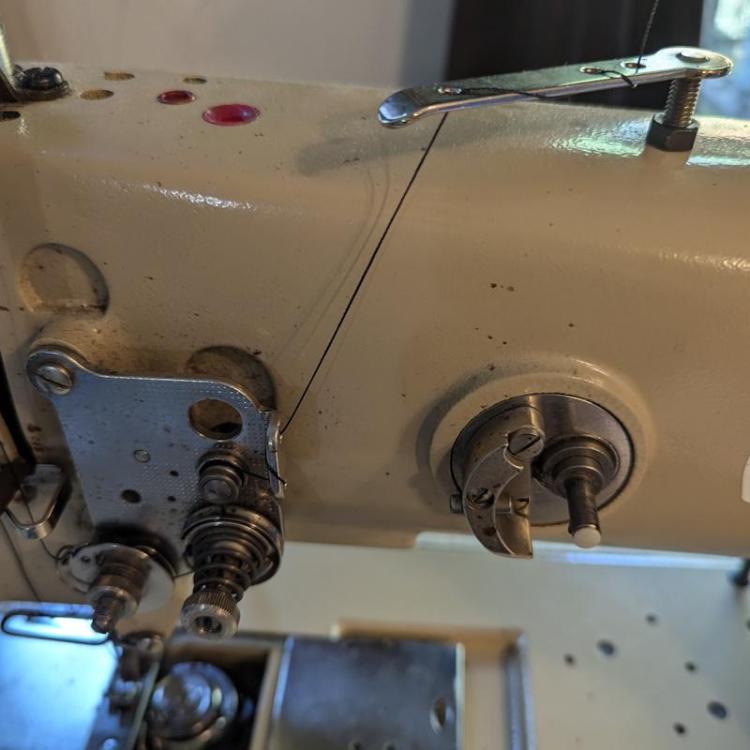
Alright, so here are a few images of the threading. The top tension knob here is set very low, which you might be able to see. This seemed odd to me, but it was giving me good results when sewing a few layers of 4-5 oz leather plus canvas. The bobbin tension is normal from what I can tell, it's tight enough that I can hold the bobbin + case from a length of thread without it unspooling, but if I pull gently it'll come out. Bottom stitches looked fine with this setup.
-
Hi all! I've got myself a Pfaff 1245-706 machine, and thanks to reading other posts on this forum I've been able to (mostly) get it cleaned up and running. When I say mostly running I mean everything seems like it's mechanically smooth, oiled and greased properly, I've spent a lot of time making sure I'm threading it properly and testing out thread and needle sizes to get the right fit. I've finished making a tote bag which mostly went fine, when I say it's running I mean that with enough fussing I've had it making nice stitches for long enough to finish a project. The problem I'm having now (and a bit when I did my first project) is that it seems like it's incredibly easy to throw the timing off. To the point where I can't really re-attach the drip tray under the table or cover the gears that spin the hook race because I need to access and adjust them so often. I'm following the steps outlined in this video starting around 16:36. So I'm getting the needle to the lower dead point, loosening the two screws on the small gear, and adjusting so the hook meets the middle of the scarf when the needle in about 3mm up. And this works... Kind of. Like I said before, I was able to the machine working nicely long enough to finish a tote bag, but basically any little hiccup - tension slightly being off, bobbin winding being a bit too loose, etc. results in the timing being thrown off. Sometimes if there's a big thread tangle I'll have to reset the safety clutch, but often I'll have to adjust the timing without the safety clutch needing to be reset. I can't quite figure out how this happens, as I'm re-tightening the screws on the small gear after re-timing. One guess I have is that this is a tension issue. The thread is usually quite hard to pull through the machine when it's threaded. When I had it working properly the tension dial was set very low and that was producing good stitches, but it seems suspicious. That thread wasn't particularly heavy (it's unlabeled so I'm not sure of it's size) I was sewing with a system 190 size 130 needle which was a good size to have the thread pass through the needle easily. I'm experienced enough with sewing that I think I can match a thread and needle size pretty well. I'm currently trying to set it up to use a heavier thread, labeled as Cansew CBB138 nylon. I'm using a 160 size needle and that seems about right, but again just pulling it through the machine when it's threaded and the foot is up/tension discs loosened, it's in there quite firmly. I wonder if I should be adjusting the way I'm threading, like maybe just going through a single loop on the top finger instead of winding it around a few times like they recommend in the manual? This is my first time working with an upholstery machine and thread this heavy, so I'm not quite sure if it's normal to adjust the threading path if tension is too high, or even if the settings should have to be so precise to avoid jams and skipped stitches. Every other machine I've used from domestics to an industrial Pfaff 563 was a lot more forgiving when it came to threading and tension, very rarely had thread breaking or skipped stitches so I'm curious to hear thoughts on what might be happening with this 1245 machine. As of right now with this heavier thread, it's not really jamming or breaking thread, but after the first few stitches the timing seems off and stitches are no longer being made properly. I can provide pictures if that helps at all, thanks in advance!
-
Pfaff 1245 bobbin shuttle won’t spin
ipswitch replied to Nims8582's topic in Leather Sewing Machines
From the future, THANK YOU. I'm getting a Pfaff 1245 up and running without much experience, I still have a few things to fix but this was a major one that I could not figure out. Lifesaving advice! -
Good points everyone, thanks for the input! I did look up another manual and it does mention specifically for 1245-706 (which is the model I have) that it's oiled manually, seems like the oil reservoir is for the Pfaff 245-706. This is great news, means I can start using it almost right away, I wasn't looking forward to ordering parts. Thanks again!
-
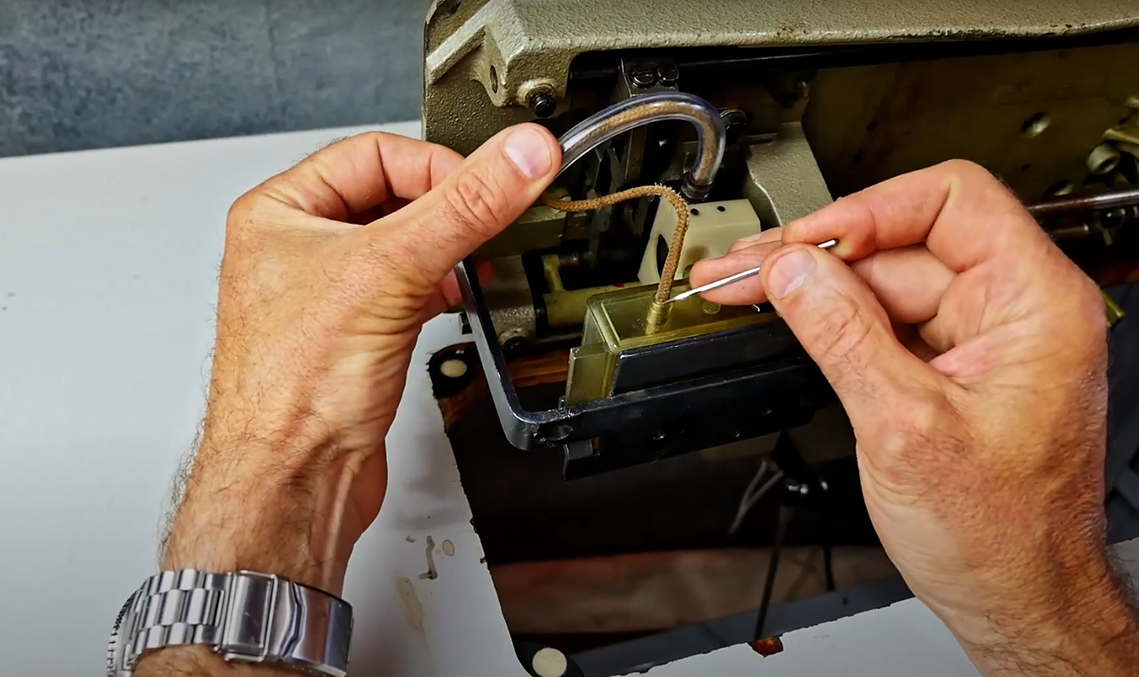
Hi everyone! I've recently acquired an older model Pfaff 1245 and I have a parts/maintenance question that I haven't seen discussed anywhere else yet. A bit of context, this machine was on it's way to the dump and I rescued it - it was abandoned in the alterations department of a clothing store that had gone bankrupt and I was able to take it when the space was being cleared out. As far as I can tell it was being used up until the store closed about two years ago. There were other machines in there which were missing parts or needed fixing but they were labelled pretty clearly so that makes me think this machine is in good shape. The balance wheel turns very smoothly, outside of some oiling and greasing I think it should be ready to use except for one issue: It seems to be missing the oil reservoir that I can see in a youtube video walking through the cleaning of this machine (I'll also attach a screenshot). I also have a pdf manual I've downloaded which isn't very clear, it shows the same oil reservoir (which is supposed to be for hook lubrication, I believe) but also mentions you can oil the hook via a hole in the bobbin area. I'll attach a photo of the underside of my machine as well. It looks very similar to the one in the video, just no oil reservoir and slightly different plastic coverings for some gears. So I suppose my question is - do I need to find an oil reservoir for this machine? It seems like an obvious yes, but there's also evidence that it was being used without that part, and a manual that suggests an alternate way to oil the hook system. Is it possible the reservoir is an optional part to make oiling easier? Seems weird that they would make a machine that way but I've only used domestic machines up until now so I wouldn't know. Or maybe there's a sub-model of this machine that doesn't have the oil reservoir, and mine is meant to be oiled manually? I'm a little confused, would appreciate any insights. Thanks in advance, this forum has already answered a ton of my questions just by reading older posts, I appreciate the expertise!