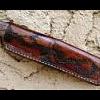
NoahL Report post Posted May 23, 2009 Okay, so it isn't "tooled" per se, but I did use a backgrounding stamp to texture it to achieve a look that (I hope) looks almost like it's been eaten by acid, and I mixed black and dark brown dyes and distressed the leather in places with various grits of sandpaper to get different textures to make it look a bit older. I burnished the edges some, but stopped before they got really smooth, because I was going for a bit of a worn look. The liner is some unidentified leather that came in a scrap pack from Tandy, and the cuff itself is made of 7-8oz horsehide, and they are sewn together with more of that hemp thread I've got. It doesn't really serve a purpose, but I thought it looked neat, and it was my first time ever playing with dyes and distressing and lining and Sam Browne studs . Thanks for looking! ~Noah Quote Share this post Link to post Share on other sites
HallisChalmers Report post Posted May 23, 2009 I like the looks of it - and I think the distressing and Sam Browne studs make it stand out from most of the typical cuffs you see out there. Quote Share this post Link to post Share on other sites
sodapop Report post Posted May 24, 2009 i thinks over all it looks cool man & ya captured what you were invisioning, nice rustic look...my only suggestion would be with the studs...i'd use the punch that is just slightly smaller then the head of them...then cut a slit in each centered...that goes towards the center of the cuff like 3/8th or so...wish i had a picture to show ya...but this method the holes won't stretch where it won't stay on...they'll fit snug & hold fast...the way you have it as is...i can see a problem that possibly now or later with stretch, they may want to pop off...hope that makes sense... anyhoo good job noah!! darryl Quote Share this post Link to post Share on other sites
NoahL Report post Posted May 24, 2009 Thanks, both of you! Darryl, I know what you mean--it would look like a pippin punch. Those holes actually are slightly smaller than the heads of the studs, though not by much, and they are a pretty tight fit. I did a test run doing it with the pippin-style hole-and-slit combo, but it didn't work very well because my cuts weren't perfectly straight, and it was pretty hard to get them onto the studs. I'll try it again sometime and try to keep my cuts straighter and see how that works. Thanks for the suggestion! Quote Share this post Link to post Share on other sites
TwinOaks Report post Posted May 24, 2009 Easy way to do the slits- Mark a line in pencil (it'll be kinda hard to see, but will wear off in a short time) in the direction and length you need. Then push an exacto blade through the hole from the back, keeping the edge lined up with the mark. No effort at all! As you push the blade through, it will slice a very neat little line right where you want it. Quote Share this post Link to post Share on other sites
ericluther Report post Posted May 25, 2009 I'm into making cuffs and cuff watches, I dig yours alot man great job!!!! Quote Share this post Link to post Share on other sites
NoahL Report post Posted May 25, 2009 Thanks for the advice TwinOaks! I'll have to give that a try the next time I work with Sam Browne studs. Thanks Eric! I checked out your website and saw some of your photography, but I'd love to see your cuffs and cuff watches. They aren't my thing as far as wearing them, but they are fun to make Quote Share this post Link to post Share on other sites