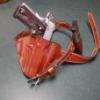
Lobo Posted June 2, 2010 Report Posted June 2, 2010 There is nothing new about belt-clip IWB holsters. These have been around for at least 50 years in various configurations. I don't receive many inquiries for these anymore, but occasionally a customer will make a request and give me something different to work on. Here is one recently finished for a customer who wanted to carry a S&W J-frame Centennial in the appendix position. Neutral cant with belt clip offset to reduce bulk at the cylinder area. Holster body and mouth band/clip retainer of 6-7 oz. Hermann Oak, 1.5" steel belt clip. Construction: pattern and cut holster body and band, assemble and stitch band to holster body, install and rivet clip, stitch rear seam, stitch lower seam. Clip installation does not allow for stitching completely around the revolver profile, so the rear seam secures trigger guard area and the lower seam secures the barrel/frame/yoke area. Wet-forming and boning completes the fitting process. Finish is neatsfoot oil followed by Bag Kote, then acrylic sealant inside and out. Worked into the schedule with other orders, total production time was about an hour. Once again, a little something to keep life interesting in the shop. Quote Lobo Gun Leather serious equipment for serious business, since 1972 www.lobogunleather.com
Members particle Posted June 2, 2010 Members Report Posted June 2, 2010 Looks great! Man, one hour? I need to pick up the pace!! Quote Eric Adamswww.adamsleatherworks.com | Facebook | YouTube | Instagram
Lobo Posted June 3, 2010 Author Report Posted June 3, 2010 Looks great! Man, one hour? I need to pick up the pace!! Perhaps a little clarification is in order. When I refer to total project time I don't mean that I started on this holster and had it completed one hour later. My usual production runs include about a dozen pieces. I cut all patterns at one time, then I assemble and sew them, then I form them, then I dye them, then I finish them. These processes usually take place on different days, and a production run typically takes place over about 3 days. I usually set up the dye station once per week for each color to be dyed, doing all like-color orders at one time. During the drying cycles I start another production run, or I will do my pouch orders, belt orders, shoulder holster harnesses or whatever else is scheduled for that week. At the end of a week I have usually completed 3 production runs. After the finishing work is completed I do all of my hardware installation and everything is ready for packaging and delivery. Combining multiple pieces at each stage can make the bench time much more productive. My average shop time per completed piece is usually around 45 minutes. Making new patterns adds time, installing holster linings adds time, thumb-breaks add time, etc. But I am usually working in the shop for about 25 hours or so per week. Add in the time required for responding to customer inquiries and orders, I usually put in a solid 40-hour week. Best regards. Quote Lobo Gun Leather serious equipment for serious business, since 1972 www.lobogunleather.com
Members particle Posted June 3, 2010 Members Report Posted June 3, 2010 Thanks Lobo - I didn't assume you did it all in one sitting and assumed it was over the course of time. I appreciate the insight into your workflow - that's something I really need to work on. I'm a "one thing at a time" guy. The Avenger style holsters have to have their reinforcement piece sewn on, then wet and folded and allowed to dry overnight. The Pancakes don't need that extra day of drying time, and I could certainly proceed with their production, but I usually just wait until the Avengers are ready to proceed. Not very efficient. Perhaps I should, like you do with colors, do one style of holster at a time so the workflow is the same for all the holsters in a given batch. Anyway, thanks for the clarification and insight into your production routine. It's much appreciated and something I could certainly learn from. Quote Eric Adamswww.adamsleatherworks.com | Facebook | YouTube | Instagram


Recommended Posts
Join the conversation
You can post now and register later. If you have an account, sign in now to post with your account.
Note: Your post will require moderator approval before it will be visible.