Members katsass Posted March 2, 2011 Members Report Posted March 2, 2011 I tried some new thread designs and a new dye this weekend, how can I improve the design? Robert, My suggestion is, when marking out your stitch lines, mark out another line inside of that to make a 'frame' around your basket weave. You might pick up a copy of Al Stohlman's book, "How to Make Holsters" (about $12). It gives you an awful lot of good info, and it has a section on how to align and work the basket stamp well. Mike Quote NOTE TO SELF: Never try to hold a cat and an operating Dust buster at the same time!! At my age I find that I can live without sex..........but not without my glasses. Being old has an advantage.......nobody expects me to do anything in a hurry.
Members shakygreg Posted March 2, 2011 Members Report Posted March 2, 2011 You asked how to make the belt loops flow better into the hole punches. What I do: 1. Punch the holes. 2. Use a straight edge to mark the cut line. 3. Use a razor knife and start at one hole and cut on the line halfway on both sides, turn the project around, and cut the remainder of the line on both sides. 4. Use a dremel sanding bit to smooth out the inside of the slot. 5. Use a burnisher with water, then a burnisher with gum tragacanth. Quote _________________________________________________________ Shaky Greg Sass#87514 God Bless Jer-29:11-14
Members Eaglestroker Posted March 7, 2011 Author Members Report Posted March 7, 2011 (edited) You asked how to make the belt loops flow better into the hole punches. What I do: 1. Punch the holes. 2. Use a straight edge to mark the cut line. 3. Use a razor knife and start at one hole and cut on the line halfway on both sides, turn the project around, and cut the remainder of the line on both sides. 4. Use a dremel sanding bit to smooth out the inside of the slot. 5. Use a burnisher with water, then a burnisher with gum tragacanth. Thanks Greg, I found my biggest issue was not the method but the cutting surface itself. Per recommendation I snagged an old plastic cutting board from the goodwill and the results improved ten fold! I won't have pictures of the holster I made to match this until tomorrow but I did this using Mike's burnishing method. My results will only get better, I think I should have been a bit more aggressive with my sanding after seeing the finished product. I will continue to get better though and I think from now on I will be hand burnishing! Edited March 7, 2011 by Eaglestroker Quote
dirtclod Posted March 7, 2011 Report Posted March 7, 2011 You strap is faceing the wrong way it needs to be behind you. If you walk through some brush the way it is now theirs a good chance it will get snaged and come undone and you may lose your knife. Quote I'm old enough to know that i don't know everything.
Members Eaglestroker Posted March 7, 2011 Author Members Report Posted March 7, 2011 Thank you for that tip, I had never heard or read that. My pistol sits on my right side so this is on my left, and it will work out following your rule. Should I make others though I know something to ask about! You strap is faceing the wrong way it needs to be behind you. If you walk through some brush the way it is now theirs a good chance it will get snaged and come undone and you may lose your knife. Quote
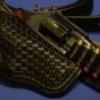
Members Eaglestroker Posted March 7, 2011 Author Members Report Posted March 7, 2011 Holster hasn't been sealed yet but otherwise it is ready to rock. Have to get the bulk work done before the week starts and I get busy again, any and all criticism welcome! Please don't be gentle guys Quote


Recommended Posts
Join the conversation
You can post now and register later. If you have an account, sign in now to post with your account.
Note: Your post will require moderator approval before it will be visible.