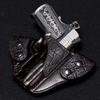
Members markush Posted December 2, 2011 Members Report Posted December 2, 2011 This Axiom copy is for my 2" J-frame. This is my second attempt at making a holster for this revolver and I still didn't get the stitch line just right. My very first holster was a cross draw rig for this gun and I just guessed at stitch line spacing...it ended up being too tight. This time I measured the cylinder and went half of that all around the gun...it's too much. Maybe on the third one I'll get it figured out. This is the first time I used Tandy' s black line 24 snaps and I am NOT pleased with how the finish is coming off! They've been snapped/unsnapped less then a dozen times and I've worn the holster less then 10 minutes and two of the snaps look like they've been drug across the pavement! If there's any criticism you guys can offer to help make my next holster better, besides stitch line spacing, please let me know! Quote
Members Andrewsky Posted December 2, 2011 Members Report Posted December 2, 2011 Looks real nice to me. Is it actually loose in the holster right now? I use line 24 snaps from Tandy all the time and have never had finish wear like that at all. If you're trying to sell this thing for $250 I'd worry about the look of the snaps, otherwise you're fine. Edge distance from stitching lines looks good. What kind of tool are you using to bevel your edges? They look nice and rounded. Could you explain exactly how you bone inside the trigger area? That looks really good and I'm not sure how to do that. Quote
Members markush Posted December 2, 2011 Author Members Report Posted December 2, 2011 Looks real nice to me. Is it actually loose in the holster right now? I use line 24 snaps from Tandy all the time and have never had finish wear like that at all. If you're trying to sell this thing for $250 I'd worry about the look of the snaps, otherwise you're fine. Edge distance from stitching lines looks good. What kind of tool are you using to bevel your edges? They look nice and rounded. Could you explain exactly how you bone inside the trigger area? That looks really good and I'm not sure how to do that. Thanks. No, it's in there tight and as deep as I intended it to be. The snaps all looked fine when I set them. When I attached the straps to the holster and formed them to the belt I noticed the top one starting to look like that. After I applied finish to the holster I noticed the bottom one was starting to look the same way. I have no clue why the finish on the snaps is doing what it is. For my burnishing I'm using Cocobolo edge burnishers made by a forum member here that goes by "spinner" . I'm not really sure how to bone either and it's one area that I would like to improve. To me it's like drawing a picture...I can't draw a straight line to save my life! I've read some people use "modeling" tools to do their boning. I have a set of steel "picks" that I use to try to draw the boning lines with. Quote
wizard of tragacanth Posted December 2, 2011 Report Posted December 2, 2011 Nice work. The only thing missing is your Maker's Mark! I can't understand why the finish is coming off those snaps? Weird. I guess you could drill them out and use some new ones. Nick Quote Wisdom from an old Missouri farmer, my Grandpa: If it's not sharp, it's not a knife.
Members Haystacker Posted December 2, 2011 Members Report Posted December 2, 2011 Markush, What a great job. If you want to tighten this holster, just add another stitch line. Before you make your next holster, make another copy of your pattern. Then trace in the stitch line a little tighter, using your holster as a guide. Then cut out the stitch line pattern and use this when you make you next holster. all of my patterns are two pieces. The outside and then the inside stitch lines. I hope the pictures help explain what i mean. Again, looks great. best regards, Jeff Quote haysholsters@hotmail.com NRA Life Member
Members jlaudio29 Posted December 2, 2011 Members Report Posted December 2, 2011 Looks good. Stitch lines on a Revolver are the hardest for me. once youve done it a few times youll learn where you can move the line in or out and get the stitch line closer (refering to revolvers im sure you have semi-autos down) What are you using to finish the surface of the leather. Also, i hate tandy snaps, i need to use up what i have and get away from them. The gun metal ones like you got, the finish seems to like to peel off there very easily. I have started putting a thing cloth down between the snap and the little circular seat that it sits in when getting set. it has helped with the stuff not chipping or wearing off but its another thing i have to do that is more of a pain in the butt. As far as boning revolvers... i tried on the first few to add some boning. but in the end i decided that just working it with my fingers really well and only boning the trigger guard gave me a good look that made me feel as though i molded it and still looked good with out looking like i needed to do more. If that makes any sense... my rambling is terrible sometimes. Quote
Members dickf Posted December 3, 2011 Members Report Posted December 3, 2011 What's not to like? The leather looks to be of good quality and isn't overworked, the color is nice and even, and your edges look great! The stitch line is the only thing I'd concern myself with regrading function. I will say that I think it would be in your best interest and good form if you make this pattern for personal use only and don't start selling it like others have. If you're going to improve upon it, know why you're doing what you're doing, test the hell out of it, and sell away! Quote US GUNLEATHER www.usgunleather.com twitter.com/usgunleather facebook.com/USGUNLEATHER
Members Andrewsky Posted December 3, 2011 Members Report Posted December 3, 2011 I'm still curious how you are beveling your edges. I'm using a Tandy beveler and don't get that nice rounded edge. Quote
Members markush Posted December 3, 2011 Author Members Report Posted December 3, 2011 (edited) @ Andrewsky I simply chuck one of these into a drill press, spin it at 3100 RPM, and run the holster edges through the appropriately sized channel while it is still wet from the vinegaroon process...no super slippery secret sauce required. @ dickf I agree with you about the design. Every thing I've made has been for myself. I know what I have here is an as exact as I can make copy from only seeing photos of this holster. I take no credit for anything other then putting this thing together. And I'd have no clue how this design could be improved upon. Heck I don't even know what you mean by overworking the leather... @ jlaudio I'm just using Bag-Kote as a final finish. Vinegaroon for color a touch of neatsfoot then the Bag-Kote. I've actually polished my snap setter anvil so it's super smooth. It's possible the finish "cracked" while setting them but I know they didn't get scratched while setting them. @ haystacker yes your pics help a lot. I am now considering adding another stitch line to this particular holster to help it keep it's retention as it gets worn...would it be smart to do it right now or would there be any harm in waiting until the holster loosens up a bit and then adding another line? @ wizard yes I know! I keep thinking the perfect design for a mark is going to hit me in the face one day and I'll know it when I see it...nothing yet. Edited December 3, 2011 by markush Quote
wizard of tragacanth Posted December 3, 2011 Report Posted December 3, 2011 Markush, I said Maker's Mark, I should have said Maker's Stamp... you know... the one's that have your name and say "maker" on them. One of these would work until you come up with a logo. I have a plastic one... it works fine and was very inexpensive. http://tuffcase.com/shop/index.php?main_page=product_info&products_id=46&zenid=0auj18qra46agkrpi65lvhv8c7 If you want one that is smaller or larger, look here http://greyghostgraphics.com/Stamp%20Brochure.pdf If you want a steel stamp, look here http://www.steelstampsinc.com/ Nick Quote Wisdom from an old Missouri farmer, my Grandpa: If it's not sharp, it's not a knife.


Recommended Posts
Join the conversation
You can post now and register later. If you have an account, sign in now to post with your account.
Note: Your post will require moderator approval before it will be visible.