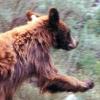
WinterBear Report post Posted June 26, 2012 (edited) Double C convinced me to come and post this here. It's a small piece of inlaid overlay for a notebook cover I am working on for myself as time allows. The jackrabbit is a fairly common symbol of traditional and modern pottery in the 4-Corners region. It ranges from a very simple outline to elaborately speckled and striped variations. I purposely kept the outline a little blocky to imply pottery sherds. The red and black colors are meant to imitate the burnished red oxide slip and the black burnished pots, such as those called "Santa Clara" pots. The brown is the color of some detail work used on the white painted pots. The black around the edges o the brown portion is similar to the char a more traditionally fired pot would show. Jackrabbit is 8-9 oz veg-tan cow, dyed orange then overdyed with Ecoflow scarlet mixed with a little blue to acieve the shade I wanted. The underlay of blue black for the crescent and the eye is 3-4 cow skived thin after dying. Dye was the Tandy blue mixed with emerald green and burnished into the leather until the leather turned glossy. For the body inlay, thin tooling pigskin was oiled with neatsfoot and darkened around the edges with a little black soot collected from a candle and mixed with neatsfoot. Following a burnishing to remove any extra dye or oil, the jackrabbit was sealed with 3 thin coats or Fiebings Tan Coat. Edited June 26, 2012 by WinterBear Quote Share this post Link to post Share on other sites
DoubleC Report post Posted June 26, 2012 Winterbear, I think I just fell out of my chair because you actually posted something. And what a gorgeous something it is too. And I really appreciate you sharing your burnishing method with me to get regular cut veg tan looking good enough to be the overlay itself. You know that's where my current train project resulted from. I absolutely adore this and can't wait to see it as a notebook cover. c Quote Share this post Link to post Share on other sites
WinterBear Report post Posted June 26, 2012 Yeah, well, it might help things if I could actually spell worth a hoot tonight. You might be waiting a good long time to see this notebook finished with the way my schedule seems to be lately. Quote Share this post Link to post Share on other sites
DoubleC Report post Posted June 26, 2012 Too true, I may forget your name if you don't slow down some. And I manage to stumble on through the post when you said tolling pigskin instead of tooling. It really is the nicest piece honestly. Now if I could get you to put your Lion applique on :-) Quote Share this post Link to post Share on other sites
WinterBear Report post Posted June 26, 2012 But the Lion isn't leather. Quote Share this post Link to post Share on other sites
DoubleC Report post Posted June 26, 2012 Oh it isn't? I was going to use all these leather pieces and parts I have around here to do mine because I thought that's what you used. See? Can post it anyway, no one will know, LOL. (Uh what year did I plan to take time to do something that involved?) Quote Share this post Link to post Share on other sites
WinterBear Report post Posted June 26, 2012 Nope. The lion is an applique quilt, primarily cotton, with some cotton-poly blend fabrics and cotton batting. It might have been simpler to make in leather. I wouldn't have had to satin stitch all of those bloody edges or quilt the hair lines into the mane! Quote Share this post Link to post Share on other sites
DoubleC Report post Posted June 26, 2012 See? I already knew all that so I guess that's why I was thinking leather :D Quote Share this post Link to post Share on other sites
WScott Report post Posted June 29, 2012 Cool looking rabbit!! How will you apply it to the notebook? Glue? Stitch? Please show the finished project when you are done Scott Quote Share this post Link to post Share on other sites
WinterBear Report post Posted June 29, 2012 It will be hand stitched. Glue wouldn't be as aesthetically pleasing as a contrasting stitch, plus I tend to always make a mess with glue. I'll show it as it progresses, but it will be a long wait I'm afraid. Much of my "free" time is eaten up by Scouts and projects in the summer, so I don't get to do much with leather. Quote Share this post Link to post Share on other sites
WScott Report post Posted June 30, 2012 It will be hand stitched. Glue wouldn't be as aesthetically pleasing as a contrasting stitch, plus I tend to always make a mess with glue. I'll show it as it progresses, but it will be a long wait I'm afraid. Much of my "free" time is eaten up by Scouts and projects in the summer, so I don't get to do much with leather. Ok so now another question....with a piece so small and detailed, how do you stitch it to the project without it being obvious or destroying the rabbit's fine detail? ie where will you put the stitches to hold it on the notebook as the rabbit already has nice stitching around it. I have seen a AL Stohlmann book where he had fine hand stiching holding a horse emblem onto a saddle with a really fine thread, but wondered about strength. Thanks, Scott Quote Share this post Link to post Share on other sites
WinterBear Report post Posted June 30, 2012 Well, it's not stitched yet, and when it is stitched, the thread will be part of the design and a contrasting color. Those marks are where the stitching will be, and where I've marked the stitching holes. I didn't use a groover to mark the stitch lines as I didn't want to remove any of the grain and potentially weaken the thin parts, like the base of the ears and the legs, so the stitch lines are just beveled in. It is also a very thick piece of leather, and was lightly hammered and well burnished before being cut out to compress the grain and make it tougher. Quote Share this post Link to post Share on other sites
WScott Report post Posted July 1, 2012 Oh right, now I see the stitching holes are empty Sorry my bad Quote Share this post Link to post Share on other sites
DoubleC Report post Posted July 1, 2012 LOL, I thought they were laced too. Cheryl Quote Share this post Link to post Share on other sites
jmkjmk2 Report post Posted July 4, 2012 Great looking rabbit Quote Share this post Link to post Share on other sites