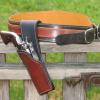
Members Red Cent Posted April 2, 2014 Author Members Report Posted April 2, 2014 After I cut and glue, I square all the edges with a band sander and/or a drum sander. I bevel then I sand with a hand held hook and loop rubber block with 220 grit. I finish with a sponge that is impregnated with fine grit. Sponge forms a great rounded edge and removes the "hair" from the edge. I apply water with my fingertips (sparingly) and burnish with my home made dowel rod burnishing tool on a drill press. At this point, I usually have a glass smooth edge. I use Fieblings brown and black edge dye. When fully dry, I burnish again. Another glass smooth surface. Then, normally, I apply an acrylic I bought at Zack White. It is a proprietary coating that he doesn't advertise. My little plastic bottle has #250 hand written. I also have a large bottle of #300 also hand written. Let it thoroughly dry, buff with a t-shirt and a good edge jumps out at you:). Sometimes, after the dye, some bumps may appear that are remedied with the sponge. Burnish again. I have gotten away from the glycerin bar soap, beeswax, and/or paraffin for the most part. If a certain piece is stuborn, I may resort to beeswax:). Quote https://www.facebook.com/redcentcustomleather?ref=bookmarks http://www.redcentcustomleather.com/
Members 4wheeler4 Posted April 4, 2014 Members Report Posted April 4, 2014 After I cut and glue, I square all the edges with a band sander and/or a drum sander. I bevel then I sand with a hand held hook and loop rubber block with 220 grit. I finish with a sponge that is impregnated with fine grit. Sponge forms a great rounded edge and removes the "hair" from the edge. I apply water with my fingertips (sparingly) and burnish with my home made dowel rod burnishing tool on a drill press. At this point, I usually have a glass smooth edge. I use Fieblings brown and black edge dye. When fully dry, I burnish again. Another glass smooth surface. Then, normally, I apply an acrylic I bought at Zack White. It is a proprietary coating that he doesn't advertise. My little plastic bottle has #250 hand written. I also have a large bottle of #300 also hand written. Let it thoroughly dry, buff with a t-shirt and a good edge jumps out at you:). Sometimes, after the dye, some bumps may appear that are remedied with the sponge. Burnish again. I have gotten away from the glycerin bar soap, beeswax, and/or paraffin for the most part. If a certain piece is stuborn, I may resort to beeswax:). Thanks for the tips, your work is always top notch!!!! Quote
Members Red Cent Posted April 5, 2014 Author Members Report Posted April 5, 2014 Thank you. Quote https://www.facebook.com/redcentcustomleather?ref=bookmarks http://www.redcentcustomleather.com/
Members MDH Leatherworks Posted April 5, 2014 Members Report Posted April 5, 2014 Thank you for laying out your process on your edges - great work! Quote
Members marine mp Posted April 7, 2014 Members Report Posted April 7, 2014 Red Cent, Nice work. I myself have gone to just using H2O as my edge burnishing "secret " formula!!!!! Take care...Semper-fi Mike Quote "The first one thru the door...gets the copper-coated candy". ADL Custom Holsters "I've got a LONG list of real good reasons, for all the things that I have done"!!!


Recommended Posts
Join the conversation
You can post now and register later. If you have an account, sign in now to post with your account.
Note: Your post will require moderator approval before it will be visible.