Jump to content
OLDNSLOW

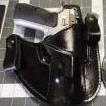
After 2 Failed Attempts This Is My First Holster But Not Complete

Recommended Posts

I have always enjoyed the quality that Milt Sparks portrays in his holster work, but could not bring myself to paying for one. But now after having gone through the trouble to cut, hand sew, die, edge work on and on I can have a better understanding of what goes in to making a good quality holster. So many people have gone to Kydex simply because they are less of a cost compared to Leather, but there something about leather that says and speaks class. Well as the title said this the first after 2 fails and there are still a bunch of problems with it, but it can only get better from here, what is left is to water form, then seal it, the straps, my wife liked this one and it should fit here gun so I will form it to hers. Let me know what y'all think the skin isn't to thin yet but be kind on an old man.

Thanks

O n S

well I have to resize my photos to get them to post be back in a few

Edited by OLDNSLOW

Share this post


Link to post
Share on other sites

this should work

, so let me know what needs to be worked on

post-62918-0-94650200-1451198753_thumb.j

post-62918-0-62420100-1451198774_thumb.j

Edited by OLDNSLOW

Share this post


Link to post
Share on other sites

What thickness leather did you use?

Share this post


Link to post
Share on other sites
Whether straight, curved or angled smooth flowing lines and transitions will go along way towards getting you to be closer to what Milt holsters look like. This includes the stitch lines as well as the edges.


For making my holster designs I start with a pattern for the gun pocket. Then I add in my belt lines equal to the width of my belt at the cant and ride height Iwant for the holster. Then I figure out how wide the holster needs to be based on my belt loop/strap locations. From there I can now start making flowing lines between the outer most points of the sides down to the muzzle end and up to the sweat guard if used. I do this on cardboard so it is easily traced onto the leather and I do it in pencil so I can erase unwanted lines.


Once you have the two halves glued together and the edges sanded, you can use a groover such as this one http://www.tandyleather.com/en/product/craftool-adjustable-groover. Or if just making a stitch line without making a groove for the thread to lay in you can use a compass or something similar. You will still need to do freehand for the gun pocket but then your pocket pattern can help you with that.


This is my first holster. th_firstholster_zps7493616c.jpg


This is my latest holster. It is my 9th one and I am still learning as I go. th_20151224_222708-1-1_zpsep9wqlkd.jpg


I try to learn from each one I do and apply it to the next one. Looks like you are willing to do the same and that should go along way for you.


Share this post


Link to post
Share on other sites

There was a lot to be learned from this one after a few failed attempts, 2 of the things that correspond to each other are the grove, and the stitches. I have not been able to get them as straight as I would like and also have not been able to get the grove like I want it. It is a learning process for sure, even in applying the sealer was an ordeal that should have been very straight forward. Having put thought in to the process after the fact, even the weather plays a part in how the sealer went on, for it being the 1st successfully completed holster I have something to look at and use as a learning tool for the next one.

Share this post


Link to post
Share on other sites

I don't have that one, it is different in that the grove attachment is in the handle and the guiding edge is the curved item if that makes sense?

Share this post


Link to post
Share on other sites

Join the conversation

You can post now and register later. If you have an account, sign in now to post with your account.
Note: Your post will require moderator approval before it will be visible.

Guest
Reply to this topic...

×   Pasted as rich text.   Paste as plain text instead

  Only 75 emoji are allowed.

×   Your link has been automatically embedded.   Display as a link instead

×   Your previous content has been restored.   Clear editor

×   You cannot paste images directly. Upload or insert images from URL.


×
×
  • Create New...