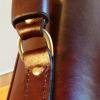
Paulsleather Report post Posted January 16, 2013 Hi all, I'm new to leather work (about a year) and just have to say what a huge resource this forum has been. I couldn't have made it this far without it. My first briefcase project was from an attache pattern I purchased from Bighousedaddy.com. Very happy with the pattern and the way the project turned out. After bringing it to the office, I was asked by a colleague to build a custom designed briefcase for a corporate director. After hearing his design ideas I took a deep breath and agreed to do it. So, after two months of work, I've finished the bag for my first customer. The pattern work was more challenging than I thought and I had to modify and adjust as I went along. The bag itself is a double gusset, double flap design with an additional front pocket. The pocket also has 3 mini pouches, plus pen and biz card holder. The handle and structure is attached to an oak dowell. The leather used for the exterior of the bag (including strap and shoulder pad) is cut from a 9 ounce, black, Austin Double Shoulder. The interior is lined with 3 ounce naked finish steer hide. I used magnetic closures for both the front and back flap. Due to my inexperience, I was not fully prepared for the amount of effort it would take to complete the gusset work (especially in the corners). Hand stitching through a combination of 6 layers at the centerline (36 ounces in total) drove me to the edge of insanity. I did manage to come up with a technique to hold the layers together so that I wouldn't completely lose my mind. Anyway, I'm totally exhaustive but still smiling. Learned my lesson though when it comes to choosing leather thickness for gusset work! Comments welcome - Quote Share this post Link to post Share on other sites
King's X Report post Posted January 16, 2013 Great work for your first time! I like the nail idea though I tend to use large paper clips or thick string as temporary clips. I did have an older briefcase that had magnetic closure and found over time that they gave out and had to replace them with Line 24 snaps. Keep it up and Welcome to the forum! Quote Share this post Link to post Share on other sites
electrathon Report post Posted January 17, 2013 Great lookng work and like the design too. Aaron Quote Share this post Link to post Share on other sites
bluesman1951 Report post Posted January 17, 2013 Very nicely done. Elegant looking case . I would like to know why you ended up with the huge thickness . Is there no way to design around that perhaps by hiding the gusset attachment on the inside . I like this a lot and in my opinion its shelf ready anywhere . My compliments on a fine project . Bill Quote Share this post Link to post Share on other sites
Paulsleather Report post Posted January 17, 2013 Thanks King's X - appreciate the feedback on the magnet closure and the alternatives to my nail approach. Thanks Electrathon, I'm hoping she likes the design, too, when they present it to her next week! Quote Share this post Link to post Share on other sites
Paulsleather Report post Posted January 17, 2013 Thanks, Bluesman1951 - i really appreciate the comments! That's a great question. I'm trying to visualize the suggestion but can't quite wrap my mind around it. Would I stitch it flesh side out and then turn it in side out so that the stitching along the gusset disappears? Sounds like it would look nice. I think the thickness stems from the fact that the two gussets and the center panel that they attach to (each 9 oz), are lined with the 3 oz leather (see last photo). I basically went a little overboard with the thick leather. Thanks again! Quote Share this post Link to post Share on other sites
lightningad Report post Posted January 17, 2013 wow - really good looking bag! Thats just the kind of project i'm working myself up towards. Not sure which worries me more... making it or buying all the leather! Quote Share this post Link to post Share on other sites
Paulsleather Report post Posted January 17, 2013 Thanks, Lightningad! I whispered more than a few prayers before putting the knife and hammer to those beautiful (and yes, expensive) double shoulders. Lots of hand wringing and nervousness especially before using the drill press to bore the holes into the leather wrapped oak dowell for the handle loops. When you get the scratch together - just go for it, man! Thanks again - Quote Share this post Link to post Share on other sites
lightningad Report post Posted January 17, 2013 just out of interest - how much leather did you need for the project? Quote Share this post Link to post Share on other sites
Paulsleather Report post Posted January 17, 2013 It took a full double shoulder - about 12 sq feet - for the bag. I had to cut the strap from a second one, though. I now have plenty of left over for small laptop sleeves! I kept the bling to the bare minimum in order to keep a lid on costs. Quote Share this post Link to post Share on other sites
RavenAus Report post Posted January 17, 2013 Did you skive the leather down at all? I think with that thickness it could easily lose a few oz at the seams Quote Share this post Link to post Share on other sites
Paulsleather Report post Posted January 17, 2013 That's it - there you go - problem solved - staring me right in the face the whole time. Thanks mate. I don't know why it didn't occur to me to do that. The only skiving I did was at the tops of the panels where I folded the leather over and stitched across the top for a clean edge. Now that I think of it, I was pretty miserable doing that skiving. Seemed like it would never end. I'm sure it was due to the fact that my technique needs work (or practice, or both)... and a sharper blade wouldn't hurt either. Thanks very much for that suggestion, RavenAus. It will really make the gusset work more manageable in the future. Quote Share this post Link to post Share on other sites
David8386 Report post Posted January 18, 2013 Good job, I think it came out very nice. Thanks for posting it. David Quote Share this post Link to post Share on other sites
Paulsleather Report post Posted January 18, 2013 Thanks, David. Quote Share this post Link to post Share on other sites
lightningad Report post Posted January 18, 2013 It took a full double shoulder - about 12 sq feet - for the bag. I had to cut the strap from a second one, though. I now have plenty of left over for small laptop sleeves! sorry if this is a dumb question...does that 12sq ft include the lining or is that another 12sq ft? adam Quote Share this post Link to post Share on other sites
RavenAus Report post Posted January 18, 2013 (edited) To be honest, my skiving technique is pretty rubbish too A new blade really does help. What do you use to skive? I have Tandys super skiver - not so super really, it's a pain to use and the result is never even! I'm trying to figure out if there's any way I can make an edge skiver that won't cost a fortune, but coming up blank right now Edited January 18, 2013 by RavenAus Quote Share this post Link to post Share on other sites
Paulsleather Report post Posted January 18, 2013 Yes, Adam, add maybe another 8 for the liner. Since its thinner, I cut with scissors and was able to minimize waste due to simply tracing the patterns vs taping them down on the leather. Quote Share this post Link to post Share on other sites
lightningad Report post Posted January 18, 2013 thanks Paul, very useful in helping me gauge what i might need to make a similar bag. Quote Share this post Link to post Share on other sites
Paulsleather Report post Posted January 18, 2013 Yep, mine is similar to the Tandy one but I got it at Springfield leather. I'm not sure if its the right tool for the job that I was trying to do. Let me know if you come up with a cost effective way to make one. Quote Share this post Link to post Share on other sites
Bob Blea Report post Posted January 18, 2013 Hi Paul, I'm really impressed. I've been trying to learn this stuff for several years now and I'm not to the point where I would try something like this. It looks really nice and you should be proud. Bob Quote Share this post Link to post Share on other sites
Paulsleather Report post Posted January 18, 2013 Why thank-you, Bob. I appreciate the feed back. You know, there were more than a few instances of late night panic waking up saying "what was I thinking, I'll never get this done on time, I'm in over my head". But, I would basically tell myself - quit your whining and worrying and get after that thing! Plenty of life lessons in leatherworking, for sure. Thanks again! Quote Share this post Link to post Share on other sites
mototech7 Report post Posted January 18, 2013 i really laughed out loud on that one paul! I'm sure that thing will be in her family for a long time! Quote Share this post Link to post Share on other sites
Paulsleather Report post Posted January 18, 2013 I hope so! They came by to pick it up today for the presentation next week. You'd think a family member died by the look on my face after they left with the bag. I was half tempted to tackle the guy in the hall way before he got to the door. Must be some deeply seated possesiveness issues going on in my psychy. Oh well, off to the next project! Thanks for the comment Mototech7! Quote Share this post Link to post Share on other sites
idlewilder Report post Posted January 21, 2013 I know I'm going to sound like a salesman, but a friend of mine recommended K & J Magnetics for magnets, and they claim the magnets don't loose strength unless they are heated. Quote Share this post Link to post Share on other sites
Paulsleather Report post Posted January 23, 2013 Thanks idle wilder, I'll check them out. Always good to have alternatives. By the way - just finished the matching case for the iPad mini. Here are some photos ... Front, back, and liner. Quote Share this post Link to post Share on other sites