SooperJake Report post Posted October 5, 2013 (edited) I was asked in another thread to better explain one of the ways I make a holster pattern. This method came from trial and error in an effort to get good lines on the trigger side of the firearm, because the exact shape of the gun and the shape the leather actually molds to aren't always a mirror image. So here it is with pictures taken on my dumb phone. The idea is to mold the gun to get a good trigger guard side and tweak the tightness by adjusting the straight stich line on the slide side of the pattern only. it works like a charm. I came up with this for holsters with lasers originally. Edited October 5, 2013 by SooperJake Quote Share this post Link to post Share on other sites
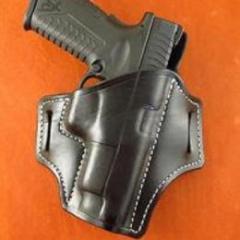
SooperJake Report post Posted October 5, 2013 (edited) By the way this is for a pancake style holster. Since Pancakes are for breakfast I call this a belt-slot holster. Pics here listed are in the order I posted them not the numbers I named the files. P1 : Cut the leather to reflect the top front of the holster avoiding the mag release. P2: Cut the back piece to match. P3: Glue the edges of the halves. P4: Wet for molding. P5: Vacuum molding in progress P6: Bone the outside edges, ejection port and trigger guard on both sides. Not too much molding is needed since we are developing the stich lines primarily. That tool you see is stainless steel for working with clay and comes in a set of 3 sizes made by Sculpey and sold at Michael's craft store. Yes, I knew you'd ask. P7: Molding done, dry the holster (NuWave oven at work) P8 molded and dry. P9: Cowboy CB4500 unthreaded with single left foot on. Hand stitch people~ get your awls sharpened up real good. P10 Stitch around the molding at the desired distance away. I stitch in the bottom of the curved indention line formed by the Sculpey tool. That leaves me about 1/16 to 1/8" away from the vertickle plane. (I like to use the word tickle when ever possible.) P11: Close up along trigger area. P 12: tear it apart. P13: Two halves. P14 Rewet the front, and use something flat like a bone tool and your fingers to flatten out the front the best you can. Here is where over boning in the trigger and ejection port will come back to haunt you. P15:Back in the NuWave. You can also air dry which is actually best. P16: Lay the dried front onto pattern paper and trace the top line and then use a needle to transfer your stitch holes to the pattern. P17: Use gun or gun mold to further develop the chaffing panel. P 18 complete the perimeter of the pattern. Clear as mud. Edited October 5, 2013 by SooperJake Quote Share this post Link to post Share on other sites
chiefjason Report post Posted October 8, 2013 Best part, that is exactly the kind of tool I've been looking for to burnish the inside of my holsters! Picked one up today. Quote Share this post Link to post Share on other sites
SooperJake Report post Posted October 8, 2013 Best part, that is exactly the kind of tool I've been looking for to burnish the inside of my holsters! Picked one up today. Yeah, they work great. Quote Share this post Link to post Share on other sites
rundogdave Report post Posted October 18, 2013 Sorry I haven't replied sooner. Been having puter problems. Now that I have seen the pictures, my little pea brain understands. Thanks very much. Quote Share this post Link to post Share on other sites