

TrustCommunicationConsent
-
Content Count
72 -
Joined
-
Last visited
Posts posted by TrustCommunicationConsent
-
-
Thanks for sharing your ideas. I made a beveler from a wooden dowel that i cut at an angle. Then I found a metal collar that can be adjusted to the proper width. I look forward to seeing your other creations. I also made a crude but useable splitter from a piece of PVC pipe and bolts and washers. Depending on the thickness of the string, I can add or remove washers.
Logan
I have seen them even tried making one but I have to change sizes to much to like them I finally found and baught one from Austriail that I now would not be without. it is hand held and perfect for my needs. It uses standard utility blades and thickness is adjusted with a simple thumb screw.
-
.... in an 8 strand round braid?
The only nice pattern I found by accident was a chevron pattern that you get when you have two strands of each color going round left and two of each color going round right. They alternate, one dark, one light .....
Are there other nice variations with two color braiding in eight and six strands?
JOhan
When I read this post i got to thinking about combinations with 8 strands and 2 colors. I concluded (maybe wrongly) that there are 144 patterns IF you use 4 strands of each colors. Once it occured to me that you do not have to stick with 4 of each color the number went immediatly into the thousands, for instans 4 of a single color one one side and different conbination of the 2 colors on the other side. that may well bring it to 144 to the 2nd or 20,736 patterns. what ever the number is I am guessing it will be a while before anyone has them all cataloged. LOL
-
Yes, much better! I'll look it up. Thanks!
Some amazing work. My respect for folks that can do leather carving / stamping is HUGE.
-
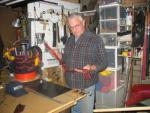
Time to give back a bit. I have learned a LOT from this site and while I do no know it all I do do a few things others might find usefull.
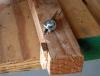
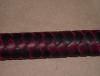
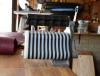
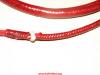
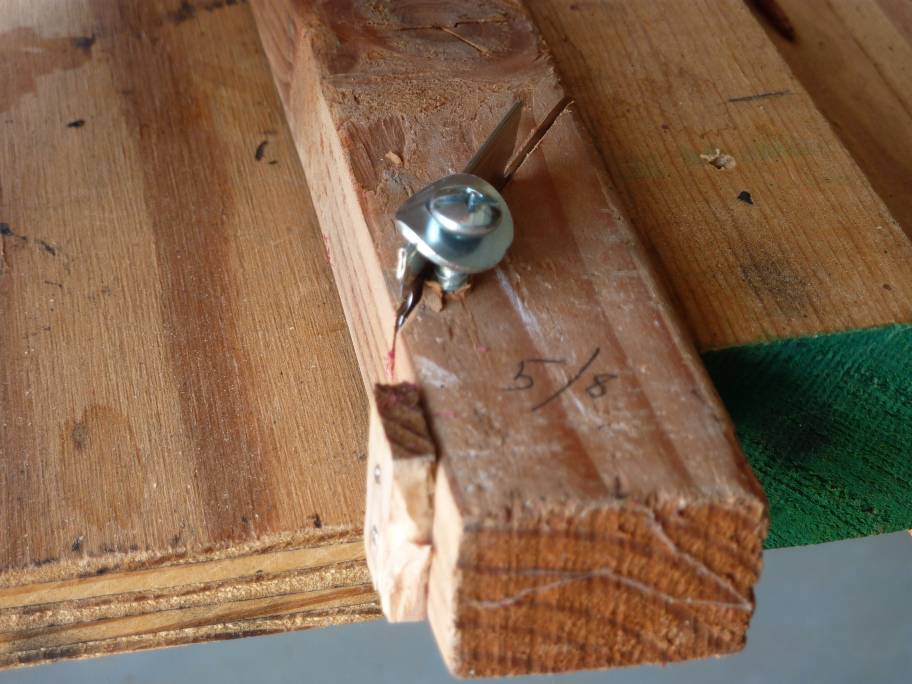
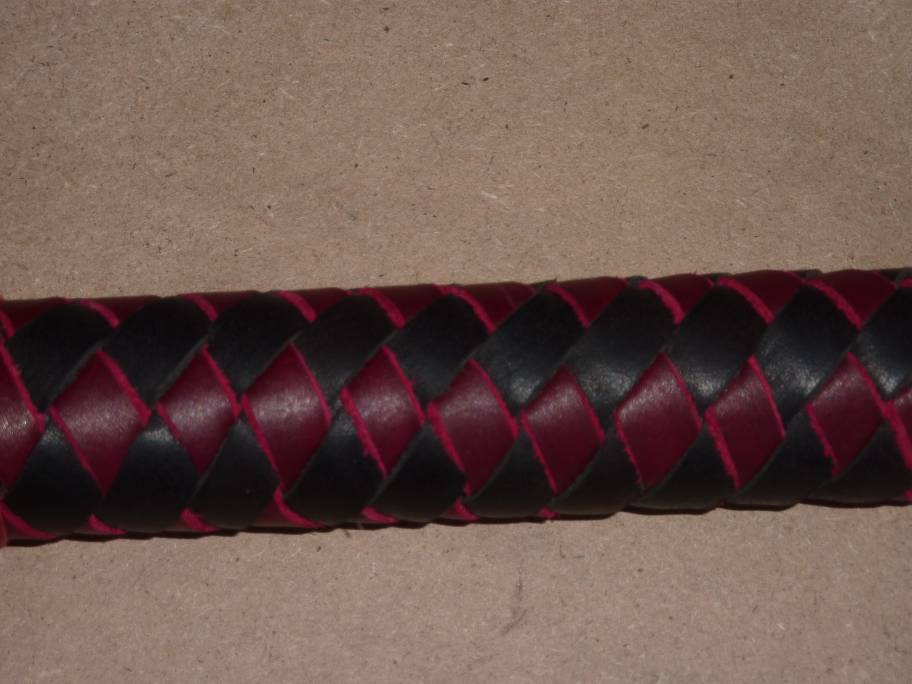
I have a shop full of different types of bevellers and strap cutters some of which I have made. the first picture shows how to make a very simple bevler (I have 6 of these (3 sets of 2)). I use them to bevel both sides of my straps before I braid for me it just makes for a better looking end product. the 2nd picture I braided to show the why i bevel (notice the red shows a pinkish edge when the straps are not braided, also I find the finished producet is also smoother when the edges are beveled. I also run each strap through my splitter so that all of the straps are the same thickness.
To make a bevler I simply take a bit of wood and cut a slot in it with a hack saw (a jewlers was wuld make a thinner slot but I do not have one). Right by the slot I drill a hole to take the screw that will go there. I take washer and bend over on edge (simply by putting it in a vice and hitting it with a hammer (suttle I am not)). put the washer on the screw and lichtly start the screw in the hole. slide a single edged blade into the slot and under the bend in the washer. tighten down the screw and you have it does except for the width. You can do quite well with just one of these and a clamp to adjust the width of the cut. I do a lot of beveling so i took the little time needed to make up a couple of set with standard (for me) widths. For instance I make a lot of flogger handles so I have a strap cutter set up to cut 4 straps each 5/8" (third picture) then I have a pair of bevelers the first one cuts just a shaving off the 5/8" while beveling it and the second makes sure it is exectly 1/2" while beveling the second side (both of the bottom sides are bevled). Next time I will show my splitter (one made for braiders rather than saddle and belt makers) as well as a nice strap cutter that can cut tapered plaits.
Here is hoping this is usefull.
Mike
-
when you do the 6 you have to do the 2 sides differently...one side is under 1 over 2 and the other side is under 2 over 1 this produces a pattern that matches on 2 sides that is side 1 and 3 will match and 2 and 4 will match. otherwise you have to do the o1u1 pattern. hope this helps.
Had never thought of that (I use 8 - 12 - 16 or 24 plait) but it makes perfect sence, since with 6 you will have an odd number of plaits on each side.
That takes me to the thought that an odd number on each side (perhaps an 18 plait which would give 9 on each side)can produce some interesting patterns I had not thought of.
Many thanks for the idea.
-
I am interested in adding a line to my website so looking for a leather worker to make harness and tack items. Preference is some one in So Cal (I really like to personally know the people I do business with) but more important to me is that they be kink friendly. Also interested in some one who does leather carving and or stamping. If these are the same person, even better.
-
I will add my thanks for the idea to that. I do not have the bearings or the bearing holders or even the thing that you run thru them but the idea i can and will use. I just started making a different kind of whip for BDSM people that has a twisted rawhide core, this i then cover with a thin leather and add lead shot. This gives both the weight many people like and much livlier whip than with a sewn lead filled belly.
Gday folks ,
well i had a slack day at work today so i came up with this to help me twist a few cores for my bosals ,i used to use a few nine inch nails and the cooks table , now i like the table but the cook thinks its time i move outside !!! I used a few sockets and rachets and come up with this
-
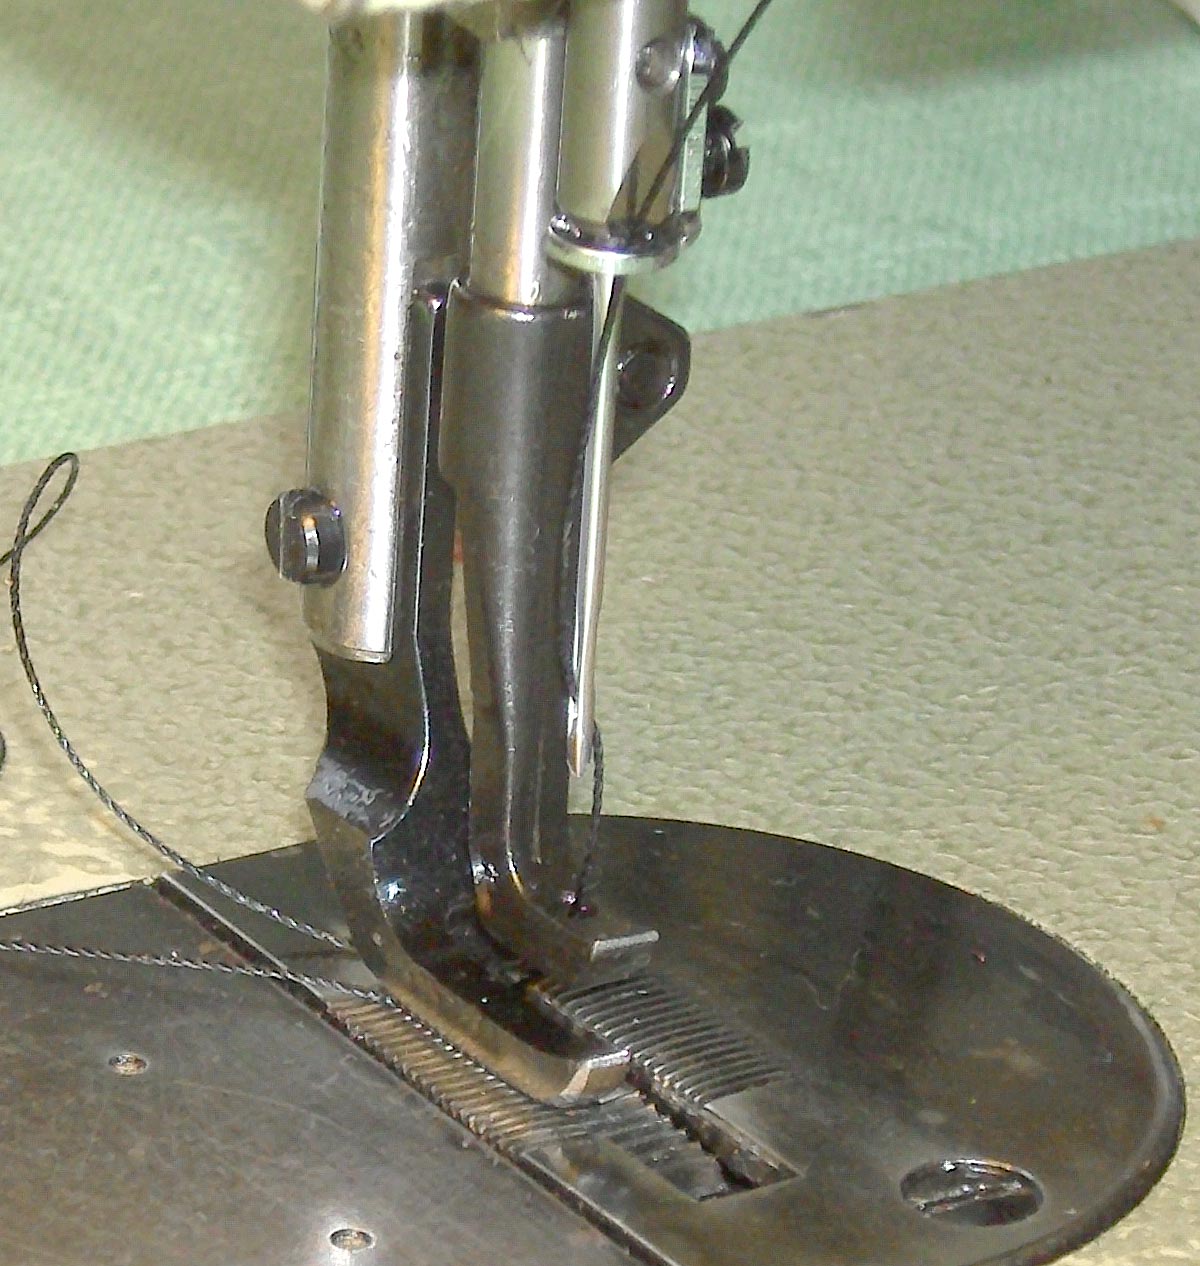
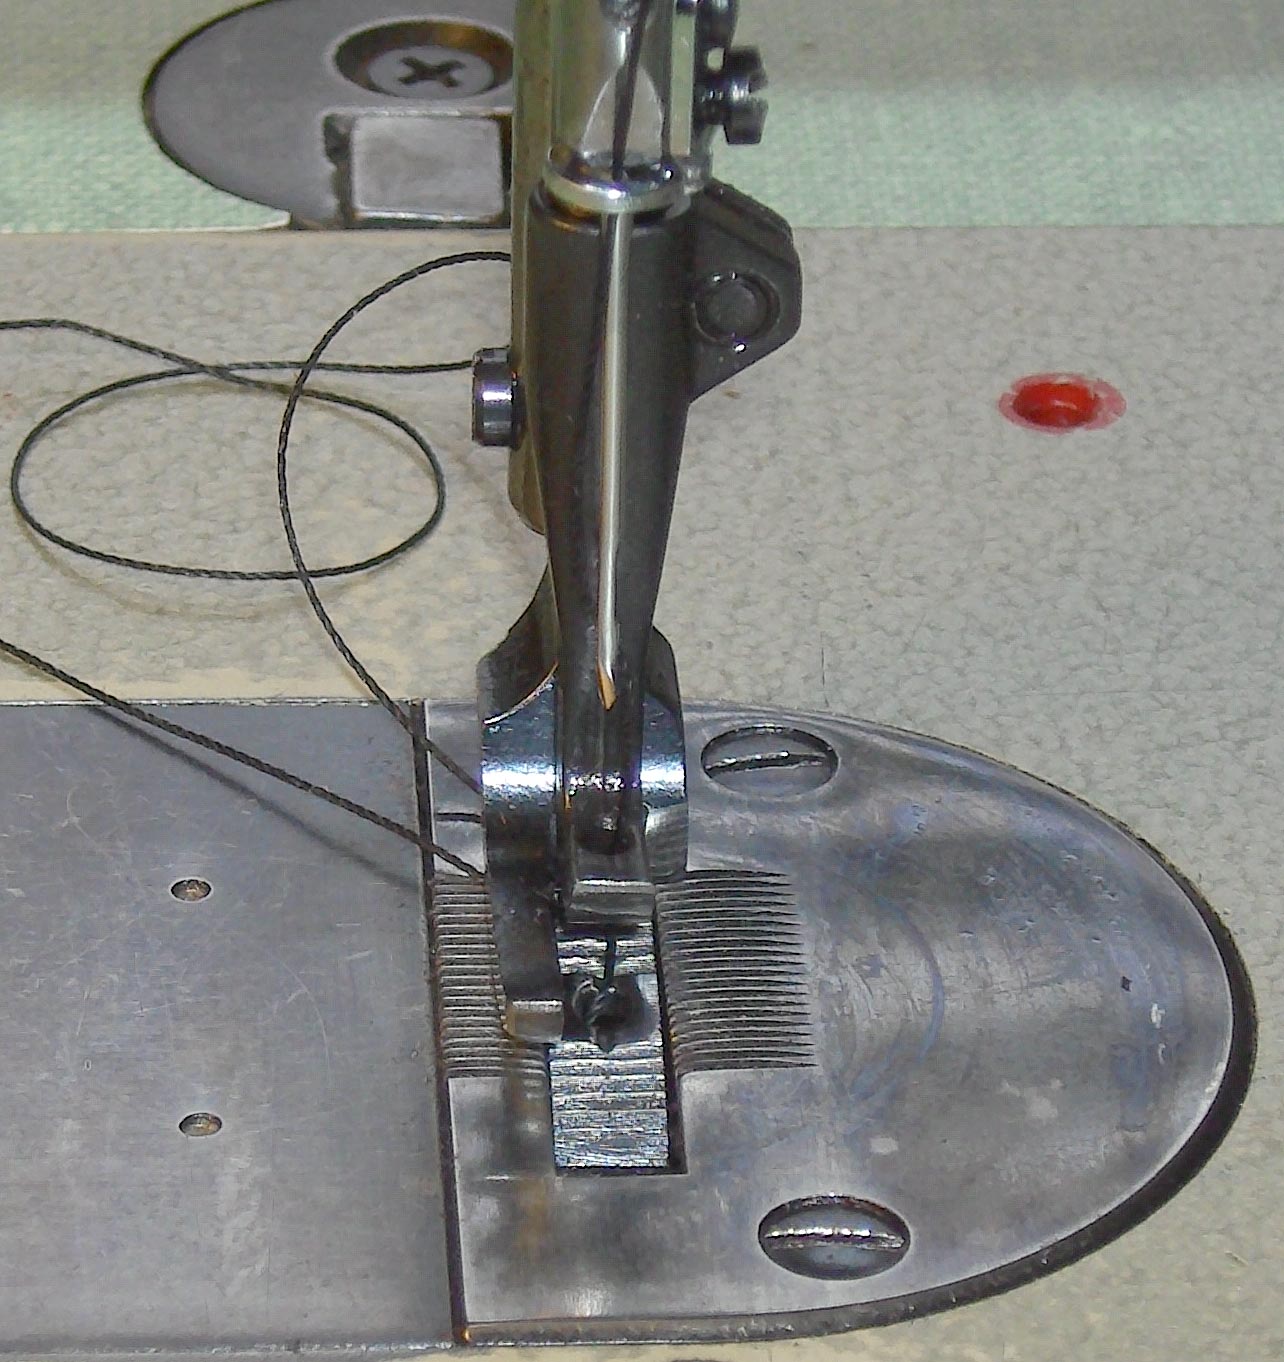
I see a lot of members asking if this or that sewing machine is a walking foot machine. That question is usually asked by people new to industrial sewing machines, who have never owned a walking foot machine before. To help clarify the confusion about what a walking foot looks like I have posted some close up photos of my own National 306N walking foot machine.
You can see that there are two pressor feet on this machine. One is an outer foot, the other is an inner foot. The inner foot has a hole through which the needle protrudes as it goes down, then back up. The inner foot and needle both move together, in time with the single feed dog, which protrudes through a slot in the throat cover plate. While the needle and inner foot are down and moving the work, the outside foot is lifted off the material, allowing it to feed effortlessly. Even multiple layers are fed without losing alignment, because the needle has penetrated all of the layers and pulls them back together, assisted by the inside foot.
Once the needle has reached its full stitch length it begins to withdraw from the material. As the needle begins its ascent the outer foot lowers onto the work, securing it, then the inner foot lifts up and moves forward with the needle, to prepare for the next stitch. This action is referred to as alternating pressor feet, or walking feet.
This type of walking foot mechanism is known as a "compound feed" or "triple feed system." This is because three pieces are involved in moving the material: the needle, the inside foot and the feed dog.
In contrast, a standard sewing machine has but one pressor foot, which remains stationary on top of the material. It always exerts pressure on the work. All of the motion is caused by the feed dog under the work. This can cause multiple layers to be dragged out of alignment, unless the top pressure is reduced to the bare minimum necessary to prevent the material from lifting as the needle withdraws. Should the material lift with the needle there will be skipped stitches.


Thank you, speaking as one of the people new to sewing of any kind I found that very helpfull.
-
Any one know what this machine can do? Is it a walking foot and can it sew 1/4" of veg tanned leather/
-
leatheroo
I figured if other professionals here were nice enough to show how they make some of their items, then I could too. making this stuff was me livelihood for a long time, but I'll still share (unlike most in me biz).
chitin
with the way I attach tails, no loss of durability. you can hang from me floggers. also, I've seen 'em done the way you're talking about and seen the handle break during a hard session. plus it's very hard to get a consistent handle size. I actually used to do them like that (never heard of any of mine breaking) and I'd used electrical tape to do a compressing wrap before doing the handle braid. another problem is when done like that you get a seam that runs down the handle. it's not that noticeable with softer leathers, but something like latigo definitely shows it. also I've noticed the balance tends to vary a lot from flogger to flogger when done that way. when done this way the balance point is about a 1/4" into the top turkshead out from the handle. but let's face it, balance doesn't really mean anything since there's so many different ways to hold a flogger. it's more about what feels right for an individual.
howard
I don't think of the the handle being braided until is done since I suck at round braiding anything more than 4 strands. that's why I came up with the way i do the handle braid. it's much quicker and easier. try it and you'll see what I mean. the only semi-difficult part of it is figuring out how snug to wrap and pull, and you figure that out fairly quickly. plus, an advantage to it is if you have to let go it for some reason it's not gonna unravel itself.
I have never heard of one breaking but am guessing it is possible if the dowel had a weak spot such as a knot. I turn my handles so I do not need to build up the ends, takes more time but I like the effect so it is worth itto me. One thing I noticed is you do not use a hanging strap.
Compleatly agree that way to many do not share. I and working on cores and or bellies for scene whips and will post how I make them after I am finished with the CAD drawings (learning a CAD program as fast as I can).
-
Years ago we used to extend the arms & make them 20" long,we would sell them for tarps & auto upholstery,but nowadays everyone thinks they need reverse(because their neighbor told them to make sure it has it)
I have a real nice one here they are real good for nylon webbing too.
I'd be real happy to find it a good home.
Bob
How thick can the sew? I do not care about reverse as i can barly sew forward. Is it a walking foot machine?
-
I'm wanting to keep using pull the dot snaps on my holsters but have started using a slightly thicker leather that the posts won't fit through. I've been using the .370 (5/16") posts from DOT direct. I am needing to find something that is about 1/8" longer. I've looked all over the web and am having no luck.
Can anyone point me in the right direction? I appreciate the help.
can you show me a picrute of one? I am thinking it may be what i call a double cap rivit, if so there is a place in LA that sels them in longer lenghts. I can fin the name and contact info if it is the same thing. Another idea is Ohio Travel bag.
-
Hello, long time lurker here.. just want to know if there are any leather splitting services being offered near the LA ca area? if not then probably in another state. as i need to be splitting around 3"X12" pieces of leather. thnx in advance for your help.
How thin are you looking to split it (or are you talking about cutting leather to the 3" by 12" not exectly sure what you were asing for.)
if you will need a lot of 3 x 12's you might just get a die made. there is a place called 3 way dye in la. and you can get hides clicked at saore more on wall street.
-
While I was waiting to need enough items from LA to justify a trip I tried out a few different glues I had around. One turned out to be the best glue I have ever worked with for leather. Gorilla glue; after sittting over night I could not seperate the 2 sections of glue period
I gluded together 3 different sets of scrap, hair to hair. meat to meat and meat to hair. In all 3 cases the bond was to tight to pull apart, the leather would tear but the glue would not let go.
I also found a 3rd formulia for barges glue its called BargeSuperStik and has returned to a none water based formula and is marked for industral use only. I will do the same test I did with the gorilla glue (also same test with the Mastes which is what i went after).
-
Barge glue is what i use.
Many thanks, I know a place I can get Masters and will pick up the others when I go to LV in June.
-
One of the problems with living in Cali is we have a lot of "interesting" laws. 1 I just heard about deals with what kind of glues can be sold in CA. I understand that a lot of better glue can be had in other stats for gluing leather. What brand of glue do you use?
once I know what I am looking for I will go to NV or AZ and stock up on the best glue I can find.
-
I use the same thing but add a little bees wax as well and yes cut down on the lard (have heard some folks us crisco).
Try cooking up a batch of plaiting soap to use to lube the roo lace. The formula that they use at David Morgan's shop can be found at http://www.davidmorgan.biz/?p=536. That's basically how I make my plaiting soap, but I use more soap and less lard. I've found that for how tight I plait having too much lard will discolor the points of my whips.
One thing about using Pecards to lube while plaiting on drum stuffed kangaroo is that is can discolor the strands quite a bit if you are using thin lace and pulling tight. I went through a short lived phase of using Pecards to plait with and the result was the 2nd half of my whips were much darker than the first half and definately had a greasy feel.
Louie
-
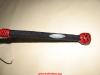
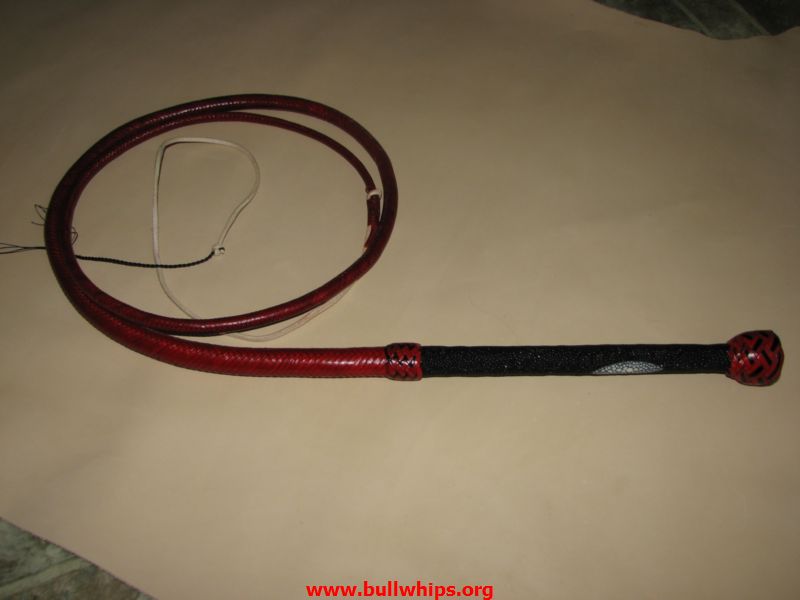
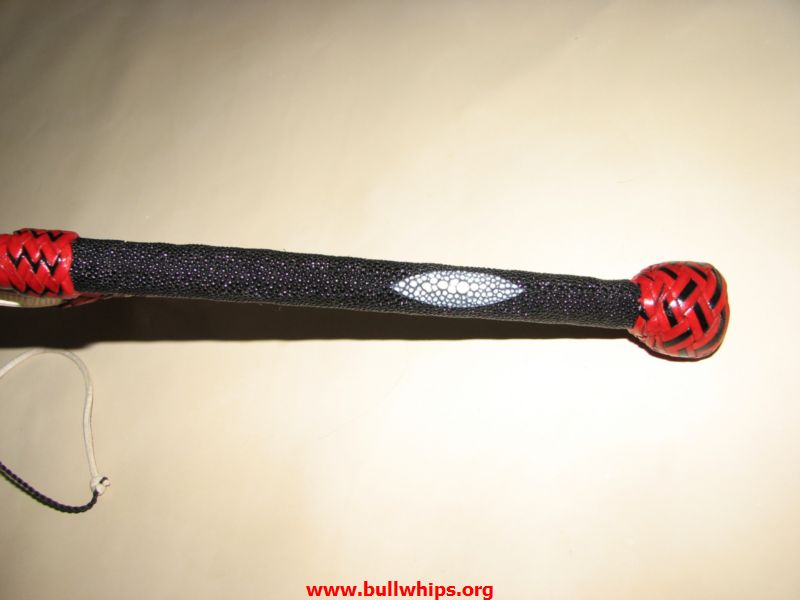
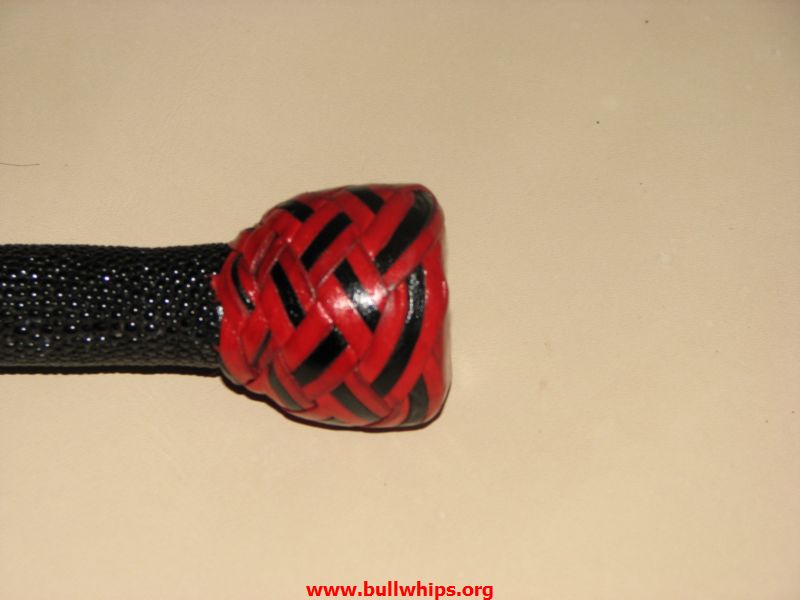
Here's a bullwhip that I finished yesterday.
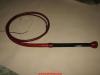
The handle is stingray.
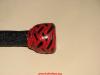
It's got a 20 plait lash that ends in a 10 plait point.
It was a fun project to do!
Louie
Very nice braiding
-
All of those are excellent machines, but some may and really work and do the same things, more or less. Have you considered calling some of the really good dealers who contribute here for some information? A ten minute telephone call can equil days of posting.
Rhank you and yes I have, they simply did not have anything in my price range.
-
This is the makes and models that have s far been recommended to me. It occured to me that having them in a list Might help other new people to sewing not have to ask as many questions as I have been asking. I am attaching it as an excell sheet ao that it is easy to change. Would love any additions or comments on machines that maybe should not be there.
Would like to add the info on how to tell by looking if a machine is a walking foot machine. sooooooo
How can you tell if a machine is a walking foot machine by looking at it?
Sorry it said i was not allowed to upload that type of file. I will gladly send it to anyone who asks and am posting the data I currently have below:
Pfaff 545Juki, 1541Consew 206RB-5, Singer 111W155, Juki LU-562, Juki LU-563, National 306N
Servo motors are great for starting out gently and limiting the top speed but if you run the motor really slow, you'll find it does not have enough torque to plow thru really heavy leather.
3:1 speed reducer will multiply the sewing torque by 3x. That means you can run the machine really slow and still have enough torque.
-
Many Thanks Wiz, that is by far the most informitave post I have seen so far. It seems I was asking the wrong questions. Again thank you very much for the help.
Singer 111W155, Juki LU-562 and LU-563, older Consew 206 models, National 306N, plus various industrial models from Adler, Artisan, Chandler, Pfaff, Seiko and Mitsubishi all are available in walking foot series and will sew 1/4" and have been around for at least 15 years or longer. Generally speaking, the older the machine, the more likely it needs parts and adjustments to sew properly and efficiently. Most of these machines are manually oiled, leaving it up to the operators to maintain them properly. An old machine stored in an outdoor locker or garage will develop rust and lose its oil, making it likely to seize up if run without first lubricating all moving parts and applying anti-seize to rusted parts.
That said, try to find a seller who is still using the machine they are offering to you. Go and watch it sew. Listen for sounds of clunking or grinding. Spin the flywheel to see if it rotates freely, without binding part way through its cycle. Test the motor and clutch. Many old machines are sold with a shot clutch, or one that is sadly out of adjustment.
Test the knee lever to ensure that it raises and lowers the pressor foot without binding. Look at the pressor foot bar and needle bar and make sure they travel in a perfectly straight line, without sideways motion. Make sure those bars are not binding as they move. Look at the thread hole in the takeup lever and see if it has worn almost through from tight thread. Remove the bobbin cover plate and make sure the bobbin case, or shuttle is not chipped or rusted and that it turns or oscillates freely. Watch the top thread as it is picked up by the shuttle point and pulled around the bobbin. It should not get hung up as it feeds around the bobbin and housing. Inspect the feed dogs for wear and chipped teeth. Make sure the thread tension parts are not rusted and allow the thread to be pulled smoothly, but with sufficient tension to make a stitch. You should be able to adjust the top tension from virtually zero, to very tight. Many old machines have worn thread tension parts. Also, make sure that the thread tension disks release tension when you raise the pressor feet with the knee lever. or the hand lifter lever.
If the machine meets all of these tests it may well be worth a couple of hundred bucks. If not, it may cost you as much as you paid for it in replacement parts. Motors alone go for over a hundred dollars, for 1/2 hp clutch motors, and more for servo motors. If you buy a machine that was setup to sew drapes, or cloth garments, it may have a 1/4 hp 1725 rpm motor, which will prove too weak for heavy leather 1/4" thick. If the clutch is shot you won't be able to feather it for slow sewing.
-
What older machines are 1. walking foot and 2. able to sew leather up to1/4".
Mkaes and models would be great so I know what I am looking for.
-
as far as i know......fold the leather around a pc of Nylon cord and have a cording foot on your
sewing machine. then stich stich close to the cord.
then on the other hand try 8-10 oz leather 1/2" wide and wet and pull thru a Rein Rounder
several times this might work.
what is a Rein Rounder? I make Whips and am leaning toward leather cors rather than lead fill bellies (makes a lighter but livelier whip). Always interested in ways to make things easier.
-
how thick of leather can it sew and are parts avliable?

Makeing Leather Round
in How Do I Do That?
Posted · Report reply
What is a rein rounder and where might I find one.