


scoutxlt
-
Content Count
14 -
Joined
-
Last visited
Everything posted by scoutxlt
-
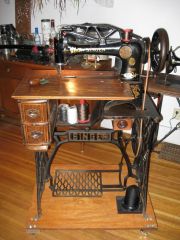
Images of the work table I constructed for my Singer 29-4 "Patcher" made from a Vintage household sewing machine table top and side drawers.
-
-
Finished work table, mounted ready to sew
scoutxlt posted a gallery image in Our Leatherwork Galleries
From the album: Patcher Work Table
I did end up doing a fair amount of work to get this "salvage" table into shape, the plans I was able to acquire from various helpful Patcher owners over the past year did get me heading down the right road; but in the end the layouts were not correct for the 29-4 and I needed to make my own pattern for the cut out. I have to say though in the end my final idea came out better than I could have hoped, I don't know that anyone has come up with a similar approach with the sewing machine drawer & top combo but maybe some out there have... Aside from the 2 carriage bolts & J hardware to mount the table "everything" else I used was salvaged from the original sewing table, even the wood screws and trim pieces I used to make the supports. The entire project cost me less than $5... the original table was a rescue, so in the end it really met my needs in spades. If anyone would like the balance of production information or pointers I'd be happy to help out. Obviously though you have to have the wood working tools & the time... both are invaluable to making a project like this.© © leatherworker.net
-
From the album: Patcher Work Table
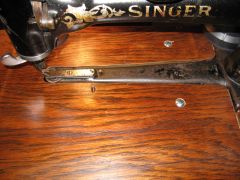
Close-up of finished work table, note the two carriage bolts on the rear of the "wings" of the table.... they lock the top down into the machine studs, and provide the secondary mounting which makes the table solid as a rock...! While still allowing the table top to be removed at a moments notice, to work on shoes & boots... or added back on to work tarps & flat work.© © leatherworker.net
-
From the album: Patcher Work Table
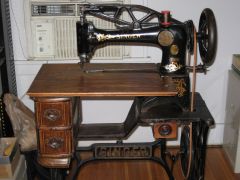
Here is a shot of the first dry fit of the table to the head & base of the 29-4 Patcher... still a bit of work to do but we're getting there finally!© © leatherworker.net
-
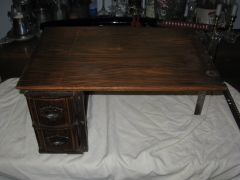
Initial placement & fitting of drawer unit
scoutxlt posted a gallery image in Our Leatherwork Galleries
From the album: Patcher Work Table
Here is an image of the initial fitting & placement of the drawer unit, it will eventually be the "support" for the end of the table and connect the working end with the iron work of the base... how to be yet determined at this point.© © leatherworker.net
-
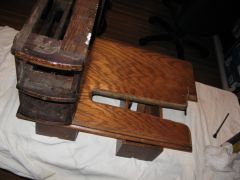
Underside of cut out, showing routed edge
scoutxlt posted a gallery image in Our Leatherwork Galleries
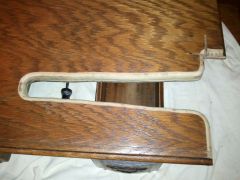
From the album: Patcher Work Table
Here is a shot I took after triple checking my template, redrawing the lines and measuring twice to cut "Once..." I also ran it through my router table to ease the edge, so it would butt up to the machine head snuggly and hopefully connect with the tabs correctly once I got the rest of the base done.© © leatherworker.net
-
From the album: Patcher Work Table
Here is an idea stage pic showing my thought process and taking the idea to task.© © leatherworker.net
-
An example of the "Iron" on my Bench
scoutxlt added images to a gallery album in Our Leatherwork Galleries
Just a few of the machines I've managed to acquire, some in process others pretty well restored and functional. -
-
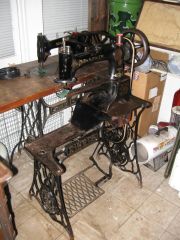
Patcher is now "Mobile..." well sort of....!
scoutxlt posted a gallery image in Our Leatherwork Galleries
From the album: An example of the "Iron" on my Bench
I have finally gotten the platform cut and sized, actually made a pair of them... I also finally selected a set of 2 swivel & 2 locking casters for the Patcher & Stand, although I'm beginning to wonder whether I went a bit under-spec on the weight range.... She doesn't roll as well as I'd hoped... but then again the wheels to be had these days at the "Big Box" shops just don't seem to meet the needs of rigs like this. Also took the added step to bolt the stand to the table too.... so now she is not only bolted properly to the stand, but to the platform too.... With any luck, she won't take another fatal tumble as I suspect she has in the past... given all the broken parts I had to replace, and the gash on her "forehead..." Anyway, sure beats dragging it around.... at least now it is mobile... I also had to make a couple new rails for the drawer I picked up. The old rails were a bit tired to say the least, and probably had a lot to do with why there was "No" drawer with the unit when I picked it up... Vintage Singer drawer, new rails I guess I can't complain. I've done a couple little projects on her and she is clacking away like a champ. Now if my ambitions meet my intentions... maybe I'll find some more interesting stuff to do... For now she has finally made the return to the land of the living... hopefully never to be in the sad state I found her in again.© ©
-
From the album: An example of the "Iron" on my Bench
Yesterday I finally got the Patcher Stand out of the garage, and had it hauled up to the porch where I performed the all important "Marriage" of the two parts. Only for the first time in many years no doubt, the head is now actually "Bolted" to the stand. With any luck the same course of events that caused her to topple over and damage all those cast parts so critical to her funtion.... will not occur again. I would like to note that yet again to Singers own specifications... the hardware for this procedure can not be had "anywhere" other than from a specialty Singer supplier. I searched high and low for the proper threaded bolts for this mounting, once I extracted the broken shanks embedded in the legs of the head. The tpi for the bolt is an "Odd" one and yet again Bob, in OH was on the money with his item and the bolts I purchased from him worked like charm. I added a star washer and a flat to cover the large diameter bore hole in the stand, and away she went. A good oiled up rag though the Iron and a bit of lube on the pinion and treadle... and she treadles like the wind. Not sure whether the hand crank would really compare... but for detailed work, I suppose it does... If your just straight line stitching and what not, the treadle is the way to go... But for one at a time stitches, I can see hand cranking of the wheel all be it a heavy one at that does have its merits. I've got projects lined up... frankly for the past ten plus years for this little honey... Now I just have to get them all ready and have at it.© $copy
-
From the album: An example of the "Iron" on my Bench
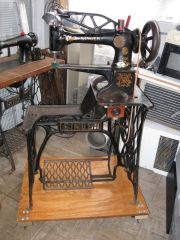
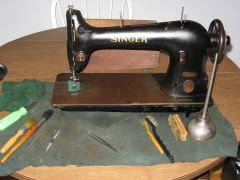
Well here is my latest aqusition.... a Singer Industrial 31-15, born on Aug 5, 1920.... or thereabouts, it came on a treadle stand industrial table with the full complement of "Singer" motor and clutch-in actuation, although sadly the entire "Treadle" mechanism was missing... The only part present was the "Stand." She was quite a mess having been stored in an old city basement.... thankfully she was well oiled over the years of use, and didn't suffer the indignity of becoming a complete rusted hulk. The foot-bed was a bit rough though... nothing a bit of steel wool and oil could not handle though. Just got done going through the head last night... The machine came with a whole pile of feet and accessories... now I've just got to learn how to use them all... I've seen a roller foot though I think I'm going to pick up, and watched a YouTube video the other day about making leather slippers, and they were using the very roller foot I've been considering purchasing for another of my Industrial machines... but now will use on this 31-15. Sure looks like they make handling leather and other types of materials like that much easier... A walking foot machine with all the bells and whistles is just way out of my price range, and further taking into account the fact that I'm not using these machines to earn a living, just as a "Hobby" and to handle household repairs, I would not even consider the out-lay... These "Old School" machines do what repairs I need to handle quite well... As with the Patcher, once I get back out to my Garage... and reassemble the machines, I'll post a couple pics of the completed project... Maybe then I'll post some of my "Repairs" too. Although they surely are not "Pretty" nor I would say worthy of any sort of "Best Of" rating... more a Frankenstein Patch-em Up Job... but hey, it works... not pretty, but it works....© ©
-
Repair Parts Installed, Patcher On Line...
scoutxlt commented on scoutxlt's gallery image in Our Leatherwork Galleries
 I've actually got the full stand too... and Bob actually managed to locate an Original Drawer, though I'm under no illusions as to the rarity of them, and consider that a fortunate find indeed. I'm still in the process of getting it all back together, and with this big snow storm this past week... my Stand is buried out in my Garage, which remains inaccessible for the present... at least until the snow melts a bit, or I get my Son to dig it out... [detached two car garage, used for my 3 season shop...] My next project for it will be to locate a set of plans for an "extension table" and build one... I've seen some images of them around on the Internet, and on the auction sites and figure I can make one for something less than they are asking for a shinny oak plank... I just would like to work off a set of plans, why reinvent the wheel as they say... I do plan on posting a couple more pics of it as I get the Patcher completed.... but I'm glad to hear there are others out there using this venerable Patcher. I've been looking for one for about a year, and finally came across one I could afford on Craig's List... and while it needed some TLC, fortunately I was able to get it up and running without "Too Much" pain... Good Luck to you with your Patcher...
 -
Repair Parts Installed, Patcher On Line...
scoutxlt commented on scoutxlt's gallery image in Our Leatherwork Galleries
It is Bob Kovar, from Toledo OH... he is a member of this Forum, "sewmun" is his ID.... he has a Toll Free number posted in all his posts, and elsewhere through out the Forum... so I don't think it would be out of line to list it here... (866)362-7397 M-F usual business hours, Eastern Standard Time... (OH) I can't say whether or not he has your exact part... but he did have all the "Major" parts that I required for my re-build, including day to day items like; needles, bobbins, thread and he was able to answer my questions too.... So he may have that spring you need, or may know where to get one.... I've found him to be "Very" helpful, and when all others failed me... he had the hard to locate parts that I needed "Instock..." and shipped them out promptly... So I would highly recommend him, for the A++ service I've received. I'll also add that I have NO vested interest in his Company... [i've noted that appears to be a concern elsewhere in this forum... so I'll add that statement in lieu of the fact.] -
I've been debating the very same connundrum... I've recently completed a complete rebuild of a 1901 vintage 29-4, with the help of Bob's Advice and Parts [Thankx!] and presently have been trying to decide whether or not to re-paint. My machine similar to yours [runningwithsissors] was in need of some serious TLC, after not having been secured to the stand... it therefore I suspect took a "Tumble" and broke some number of the cast parts... Though thankfully only replaceable parts, while the actual head only suffered a number of dings and nicks to the finish... At any-rate, it is up and running at this point and I have been considering the very same situation... Repaint or No... I think for my purposes I'm going to leave it "Original" and just oil the machine up and keep it so.... I've got a bit of surface rust on the backside of the head, since I further suspect it was stored in a not so dry barn after its little tumble.... Which was quite evident when I rescued it... I've posted a couple pics of my 29-4, and will post another one or two once I get the head remounted to the base and finish the "restoration...." The base it is currently buried out in my Garage, and not likely to be accessible for a couple weeks or until some of this new snow melts... But they don't need to look like the prettiest girl at the dance to knock out some repairs.... I've actually already completed a pair of moccasin sole replacements with mine... But as Bob was suggesting, if your going to be doing a full over-haul and then re-selling the machine... having it look the part will doubtless get more action than leaving it in the rough.... Although I've been watching them for some time on the auction sites, and note they seem to hold their value quite well.... pretty'd up or no, as long as they are in working order... Though I would seriously reconsider that decision myself, if I was able to get a complete set of repro decals to return it to its former state... Enjoy your machine... I know that I'm already putting mine through its paces, learning the ins and outs of it... and thoroughly enjoying my "new" Patcher, which was a Craig's List Rescue and a fairly reasonable one at that...
-
Repair Parts Installed, Patcher On Line...
scoutxlt posted a gallery image in Our Leatherwork Galleries
From the album: An example of the "Iron" on my Bench
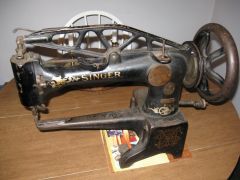
Well the new parts have been installed.... they make the world of difference. I was trying to figure out earlier how the presser foot moved the work, and with the broken parts I had originally, that was "Impossible" as I can see now. The ring around the lower head, not sure of the proper term for it... it "Critical" to the proper function of the machine. Once the two parts I ordered from Bob arrived today, and I got them installed... The machine was running smoothly and efficiently. My Thanks to Bob in Toledo OH, for his assistance with the parts and taking the time to make sure I got all the items I need for the Patcher....© ©
-
From the album: An example of the "Iron" on my Bench
The latest aquisition, a 1901 Singer 29-4... the bolts holding it to the bench were all sheered off and the resulting tumble it took is what I suspect "Broke" all the cast parts.... Thankfully the machine its self did not get any perminant damage. Just numerous parts in the head, which I was able to replace with the help of "Bob" from Toledo, OH.... A big thanks goes out to him for all of his assistance! In the next week or so this machine ought to be back in the land of the living.... she is a bit under the weather right now. She just came in from the 'Cold...' having spend the past number of years no doubt resigned to the "Barn" from what I could tell when I rescued her....© ©