


Aggiebraider
-
Posts
334 -
Joined
-
Last visited
Content Type
Profiles
Forums
Events
Blogs
Gallery
Store
Everything posted by Aggiebraider
-
I would say that the option C would be best. That will most likely be your most secure option and thats how I do any terminal pineapple knot to prevent it from being pulled off. I think this will be the strongest as well if they are actually going to be used. CW
-

Trying To Make Design A Stitching Pony
Aggiebraider replied to bkingery's topic in How Do I Do That?
If you are really set on making one, by all means, but we bought a bench mount stitching pony from Bob Douglass for my grandfather and they are REALLY nice. The jaws arent really big, but they are really well made and are nice wood as well. They are really affordable as well, I think we paid $75 for his. I plan to order one this year for myself. CW -
First, how thick is the leather you are trying to sew? Secondly, are you waxing your awl before you try and pierce the leather? If not, try using beeswax and just stab the awl into it as far as you feel necessary. This will allow the awl to slide through the leather as it pierces it and not grab. Then just rewax as needed. Strength could be an issue, no offense as I have no idea how strong you are. I am a very large guy, and sometimes have trouble getting my awl through really thick stuff. The leather quality or moisture content could also be the problem. If the leather is really dry, you might not completely fix the problem with just wax. You could also try casing the leather prior to sewing. Most projects require this and so once you get to sewing it together it should be wet enough, but since you are using scraps you may have not tried that. Hope this helps, CW
-
LOL I guess I should have said that they are for her horse, not her directly lol. I really appreciate that Bevan. At least the 6 year drought (or however long it was) is over with! Stay dry! CW
-
Thanks for the compliments everyone! Bevan, I hope youre staying dry down there! I saw something on the news this morning about all the flooding they are having in Aussieland, but wasnt sure if it was near you or not. Hope all is well. CW
-
So I completely forgot to post this, but I found some interesting information over Christmas break when I was home at my grandfathers. He bought the new Ortega book at the Congress this year and in reading through it he showed me a set of romal reins that were made I think in the 40s that were made completely out of deer rawhide, buttons and all. They looked to be perfectly fine and were actually a very nice set, especially for how old they were. They did look to be used at one point, and I am not sure who owns them now or if they are in a museum. I think most people (myself included) relate the stretch associated with deerskin to what would also be seen in deer rawhide. I am not sure as I have never tried it, but the stretch may get taken out at least to a little extent by making it into rawhide rather than brain tanning it to turn it into conventional deerskin. Having seen that, I wouldnt be afraid to try it if you have experience making rawhide from cows. Have a good one, CW
-
Hey Brain, Thanks for the kind words, and yes the twist is sure a pain in the butt to prevent. I tried my best to get my strands as adjusted as I could and then just said the heck with it, this is my first one lol. Once I get back to Texas I am planning on making a few cores with what little rawhide I have and hopefully can get this problem fixed with my next few. Have a good one, CW
-
Hey Little, Im not really sure which you are asking about, but I attached two different quick change headstalls that I think you might be thinking of. The first has a metal loop that is attached to the back portion of the cheek, pulled through a slit in the front side of the loop, and the strap from where the buckle attaches to the cheek is slid through. I think this style works fairly well, but outside of an arena, I wouldnt really trust it. I would be afraid something would hang on the strap and pull it from the loop, dropping the bit from the headstall. The second has a buckle which looks to be attached to the cheek piece by putting the higher buckle onto a long strap that can go all the way down through the bit and up into the lower buckle. The lower buckle may be attached directly to this long strap by just taking a small piece of leather, running it through the back of the buckle and sewing it to the long strap. I hope this all makes sense. Sorry I dont have any photos to explain exactly what I mean, but I havent made any of these since I dont really like them. If you are making them for a customer, then sure, but for my own preference, if I have more bits than headstalls, I just make another headstall lol. I much prefer to have a headstall and reins for each bit I own. That way I just pick it up and go, but thats just me. If you have any other questions, I will do my best to help. Have a good one, CW
-
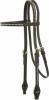
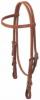
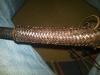
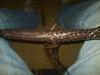
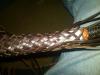
Howdy Everyone, I hope that everyone had a great holiday season this year and I just wanted to post some pics of a couple of things I finished over Christmas break. The first is a set of rein connectors I made for my brother's girlfriend. I am pleased with how they turned out, I used 3/32" lace for the buttons and I think they turned out well. The second and third pics are a noseband for a tiedown for my brother to use on his roping horses. I wanted to try one, because I had never seen a toedown with a noseband like this and I think it turned out all right. Im not happy with the twist in the nose button, but since this is my first one, I think its ok and it was good to finally make one. The other knots turned out all right and cover pretty well, but there are always areas to improve. The braiding on the cheeks is 16 strand. I know the noseband looks longer on the right side than the left, but I promise you, I have measured it 100 times if I measured it once and its even lol. For some reason the interweaves arent directly in the center even though I counted the number of parts and made sure my center row was set in the middle, number wise. I think maybe one side of the nose button has the passes pulled in closer together, making it all closer to the left. Critiques are always welcomed with further instruction =). Sorry for the terrible pics, I had to use my phone. Have a good one, CW

-
Miguel, To say that you have invented braids and knots is quite arrogant if you ask me. Mathematically, there are only so many patterns, knots, and designs that we can accomplish as braiders, and if you are doing it now, it has probably been done by someone else somewhere over the years. Dont act like you are the only one to ever think up this stuff. As far as copying goes, I feel that it is the most sincere form of flattery as far as pattern work goes. I have seen a few bosals on here and other places that I want to do (interweave patterns and all) because I feel that they are really nice and look beautiful. Unless you go through the process to COPYWRITE or PATENT something, shut your mouth. You hold no rights to it. When someone comes to us as a client, rarely do they ever say "I want you to make me something because of that pattern you did right there". They come to us because they feel our braiding technique (including everything that goes with that such as lace preperation, consistency in plaits, etc.) is better than either they could do themselves, or better than other braiders. Brian went above and beyond in posting your work and bringing you to this community and the comments you have provided (even if English isnt your first language) have shown nothing but arrogance and disdain for those of us trying to learn from you and share in your knowledge. CW
-
Yeah you can try that, but I wouldnt try splitting it with absolutely no moisture in it as it may be too stiff to pull through your splitter. If you want to try and split it when its wet, you can use a planer blade at a 90 degree angle. I have seen some pretty inexpensive jigs that hold a planer blade at the desired thickness and just scrapes the flesh side off and works well when the lace is pretty wet. CW
-
I received the dvd with Bill Dorrance called 4 Strands of Rawhide for christmas, and after watching it, I feel like I can comment without ever having made a honda lol. The way he shows in the dvd is to use a series of wedges that he hand cut, two of which are round on one side and the rest are flat. Bill used 4 different wedges together and fit the two with the rounded edges on the portions of the inside of the honda you would want to be rounded. The other two were put in between the first two in alternating directions so that it basically made a block with rounded ends. By using wedges, you can put them in one at a time, rather than trying to shove a whole block in at once. Once they are inserted, you can either let it dry normally, or I read somewhere on here that some people boil their hondas with the wedges inside to allow for more water to be in the strands, and then shrink uniformly around the wedges. I think it also said this somewhat hardens the hondas a bit. Hope this helps, CW
-
Hey Alan, Thanks for the help, I figured after I tried it the first time that I should match the width of the ring knots with the width of the middle. I tried this time by stacking two 3 pass ring knots on top of each other and i think it will work better. I dont have any leather handy to just make a ring with it and skive the ends to make it smooth and round. Im trying to get motivated enough this evening to start it over. We will see how it turns out tonight I might post more pics tomorrow. Have a good one, CW
-
Yes you do. Most people bevel the GRAIN side edges with RAWHIDE and the FLESH side edges on leather or kangaroo. Some people do opposite edges for certain applications, but for lacing with rawhide, you should do the GRAIN SIDE CW
-
Thanks Bevan, I think part of the problem was the facet that I took the string off too soon. I was planning on ending the strands on the horizontal line rather than the vertical like you said in order to eliminate any bulges in the center. As this is the first nose button I have done, Im not upset that I had to take it off and start over, just happy for the ability to understand how to fix it. Thanks all for the advice, CW
-
To answer your questions, yes you need to wet it, and not it will not ruin it if done correctly. You need to case rawhide similarly to the way leather is cased for tooling so that proper tightness can be achieved in your lacing or braiding and will allow it to shrink a little as it dries. There are lots of different ways to achieve this, but some more common techniques are reviewed in the braiding section of this forum. Look for "casing" or "tempering" rawhide. One very important thing about using rawhide is that you make sure you bevel the grain or hair side edges as when the edges of rawhide dry, they actually can become sharp enough to cut you. Unbeveled rawhide is very unattractive and looks cheap to the discerning client. Have you checked on kangaroo? Im pretty sure you can get it in white. You might have to buy a whole hide from someone like Hardtke's and then have someone else cut your lace if you are unable to......I have a lace cutter and may be convinced to sell my services lol. Hope this helps, CW
-
Thanks guys, I was already planning on redoing this when I posted it, just havent had time to take it all off. I already have Gail's books, have read Alan's tutorial, and this was a problem I hadnt seen discussed anywhere, but had an idea as to what the problem was. Roo, I agree I think I just need to use a larger foundation knot or a piece of leather like Alan uses. Hope everyone is having a fun Christmas, CW
-
Not to be argumentative Miguel, bud I did do a 2 pass Spanish RIng knot. I think it looks so small and flat, because it is lol I used 1/8" lace for it and think I should have used something larger. Thanks though, CW
-
I am planning on going to this. If anyone else is going and wants to share a hotel room let me know. Megabit, do we need to contact Mehl or Nate to sign up? Oh and thanks so much for passing this info on, I am really looking forward to participating in this great opportunity. CW
-
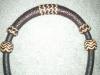
Howdy Everyone, So with the weather colder I have actually found some time to get some braiding done, and have been trying to finish a noseband for a tiedown for a Christmas present. Well as the title says, I am having serious issues with the nose button. Attached are photos, please take a look and see if you can give me some advice. I had everything laid out really well, and had troubles when I started crowning the strands over the ring knots at each end. I think the Spanish Ring knots I used are too small. What do yall use for the ends? The first picture I am pretty happy with the spacing, but as you go towards the right and the third picture, you can see there is too much space out toward the end. How do you determine how many parts you need to do for a nose button? I made this one 8", so its a little smaller than most. Any help and advice on this is greatly appreciated. I think I have a way in my head to fix to spacing issue, but the ends popping off made me really frustrated. Thanks and happy holidays, CW
-
I know Bob Beard makes some pebble backgrounders that look really nice but are expensive. I talked to Clay Miller about making some and he seemed interested, just havent gotten them ordered. Not sure if Tandy carries any or not.
-
HI Chris, I am interested in you rein rounder, the overstitch wheels (depending on what size and their condition), and the Versa Groover. If you could send me pics of the overstitch wheels with the sizes and prices for these items, I would really appreciate it. CW
-
Hey Annette, Flat braiding with a conway buckle was the first way that I thought about doing this, but flat braided paracord has a few problems. I made about 10 pairs of split reins when I started braiding and they all had about 3/4 of the length of the reins done in flat 8 strand braids. I will never make split reins out of paracord (flat braided) again. They feel terrible. There isnt enough weight and they "stretch" alot. The reason I said "stretch" is because there is not way to get the braids tight enough to take all of the slack out between the individual strands, and the braid always seems to want to bungy back and forth. This was using the traditional 8 strand U1O1U1O1U1O1U1 pattern from left to right. If you did a braid with 4 strands on each side and go U1O1U1 with the left strand then take the right most strand and go U1O1U1O1, you will build a more "Gaucho" patterned braid that may not have this bungy effect. As far as tiedowns go, and I feel that I am somewhat knowledgable in the world of tiedowns as I have team roped and calf roped since I was a kid, you dont want a tiedown with a lot of spring to it. They are intended to give your horse something to brace against as they stop. NOT TO BE USED FOR HEAD SET!!!!! and should be adjusted so that when your horse's head is in the neutral position, you can touch the tiedown to their chest. This is evident when you run a tiedown through a keeper on your breast collar like most suggest. While you may say yes leather and biothane tiedowns will stretch some over their lifetime, they wont have the spongy properties you would see in flat braided tiedowns. If after reading through all of this rambling, your friend still wants you to make one, knock yourself out. I just wanted to explain to you why I would never use a flat braided tiedown out of paracord and would be hard pressed to even make one for someone. If she wants you to make her something fancy out of paracord, you might think about making a noseband for her tiedown. You can make it using the same process of a bosal and use either a normal ring through the center of the heel knot or they make a ring that has two circles on each side of a large ring that is at a 90 degree angle to the other smaller rings. Pretty confusing I know, I cant find a picture and I dont think they have a specific name. If you have ever seen the nosebands that have piggin strings for the body, they use these rings. I am actually making one such noseband for a tiedown for my brother for christmas, and once I get it finished I will be sure to post some photos. Hope this helps, CW
-
Very nice braiding! Are all of the pineapple knots on the cheeks loose? I was trying to figure out how you would adjust the length of the cheek pieces and that was the only way I could figure it worked. Also, how do you attach your tassles? I was trying to do this on a set of mecate reins and it didnt work out the way I tried, so I am still trying to figure out the best way to achieve this. Looks great, CW
-
How To Finish Off 4 Strand Round Braid
Aggiebraider replied to walletman's topic in How Do I Do That?
It would all depend on how big you wanted the finished diameter and if you were wanting to use a core. I think 1/8" lace that is beveled makes a very nice 4 strand braid with no core. It pulls together nicely and ends up fairly thin. That size would probably work best for this application. CW


