jpsjewel
Members-
Content Count
11 -
Joined
-
Last visited
About jpsjewel
-
Rank
Member
LW Info
-
Leatherwork Specialty
None at this time
-
Interested in learning about
Basic techniques
-
How did you find leatherworker.net?
Google
-
Thanks all for the responses. Do you apply these the same as paints or dyes specifically made for leather or is it a different process?
-
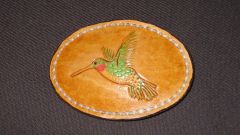
I am trying to create a hummingbird belt buckle and want to get an iridescent look to some of the colors to make it look more lifelike. So far, the colors I've tried are bright but not iridescent. Does anyone have any thoughts on how I can achieve this look?
-
Front Pocket - Lcp
jpsjewel replied to JeffGC's topic in Gun Holsters, Rifle Slings and Knife Sheathes
Very nice! I'm still fine tuning a couple of holsters I've made for Elsie but hadn't thought about adding the thumb tab. Looks like I'll be making at least one more. -
Wallet Holster Questions
jpsjewel replied to jpsjewel's topic in Gun Holsters, Rifle Slings and Knife Sheathes
Thanks! It's for the Ruger .380 so I'll let your previous experience guide me. -
Wallet Holster Questions
jpsjewel replied to jpsjewel's topic in Gun Holsters, Rifle Slings and Knife Sheathes
Thanks for the info. The trigger will be completely covered so the gun would have to be pulled to shoot. But, it's good to know what the laws are. -
I'm planning on making a wallet holster but have some design questions: My plan is to have a flat piece of leather as a backing to give it the "wallet" shape and then a wet formed piece in the front to hold the pistol. I want to use a fairly thin piece for the back panel so it isn't so thick when it's in my pocket. But I'm concerned that if I build the whole thing and try to wet form the front, the back panel will warp out of shape. I'm not sure if you can wet form a single piece of leather (I'm new to this and have only wet formed one holster after I sewed it)). But I assumed that you'd have to have two pieces sewn together to get the leather stretched properly and help hold the form while it's drying. Any thoughts/suggestions on the best way to proceed?
-
Thanks for the link! That's exactly what I was looking for.
-
I have already read that and that actually created more questions which is why I posted. For example he mentions pulling the leather through water while I use a sponge. That's why I asked the question about sponges. I would think that the leather would be much wetter immersing it in water even for a second or two than using a sponge. So now I'm not sure if I'm even wetting it enough from the get-go. But I wanted to make sure I didn't get it too wet and damage the piece even before I get started. That's also why I mentioned using 4 oz. leather. I was thinking his method would work on thicker pieces but thought it was too much for such a thin piece of leather.
-
I'm having trouble determining when my leather is cased properly and how often to wet it. I currently use a damp sponge and then place it in a plastic bag for 10 - 15 minutes before I start tooling. When I'm done (30 to 45 minutes) with my "session" I put the leather back in the plastic bag. I'm currently using 4 oz. leather. If I return the next day to continue working, would I need to re-case it or will the plastic bag keep the moisture content high enough? What's the best indicator that the leather has dried out too much and must be cased again? Is using a sponge a good idea or is there a better way to case 4 oz. leather? Thanks in advance for your replies!

