


Big O
-
Content Count
321 -
Joined
-
Last visited
Posts posted by Big O
-
-

I made a couple so far, I really need to take a better pics..
This is your world. We're just living in it.
-
I am squeezing and getting a slight hand twist down and to the right.
Check to see if you've got too much finger on the trigger, if right-handed. Ideally, the pad of your finger should fall across the center of the trigger face, rather than the tip or the crease.
Also, THINK "press" rather than "squeeze". Sounds silly. Works.
-
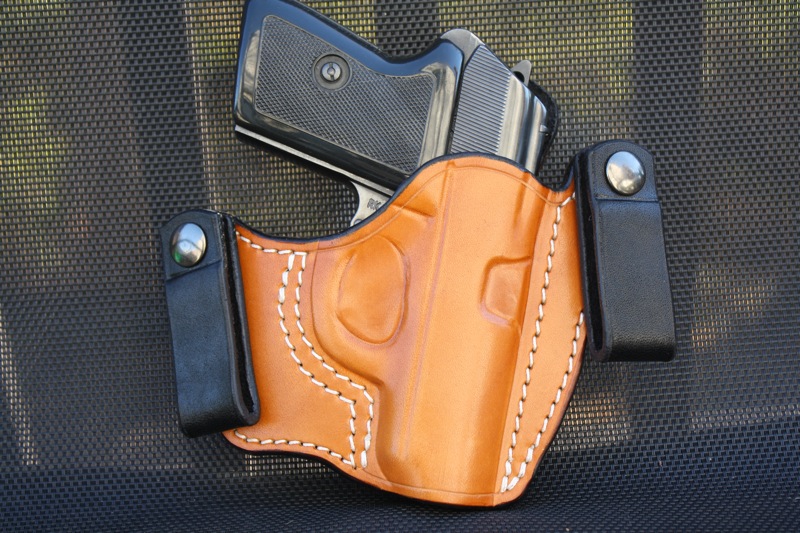
Nice looking holsters, Big-O. I especially like the shape and two-tone on the smaller one :-)
As far as the dual carry thing (strongside/crossdraw) I wonder if you could use another layer for the strongside beltloop, and that way the two carry options wouldn't be going under the same piece. So you'd be able to stitch along the tunnel for the crossdraw carry , making it more stable. It would make it a bit fatter on the backside though... Does that make sense? I was just thinking about how to stablize it a bit and still keep both wearing options.
Keep up the good work, bud!
Nooj
Thanks!!!!
A bit......complicated, but that might be just the ticket!
-
Then don't make it. Have some standards when it comes to safety. It's not a bad thing to turn someone down because you feel their request is unsafe and potentially dangerous/deadly to themselves or others. You might prevent someone from getting hurt and your peers will respect you more for it. If it's something that you feel you must make, then spend time to refine the pattern to get things just right.
With that, I'm giving you constructive criticism - it's nothing personal. You're saying that this holster, that someone is using with a loaded firearm, is meant to be hanging on the belt by that 1 little piece of leather and nothing else. This is one of the most reckless things I've seen regarding holster designs. That holster with it's loaded cargo is going to be flopping all over the place. Hopefully the user doesn't need to run or do anything else physical while wearing it.
You're right. While I did test the holster out, and it seemed perfectly stable in both positions, that might well change with time and wear.
I apologize for taking it personally, and getting snippy.
This is a design I've been struggling with. I made one previously, for a Taurus Public Defender, that was more stable and secure, but also monstrously large. It might just not be practical in anything other than a pancake design.
Any ideas, anyone?
-
You should consider that avenger pattern and make changes as necessary. If your customer has a gun belt, I don't see how he/she will wear it using the lower slot and it also creates an unnecessary point of failure, in my opinion.
The crossdraw position does not use the belt slot, as your photoshop clearly shows. Hence my earlier comment that it's not as stable in that position.
Look, a "jack of all trades" is, of necessity, a master of none. This customer wanted a multi-tool. Should I have sold him pliers, AND two screwdrivers, AND a file, AND a saw, AND a knife, instead?
-
What hardware did you use in this holster to attach the belt loops to the body of the holster? Pull-the-dot snaps? Line 24 snaps? Chicago screws?
-
Dick, I might just try the airbrush route. I've got two airbrushes left over from my custom truck obsession days.
Yes, I brushed the finish on.
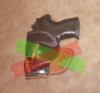
The lower cutout in the Beretta holster is a second belt channel. The holster may be worn either strong side or crossdraw. More stable in the former than the latter, which is what I explained to the customer.
-
The guy I made it for liked the western design, so I started out with the intent to make it much like a western holster:

I thought it fit quite well at that point. But he wanted it molded, so I molded it before applying the finish. I was a bit surprised at how much "open space" there was after that.
-
For a first try, that looks GREAT!
I'd want the stitch lines a little closer to the outline of the pistol, but that's something I've wrestled with a lot myself.
There's something in the finish that looks odd in the first picture. Could be gouges from boning, could be hairs from the brush you used to apply the finish. Hard to see.
I really really REALLY like the concentric stitching.
-
very nice Big O!! what are they finished with?
Tony
Resolene and water. Somewhere in the general vicinity of 50/50, as several here have recommended.
I'd love to find something that has about HALF the shine.
very niceeee! and hey if ya dont want that revolver and the holster i'll take em off your hands for ya
 lol seriously, great job i like em
LoL! Thanks, but I don't think their ACTUAL owner would have appreciated that.....
-
-
Nice!
Where'd you get the hardware that holds the flap closed? Looks like the same kind of setup the military used for the old leather flap holsters.
-
Doesn't matter to me what others do.
It's not for me. I've spent my entire adult life as a soldier or a cop.
....which means it's a major plus to leave this world with no more holes in your body than you came into it with.....
-
I'd be asking myself, first of all, if such a compact pistol was worth wearing all that leather for.
And, secondly, if I would be willing to wear a jacket all the time.
Beyond that, I second Lobo's opinion.
-
Oh, why the hell not?
Add me, please.
-
FWIW: The first thing that strikes me is that you are trying to make a rig that is concealable in your 'normal' attire. One of the first things you learn when you get serious about concealed carry is that you "dress to conceal"....not the other way around. A sweater or 'hoody' most likely won't fit the bill for a Model 29. It's large, and not too easily concealed with a belt holster....unless you make some adjustment to your attire. I personally carry a 3" Model 24 (the 24 and 29 are both 'N' framed) in a leather 'carry' vest with an inside pocket holster, this during the wet and cold weather. In warm weather it's a different (smaller) gun......if carrying concealed. Mike
Agreed.
I carry full-sized pistols, mostly OWB, and, as I like to put it, I am willing to commit all manner of fashion crimes to facilitate this.
High-ride is a good idea, but it has its limitations. I think it'll allow you to use a cover garment that's simply loose, instead of loose AND long.
-
-
I wouldn't think it'd be much more difficult. You'd have to be careful about more area of stitching, to be sure it isn't too tight anywhere, but, really, as long as it's tight ENOUGH in just two spots, there shouldn't be a problem.
One thing I might consider with a barrel that long is speed of presentation, if he's using it for competition or even hunting. (Pretty sure combat use is out of the equation with a barrel that long - also, is that a .41 Magnum revolver, or a S&W MODEL 41, which IIRC is a .22?)
With long barrels, you might consider some sort of cutout or split to reduce leather-clearing time. Along the front edge of the holster if it's a strongside, along the rear edge if it's a shoulder holster or vertical crossdraw. Front crossdraw should be fine as it is.
Also, if it's the big revolver, it's gonna be HEAVY, so I'd make a large, sturdy belt attachment.
Might even consider making a reinforced belt, or suggesting that he use one, anyway.
-
Can you borrow the gun?
-
Pigskin?
-
I'd think it'd be PLENTY stable with just the tunnel, and not the rear slot.
....for anything short of a 40-rd AK mag.....
Looks flat-out GORGEOUS, though, just like everything you make.
-
It's not at all NSFW. I'll take some pics tonight and post at least one here.
I'd do it now, but I mostly host my pics on my Facebook page, and all my friends can see them, and this is intended as a suprise.....
-
I did this for a Halloween costume. I'm dressing up as Jayne Cobb from Firefly/Serenity. Since I don't own a LeMat, but want to keep to the western flavor of the show, I looked over the "Cowboy Holster Tutorial" and made this:

-
I do mine just a little bit differently. I make mostly wraparound holsters (as shown in that tutorial), rather than pancake holsters. I'm still new at this, but already I've made quite a number of mistakes, which I've learned* from.
Here is my process at this point:
1. I do not yet own any blue guns, so I use the real thing. Unload it. Make sure it's unloaded. Make double sure it's unloaded.
2. Take a manila file folder and open it up on the work surface, with the crease running straight away from you. Take a pen or pencil and fill in the crease to make it more visible.
3. Check again to make sure the pistol is unloaded. Place the pistol upside-down, centered on the crease, with the center of each sight resting on the crease. Trace the outline of the slide.
4. Roll the pistol over to one side and trace its outline. Also trace as much of the inside of the trigger guard as you can, to mark the trigger location. Carefully roll the pistol over to the OTHER side, and repeat.
5. Measure the width of your first tracing, the outline of the slide. Take half that distance, and add to it the measurement of the thickness of the leather you're using. Using a ruler and a pen or pencil, plot a series of points on the folder that distance away from the outline of the bottom of the slide and trigger guard. If the slide of the pistol narrows at the front end, as most do, add about 1/16th of an inch for good measure so you don't need both hands, both feet, a pry bar and an anvil to get the pistol into the holster for the molding later (lesson learned*). Connect the dots using your pen and pencil. This is your stitch line.
6. Place the pistol on your belt where you intend to wear it. Find a comfortable (but realistic) height and angle. Make note of where the top of the belt relates to the top of the slide and the bottom of the trigger guard. If you're making the holster for someone else, have them do this, while wearing the pants and belt they'll most often be wearing*. Make note of the relative location of belt loops*, and of the width of the belt.
7. Find and mark those same two points on one of the side outlines of the pistol. Draw a line through them, and beyond. Draw a second parallel line below the first one, to represent the bottom edge of the belt. When measuring this out, add 1/8th of an inch*.
8. Find a handy location for a belt slot at the rear of the holster, and mark it on the template. Make sure it's at least 1/2 inch beyond the stitch line, and will not interfere with any offending belt loops*. Now drop it down 1/8th of an inch, because the angle WILL change when you unflatten that perfect layout by stuffing a pistol in it*.
9. Draw the outside edge of your intended holster, making sure it's outside the stitch line and belt slot. Leave at least 3/8ths of an inch clearance from both. Make sure you leave at least a middle-finger's width between the grip of the pistol where ti meets the trigger guard, and your outline at that point.
10. If you've incorporated a body shield/body guard/sweat shield, you'll have to move it back a little, because of the aforementioned dimensional shift that occurs when you unflatten the layout with a pistol*. Half the slide width has worked for me.
11. I like to incorporate a shallow half-circle at the top and bottom centerline of the holster, both for visual appeal and as a reference when folding the leather later. Omit this step if that's not your thing.
12. Fold the manila folder in half, so that you can see where you marked the stitch line, belt lines, and belt slot. Take the crappy, Made in Japan, too-small awl that you bought, not knowing any better*, and put it to a useful purpose: poke holes along the stitch line, belt slot, and at the far end of each belt line. This allows you to see those features on the OTHER half of your template*. I put an old mouse pad under the folder while doing this, to minimize the chance of marring the top of the computer desk and incurring the wrath of the War Department*. If you've incorporated a sweat shield into your design, also use the awl to poke out the top line of the holster on the front, where the body shield WON'T be.
13. Draw the belt lines on the "back half" of your template, by connecting the dots of the holes you punched.
14. Draw the outline of your reinforcement piece/belt tunnel, leaving at least 1/8th of an inch extra clearance on both ends for the belt.
Make sure it doesn't overlap your stitch line*.
15. With the manila folder folder in half, cut out your template. Trim off the "extra" sweat shield, along the line of holes you poked in step 12.
16. Place the template on your leather, making sure you're cutting it out with the correct sides of the leather "out" and "in"*, and trace it with the marking device of your choice. Cut out your main holster body.
17. Cut out your reinforcement piece from the template, and repeat step 16 for it.
18. Place your templates on top of your holster body and reinforcement piece, take your awl, and poke reference holes for the stitch lines and belt slots on both sides. Make use of groovers and punches to create the actual stitching grooves and belt slots.
This concludes the template/cutting process. All you need to do now is edge, groove, burnish, dye, wait, glue, wait, poke holes, bandage fingers, stitch, fold, glue, wait, trim, poke holes, bandage fingers, stitch, sand, wet-mold, burnish, wait, finish, and wait. Humming, whistling and cursing are optional.


What Is Your Favorite Holster/belt Leather?
in Gun Holsters, Rifle Slings and Knife Sheathes
Posted · Report reply
I've just been using double shoulders, and horse butts.