


ghstrydr164
-
Posts
49 -
Joined
-
Last visited
Content Type
Profiles
Forums
Events
Blogs
Gallery
Store
Everything posted by ghstrydr164
-
 SOLD, Thank you.
 -
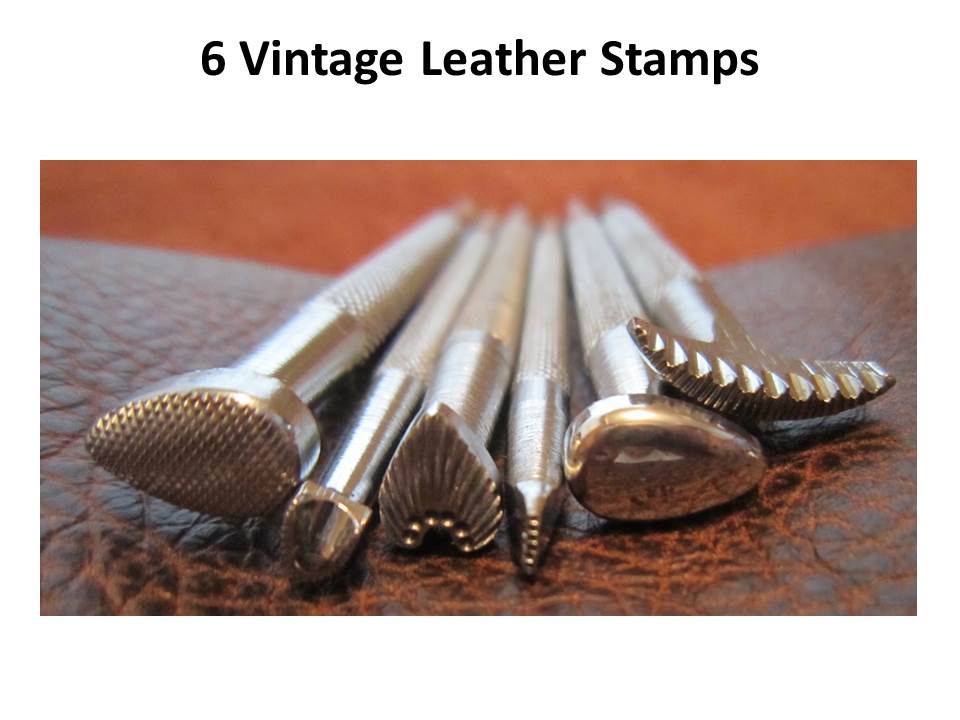
6 Vintage Leather Stamps Four early pre-letter Craftools, Two RBS (Roth, Barnes, Stohlman). Craftool Co. : 222, 708, 714, 853, RBS : 113, 300 $48.00 Shipped

-
This Item has been SOLD
-
6 Vintage Leather Stamps Four early pre-letter Craftools, Two RBS (Roth, Barnes, Stohlman). ITEM # LWT-22 $48.00 Shipped Craftool Co. 222, 708, 714, 853, RBS 113, 300
-
Eleven early pre-letter Craftools, three RBS (Roth, Barnes, Stohlman). $100.00 Shipped Craftool Co. 100,103 1/2, 104, 212, 222, 359, 708, 710,714, 853, 888 RBS 113, 300, 889 Email: cyrus@cyruskemp.com
-
Craftool 3/4" Alphabet Set W/ Celtic Medieval Pattern #8140
ghstrydr164 replied to ghstrydr164's topic in Old/Sold
The above Item has been sold. Thanks -
Craftool 3/4" Alphabet Set W/ Celtic Medieval Pattern #8140
ghstrydr164 replied to ghstrydr164's topic in Old/Sold
I am leaving leather working, so I have no need for additional round knives. Thank you for your interest. Cyrus -
Craftool set #8140 is in very nice, clean condition! Original box missing label with shelf wear and tape marks. This set was discontinued and is very rare! Each individual stamp has unique medieval scroll work and Celtic braiding. These are large, bold 3/4" characters. $95.00 + $10.00 Shipping cyrus@cyruskemp.com
-
Very nice tools! First thing you should do is remove all rust before you use them.. DO NOT USE CHEMICALS or Sand Paper to remove the rust. Use a razor blade to scrape away heavy rust then a small fine wire brush and steel wool. When all rust is removed clean with something like 409, rinse very well and dry with a cloth followed by a hair dryer. Do not get the wood handles wet. Clean the wood handles with a soft cloth and give them a light rubbing with some oil designed for wood. Finish things off with a good paste wax made for autos. Wax the wood and metal, let dry and buff with soft cloth. They will be good for another 100 years.
-
Sometime back I posted some info and pictures of some un-plated and some unmarked,Craftool and RBS, stamps. http://leatherworker...32 As it turns out about half (30+) of these stamps were really stamp blanks in various stages of completion. I now have some time to deal with these stamps and thought that many of you might like to see how these stamps were made, It may give you some insight for your own stamp making. You can see that this blank is cast and was for making the #455 Craftool shown next to it. Three of the blanks were not knurled and the rest of the blanks were either un-marked or stamped with Craftool or RBS and numbers. All of these blanks came from the same source at the same time so I would think that this shows that the Craftool and RBS stamps were being made at the same facility at the same time. I would like to here what the advanced collectors of these tools think about the fabrication process based on these blanks in various stages of completion.
-
Vintage Un-Plated, Craftools, Rbs And Un-Marked Stamps
ghstrydr164 replied to ghstrydr164's topic in Leather Tools
I recently acquired some early Craftool, RBS and unmarked stamps that are not and never were plated. The early Craftool and RBS stamps have no letter designation with thenumbers and the unmarked stamps have no numbers on them. I would like to knowat what point the Craftool and RBS stamps started being plated? Would anyone venture a guess as to value of these stamps, as I may be putting them up for sale sometime in the future. Here are a few of the fifty plus un-plated stamps I acquired. The kick or lift is one of the best I have ever used and I have copied it for my own tools. Three of the unmarked stamps below they leave excellent sharp marks. -
First Sheridan Attempt Checkbook Cover
ghstrydr164 replied to flathat4life's topic in Floral and Sheridan Carving
Good Start! Suggestions and observations: 1. Your carving looks as if the leather might have been too wet or your swivel knife a little dull from the pulling observed on the leather surface. 2. Your lines look a little choppy as if you are trying too hard to follow the traced lines of the pattern: make your cuts smooth and fluid and only use the pattern lines as a reference, and lighten your cuts as you come toward the flower center as if you were doing decorative cuts. Cut lines should never be the same depth from start to finish. 3. It helps to stamp your flower centers before you start to carve so you can carve to them. 4. I think the pattern is a little over tooled; I would back off on the pear shader. 5. You should also tapper the bevels to a lighter depth as you finish a line. Take a close look at the carving of the masters and you will observe the hints I have mentioned here and many more. Best to you -
I purchased it about 15 years ago from a gentleman that had made handbags with it years earlier and had it stored in his garage. I was going to use it for punching multiple holes all at once,setting snaps,rivets and studs. Never got the shop finished and now I am into other endeavors that make the foot press unnecessary for me.
-
Vintage, Deep Throat, Heavy Duty Foot Presses allow you to keep both hands free to position Items and feed fittings. It works well while sitting or standing. Measures 38" to bottom die holder; it has a 9" deep throat, very heavy Cast Iron and works very smoothly. Comes with some guides and dies to show how simple it is to make set-ups for your needs. Because of size and weight I cannot ship this Item. Local pickup only Los Angeles, CA area, city of Monrovia. $350.00 Cyrus Cell: 626-422-5241 Email me
-
The Boss is sold thank you all for your interest. Cyrus
-
Solid Rock Maple construction. Very tight no wobble. Quite old from the looks of the hardware and leather strap which is still sound. Jaws open and close properly and are ready to have new leather pads installed. Seat dishes in and is large and comfortable but would benefit from a padded and tooled seat cover. This one is so nice that your spouse might let you keep it in the Television Room. There is a diamond shaped brand with what appears to be a “C J” at front. Seat is 27 ¼” High Holding devise is 17 ¼” Above seat Height Top section is 26” Long I cannot ship this item so it must be picked up in Monrovia, California which is located in the San Gabriel Valley of Los Angeles County. Because of this I am Offering this Stitching Horse for $250.00 cyrus@cyruskemp.com Cell: 626-422-5241
-
Here is a used one that sold on ebay today 4/4/2011. http://cgi.ebay.com/ws/eBayISAPI.dll?ViewItem&_trksid=p4340.l2557&rt=nc&nma=true&item=270727296721&si=wNXegN5Zuc7J3d3EaUvH6gPjRGY%253D&viewitem=&sspagename=STRK%3AMEWAX%3AIT&autorefresh=true#ht_500wt_1065 $1250.00 + $50.00 shipping All accessories that fit the new model fit this model, per Tippmann.
-
Which Size Edge Beveler? And Other Questions
ghstrydr164 replied to chaosready's topic in Leather Tools
In my opinion it is a matter of taste. Some people like very rounded edges and others like the more square look. I will sometimes use different size edgers on the same piece in different areas. Remember that no matter the weight of your leather you may have multiple layers. When you make a knife sheath you will have a front, back and a welt to prevent the knife from cutting the thread so you will be edging three pieces of maybe 8oz. leather in some places and one piece of 8oz. leather in other areas of the sheath for a large knife. I would purchase at least two different sizes and three would probably serve you better. But remember there is no right or wrong in this matter. As for sharpening the Tandy craftool V shaped beveler I recommend using 220 wet dry sandpaper and a rag buffer with green rouge. If you strop with the buffer often you will not have to use the 220 very often. -
After rough cutting edge, glue things up with barge cement and get a drum sander that you can run in your drill. Sand the edges smooth, neat and then make your stitching groove. I always glue and sand before stitching. Don't edge your edge until after making your stitching grove ( makes using the divideres easier) so allow for the edging space when making your stitching groove.
-
Here is an example of a holster with many groove lines accomplished with the method I described. The grooved line on the skirt is curved and goes around corners very neatly
-
Keep the angle consistent and make many light passes putting a little extra pressure on each pass, the existing grove will help guide you and the dividers, instead of trying to make one deep hard pass. Make sure the leather is properly cased, as for carving.
-
By the time you remove the plating that makes it very difficult to grind or file. you might as well buy some stainless bolts and rod to copy the craftool with the modifications you want. Cut to the length you feel comfortable with and sell the Craftool to cover the cost of the bolt. See this Pinned Post above http://leatherworker.net/forum/index.php?showtopic=10252
-
I recently acquired some early Craftool, RBS and unmarked stamps that are not and never were plated. The early Craftool and RBS stamps have no letter designation with thenumbers and the unmarked stamps have no numbers on them. I would like to knowat what point the Craftool and RBS stamps started being plated? Would anyone venture a guess as to value of these stamps, as I may be putting them up for sale sometime in the future. Here are a few of the fifty plus un-plated stamps I acquired. The kick or lift is one of the best I have ever used and I have copied it for my own tools. Three of the unmarked stamps below they leave excellent sharp marks.
-
It's the studier better built, Cast Iron model which weights 46lbs, as opposed to the 23lbs. Aluminum model. I want$1200.00 +shipping. Postal Money orderor add 3% for paypal. I am attaching pictures. I purchased this Boss back in the mid 90's set it up and tested it then repacked it until my shop was finished. Never finished the shop and am no longer doing lether work that would require the Boss. Cyrus, Cell 626-422-5241 cyrus@cyruskemp.com
-
To prevent active rust on your carbon steel stamps and black marks on your leather get some mild acid such as oxcilic acid, distilled vinegar, lemon juice or whatever. Remove all active rust with steel wool steel wire brush (not brass) small tooth brush type works fine for those crevices, you may need to use some small pick such as a needle for small areas. Once the rust and scale has been removed wash the stamps with a strong grease cutter to remove any crease and oil. Place the tools in the mild acid and let stand and agitate from time to time until you see a darkening of the stamps. When darkening appears remove the stamps and rinse with clear water. Let air dry and repeat the dip process again. The stamps may require three or four treatments to build up a good layer of oxidation which will help keep them from rusting. Once you are satisfied with the oxidizing rinse let air dry and spray with WD 40 once the WD 40 dries buff the stamps with a very stiff rag such as canvass. Once you have finished buffing you should wash stamps in a mild liquid hand dishwashing detergent to remove WD 40, dry tools well with a hair dryer and you should be in good shape for no rust or black marks on your leather. This oxidizing process serves the same as bluing on steel. The color of the oxidation will very from light grey to dark black depending on the steel alloy of your stamps and the number of treatments you use.