


Tae
-
Content Count
36 -
Joined
-
Last visited
Posts posted by Tae
-
-
Hello leatherworkers,
I made this a few years back, but I'm new to this forum so I thought I'd share.
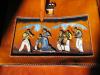
Goal
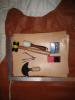
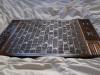
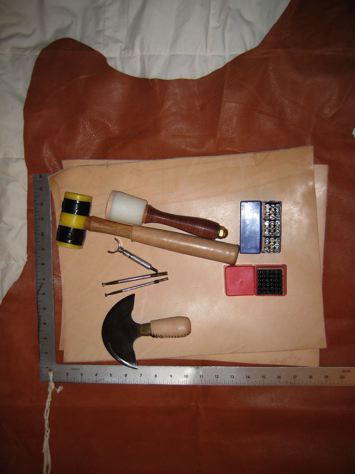
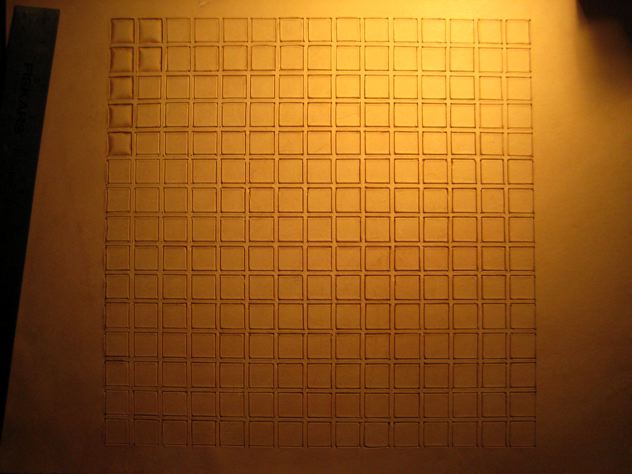
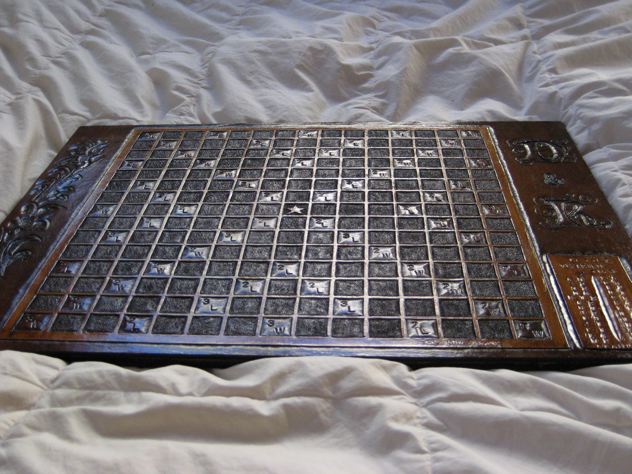
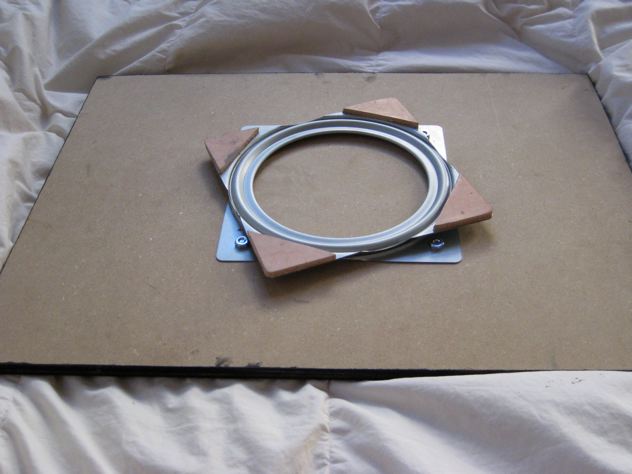
Here is a scrabble board that I made as a wedding present for a friend. I mounted it on MDF with a lazy susan attached to it. I also cut out the tiles and made a simple pouch for them.
Materials
All materials were obtained from Tandy and Home Depot for the most part (except for the Osborne round knife, the Barry King maul, and the letter sets that I got on eBay).
Cost
Approximate cost of the leather & stain is $50, although I forgot and this is just a guess.
best regards,
Tae


-
Hello leatherworkers,
I made this a few years back, but I'm new to this forum so I'll post it now.
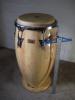
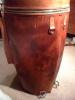
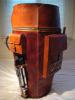
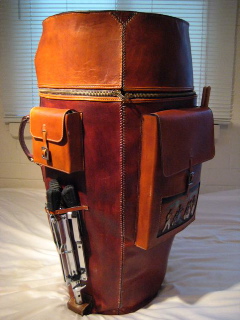
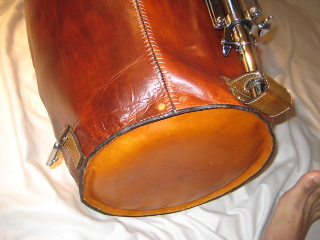
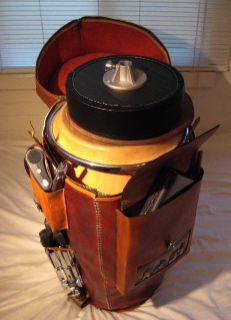
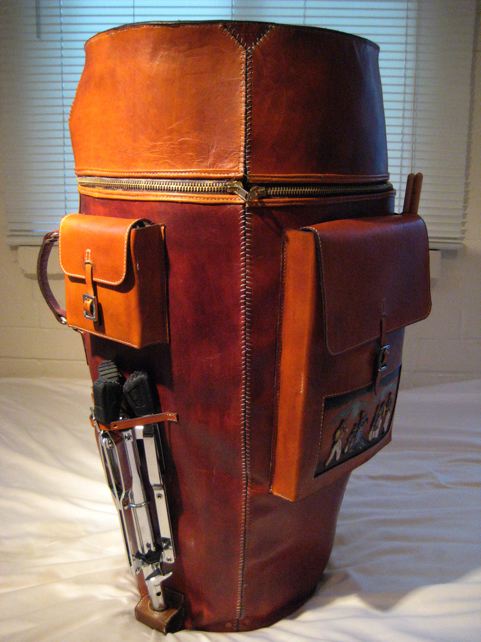
I bought my first drum back then and got very excited. Since I had been making small wallets etc. for myself and my gf, I thought I'd make a case for my drum (it was a big jump!). Needless to say, this was the largest project I've done, so it took many months since I can only work on it at night and weekends when I wasn't practicing my open tones. Now that it's done, I can finally practice!
Goals
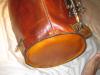
I designed it so that it to take all my gear to my music class in one bag. The inside fits a 30" conga drum (it fits both my drums with an 11" and 12.5" head), a circular wooden board for under the drum, a drum throne seat. The top opens up via two 26" zippers ($20). The outside has a loop that fits the drum throne support (like an umbrella on a golf bag), two pockets, and a triple-fold suitcase handle. The large pocket holds a handheld cowbell with beater, a pair of clave sticks, and timbale sticks. The small pocket holds a digital metronome, a tuning wrench, and a pen. There is a loop on each side of the pocket.
Final design
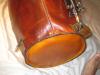
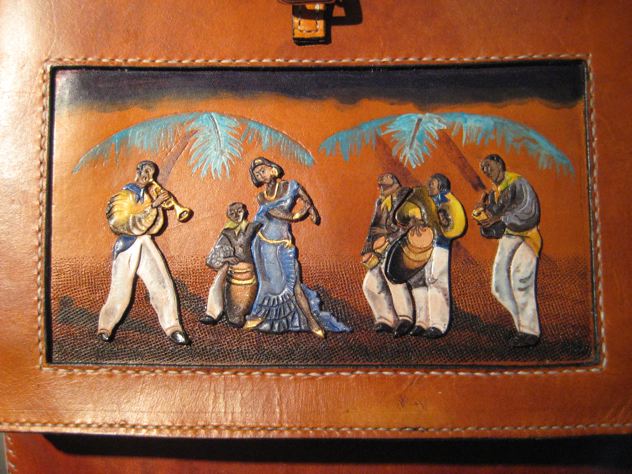
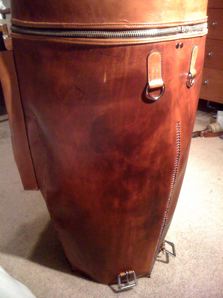
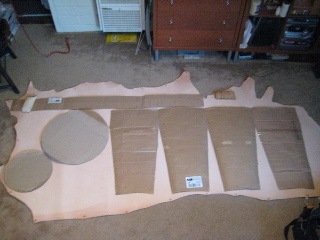
I own no machines. Everything is hand-cut, hand-dyed, hand-painted, hand-stitched, hand-polished, etc. I made the body out of one piece of 4-5 oz veg-tan leather from Tandy Leathercraft ($150). It's cut into four sections that taper down like a mercator projection on a world map. The leather is dyed using Fiebing's professional saddle tan oil dye ($50); the body is darker because I mixed some of Tandy's own canyon tan water-based dye ($15). The lining is thin velvet-like material made of polyester from JoAnn's Craft Store ($12). The art work on the pocket is my version of the artist Evelio Garcia Mata's La Conga (1930s). The figures are filigreed, dyed ($20), then finished with Cova acryllic paint ($20). I baseball stitched the vertical seams with brass rivets ($10) at the bottom. Everything else is saddle stitched with nylon thread ($20). I also added wheels ($20) at the bottom after the photos were taken with a circular wood piece of plywood on the inside ($10). I used the Stohlman brand for hardware ($30).
Cost, time
On general stuff, I consulted Al Stohlman's books ($30) on cases, esp. the part about the golf bags. On specific stuff like handles and loops for buckles, I followed Valerie Michael's book ($20) on cases because the lines seemed cleaner to me. I spent a few nights a week for 3-4 months. For example, a suitcase handle takes 4 hours to complete; cutting/dying/painting/repainting the figures took 20 hours over two weeks. I spent about $200-$400, depending whether you count the left over material like dyes, paints, and books into the cost.
Future project
I plan on making a matching case for my wife's bongo drums. The art work will be La Rumba by Antonio Sanchez Araujo. Hopefully it will only take about a month when I get around to it.
cheers,
Tae
PS
The whole thing with the drum and seat are really heavy. I added wheels to the bottom for now, but I'm thinking of hacking the top part down so that it's just the drum. As this would require much surgery (and possible destruction), I've just been putting it off. I still haven't made the bongo case yet.


-
Hello,
I guess I've always cut my veg tan pieces before applying dye on it. I usually buy small shoulders, so I've always done it this way. This time, I've got a rather large piece of veg tan because I'm going to try to "mass produce" some bags for my friends (about 5-6 because I like the one I made for myself). I'm thinking about dying the large piece with Fiebings saddle tan dye then applying super sheen before cutting out the pieces. I guess if I dye first, there is no danger of making the back side dirty. I'm going to line it with pig skin, but I'm guessing it might be better to be clean about it.
What are people's opinions about this? Does it matter? Am I forgetting something?
Sincerely,
Tae
-
Drumsticks? For a conga drum?That is a keen observation! In Cuban folkloric settings, you can to play palito patterns on the side of the drum with the sticks. In merengue settings, you can mimic a tambora with one stick on your left.
-
this is awesome. great design..my buddy's been houndin me to make him a case for his drum. been hung up on where to start. this is very inspiring... thanks..
Thanks for the compliment. I'd be happy to scan in my initial design for you. The actual design changed a lot while I was making the case, but it was a good start.
As an update, I decided to add wheels at the bottom of the case.
-
Spider, the iPhone case is awesome. Did you carve a wood skull first? And if you don't mind me asking, how do you nail the leather on to the wood piece since it's pre-cut?
Tae
-
This is awesome. Great work. What color did you use for this or did you buy it colored?Thanks, Spider! I used Fiebing's "Saddle Tan" professional oil dye. However, since this item is like gold to me, I have mixed some of Tandy's own taddle tan for the body part. You'll notice that the pockets and the top part are lighter and gives a nice contrast to the body. The finish is done with Tandy's "Block-Out" for a duller finish (and I got a quart for $10).
Tae

-

Hello,
I made a case for me to take my equipment to percussion class in the city.
Goals
I designed it so that it the inside fits a 30" conga drum (it fits both my drums with an 11" and 12.5" head), a circular wooden board for under the drum, a drum throne seat. The top opens up via two 26" zippers for chaps. The outside has a loop that fits the drum throne support (like an umbrella on a golf bag), two pockets, and a triple-fold suitcase handle. I plan to make comfy padded backpack straps soon. The large pocket holds a handheld cowbell with beater, a pair of clave sticks, timbale drum sticks. The small pocket holds a digital metronome, a tuning wrench, and a pen. There is a loop on each side of the pocket.
Final design
I made the body out of one piece of 4-5 oz veg-tan leather cut with four sections that taper down like a mercator projection. The lining is thin velvet-like material made of polyester from JoAnn's. The art work on the pocket is my version of the artist Evelio Garcia Mata's "La Conga". The figures are filigreed, dyed, then finished with Cova paint. I baseball stitched the vertical seams with brass rivets at the bottom. Everything else is saddle stitched.
Cost, time
On general stuff, I consulted Stohlman's books on cases, esp. the part about the golf bags. On specific stuff like handles and loops for buckles, I followed Valerie Michael's book on cases because the lines seemed cleaner to me. It took a few months and about $250-$300. I used the Stohlman brand for hardware.
Comments welcome. I am always looking to improve the quality of my work, so feel free to be tough

cheers,
Tae
-
Yeah, I got mine for $6 at Tandy. It was noted as a discontinued item.
-
Oh geez, where did you get that compass on the wall? That is like 20 inches long!
-
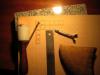
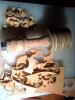
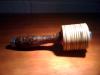
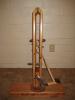
I bought a Stohlman 3lb head on clearance and put a handle on it. I'm rather proud of it and wanted to share the result. I already have a Barry King 1lb, and tried to mimic the shape and length of the handle.
I used a 5/8" bolt with two washers around the head. I cut about a dozen circles with my 1" Osborne punch and about a dozen at 1.25" by hand. I punched hole for the inside diameter for the bolt. I stacked the leather washers after putting contact cement (1st photo). I tried sanding it with my dremel tool with a sanding head at first, but I was getting no where. So I switched to my craft razor and started hacking away. I dyed it Fiebing's light brown and burnished by hand (2nd photo).
Total cost (including the head): $10.
-
Thanks Jim. I always put in my iPhone facing in because I have the same concerns. But because I punched a hole where I connect the earphones, it's hard to mess up since otherwise I can't connect! Another design concern I had was whether to make it horizontal or vertical. To find out for myself, I made a prototype that looked like two loops (one for the iPhone and one for the belt) and wore it for a few hours when I was sitting around. I decided that the vertical was not uncomfortable and it allowed me to simultaneously carry the Leatherman.
-
Thanks! Yes, they are all hand stitched.
-
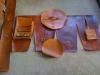
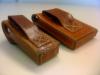
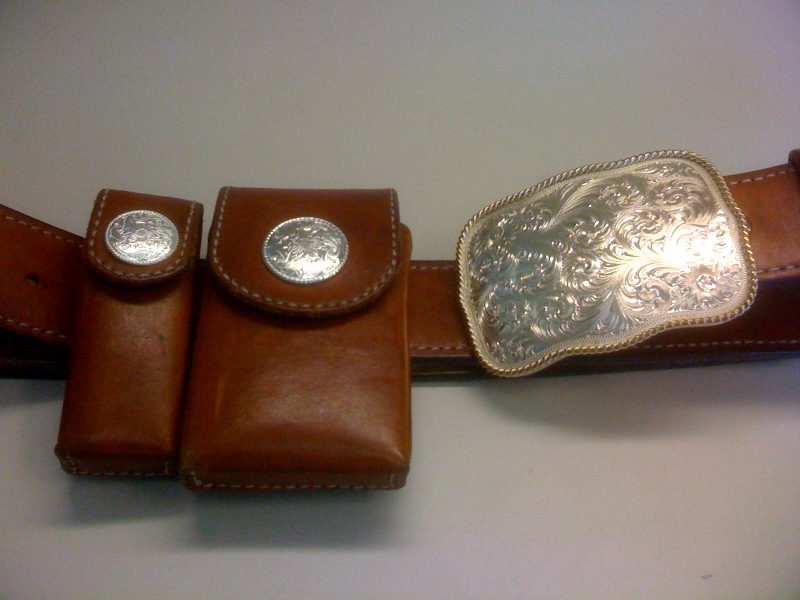
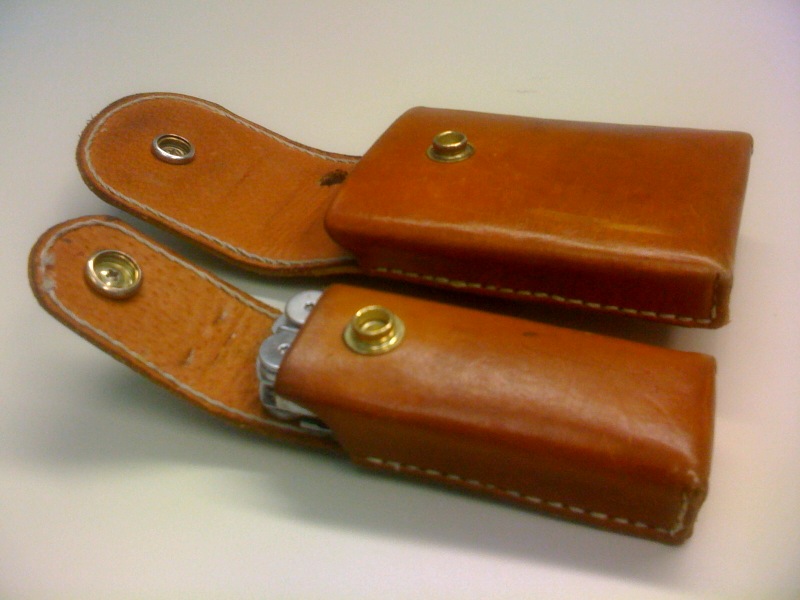
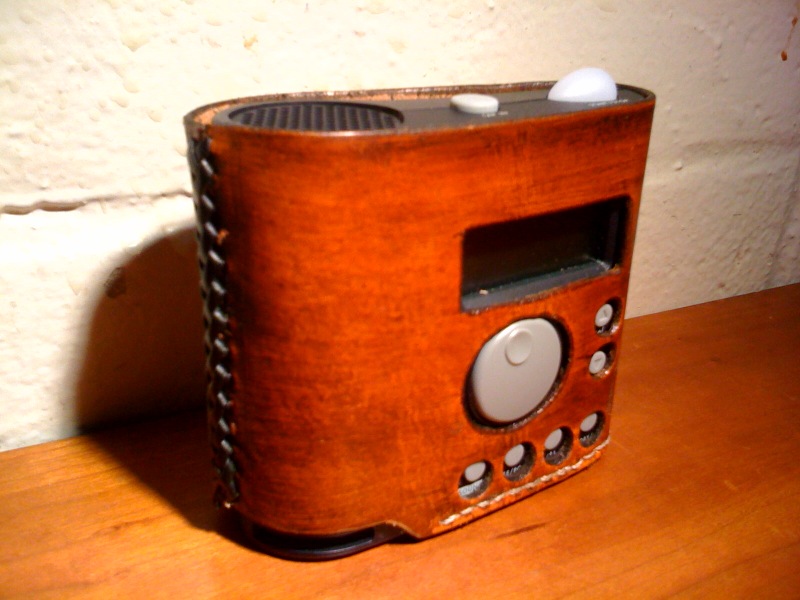
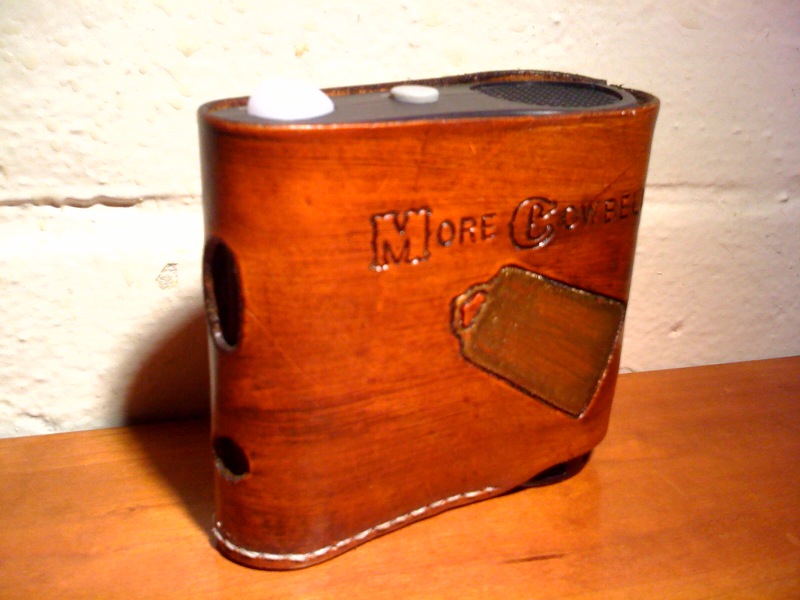
Hello LW,
I made a few cases that I'd like to share. The first two are iPhone and Leatherman knife cases to match my belt (I did not make the belt). I used 4-5 oz veg tan and lined it with pig splits. I decided to box stitch the two so that it would be slim on my waist. The cases are fitting as I measured and remeasured the leather before cutting.
The third case is for my digital metronome with "More Cowbell" on the back.
cheers,
Tae


-
Hi,
I was going to buy some wing dividers on eBay, and noticed that there are wing dividers in the woodcraft category. Are these different from the ones in leathercraft?
Thanks.
Tae
-
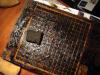
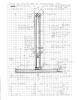
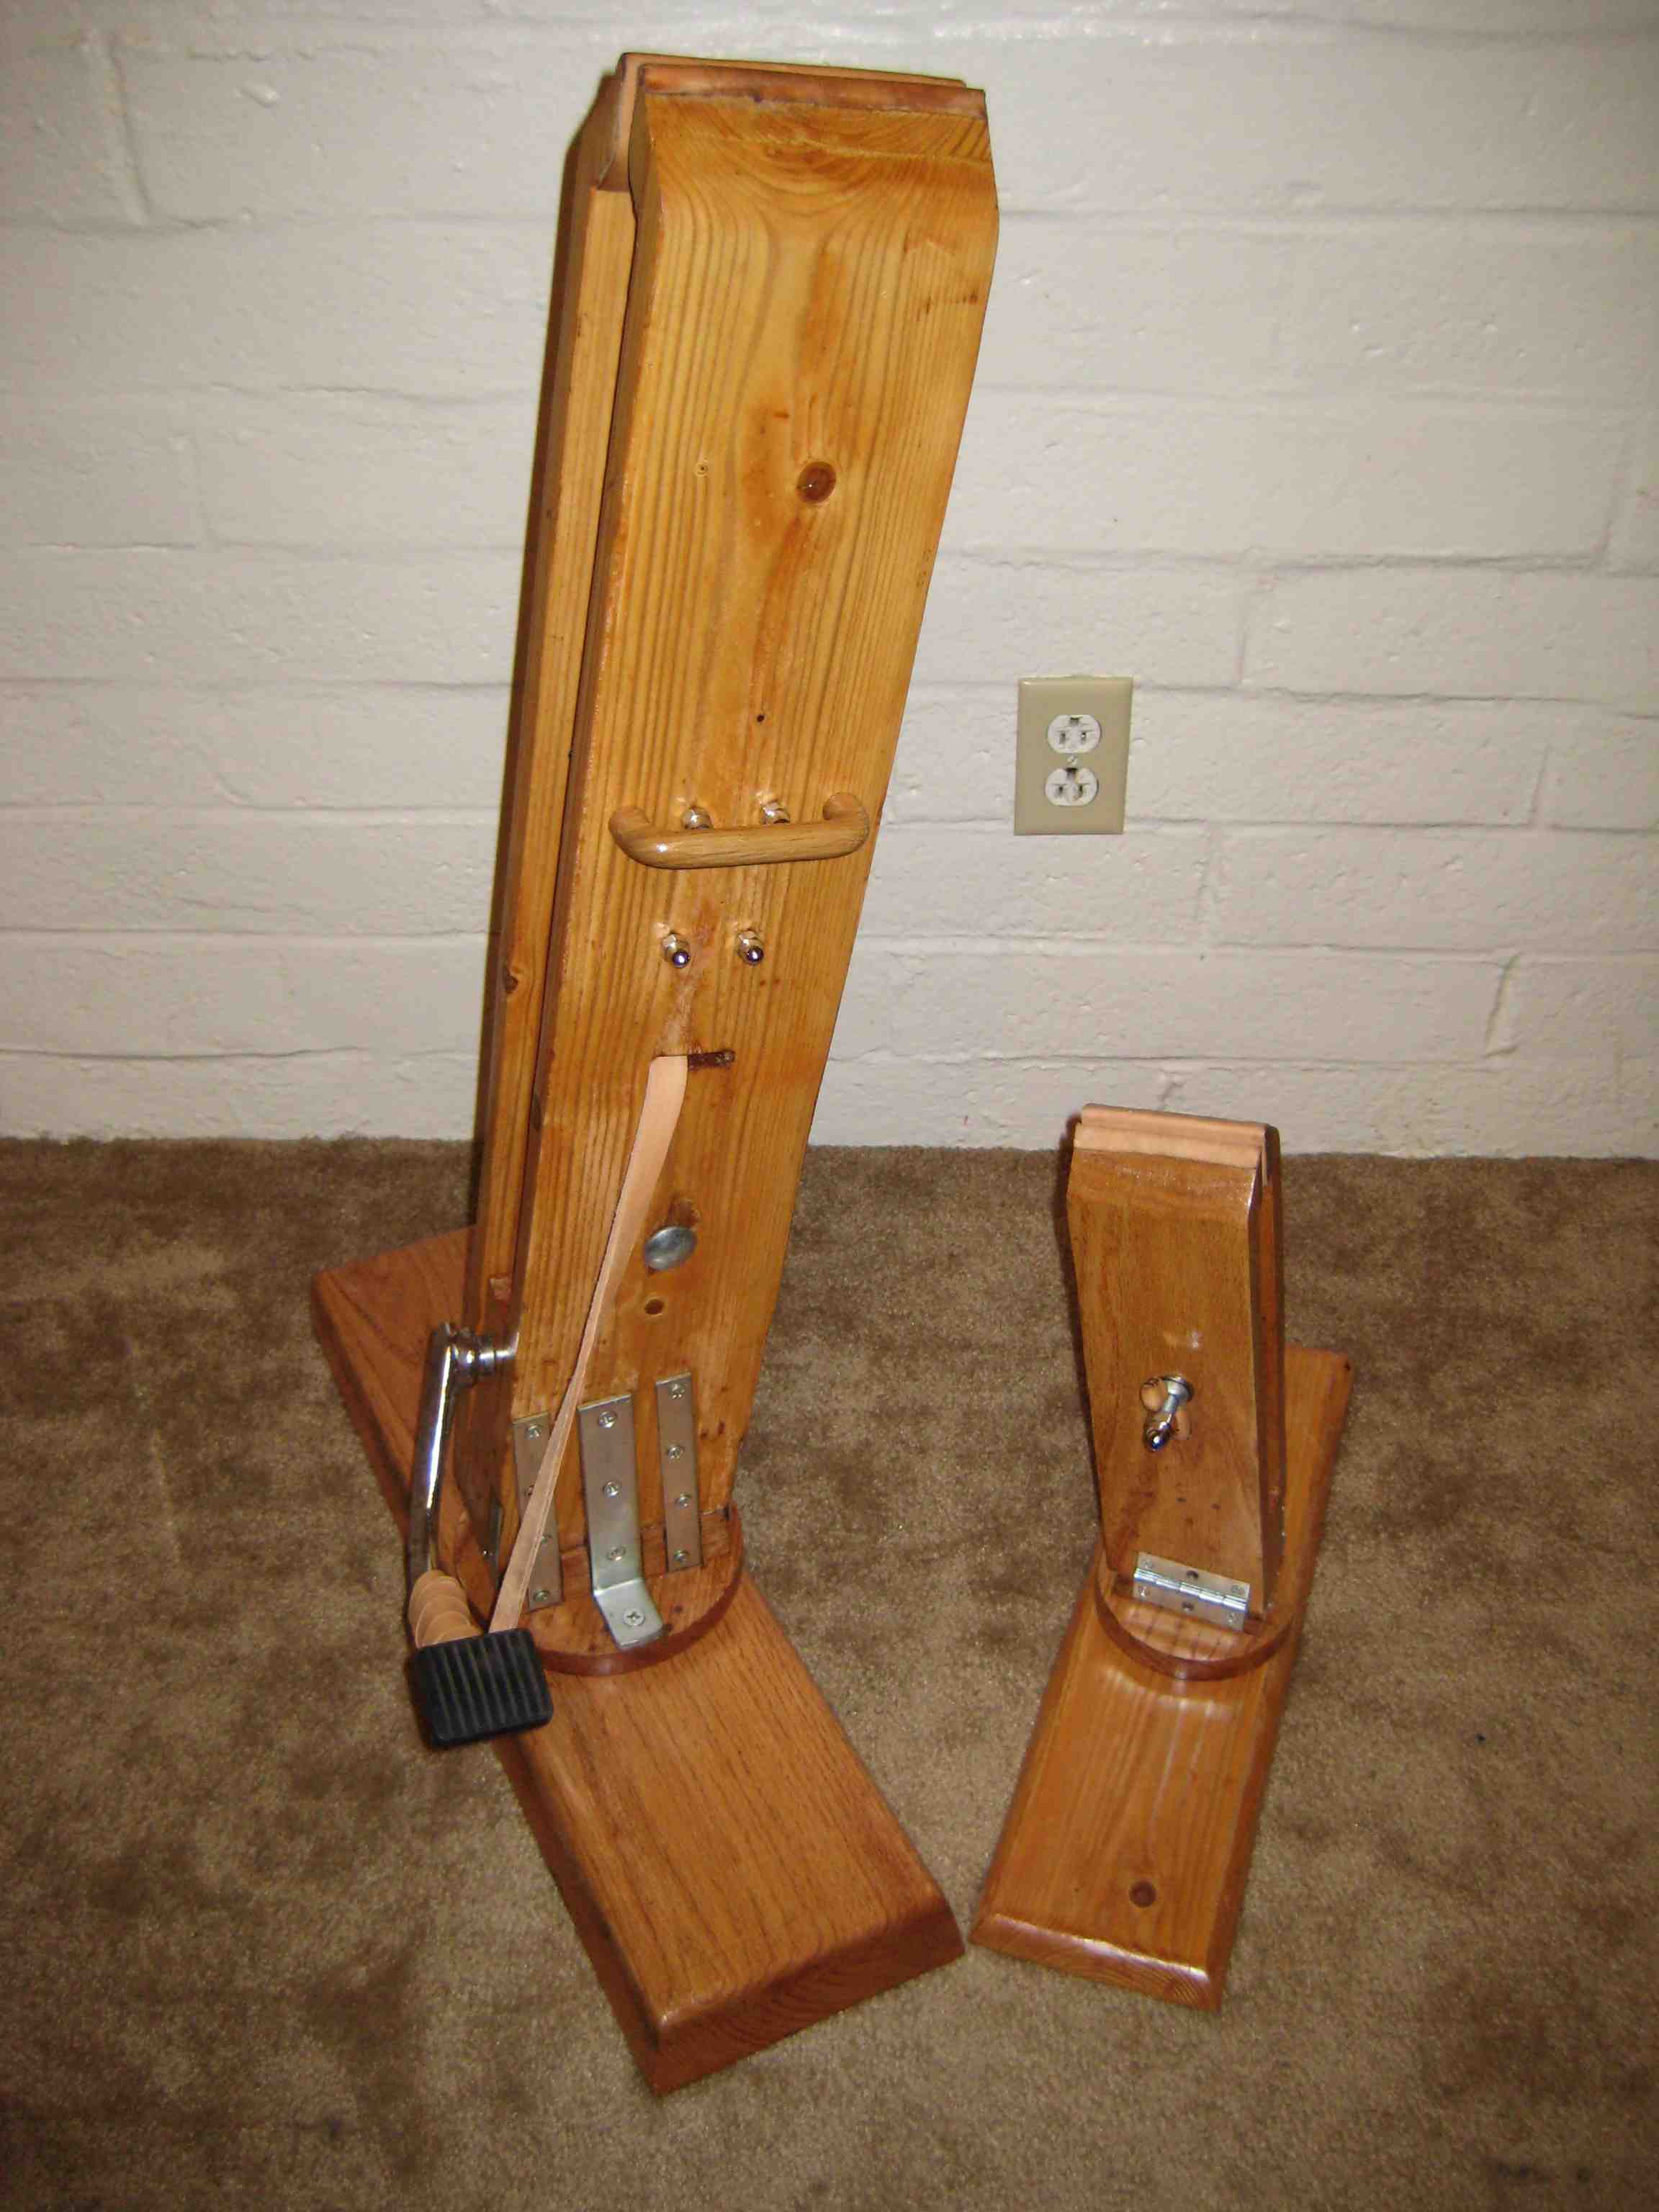
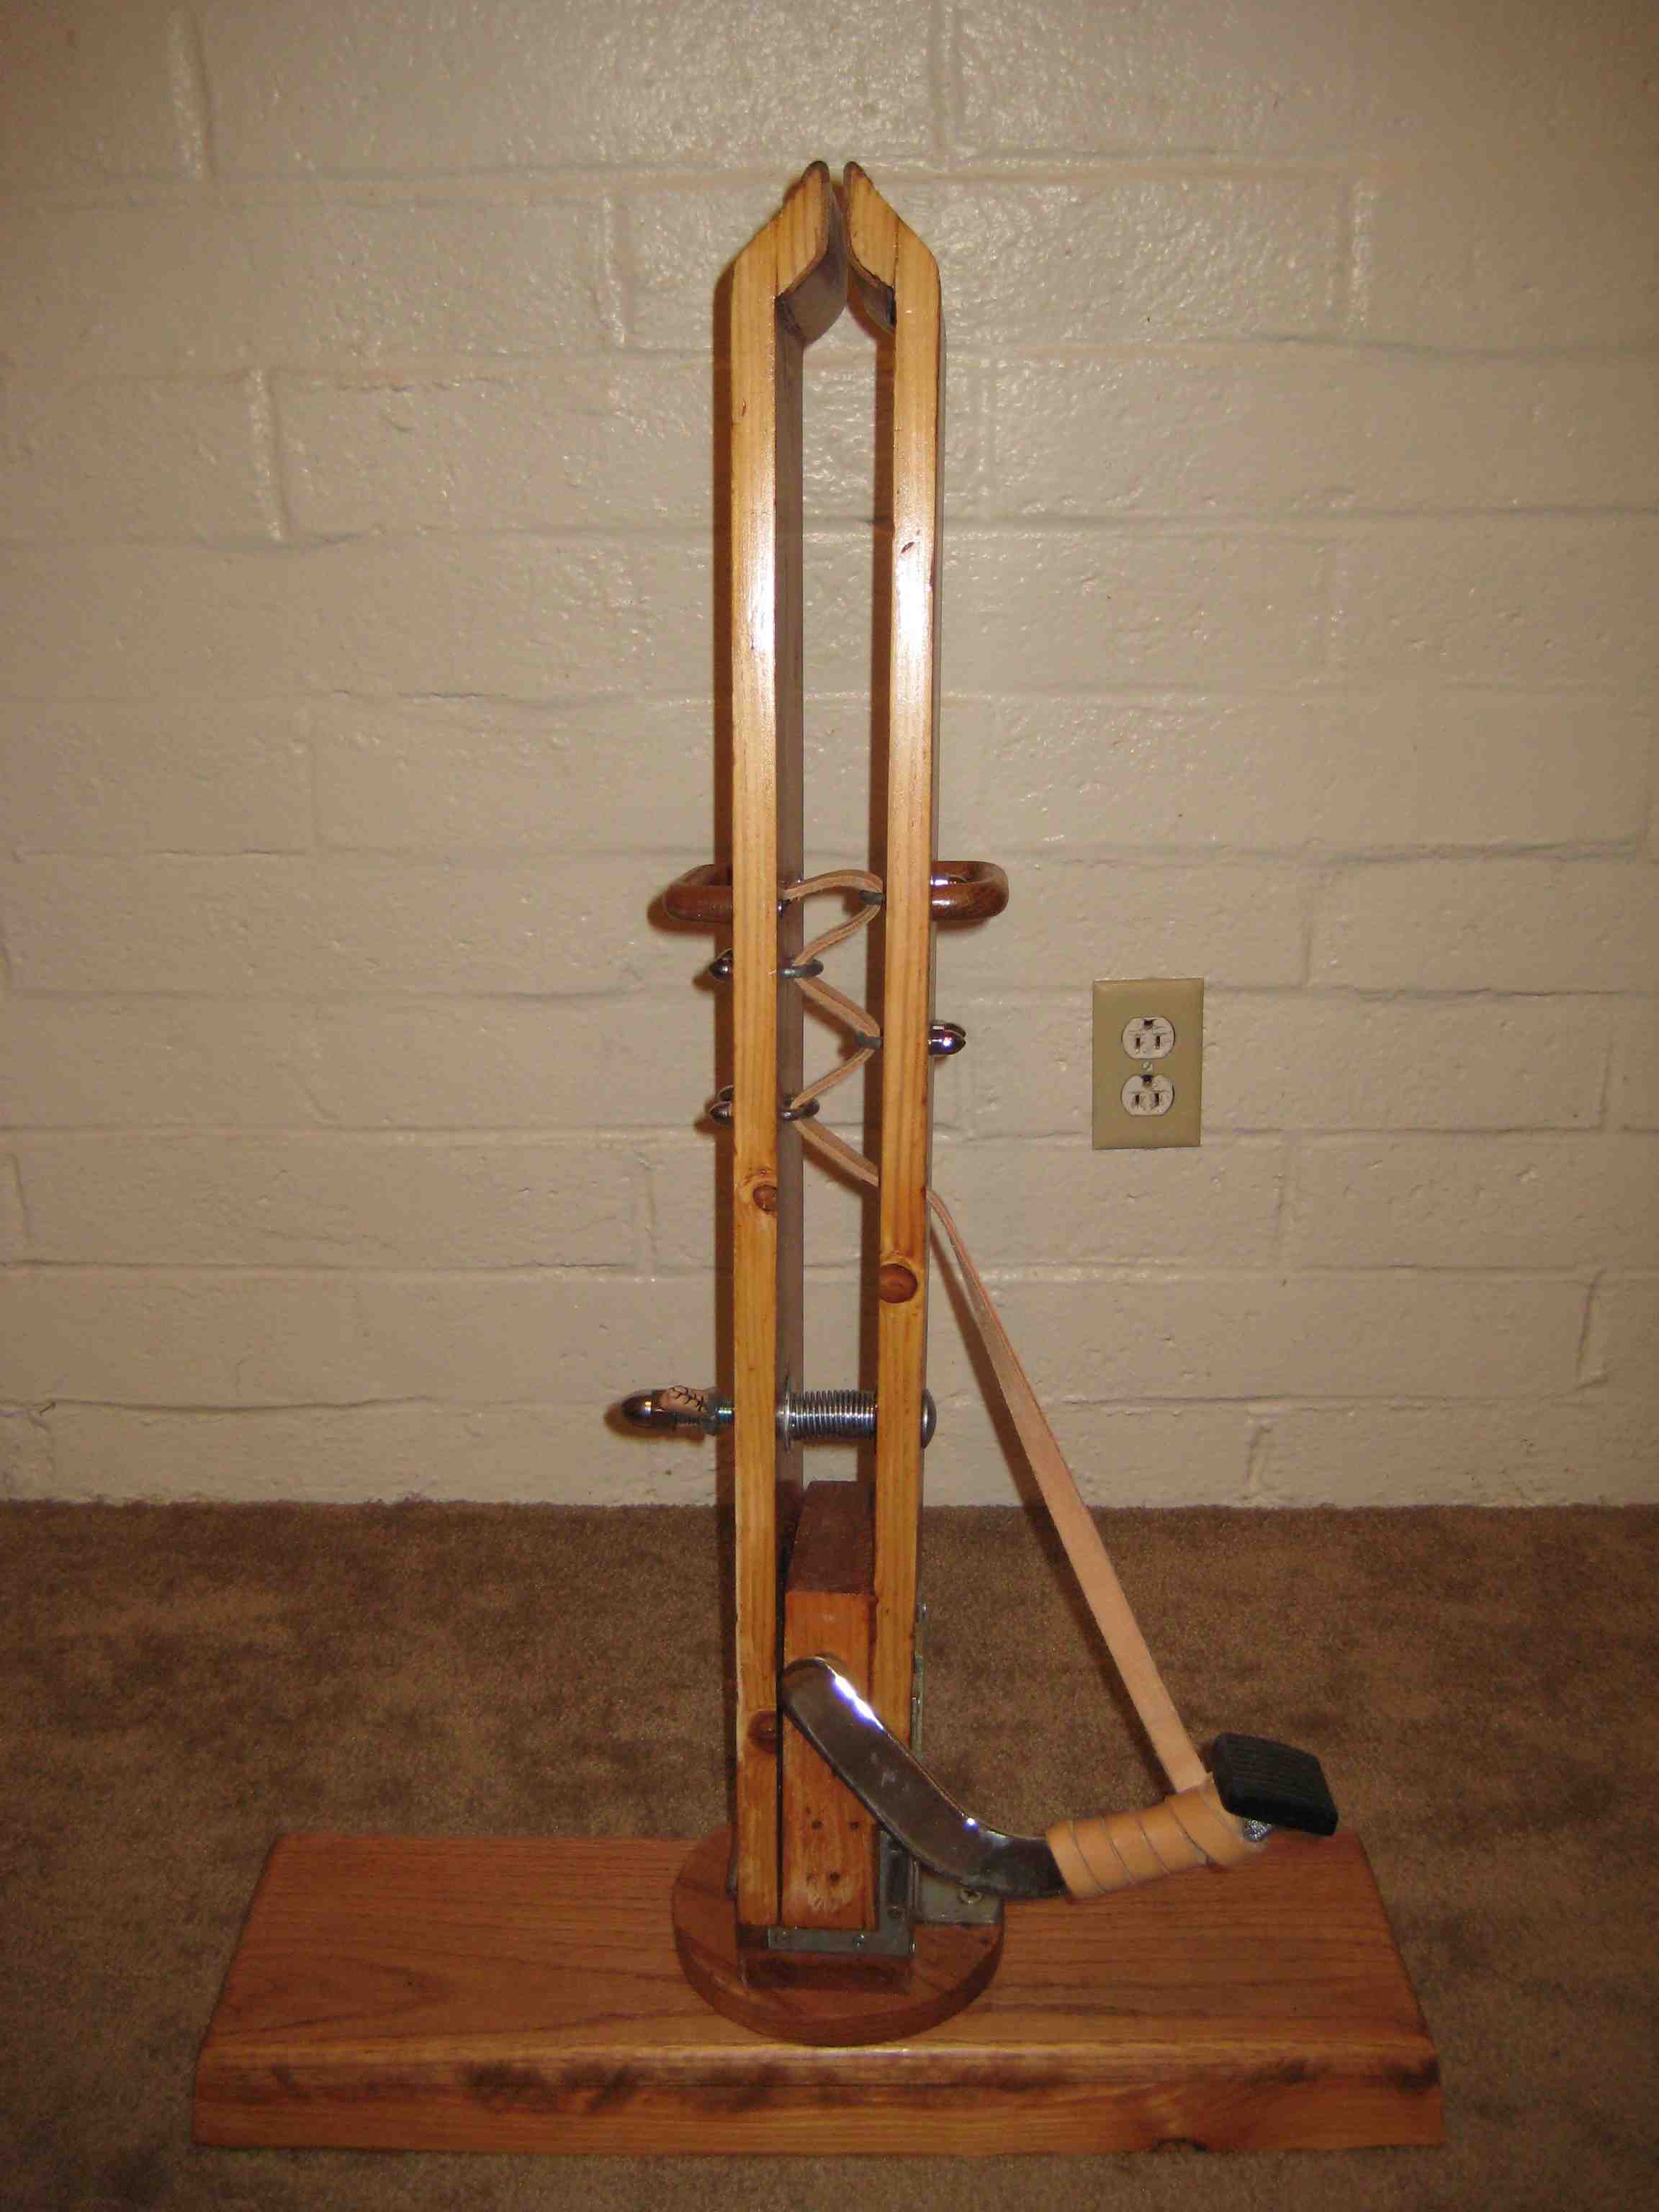
Thanks! Here is the orig. plan, but I've made changes along the way. In the beginning, I made all pieces out of pine, but the square base piece cracked and the surface of the 2' base piece was warped. So I did surgery and replaced the square piece with oak and added a circular base. Also, I planed and sanded the 2' base piece and added a 1" oak board for flatness. In addition:- Jaws: I made them out of pine, but in retrospect, I should have made it all out of oak. The left over wobble is the bend in the pine jaws that I have to live with.
- The intermediate piece is out of two (not one as in the diagram) glued square pieces of 1" oak
- I added a circular base below that (see photo)
- The 2' base piece was initially out of pine, but it wasn't flat enough, so I glued an oak piece, cut and sanded it down. In fact, I like that it's 2.5" thick. Th swivel idea was good on paper, but doesn't work too well, so I tighten the nut all the way.
- In the future I will not use chrome acorn nuts. They cost me like $20 for what you see!
- I use a leather strap. It's nice because the friction makes it stay, but in the same regard, it doesn't spring open as easily. I have to help it open by loosening the strap in the middle with my fingers. I kinda like this setup because then I don't need a racket scheme
- I added wooden cabinet handles. It makes moving it easier and it's handy since I can stick my stitching awl in there when I stitch
- I added rubber feet so they don't slip around carpet or scratch wooden floors.
- I added and modded U-bolts for the strap by cutting them shorter with my dremel tool with cut-off discs.
- I added a wingnut (with leather handles!) just in case I really want to hold it shut without my foot pressing the pedal.
In retrospect, I probably spent more than $125 that buys a stitching horse from Mr. Grabowski, but it was fun!
Tae
-
Just moved into our new house! Building my workshop now! A Stitching Horse & Pony are two things that are definately going into the shop! Any chance you have a blueprint and parts list you'd like to share? Nearest Home Depot is 20 miles away! hahaha That is awesome!
Thanks! Here is the orig. plan, but I've made changes along the way. In the beginning, I made all pieces out of pine, but the square base piece cracked and the surface of the 2' base piece was warped. So I did surgery and replaced the square piece with oak and added a circular base. Also, I planed and sanded the 2' base piece and added a 1" oak board for flatness. In addition:
- Jaws: I made them out of pine, but in retrospect, I should have made it all out of oak. The left over wobble is the bend in the pine jaws that I have to live with.
- The intermediate piece is out of two (not one as in the diagram) glued square pieces of 1" oak
- I added a circular base below that (see photo)
- The 2' base piece was initially out of pine, but it wasn't flat enough, so I glued an oak piece, cut it at 75 degrees with my circular saw and sanded down the edges. In fact, I like that it's 2.5" thick. Th swivel idea was good on paper, but doesn't work too well, so I tighten the nut all the way.
- In the future I will not use chrome acorn nuts. They cost me like $20 for what you see!
- I use a leather strap. It's nice because the friction makes it stay, but in the same regard, it doesn't spring open as easily. I have to help it open by loosening the strap in the middle with my fingers. I kinda like this setup because then I don't need a racket scheme
- I added wooden cabinet handles. It makes moving it easier and it's handy since I can stick my stitching awl in there when I stitch
- I added rubber feet so they don't slip around carpet or scratch wooden floors.
- I added and modded U-bolts for the strap by cutting them shorter with my dremel tool with cut-off discs.
- I added a wingnut (with leather handles!) just in case I really want to hold it shut without my foot pressing the pedal.
In retrospect, I probably spent more than $125 that buys a stitching horse from Mr. Grabowski, but it was fun!
For materials I've bought everything at home depot (except chrome acorn nuts, avail at osh)
- one 2"x10"x8' piece of pine
- one 1"x10"x6' piece of oak
- 4 U bolts with chrome acorn nuts
- 1 3/4"x8" carriage bolt with wing nut and chrome acorn nut and 3 washers
- 3 1/2"x3" carriage bolts with nuts and washers
- wood glue
- one stainless steel door hinge
- one set of L brace (I think 2"x2") that I bent slightly using a vise and hammer to match the tilt of the pony
- one 6"x6" bracket that I cut short fit in the circular base
- two 6" mending brace
- compression spring
- one left-over leather strap that was tapered slightly from 3/4" to 1/2" along the way
- set of screw on rubber feet
- 4 screws
- 2 wooden handles
- cherry pecan stain
- semi-gloss polyurethane
- leather to cover the jaws -- I used contact cement
For tools, I used
- circular saw
- jig saw
- hand plane
- corded drill with sanding attachment
- various drill bits
- dremel tool with cut off disc
- angle grinder (to round the edges of the cut-off bolts) -- kinda unnecessary
Have fun!
Tae
-
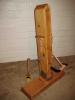
Six months ago, I was motivated to build a stitching horse. I liked Dale Grabowski's Sit 'N Stitch and the only requirement I had was that I'd use my old motorcycle brake pedal for something.
I made a small version first and scaled it up. After a gazillion trips to Home Depot and OSH, it's done.
Check it out! I'm stitching/lacing everything I see!
Tae

-
Bicycle seat
in Art
Hey that looks great!
Looking at your 1st and 3rd photos, did you use tan lace and dye it all at the end?
I think my own bicycle seat needs a cover! (then I might consider doing my motorcycle too =P
Tae
-
Hello,
I have a question on how to sew on keepers when I don't have access to the other side of the leather. I would be grateful for any advice.
I got myself, for free, some polo leather knee pads with some good padding. They were free because it was missing all the straps and most stitching for the keepers for the straps came off. The body is still good, so I dyed it a little bit darker to hide the blemishes and reconditioned the leather. I can easily make the straps, but I'm having a difficult time thinking of ways to put the keepers back on.
The keepers were sewn first to the top layer, the second layer is padding, and the bottom layer is a thin piece of leather. This was all glued together, then stitched around. Since I can't seem to take the top layer off, I'm at a loss. Additionally, the holes for the stitching are there and are visible.
Should I try to somehow reuse those holes? I was thinking of using a curvy needle, but that's a really tight radius to go 1/8" from one stitch hole to next.
Is is what it kinda looks like, but with buckles with keepers instead of velcro, and a LOT older and used.
http://cgi.ebay.com/PRO-LEATHER-KNEE-PADS-...bayphotohosting
Also, for the straps, I was thinking a latigo belt strip from Tandy and cutting it up. Is there a preferred stuff for outdoorsy or sporty activities? I usually just carve patterns on veg tans, and am new at leathercraft, so this is unfamiliar territory for me.
Thanks!
Tae
-
Wow!
Thanks so much for all the tips!
I will start buying a few things I need to start off. Probably some files and a vise would be a good start.
I will post progress here if I run into some trouble.
Tae
-
That's a funny anecdote Johanna. I enjoyed the story.

However, don't you think it's his lack of experience in leathercraft rather than his maleness that is the main difference between his and your approach? If I may suggest a fun experiment, why don't you both make a wooden box and see how they turn out?

Tae
-
Hello,
I'm contemplating making my own stamps. The big catch is that I only own a few tools, mainly a dremel tool and files. I also own small power tools (circular saw, jig saw, drill) and hand tools (saws, files), but they don't seem as useful.
I got a suggestion at the Tandy store that I can make them out of derlin rods. I found some on eBay (they were called aerlin/acetal rods), so I'll try the 1/4" rods. The thing I probably need most is a bench grinder, but I'm going to try to use the grinder bits on the dremel for now.
Does anyone have any suggestions for me? I would appreciate any input.
cheers,
Tae
-
Thanks for your reply Kate. For this one I made the leather board slightly larger than the mdf piece and cut it flush.
For the next one, I'm thinking of finding myself a square punch or making one by grinding an aluminum pipe from osh. With this, I'll punch out the squares and put another layer on the bottom dyed differently. I suppose I can glue cardboard to the leather when I'm punching out since the borders are pretty thin and will not hold shape without some support. I guess this is all theory until I put my round knife on some leather.


Scrabble Board & Conga Drum Case
in Boxes, Clocks and Game Boards
Posted · Report reply
Hello,
I made a Scrabble board here:
http://leatherworker...showtopic=49990
I made a conga drum case here:
http://leatherworker...showtopic=49989
I posted in the specialty forums, but haven't really posted here before. Please let me know if I'm not supposed to cross post.
cheers,
Tae