


AdamTill
-
Posts
112 -
Joined
-
Last visited
Content Type
Profiles
Forums
Events
Blogs
Gallery
Posts posted by AdamTill
-
-
It's price of getting there from Canada that's the kicker
")
-
If only the economy wasn't in the pits around here...those look great!
-
Adam,
I think you did a fine job on this saddle, especially for a first attempt. I do have some suggestions and comments. First, the placement of the saddle on the horse appears that it is sitting back a little. Your latigo does not appear to be aligned straight up and down. This out of aligned placement shows also in the seat centerline to the horses centerline where the riders center of gravity is back behind the horse's center of gravity. It may be the photo illusion, but the placement of the girth appears to be placed close to the horse's elbow so you may not be able to set the saddle any more forward. Second, I don't understand the rear girth idea. I've only seen two girths used on pack saddles, then they were attached together and not at the normal girth/flank cinch offset. If you're going to be roping, you have to secure your rear off-billet so it doesn't get caught in your loop. Yours is just hanging there.
Two other comments are cosmetic: your horn could be trimmed straighter up and down, and edged rounder, then burnished. And, your border needed the camo (or border stamp) stamped on the bottom like you did on your fork pattern. This adds to better symmetry of your design. Finally, the screw at the fork is too far back towards the seat. It should be placed in the centerline (up and down) of your fork, and about 1 to 1 1/2 inches down from the top edge of the seat jockey. I would have placed it about at the position of the 6th border stamp back from your latigo catcher in your offside photo (photo 5). This avoids pinching the seat leather in and interfering with your stirrups forward swing.
Good luck on your next saddle.
Ron
Thanks to you too Ron, and for the critiques too - always want to learn how to do things a little better!
>First, the placement of the saddle on the horse appears that it is sitting back a little. Your latigo does not appear to be >aligned straight up and down.
Here's a better photo showing the tree: http://www.easphotography.com/Carly/NewSaddle/8.png
I'm not a firm believer that the latigo has to be vertical, since that's not always the shortest distance between the cinch ring and the saddle rigging. The latigo should be perpendicular to the underline of the horse, but if the underline doesn't parallel the ground, that can put the latigo at an angle. I honestly can't remember if we moved the saddle after the photos, but I'll check where it ends up next time we go out to ride. Also see: https://www.facebook.com/photo.php?fbid=295408770503673&id=100001036569365&set=a.171624229548795.36485.100001036569365&__tn__=C
>Re: Second, I don't understand the rear girth idea. I've only seen two girths used on pack saddles, then they were attached >together and not at the normal girth/flank cinch offset. If you're going to be roping, you have to secure your rear >off-billet so it doesn't get caught in your loop. Yours is just hanging there.
It's quite an old style of doing things, but here's an example if you look at the 1892 saddle:
My wife hadn't finished her cinches yet, but the the final cinches will have keepers so the tails will be taken care of. I've also used a little 3/8" buckle and tail in the past to hook the free ends together. The advantage of this over a leather rear billet and girth is that you can run the rear snugged up all the time without restricting the horse, since the mohair gives a little bit. I'll be happy if she ever decides to rope anything, but it's a more sensible arrangement until that day comes about. On the world's bounciest Arab, it pays to keep the tail end of the saddle as much under control as possible.
>your horn could be trimmed straighter up and down, and edged rounder, then burnished.
This was a goof on my part. I ended up trimming the horn cap too close to my stitch line, so there wasn't a lot of leather available to round. I may end up redoing the cap later on as a result, but I was running out of time right now.
>nd, your border needed the camo (or border stamp) stamped on the bottom like you did on your fork pattern.
I added it to the fork beacause it seemed a bit empty without, but I can see what you mean. The skirts have the stitch line there, but I could have run the border stamp on the seat since that's not lined.
Thanks also for the note on the placement of the fork screw. I mimicked another saddle I had on hand, but I'll keep your thoughts in mind for next time.
Thanks again!
Adam
-
Nice job Adam. Will be looking for more of your work as you continue. I like this one really well. Now that you have most of the stuff in hand, it's time for you to get at that cantle binding stitch. It just takes time and patience. A little tip, when you are pushing you awl through, just before it comes out the back side you can see where it is going to come out. even if it comes out a little pull it back some and re angle the hole to come out where you want it. The mark or litte prick hole from the first try will close up and not show.
Again, nice job. Keep up the good work.
Bob
Hi Bob, thanks tons! I got a good feel for that with the binding even though I ended up hiding it, and the horn stitch line came out well. I'll be doing an exposed stitch line on mine since I think I'll end up with a really narrow cheyenne roll, so we'll see how it goes. This project, while fun, was under a little bit of a time crunch because it was needed for a riding competition, so I didn't want to risk messing up a large area like the seat. Thanks for the tips though, I'll keep them in mind for the next go.
-
Good Job Adam!
I like the clean overall look of this rig & I think your seat profile from the side view looks good. I believe less rise helps with staying centered - Is that what you find? I'd be interested in more info on this.
Anyhow, excellent overall! This site sure is invaluable for us first time makers - Really ups the ante and helps with relevant info on specific issues.
Looking forward to seeing more of your work! This saddle of yours inspires me to try and do better on the rig I have underway!
Ron L
Thanks Ron! The theory is that a flatter seat restricts your seating position less, though I've ridden some seats with a decent rise that still allowed a balanced position. Interestingly enough I'm now going to have to build a set of bucking rolls because the dressage saddle my wife normally rides is more restrictive than this one and she finds it a bit unnerving lol
-
Well done Adam. While I assume the pins are easier than an exposed stitch line. Regardless you did a nice job on them. I like the in-skirt rigging. Can you post a picture of the rear dee? Is it hand or machine stitched? Thanks,
Randy
Hi Randy,
Sorry, forgot to get a closeup, but there's not much to see. It's a Horseshoe Brand rigging D sandwiched into the skirt with a fairing plug, and held on by a couple of copper rivets. Is there something in particular you wanted to see? Basically done like this:
http://leatherworker.net/forum/index.php?showtopic=16313#entry179809
The saddle is entirely hand stitched, I don't own a sewing machine yet.
-
Thanks folks, but man I'm going to break some hearts from the sound of it when I say I sold that Icelandic to a friend. He really wanted to be a trail horse more than a rope horse, and they're happily tolting the trails of northern Alberta together.
Billy, I cheated a little on the cantle binding with the eustachian pins. I didn't want to try an exposed stitch line the first time out, so this was a nice way to cover that up. The binding was getting a little thick too, so it saved a layer of leather to go through.
I also really wouldn't want a 15hh Icelandic, honestly. They're wide horses on average, and I couldn't sit on that guy at 14 hh bareback for any length of time without my hips hurting. Even in a saddle (which need a lot of build up leather to get a narrow enough seat) it was tough to ride with relaxed legs due to the width of the horse.
Now if my current 14hh horse was 15hh I'd be thrilled, but he's a lot narrower and a HECK of a lot easier to fit a tree to. I like the little ones though - turn on a dime if they're set up for it correctly.
Stressed out over hobble training (photo credit to Lee McLean):

-
The last two "first time" saddles that I've seen posted on this site have looked really good. You did a really good job. I do have some questions for you before I jump in with suggestions. It looks like you have inskirt rigging, right or wrong? How did you make your flank cinch? What size seat is on the saddle? Will this saddle be used on the horse in the photo?
Ron
Hi Ron. You're right in that I have another one started, but this is the first one is the first I've finished. The other is on hold because I ended up selling the horse it was intended for. I have a third Rod Nikkel tree that I'm going to build off before I go back and finish the first one to sell off (neither of the horses we own fit it anymore, the tree is very wide).
Yes to in-skirt rigging. Going to be running two mohair cinches, so no leather flank cinch. My wife is weaving her cinches right now, so these in the photos are very temporary. Seat is based off a 10 3/8" thigh length, and the tree was made for this horse. It's seeming to sit a little nose down right now because the shearling needs packing down a lot. The tree bars have some accommodations for the short saddle fitting zone on Arabs, and seems to work pretty well so far.
-
Hi folks,
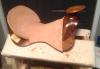
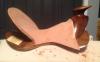
Due in large part to the info on this site, I finally finished (99% or so of the way) my first saddle this week.
Still needs stirrup twist wraps and hobbles and a little cleaning and conditioning. I would have preferred a mule hide horn wrap, but since this was for my wife, it had to match the seat leather (she won't really be roping out of it). The line of the fork shows though the seat a little in an attempt to keep the rise as low as possible, but the shape seems to ride really nicely.
Rod Nikkel tree, Steve Mason silver.
Any tips or honest criticisms greatly appreciated.
Thanks!
Adam


-
Would love to see the rest eventually! I'm just finishing up my first western saddle, but I know my wife would love it if I could do her up a new dressage saddle as well. Much tougher for Joe Average to get the trees required though, plus then there's the black art of stuffing panels
Thanks for posting!
-
No problem, nows the time for lots of cheap sketches rather than expensive leather
Here's another option that I noticed with a quick search. Same general look, but the rear rigging is separate from the front.
https://dennisranch.files.wordpress.com/2008/07/100_2291.jpg
-
I'm no expert by any stretch, but I don't think you're going to be able to have your rear rigging ring on top of the edge of the tree bar like that,. The leather will be wanting to follow the curved top line of the bar, and if you're not willing to pound the rigging ring into the same curve, it will tend to stick out a bit.
As an aesthetic thing too, the straight rear rigging lines don't compliment the curved skirt line. Nothing functional at issue, but it's just a suggestion.
Good luck!
-
I've seen this brought up before, and the only thing suggested as being chemically safe to put in their mouths has been rawhide (even then, not sure I'd do it). People have reacted to the tanning chemicals handling leather, never mind chewing on it.
-
Rod and Denise made me a nice Bowman tree with a large wood post horn. There were a few changes required to balance to look of the fork (stock and gullet thickness), but I don't foree and problems building on it. I had the same thought as you - like the slick forks, but wanted something to ride jumpy horses in the mountains on.
-
Don't do it to save money, even the materials are more than a finished production cinch of average quality. I did it to get a custom width, custom length cinch I made myself, not to save anything on the dollar side. I took a class in person from Pop Wagner, backed up with an ArtCords DVD.
-
Good stuff, thanks much. Wasn't something that made sense to me either.
-
Hi folks,
Was making up plugs for my skirts last night, and was hesitant about plugging all the way around the rear of the skirt to bring them level with the bars between the two bars. The Watt DVDs plug right across the back, but doesn't that risk rubbing the horse's spine if they have even a slightly prominent backbone?
It looks like on his saddle the only "spine channel" is removing fleece to allow the skirts to be laced together.
Thoughts?
Adam
-
I considered them for mine, but in the end decided that the straight-ish leading edge of the fender that they really best suit didn't fit well with the very rounded saddle lines I was going with. I think the only real downside is extra weight and thickess, and the more limited range of cosmetic choices.
On the plus side, they look really nice tooled up.
-
Looking good! Which Carlos stamp is that?
Stitching is looking good too, from what I can see. Going to be hand stitching myself, and given making up a set of zippered shotguns with all hand stitching was a big enough project, I've already noticed that the Tippman Boss is on sale. We'll see!
-
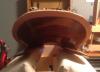
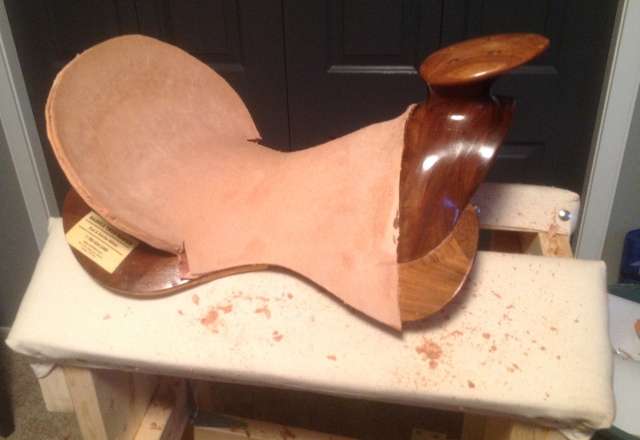
Bit of progress. Got the ground seat in, which required an extra layer of leather compared to what I was expecting. I think it's because my horse is so wide, but yet I still wanted to use the seat shaping templates that Cary Schwarz shows in his video. Seems to have been worth it, since sitting in the seat is pretty comfortable. Just have final work with the spokeshave and it should be ready for a seat later on.
The cantle is just rough cut to 1" wide, since I'm waiting to see what the final thickness with the seat will be before cutting to width. I added a filler later behind the cantle filler and above the rim of the cantle, since I'm not doing a leather cantle back. The plan was to use a cantle binding with a scalloped edge and attach it with stainless eustachian pins, so the wood back is shown as much as possible.
I rough cut all the other parts, and then got a shipment of cinch buckles in from Bork & Sons. I started stringing up a cinch, and it's looking like it will work pretty well.

-
Sorry, good point, since I'm doing a single rig I don't have flank cinches to cut out. Will update my other thread with photos in a little bit.
-
I just bought a piece of 13-15oz HO from http://www.montanale...her.com Talked to Jamie. They are out of Billings MT.
Mind my asking what shipping method they use and what the cost would be?
I would be interested to know how many professional saddle makers can get a complete saddle out of two hides...And would that include stirrup leathers too?
No professional here, but I would have come close aligning things a little differently. I needed an extra seat liner to account for a very flat bar profile, and I miscut my cantle filler once. I probably would have come close to getting a seat without those mistakes, and I cut my parts as Jeremiah Watt outlines on his video.
-
Adam: Thanks for the heads up - I called Ken and it looks like they won't be bringing in anymore of the 13-15oz HO - Guess I'll call up Sheridan leather and try and get a side from them.
Too bad about them closing - Ken is a great guy to deal with...
R
Agreed! He had a few Horseshoe Brand tools on sale if you need anything. I was thinking of trying Hide House since they ship Fedex (UPS is a no-no for duties and us Canuks) and are cheaper than Sheridan I think. I need at least one side - apparently my layout skills need work, since I won't be able to get my seat where I want it. Have another tree coming in a few months from the Nikkels, so I might just go ahead and get three to avoid doubling up on shipping.
-
Check out www.caledonleather.ca they're based out of Calgary and are Canadian distributors of Herman Oak and Thoroughbred leather. Their site isn't the greatest and they don't have any kind of stock listings so you'll have to contact them directly to find out if they have what you're looking for. I haven't placed any orders with them as of yet, so if any fellow Canadians have had experience going through them I would love to hear some feedback.
They were great (I'm actually in Calgary too), but they're closing, so I'm on the hunt too. Apparently HO is talking to another Cdn firm right now in Calgary, but it might be a while before there's a source.


Latest Off The Bench
in Saddle & Tack Maker Gallery
Posted · Edited by AdamTill
Great job on the saddle! Looks like it was ton of work, but nicely executed.
oltoot - though I get where you're coming from, for a "western dressage" saddle you'd want to allow some rearward stirrup movement, because they often have to drop their legs back to cue their horses. Most dressage riders are fussy enough about stirrup movement being restricted in general moving from english saddles.
As for being impressed about riding WD in a bosal, I wouldn't get too excited. I don't know the person in question, but if it's anything like these...people...they're just dressage riders playing dressup:
https://www.youtube.com/watch?v=VLslhXR1uwY
Everything about this video is an english rider having no idea how to use a bosal. Ride like this never letting the heel knot drop and you're asking to get a colt running through the bosal. You'd never make a colt like this, so these are just dressage horses where the tack has been swapped. Likewise riding curb bits two handed on contact.
The rules actually REQUIRE contact at all times however, which is a fundamental flaw in the whole concept. They're bringing eductation to all us unwashed western masses though lol
The whole "sport" is a bit of a mixed up mess right now IMHO.