


Pit 4 Brains
-
Posts
29 -
Joined
-
Last visited
Content Type
Profiles
Forums
Events
Blogs
Gallery
Posts posted by Pit 4 Brains
-
-
I might pick up a bit of beeswax to use as I stitch. I was using artificial sinew and it was fraying quite a bit. Thanks for the tip..
-
Is there any concern about the overall "de-waxing" of thread or artificial sinew after doing 30 or forty stitches? I was stitching up a holster today and noticed that the thread (A.S.) was almost devoid of wax by the fiftieth stitch, or at least not nearly as waxy as the first few. After I set the stitches with a mallet, they all look the same and are very consistent.
While I'm here, will wiping the the leather with alcohol before dyeing affect the wax in the stitches?
Thanks..
-
Wow. I really need to get going on my next holster. My turkey hunt is going to be a snow/rainout this weekend so I might as well get some leather tomorrow and get to work. Thanks for all the tips!
Looks like it's time to pick up one of those boning tools too..
-
Good product, fast shipping! Thanks!
-
Among other things, he was a Medal of Honor recipient. Rickenbacker Air National Guard Base is named in his honor. It is home to the 121st Air Refueling Wing, one of our sister wings. I serve the 161st ARW in Phx, AZ.
-
FWIW add another to the vacuum sealer crowd. to save $ on the bags use the rolls and cut them a foot or two longer than you need. that way when you cut it open your only cutting off a couple inches and can reuse the same bag till it's too small to fit everything inside. instead of 2 disposable bags out of 2 feet you can probably get 5+
I just found a couple rolls in the pantry. I asked my wife if we still had the sealer and low and behold it was tucked under the counter in the corner of the cabinets. I thought we sold it in our moving sale.
I use a garbage bag and a shop vac to form mine.
Hmm. How do you keep the garbage bag from flattening and sealing before a lll the air comes out? I tried to deflate an aircraft lifting bag like that but the low pressure at the nozzle just flattened the bag right there and left the bag somewhat inflated. And that was some heavy duty rubber too.
-
Lobo, thanks for that VERY informative post. Before this I had never thought to do two formings. Now all I have to do is fab up some boning tools and get to work on my next holster. Thanks again,
-Pete
-
Like anything else, looks like I have a lot of trial and error ahead of me. Thanks for all the tips and help. I'll be forming up another this weekend and applying what I have learned with this one.
-Pete
-
Figure where your stitch lines will be then bevel the inside of the mouth and toe between the stitch lines. If you bevel the inside edge of the pieces that get glued and stitched together you will end up with a groove in the middle of your edge. I found that out the hard way along time ago.
Ok, stitch line to stitch line.
I think I'll do a much simpler one this week with the leather I have left. Maybe just a bit wider than the belt loops for a high-carry, non-retained type.
I use some simple Tandy waxed thread laid in a groove with a 2mm Craftool diamond punch (two prong). What 's the norm on hand stitching these things if I might ask?
I had one of those. It wasn't cost effective to store food at all as fast as we ate it. Wish I had it now. I'll be in the used market for one now.. Thanks for the scoop on that method.
Does the texture of the inside of the bag imprint itself on the leather?
-
This is a good investment. At least it works very well for me. I practically saturate the leather and drape the leather over the mold gun or a protected real one. When you hit the start button, help the leather to stay close to the gun so you can get some good angles on the leather and makes for tight stitching. The leather will remain wet but the shape will form. Leave the bag closed for an hour or so. Remove the leather and gun and leave the leather on the gun. When out side is somewhat dry, remove gun and let dry. If sunlight is available at this time, ya got it made.
I had one of those. It wasn't cost effective to store food at all as fast as we ate it. Wish I had it now. I'll be in the used market for one now.. Thanks for the scoop on that method.
-
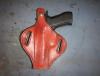
Well I am not saying that this was not a decent holster for your first attempt, because it is a decent one for the first. Just pointing out some things for the next one. When you do the next one try to remember to bevel the edges of the mouth of the holster and the toe before assembling then to the main edges after you have put the holster together.
It may not look beveled in the pic, but it was. I think it's the black edging I used for a final touch (another thing I think looks cheesy).
I think it may help if I have my tools out in plain sight and in order of usage..
When beveling the mouth and toe, is it imperative to not bevel the parts that are going to make up the welt? if so, how do you determine that point ? Is it right at the stitching or a little towards the welt or the mouth/toe?
Thanks ..
-
Thanks for the tip on the flat back holster.
I have to admit, I got wrapped up in this thing that I forgot to bevel all together. I did most of it after stitching and staining. I need to concentrate on my order of processes.
I did not line this, I just thought the stitching would look good along all edges. As for the toe, another overlook.
I think I need to fall back and do a simpler pancake without a retention strap.
-
Do you still have this?
Thanks
-
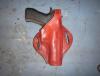
I have been looking at thousands of pics of holsters before trying to make one. My goal was to replace my Bianchi with a similar leather holster that will not rock or slide on the belt. I am new to leather so please bear with me. I have minimal tools but the collection slowly grows. I have wet formed a few small projects and I can't seem to achieve that "vacuum sealed " look that I want. In reality, my leather looks like I beat it to shape with a hammer. I used 6-8 oz veg tanned leather. Is my leather too thick to get a good fitting form? All in all, this holster came out well and it's something I'll wear when hunting since I won't mind dragging it through the Sonoran Desert brush.
The things I like:
My stitching is becoming more consistent as I go. I use a saddle stitch with a knot.
The holster wears well and fits my contour well.
The things I don't like:
Fingernail marks
Everything else
I tried to make this a pancake with the inside as flat as possible by making the outer leather bigger than the inner. It almost worked but glueing the two different sized pieces together was a solid pain. I guess I'll open myself self up to any and all criticism. I really want to learn how to make holsters as a hobby and maybe even a side income of sorts to pad a retirement.
Thanks, Pete

-
I just picked up the seven tool set from Tandy. When I told the salesperson that I was starting out and slowly building my inventory one week at a time, she mentioned a kit that had the tools and other stuff. Upon looking at the tools, it seemed like they were sand casted and the ones I had in my hand were polished and detailed. I spent the $ for the quality of the tools.
-
It only takes over the whole house long enough for you to build a separate building for it.
That only took me 5 years, . . . and about 3 grand.
Oh, . . . and that word you used, . . . uhhh, . . . "Expert", . . . well, ummmmm, . . . money doesn't buy that. You can become really good at one or two things in a couple of years, . . . but even then, . . . "Expert" is a long way down the pike.
I'm 70, . . . been messing with leather on and off for almost 60 years, . . . and will be ground temperature long before someone tags me with "Expert".
Very few attain that status, . . . and that is not meant to dissuade you, . . . just inform you.
May God bless,
Dwight
I almost thought I was reading a quote from Paul Harvey. Any man that claims himself to be an expert has a lot to learn..
BTW, I'm just starting out too…
-
I believe that half of the fun is collecting/ accumulating tools, Ebay, Craigs list, Fellow board members:( http://stores.ebay.com/Used-and-Vintage-LeatherTools) have to be quick sometimes!
If you buy a starter kit- keep what you want, give as gifts, trade or sell the tools you don't want or care for. Upgrade over time. Get creative- free granite slabs from countertop companies, dead blow hammers on sale at the farm store. I found a head knife for $20.00 at an antique store and another at a county fair by a tool vendor for $40,00. Both prized possessions!
Talk to friends, neighbors and strangers about your hobby. A guy, who knows a guy, that has a friend is selling/giving some tools away. Or knows somebody that does...
Awesome adventure! Have fun!
Indeed you are right. Collecting is the name of the game. I just want to make sure I'm getting the best item for the buck. I use mostly Snap-On tools at work but I have Craftsman at home. I don't pay for the tools at work but I know the quality vs. the ones I pay for and have at home. I don't mind having a multitude of brands in my toolbox, as long as I know that I have good quality tools. Tandy seems to be be very reputable and I see BK is noteworthy on this site. I just want to be able to sort the junk from the good stuff when I find it in the wild.
-
So the "starter" sets are off my list but I have been seeing a handful of tool sets that are labeled "floral" and "steampunk", etc. I think I'll go with a set if it has all the basic tools to start carving. Now my dilema is what brand. I have a Tandy store between my place of work and my home, everything else would be online. I checked out Hobby Lobby and Michael's nearby and their tools look like they were sand-casted and then dipped in fake chrome. I have no experience with leatherworking but I am an aircraft mechanic that works with close-tolerance parts and I can see just how cheaply these tools are made. What are some of the better grade brands out there? I don't mind paying more for quality tools that not only perform well but also last.
-
Ok. So the road I'm on seems to be a good one then.
-
I'm just getting started out in this craft and I'm on the fence about how to aquire basic tools. On one hand there are the various starter kits available that seem to include most of the things I don't need, i.e. sponge, poly hammer, rotary hole punch, cutting board, etc. On the other hand, buying swivel knives, basic stamping tools, stitch wheels, edgers, and whatnot can be expensive to buy one at a time.
As of right now I'm purchasing one or two tools a week as I find a need for them but that method led to me taking a solid month to make a knife sheath with equally spaced stitches that were in a groove. You get my point.
Bottom line, is there a really good no B/S starter kit available or should I ramp up my inventory one piece at a time? Budget is definitely a driving factor as well. I need to keep it a hobby for now.
-
Thanx a bunch. Still trilling around the site looking for the place to "jump in"..
-
Hey Ben, Pete here. What got you into leather working? I just membered up here as well.
-
Just getting in to some leather working. Not looking to go pro but just make some of the things I would otherwise buy and repair / replace some of the stuff I already have and ultimately make it a growing hobby. I have a hide from an elk that I harvested and I just can't take a knife to it without knowing what to do with it. So here I am.
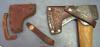
This is my axe sheath I needed to replace..


Wax Loss
in Sewing Leather
Posted
Staining before stitching. I haven't thought of that yet. That would really help keep the leather clean for a nice consistent finish. Right now (I'm still very unexperienced) I keep finding areas of my projects that did not take to the staining for one reason or another. I was assuming it was either wax residue from stitching or skin oil from all the incidental handling. Besides, if I botch a finish job, then I won't waste time stitching.
Thanks!