


dickf
-
Posts
442 -
Joined
-
Last visited
Content Type
Profiles
Forums
Events
Blogs
Gallery
Posts posted by dickf
-
-
My experience goes like this:
Dip dye a scrap piece in Fiebings Pro Oil dye (saddle color). Let dry. Blotchy. Tried 2 more times with different leather from different cuts. Same results.
It must not happen to everyone because a lot of people use the stuff, but I will say, Angelus and Lincoln dyes have NEVER done this and I've applied them to crap leather when I made the kids in the neighborhood holsters for cap guns. The holsters all came out uniform in color, as always.
-
Fiebings dye is crap. Get some Angelus or Lincoln dye. You won't have to buff the excess more than a minute and it take no effort. No bleed, no rub off.
-
I've had the same issue using Fiebing's Pro Oil brown's. The Fiebing's Pro oil will penetrate completely through the leather very quickly. The leather around the gun will stretch and/or compress during molding. It seems like the movement causes the dye discoloration, since there is so much dye in the leather. I've had much better luck using Angelus dyes. They do not penetrate as deeply, if you just give them a quick dip. Since there isn't as much dye in the leather, it does not discolor under compression/stretching. At least that's my take on the problem. I have not had any issue since switching to Angelus from Fiebing's Pro oil. I still use the pro oil for black, but nothing else.
Add me to the list, too. Fiebing's Pro Oil Tan did this once, then I threw out the bottle. Angelus dyes will not do this. It's most certainly the dye, not the procedure.
-
The custom slot punches are probably one of the most valuable tools on the bench. I used to do it the old way of drilling out the end holes and connecting with a razorknife, but the punches make a perfect slot every time and only the rear needs a bevel. If I had advice for tools that will pay for themselves quickly, this would be in the top 3, for sure.
-
I definitely not rely on glue alone for anything, but I understand your point. Stitching does help prevent leather from stretching to a degree, but it obviously does nothing for the fit of the holster. Double rows do look nice, though!
-
Very excellent fit and finish. If I had one critique, it would be to carry the inside stitch line straight down by the belt loop. Is there a reason other than stuffing stitching in you don't repeat that on the trailing wing?
I'd say it's an aesthetic thing. The rear slot's closest stitch (other than the edge of the holster) isn't that far away at the triggerguard. With more stitching in that area, you break up a field of really pretty smooth leather. The forward slot could've been left alone, too, but I don't find it imbalanced.
I'm starting to shy away from the everything-must-be-double-stitched thing and have been leaning more and more to classic single rows of earlier holster examples. I guess this is my way of taking baby steps!
Thanks for the nice words.
-
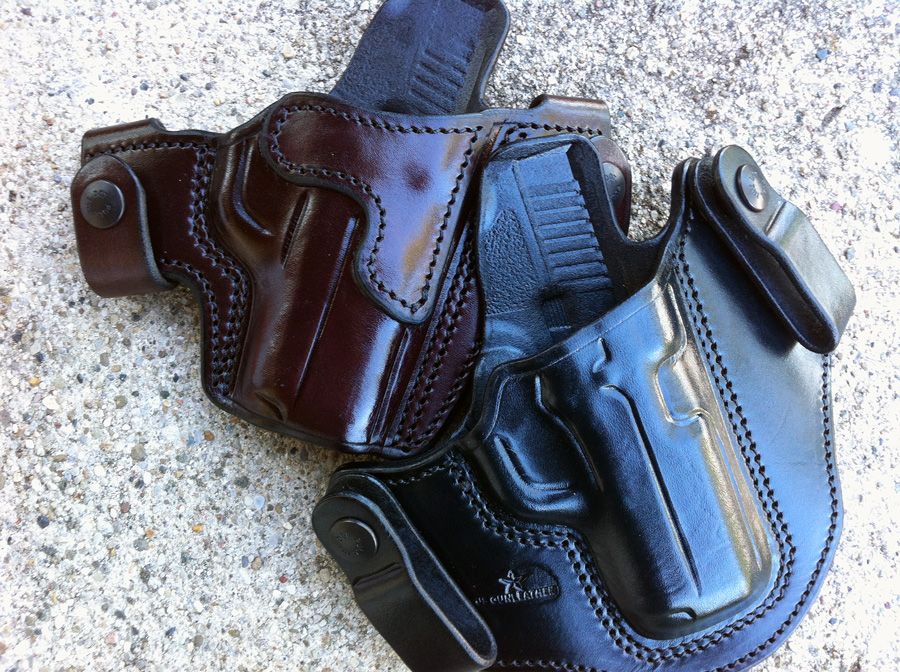
Made this pair, as well as a 938, for a customer. I don't have a whole lot of experience with holsters for Sigs, but thought these were pretty. I don't do black gear nearly as often as I'd like.

-
While it looks attractive, the trigger isn't covered and the stitch line doesn't follow the profile of the gun. To me, these are chapters 1 and 2 of holster making.
-
That is a very nice holster Supercub! The only leather gear I've made that was snap on OWB like that is a few single and double mag pouches, but I want to make a holster soon.
Ran does great work, but the snap on OWB is not a new design. If I remember right, it was the late Lou Alessi who first designed the snap on OWB. Someone please correct me if I'm wrong.
Paul
It was Bruce Nelson with his 'Patriot' holster. Lou and Matt simultaneously started working on their own versions at the same time (unbeknownst to each other at that time).
-
Thanks again, Shooter!!!
-
Hey, i think i have some brown and black laying around...the light brown can probably be dyed?..let me know and you can stop by and pick it up one evening..im just right down the road from you..
Indeed you are!
I think I'm squared away, but should something fall through, I'll certainly give you a ring. Thanks for the offer!
-
Thad Rybka designed and makes the Rhodesian holster.
-
I like the little guys, too. Looks like a fun one to make, and quick to boot. Nice!
From your pictures, it looks like your tension is off on the machine.
-
I've ordered from both places and I always go back to Rob's store. Ordering direct from Ring's (the last time I did), it was $45.95 + shipping. They were fast a few times and slow a few, too. Rob is less expensive and in my experience, just as quick.
-
I don't have your email address, but I sent a response via contact form on your site.
Thanks so much!
-
I have 1 holster to trim in a dark red or cordovan piece of ostrich (quill). Anyone have a piece they could sell me, or know of a place that sells smaller pieces?
Thanks, fellas!
-
A sharp wood chisel is what they are talking about. I may just try laying them out, punching the top and bottom and using a X-acto chisel blade straight down slowly... I wish someone made an affordable punch. I'd pay $20 or $30 but it looks like most of them are in the $60+ range...
There are a few tools in my arsenal I couldn't live without, the slot punch being one of them. I put off buying one for so long in the beginning because of the cost, but to have one made to your exact specs, punch a clean slot every time, was more than worth the price. Besides, you only buy it once. As an added bonus to making a perfect slot, you only have to bevel the rear side because of the taper. It practically burnishes the leather on the front as it enters.
-
It looks like your trying to burnish the mouth after it's molded, which isn't going to get you where you want. Try burnishing the mouth area (and toe area) before gluing. After it's glued and stitched up, but before molding, burnish the rest of the holster then mold and finish. Depending on what type of finish I'm after, I'll sometimes use beeswax which really helps lay everything down and create that one-piece look and feel.
-
Thanks! No, the cordovan dye is dipped full strength. I've tried the Angelus cordovan on many brands/tannages of leather and it's always a great performer. The color is really deep and rich.
-
I haven't posted anything in a while, so I thought I'd put this one up. These went out today, both for a Kahr CW-45. I guess there's not much to say about either one except that they both turned out really nice and are very comfortable to wear. The cordovan BSP is in 8-9 oz with Angelus dye, and the black Model 1 is in 7-8 oz with Lincoln dye.
The Lincoln is the smoothest black dye I've ever used - virtually zero excess pigment on the surface. So much that I don't even waste the time by buffing it.
Anywho, comments and critiques are encouraged. Thanks for looking!
-
Really very pretty. Your work has such a classic style to it, one that I genuinely love. To me, gunleather in the late 60's and on into the 70's was great - well designed and beautifully executed. I think you nailed it!
-
Well, I've got an order for holsters to accommodate the 9/40 and the 45. I can score the 45 but at this point, I don't think they make the 9/40 version.
Ugh....thanks for the help, fellas.
-
Hi all,
Looking for this mold - anyone seen one around?
It doesn't appear to be an item Rings sells.
-
Hey, thanks for the compliment!
Also, thanks for taking my post as it was intended. You can definitely build great holsters if you want to with a little bit of knowledge and first hand experience.
Have a nice night.

Computer Drawing Software For Making Leather Patterns
in Computer Help
Posted
I lay the gun on a flatbed scanner, use the pen tool in Photoshop to separate the image from the background and have a perfect 1:1 sized image of the gun.