


dickf
-
Content Count
442 -
Joined
-
Last visited
Posts posted by dickf
-
-
I'd say you pulled it off the best possible way. Its a beauty for sure!
That's a nightmare holster - any way you cut it, that thing is THICK inside the pants. Add the cross draw + thumb break elements and you have a holster that seems like a good idea on paper, but will likely implode due to design contentions. I totally understand your reluctance to take the build - theres no way I'd do it (I know I wouldn't pull it off like you!).
-
Interesting observation. the wing design/ spacing I mimicked from an Aker holster I have, because I wasn't sure exactly where to place the loops. I have found this distance, for my belt anyway, lays a little flatter than a closer spacing. I think my belt is too thick though.
I like my holsters to have a natural curve built into them. The front panel is always larger than the rear. This way, you don't rely on extra width - you can build gear that has very tightly close-spaced loops/slots and that rides nice and tight without collapsing the pocket.
Cheers!

-
No buffing?
Well, that was the abbreviated process. Buffing after dye takes maybe 20 seconds per panel. There's little to no excess afterwards.
-
I use linen thread, so I'm sure my thread would dye too.
I seal very last thing, either mop n glo or beeswax neatsfoot oil mix
If you are saying that you stitch and mold BEFORE you dye, then of course the thread will get dyed.
My process goes: cut panels, dip in dye, glue, sand, stitch, mold, dip in sealer. Perfect white thread every time.
I only commented on the sealer-before-stitching because it was advice given to you in this thread and I don't see how it's possible.
Good luck!
-
2 fasteners through the strap does cure the rotation of them. It's a Del Fatti design element and makes total sense. Brigade's are not both through the holster, but are simply offset.
I'm also in the group that integrated straps are the way to go. While it certainly can jack up pattern cutting, it definitely adds to the design and is worth it.
The rear of your holster suffers from the original pitfalls of the Patriot by Nelson: wings perfectly straight and attachment points too far away from the pouch. Bring it in and integrate the straps and you'll see a much more stable platform.
-
Damn fine job!
Your exotic work is always so clean.
-
Why does it seem nobody likes Fiebing's
Because you inherit issues that you're describing. I dip holsters in black dye, dip in acrylic, and the thread stays bright white (same goes for brown leather, etc).
I don't see how you could properly form a holster if you sealed the leather first.
-
If you use Angelus or Lincoln dye, there won't be an issue.
-
As stated, that's one of Andy's holsters, and they're really beautiful. I can assure you, the leather is not thin, nor does he work in horse. It's all English cowhide and that holster pictured is roughly an 8oz front on a 9oz back, give or take a mil. I'll not divulge the chemicals used, but I will say the results are an extremely firm, yet flexible holster. I'm quite fond of his gear and use 2 of his holsters often for a govt model.
The lighting in that photo caught the flat slide which makes it appear more mirror-like. This is a nice side effect of the 1911 and one reason why lots of gunleather guys prefer pictures of that model for holsters.
-
They all look sharp, mate! Nice job.
-
I'm with Katsass, vinegaroon is the only way to go for black, just make sure you search the forum for the correct procedure. Plus that is the best way to use white thread with black and for me the thread has got to be white.
I do white thread on black leather all the time with no problem, and I dip dye my leather. I think the quality of dye is the culprit.
-
Much better than my first holsters!
Looks like the leather is of low quality. If you decide to ramp it up, things will become much easier and you'll be happier with the finished product.
The only glaring thing in design that I could give advice on is the mag release is fully covered. You could easily notch out the leather for it.
Nice job!
-
Thanks for the nice words guys!
Driften, I ordered the snaps directly from DOT.
-
The profile of the triggerguard is what I was talking about. I meant no disrespect. The stitch line is critical, and if you feel that it can't get close because of the combined thickness of the front panel, then it would make sense to go lighter on the lining to achieve a tight line. A full coverage exotic is an investment and a tight, long-lasting line is completely necessary.
My 2¢.
-
I think they look nice. The stitch line is way off, but that's easily corrected.
-
The hide is really pretty. Is that for a 1911?
-
Thank you for the comments. I see things I can do better next time, but I'm still very proud of this one.
Colt, the dot is at the bottom. The carrier will not detach from the belt, even without it broken in and tight. I align these with the word 'dot' in ths position they should be pulled.
-
Earlier this month I debuted my BSP holster for an M&P Shield. Since then, I've had several orders on the books for it for different guns. Here's one for a 1911 Government (my all-time favorite to build for and personal carry choice).
The small wraparound mag carrier has the smallest footprint of any item I make, is fast on the draw, and hugs tight. It's secured with a single one-way snap for security and goes on and off in seconds. Oddly, this little piece of gear took many iterations to get right. Who knew?
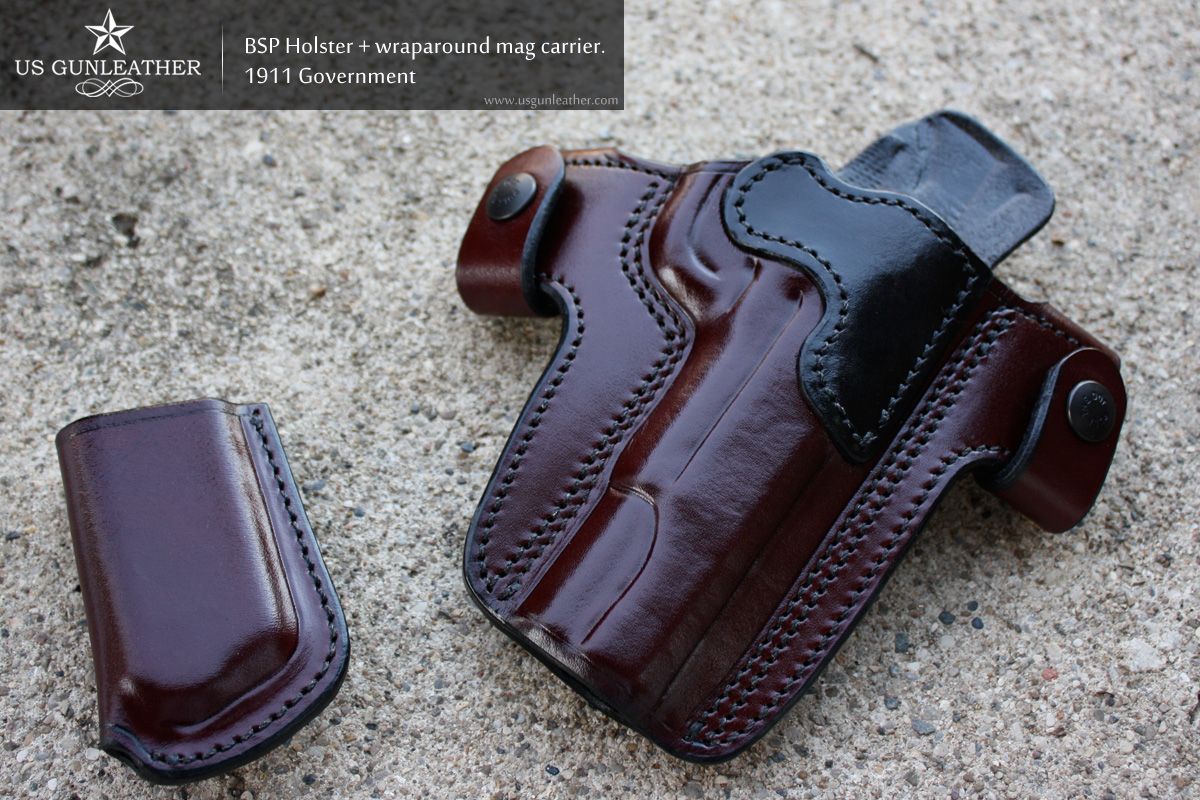
Here's a rear view of both pieces, as well as a few shots of it being worn on the body. Note the slim profile, even when worn @ 3 o'clock. The muzzle rake (angle of draw) has been tweaked for this pattern, and I'm very happy with how it draws and holsters.

The BSP (Belt Snap Pancake) is my improved version of the well-known 'Patriot' holster by legendary designer, Bruce Nelson. Bruce's original pattern had the wings over-elongated and a few other things that prevented it from really working to it's full potential. It took quite some time for me to get this one right, but it's ready for prime time and is quickly becoming my favorite holster in my lineup.
As always, feel free to pick it apart and thanks for looking!
Chris
-
Just received another inquiry (I receive a couple every week) from a gentleman who owns a 1911 pistol with Dawson rail attached, with Surefire X300 tactical light attachment, wanting a IWB-style holster made. The following is my reply.
_________________________________________________________________________
Thanks for your interest.
I offer 11 holster designs, with or without 4 common options, in 4 finish colors, left-hand and right-hand, for 139 different handguns, resulting in over 60,000 possible variations and more than 10,000 patterns in file for regular use. I still receive requests for others almost daily.
Assuming that holsters for handguns with tactical lights attached were remotely practical, and assuming that I selected only a dozen or so of the currently available tactical lights to acquire and use for patterning and forming holsters, I would then be up to around 700,000 possible variations and around 100,000 patterns in file (each of which takes a couple of hours work to generate, so about 100 years of working 40 hours per week on the patterns before a holster could be produced). Even then, the "new and improved" versions that are announced just about every week would render everything else obsolete and start the whole process over again.
Life was so much more simple 40 years ago when I took my first holster order. Half a dozen handgun manufacturers, each offering half a dozen handgun models. Now there are dozens of makers, each offering dozens of models, and new variations being announced every week. Just keeping up with the GUNS available could take a couple of people working full time every day. Adding in all the aftermarket accessories would push the possible variations into the millions.
Almost all holster making is done using "dummy guns", cast replicas of the originals usually so accurate that the serial numbers can be read. Dummies are usually available only for current production handguns that have achieved a significant market share. Newly introduced handguns are almost never available as dummies until they have been on the market for a year or so. Most handgun models are never offered as dummies because the market is so small.
Unfortunately, those who choose to acquire the "newest and latest thing" will usually find nothing available in holsters for a long time. Those who customize their weapons, or add aftermarket accessories, will always find it impossible to purchase a production holster. The only possible alternative is to make your handgun available for patterning and fitting a holster by a custom maker. This work involves multiple hours in patterning, prototype production and testing, adjusting the pattern, producing additional prototypes, etc, before the final result can be produced. Very few folks are willing to pay for the time involved. Even those who are will find that the various federal, state, and local laws pertaining to firearms transfers can make it difficult, expensive, and risky to move forward on such a process.
The best advice I can offer is to locate a holster maker within your state of residence, as close as possible to your home, then open up your checkbook and be ready to pay several times the price of any production holster to have what you want created.
_______________________________________________________________________
I'm saving this one for replies to the next couple of hundred folks with the same idea in mind.
I'd like to see 10k patterns all spread out!
I take a different approach when declining a project. I think this one is condescending and sarcastic, and you have NO idea what the end-user intends to do with that gear. Some folks have special needs for special jobs. You may have been a LEO and holstermaker for 25+ years, but your end-user/customer could be someone who significantly outranks you when it comes to tour of duty and/or being dropped in the shit. A copy/paste reply is like pressing 1 for English and then 2 for customer service. If you're a custom maker, you MUST talk to your customers and get all the details. You never know who you're dealing with, and they very well could know much more than you think. If you don't feel like you can make the holster they want and make it up to your standards, then say so and move on. Insulting their knowledge because you're not the right maker isn't necessary.
Just my $.02
-
Thank you for the compliments - I sure do appreciate it!
I think the trick to dip dying is to use good dye. I say it so often, but I stopped using Feibing's products for dye a long time ago because I could never get even shades of any brown without using an airbrush. Even then, after I got the holster wet, it bled all over my white thread and tinted it to off-white...or worse.
Angelus makes great dye that can be used for dipping, and yes - the leather panels get dipped in dye, then pulled out and left to dry. After they're dry, they get buffed and kicked down the line. There's no special trick (that I know of, at least) to getting detail after dying. I've tried molding then dip dying and my results weren't as good as my current method. I think it all comes down to the type of dye. When I started dipping, I had to buff for days using Feibing's dye, but as soon as I switched, a few quick wipes and I was moving on. There's no way to preserve white thread if you're building then dying.
Chris
-
TCD will build you a slot punch to your dimensions for $60. Mine came sharp as hell and is what I use to cut slots through 2 layers of 8/9 oz for pancakes. The dimensions are perfect and have since ordered a few more dies from them for a couple things. Just tell Heather what you're using it for and what you expect it to do.
-
Wow, thanks for all the nice comments!
I'm really liking the classic tan leather with white thread combination - something about it really speaks gunleather to me.
This holster was dip-dyed in Angelus dye and dipped in Angelus 600 acrylic to finish it off. I received some really good feedback from someone I consider to be one of the best, and I put it to use on this one. I feel it came out better because of it.
@TwinOaks - I used to build them with a shield that rises so high it covers the very tip of the beavertail, but to be honest, I think it's too much. Leather that extends like that on it's own gets flimsy and floppy and I much prefer the more classic subdued version. I've attached a pic I took of the back side - maybe it goes higher than it seems, maybe not.
@renegadelizard - I use a manual press to do the initial blocking, then hand mold the rest.
-
The whole package looks perfect together. Very very well done!
You're the one who inspired me to try shark...I guess ostrich is next!
-
Made this holster for a Lightweight Commander. Leather is tan with white thread and black loops to match the belt. I'm quite fond of the two tone look with the loops.
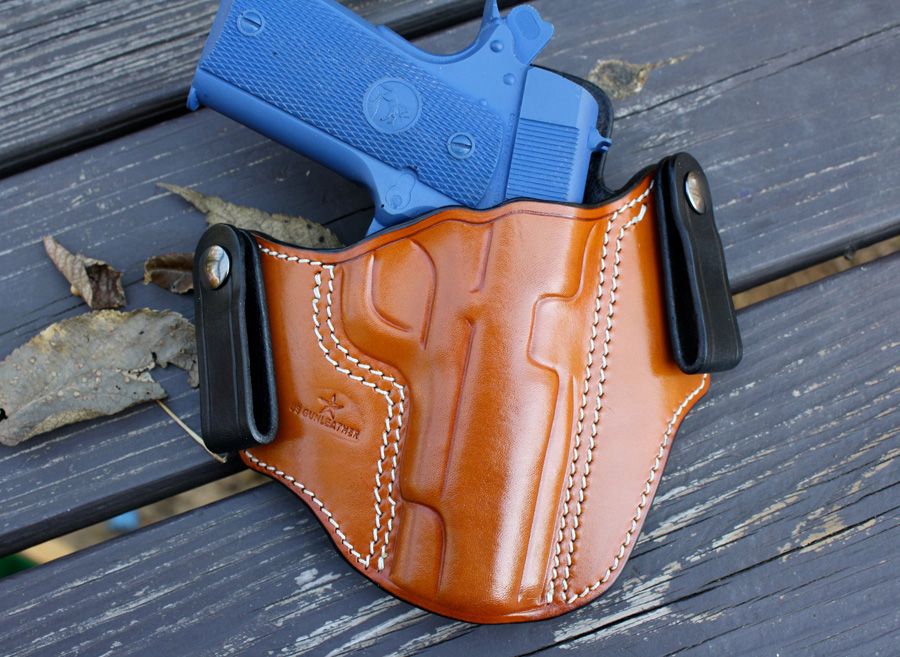
I see a couple things I'd do better next time, but feel free to pick it apart.
Chris

Sig 1911 Gun Mold, I'm About To Buy 6, Anyone Interseted?
in Gun Holsters, Rifle Slings and Knife Sheathes
Posted · Report reply
If you were getting them from any other source I'd be interested. I broke the thumb safety on a Rings 1911 govt model and ordered an in stock version from Duncan's. I paid the extra $5 for a sight rail. What I got was...
- sight rail taller at ejection port / inconsistent height
- right side dustcover completely square
- trigger guard very thick
- can you spot the very first thing I noticed when I looked at it?!
- thumb safety looked like an afterthought, although was very beefy
- Absolutely unacceptable. Sight rail was crooked and just plain sloppy.
- slide flats were not the same dimensions on both sides. Look at the base of the sight snd how uneven the sides of the slide are.
To be fair, Luke was understanding and provided me a full refund ( except the cost to ship this thing back to him). He did tell me they keep their molds within 1/64" tolerances. You be the judge on that.
I've since modified my blue guns to take steel safeties. Your mileage may vary.