


dickf
-
Content Count
442 -
Joined
-
Last visited
Posts posted by dickf
-
-
Thanks for the nice words.
@Triage: the shark came from Springfield and I dyed it black.
@Jake: I only use Angelus dye at this point. Those were dip dyed in their Spice color.
-
If Mop-&-Glow is for floors than drills are for wood and metal. There are many different ways to do things and most times no one way is right. Katsass (the grump) is very knowledgeable when it comes to leather work and he is really smart on saddle stitching.
I didn't personally attack anyone, did I? Have you ever tried any other methods?
I've used/experimented with many different natural and acrylic finishes, and mop and glo simply cannot seal the leather properly. I dunked a piece in it 3 times, letting it dry overnight between each coat and a single drop of water will penetrate right through it. For concealed carry rigs, this is unacceptable. Mop and glo is an old secret to getting a great shine on your boots, but it will discolor and potentially crack over time on any part that flexes. Let me ask you this: how many pro holster makers are using jugs of mop and glo in production?
While there are multiple ways to skin a cat, sometimes you have to use the tools made for the job.
Anyway, that's just my opinion, and it wasn't meant to be offensive.
Good luck.
-
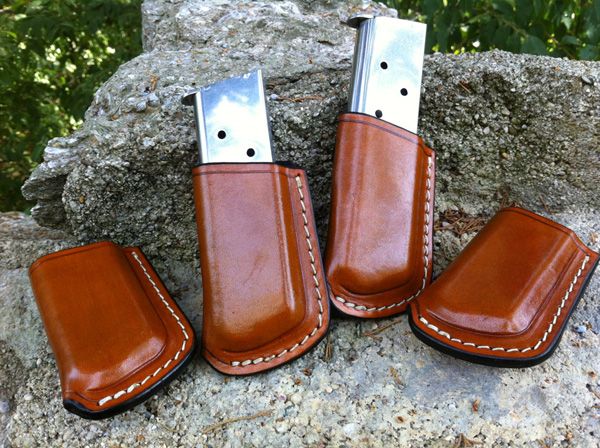
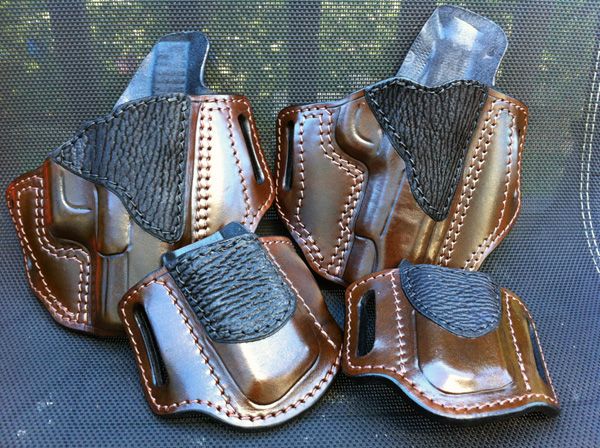
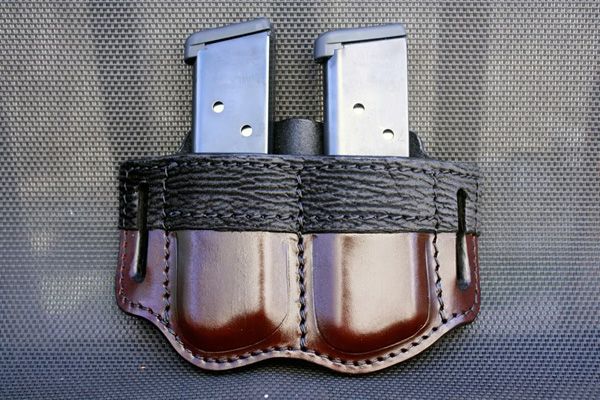
I have been pretty busy lately, but have remembered to take a few quick shots of some gear that's been going to it's new home.
As always, comments, critiques, suggestions are welcomed!
Set of 4 1911 single mag carriers in tan with white thread. I love making these.
This is a set for a soldier currently deployed in Afghanistan. He'll have these waiting for him when he arrives at the end of this month. Glock 19 and Commander rigs with black shark.
1911 Dual carrier with some shark mouth
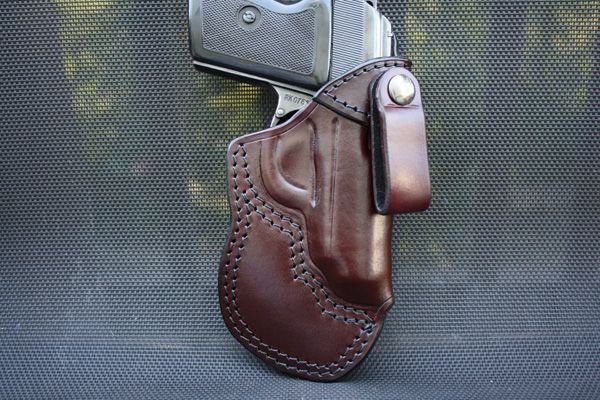
Brown IWB for the Polish P64. This is a really comfy pattern for this little gun.
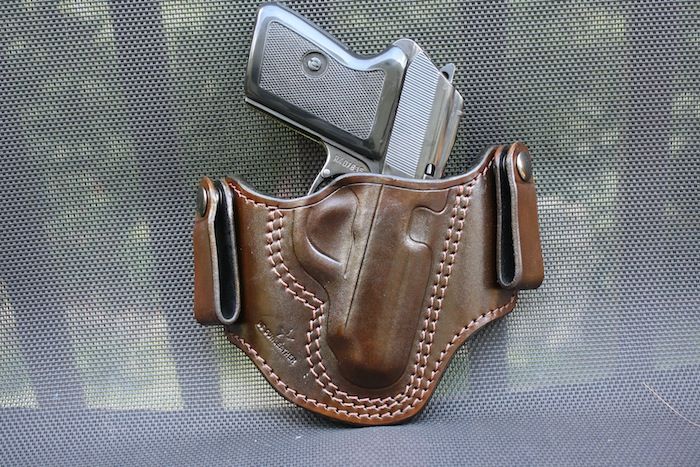
My out-of-prototype stage minimalist IWB for the same gun. I can't stress enough how awesome this holster is for small guns.
Thanks for looking!

Chris
-
I am from Amarillo Texas. I started making housters for myself last year, and wound up making more than one for most of my handguns. Then I start reading this forumn about 2 months ago and found out how BACKWARDS I was going about the process. I have spent a lot of time reading and learning from this group. An example, yesterday I said "honey you got any mop&glo" of course she said no, so we ran out and got some to try what someone who calls hinself the grump suggested. I have experimented with so mnay things that I have read hear.
Well I am just about to make my first avenger for a bersa 380. I have the pattern ready to go but have been practicing several aspect to make sure that I am ready to get it right. I have been glueing 2 small pieces together and then practicing beveling, stitch lining stiching, the belt hole airbrushing and finishing and so forth. Here are a few questions.
1. When I spay the leather cordovan and then the second black around the edges it usually looks pretty good, but I think that whe I buff them it blends into an almost black all over, Is my assumptio correct, and if so what is the remedy?
2. Most video example are sewn with a machine. When hand stiching, are stch lines on both sides of the leather? If so, it seems like the smallest mistake and the drilled hole would mis the back line.
I appreciate all I have learned form this forumn and any input to my questions. Before to long I will post a picture of some past holsters (ugly yet functional) and the new one.
Brent
Hi Brent. I'll offer this advice...
The Professional (Avenger) type pattern is one that takes a couple iterations to get exactly right. Figuring the ideal distance between the loops and where the front tunnel is located will determine how close and tight the holster rides. I would recommend a pancake for your first, as I feel it will be more forgiving in a few areas.
Mop and Glo is for floors - what you need is an acrylic that is meant to be used as a topcoat for leather. Angelus makes a wonderful product and I don't think you can go wrong with whatever finish you choose (satin, gloss, semi-gloss, etc.). To apply it, all you have to do is dunk the holster in it. Easy enough, right? I've tested the Mop and Glo as well as other chemicals. It's not up to the job that's required for a hard-use holster.
I think airbrushing dye can yield some really great looking results, but you'll not get very much penetration with the dye in the leather. One scratch will show natural leather and is pretty much a done deal. If you're dead-set on airbrushing, perhaps you could dip the pieces in the primary color (cordovan), then airbrush the black on the edges. This way you have a piece of leather that is nearly struck through will color.
Machines are obviously faster at sewing it up, but every holster maker, regardless of tenure, should know how to hand stitch properly. I always kept the grooves for the stitch line on the front panel for the reason you pointed out. I do make a point to either crease or groove a decorative line around the mouth and muzzle end of the holster on both sides. When I hand stitched, I would groove the lines, mark them with an overstitch wheel @ 6 spi, and drill them with the smallest bit I could chuck in a dremel (I think it was a 1/16"). I had to use pliers to pull the needle through the second time around. After the holster was wet and then dried, the holes closed up a little and made for an extremely tight stitch. I never did master the awl method (as opposed to drilling), but it's better than drilling because you're not actually removing material.
Sounds like you're really trying to do your best to practice before you start cutting your pattern, which is great. You'll find that each holster teaches you something new, something you should do next time, and something you should never do again!
Good luck!
-
I buckled the spine of a Glock mag making carriers. The next best thing would be to buy a real one and fill it with epoxy or something.
-
Also, judging from only pictures I've seen of them (mags), they're empty.
Rob, do any of the mags have a round in them?
-
Ordered an out-of-stock Hi Power mold from Rob @ Bluegunstore.com, and it was shipped in just a few days. Rob was fast to answer any questions I had and the gun came WITHOUT the blue paint (no blue rub-off on the inside of your gear). I usually have to order from John Ring to get molds fast and without the final finish. Rob was cheaper, faster, and is a peer. Buy from him with absolute confidence. He'll be my Bluegun supplier from here on out.
Thanks, Rob!
-
Damn! Now that's service!
-
I'm sorry- I don't know what Tapatalk is, but I will find out. You do know there is a lo-fi view for the forum, right? bottom left corner is a drop down menu (it will say MBC by default) and the lo-fi version is above it. Meanwhile, I'll check it out.
Johanna
I use the lo-fi version but you can't reply to pm's using it.
It's loads faster, though. The ad server/ implementation for this site has slowed it down ever since it was introduced.
IPBoard is supported by tapatalk.
-
Does TCD make their punch oversize? I know Shooter had his custom made through Weaver's, so the slot was wider and a smidge longer than a 1.5" belt width. 3/8" x 1.6" I think he told me. I have the Osborne. I was hoping the inside was tapered so I could grind it back to open it up, but it isn't.
Jake
They make them to your specs. I had mine made slightly larger than 1.5 x .25.
-
I use the press for the tcd punch - smooth slots every time.
Best $60 I've spent on a single tool.
-
Looks like a really nice start, Jeff!
Loads better than my first...or second!
-
I don't do it, but only because I'm a small-timer and don't have the time to commit to large production runs.
There are, however, top tier custom makers that do, and they wouldn't if it wasn't profitable. Del Fatti, Ralston, Sparks, and Bulman to name a few.
Creating a new pattern for each customer? I suppose if each customer has a special need that warrants a modified pattern, but otherwise I find this to be silly. Instead of spending time creating a new pattern to be different from the last, it would be more efficient to develop a better pattern altogether. Throwing the patterns away also seems hasty and prohibits building upon each one.
-
I stitch around the slots if I have the room. If there's no room, it means the stitch line around the gun is close enough to the slot already.
I do it because it's a little added insurance to make sure each edge is as strong as it can be, stitched leather helps prevent stretching, it looks nice, and it's fast and easy.
-
Hi Dave,
I think the other folks pretty much nailed it with regards to those bottom wings on an OWB holster. It's too much material, and if these are primarily for concealment, they will not help with that aspect. The holster should be stabilized by it's attachment points on the belt. This is what prevents it from rocking back and forth and what helps keep the butt of the gun tucked in nice and tight. I think you've come a long way in a short time.
The credit for that design goes to the late Bruce Nelson and his Patriot holster. It was groundbreaking for it's time, and lots of modifications have been made by various makers to improve on it's design.
Here's a photo of one (not mine)

Anyway, keep at it - your stitching looks great!
Chris
-
Looks like a winner to me.
Let us know.
-
Wanted to thank everyone who chimed in. Steven, I sent some business your way.
-
Not sure how close it is but the Springfield Operator is close because I have made a holster and used it, if I have the right Sig in mind. The customer was happy with it but not really sure how close of a mold your wanting on the holster. Here is the mold I am talking about Springfield Operator
RMB, the slide is more squared at the top than a traditional 1911, and I'm not sure if there is a standard with the rail.
I guess if there's no other option, I'll spring for the Ring's model of the SA. Do you have it in c&l?
By the way, your site shows the wrong item # on that gun.
Thanks!
-
Looking for a mold for a railed Sig 1911. I know there are people making holsters for them, so what molds are they using?
Any help would be appreciated.
Thanks!
-
The rear loop looks fine to me, it's the front one that needs to be adjusted. I would move it forward more. The further back the front tunnel loop is, the more the gun will angle away from the body out in front.
You didn't say in your original post if the gun angles away from the body at the front or the rear, but judging from the photos, I'd bet it was at the front. I'd have to respectfully disagree that you need more cant on this one, especially with this type of holster. I'd also disagree with the statement that more cant makes a gun ride tighter. Extreme forward cant or nearly vertical, it's all in the pattern and loop placement. Just my .02
I think the holster looks really nice and clean.
Good luck!
@evandailey - If the holster isn't built on a curve, then when the belt is threaded through, especially on a pancake, it will cinch the mouth closed a bit which will affect the draw, the reholster, and the lifespan of the holster. The curve (not bending) is vital to the holster's performance.
-
It penetrated the best in areas you didn't mold. I think you burnished the surface of the leather and prevented the dye from being able to get through. In my opinion, there are 2 things you can do:
#1 - Dip dye after assembly but before molding (I prefer this method)
#2 - Mold using a press with very little rubbing action from your tools, then dip dye the piece
Dip dyeing provides the best penetrating, truest color in my experience, and has no substitute. While I have no first hand knowledge of Super Sheen, I can tell you that what you show in your photos is what would have happened regardless of the product you used.
Good luck!
*edit - just saw Sylivia's post -
I've never had an issue with black dye, especially Angelus products. I really think you should try dip dyeing your piece before molding - it will make a world of difference.
-
Sounds like a plan I will heed your advice. Looks like i need to pick up some 5/6 leather. Oh well, it is only money ....right?!
5/6 is too thin on it's own for anything firearm/gunleather. I would (and do) opt for 7/8oz leather for carriers.
-
I think it looks really nice. You could bring the slots in just a touch, but I think they look pretty close.
Regarding the angle of slots: at some point, folks around here determined that an angled slot is detrimental to the longevity, effectiveness, and overall strength of a holster. I haven't seen proof of that. In fact, I can only offer you examples of top tier professionals who do the same thing.
Not my photo, but this is a 60TK holster, designed by Tony Kanaley.

A better shot of the same model:

-
My sympathy to the family.
Thanks for letting us know.

Couple Of Questons From A Ne Guy
in Gun Holsters, Rifle Slings and Knife Sheathes
Posted · Edited by dickf · Report reply
After I posted last night, I went into the shop. My bottle of M&G was still there, albeit covered in leather dust. I bought it specifically to test as a topcoat.
I cut 2 strips from W&C skirting and labeled them.
Test pieces with no finish.
Swatches after an application of product (still wet).
Swatches on my desk at work the next day (today). Note how the M&G has already started to develop tiny cracks simply from riding in my jeans pocket this morning.
M&G swatch slightly bent.
A600 swatch bent at much more of an angle
After dropping a few drops of water on each. The water goes right through the M&G and instantly starts turning the leather darker. It simply beads and sits on the A600 swatch.
This is a video showing the water from each piece dripped on one another. It also clearly shows how the water penetrates the M&G as soon as it touches it. (Click the image to see the clip)
Swatch after the water was removed. The wet area feels tacky and now has a white haze that you can see in the photo below. We'll see if that goes away after the leather underneath has dried.
Everyone is free to use what they want and make what they want. I'm not trying to say that my way of doing things is right or better.
When it comes to Angelus 600 vs. Mop & Glo for an acrylic topcoat for leather, it's pretty obvious which is more effective.
Chris