


dickf
-
Posts
442 -
Joined
-
Last visited
Content Type
Profiles
Forums
Events
Blogs
Gallery
Store
Posts posted by dickf
-
-
We'll just have to agree to disagree then.
-
I stand by my first statement in that it is the wrong thing to do. If you see nothing wrong with a 3" gun floating around in a holster made from a 5" gun, that's fine. That methodology is not up to my standards and I think it can pose a safety concern, as well. I also think you'd be hard pressed to find a veteran holster maker that would disagree.
-
It's a holster built on the Askin's Avenger originally put out by Bianchi. It's a widely popular design, still in hard use today. Particle has been making some beautiful avenger's for Commander and EMP size 1911's. I'd say shoot him a PM;
-
Yesterday, I received some feedback from my LEO friend to whom I gave the holster. I was a bit disappointed by his comments and would like some input on their validity. My hope was that other individuals in his agency would see the holster, be suitably impressed and then order one. When I gave him the holster, I told him I'd want $100 for similar ones.
- "For $100, you need to use thicker leather." The holster was made of 8 oz. plated Wickett & Craig leather. The mouth does not have a reinforcement. I mentioned this to him, explaining that a reinforcing band would present a thicker cross section at the mouth.
- "The belt loop portions need to be wider."
- Is my $100 price out of line? I suspect I'm high.
Any comments or suggestions will be greatly appreciated.
Jeff
You did an excellent job, but I think $100 is too high considering the following:
That holster is literally flat as a pancake. When he straps it on, it will collapse the mouth and probably render one-handed holstering impossible. It should be molded on a curve, as it will sit on your hip. Nobody has perfectly flat hips. While it's wet and you're molding the details, bend the wings in a bit toward the back side of it.
I think a general hard-use pancake for a full-size gun requires 8-9oz leather. This is another variable that will help keep the mouth open and make the holster feel more robust. Think about getting in and out of a cruiser countless times, running, hitting the gym, etc. It needs to stand up, and while the 8oz certainly won't fall apart, the 8-9 should be harder when dry and will feel sturdier. It seems like a trivial difference, but it will make a significant one.
The slots look like they're positioned very well, so I assume he wants the slots cut wider to allow a 1/4" thick carry belt. or he may think the belt loop 'wings' need to be spaced further from the body of the holster, but I think molding the rig on a curve will alleviate that.
My final critique would be to bring the stitch line in at the front of the trigger guard. Your current line is boxy and the trigger guard on the Glocks have a swoopy front. Follow the lines of the gun and you'll maximize it's retention and lifespan.
Refine your pattern, make it again, and post the results. Just a little tweaking on a beautiful holster will make it a functionally beautiful holster.

I look forward to seeing what you decide to do.
-
Hi Jim,
I think you have an interesting idea going there, but I'm a little confused as to what you're really trying to do. Is it a concealed holster, open carry, range, hunting...what is it for, really? You need to know your audience and really test the hell out of it before you start trying to make it a do-all kind of holster, and certainly before you try selling it. Asking about durability is a clear sign that this thing hasn't been through the wringer, and long-term testing hasn't yet been accomplished. Ask a local LEO friend to test one for a few months. Gather some real-world data other than your own use. I've found that I tend to go easy on my own gear, so I can't rely on just me to test it out. I need someone who will try to break it and find it's weak points.
I think that the use of straps and cords for retention is not a very good idea, as eventually, they will stretch and wear. The metal rings can and will rust. In the last photo, the one with the guy wearing it (could be you, I'll assume it is), it's clear that you've got your belt awfully tight. I think the belt being cinched so tight is what allows the holster to stay close to the body, which in my opinion, is deal-breaker. I may be wrong, but you do not look comfortable carrying in the photo. It appears as if you could loosen your belt a notch and the holster would start to roll and flop.
A great holster has good retention, conceals well/easily, and is comfortable to wear. Yours has many things going on with it, including metal loops and straps on the face of the holster body, which effectively adds thickness to it. Obviously, thickness is the enemy of concealment. I'd like to see the holster saddle stitched or machine stitched instead of the wide lacing, and the leather to go all the way to the end of the muzzle and stop there. The platform just doesn't look very stable, and adjusting cant and height via pulling a couple cords tight probably isn't an 8-10 hour long answer.
drop me a line for low-cost commercial licensing fees.
I have a feeling you're kidding, but if not, I'm not trying to be disrespectful, but you'd need a patent first. Search this forum for a few heated holster design patent debates.
 I'm sure you'll get contacted as often as Milt Sparks does when people rip off the VMII.
I plan on doing a video showing the pros and cons of each type of carry and draw, put that on a small USB flash memory stick and put that in it's own pocket in the back of the holster along with a written manual and possibly more.
Don't put the cart before the horse. The holster design isn't finished. A holster that requires a video for instruction on how to use it, is a holster that nobody will use. Think about it: if I have to tell you how to use a holster, don't you immediately think to yourself, "this guy is overcomplicating things - you put the belt through the holster somehow and go!"? I think you'll find that a lot of firearm guys prefer the KISS method.
Good luck!
-
Leave the bottom open and use any 1911 as a mold.
This is not what you want to do.
Particle just recently made a beautiful rig for a 4" Crimson Carry, so I take his advice as solid.
Note the difference in the dust covers between those 3 sizes he illustrates with his photo. This is exactly why you don't want to do what gregintenn suggested.
It's always best to use the right tools for the job.
-
Also note that the Pro Carry's are 4" guns, not 4.25" like true Commanders.
-
bigo,
Welcome to the forum, mate!
Regarding your XD SC holster:
The first thing that pops out at me is that it's going to get sloppy real fast. You have no stitch line around the perimeter of the pistol, and that's going to end up being a problem after some use. So, first things first, add a stitch line that follows the slide and around the trigger guard down to the muzzle. Make sure this line comes in close and follows the lines of the gun. Not only will it look better, but it will give that holster the long-term retention it needs to stay in service.
Another piece of advice: Don't rush this. These things aren't meant to be turned out in mass quantity by us leatherworkers - leave that to the guys with giant machines and many employees. Concentrate on quality and perfecting the little things. Your edges, for example. They could be smooth, but they are blotchy and don't hold the same color in any two spots. Get some dye and go around the edges to even the color, and do your best not to let any drift over on the holster body. Also, never leave a stitch line to dead-end somewhere. Try to connect them, and if you can't, let it dead-end in the middle of the side somewhere where there is no tension necessary.
I think you're off to a great start, but I also think you're in a hurry. Slow down, concentrate on the little things, and think things out before you start cutting. I think you'd be surprised at how much progress you'd make without the pedal to the metal.
-
I've used acetone to strip resolene off to to rework a project - it turned out okay, but not great. If it's possible to remake something, that's the route I'd take first and use reforming as a last ditch option.
-
Great advice guys I will use it all in my next build.
I do have one questions - I have read on here that know when the holster is dry enough to start moulding by when its cool to the touch and the leather has returned almost to its natural color. Here is my problem, I dye my holsters then build then mold. As a result I can't use color as an indication of when to mold. So what do I do? Obviously I am molding to soon - any advice???
I dye mine prior to stitching and molding, as well. The better the leather, the less water it will take; that has been my experience. Get it wet, but don't go folding it back and forth - that is what creates the little hairline wrinkles. Let it sit for about 5-10 minutes if you think it may be too wet, then come back and start molding.
If you have a pattern for that holster (which you should), it should be easy to alter it a little to bring the stitch line in closer where necesary.
-
My take is different than what's already been said.
I think before you address your molding, you need to first adjust your stitch line to come closer to the outline of the gun, particularly around the trigger guard and following the dust cover.
I know why you put your forward loop where you did, and I think it has the opposite effect Dwight perceives; I think it actually brings the butt in closer.
The leather does look like it was too wet when you started molding it - all of the tiny wrinkles are tell-tale signs of that. When you do go to mold it, think about the lines of that awesome 1911. The line that follows the slide to frame is a deep trench in the holster. Does it look like that on the gun? No way, that line should be thin and perfectly straight (use a wooden or plastic ruler and the head of a very small crochet needle).
I do agree with Dwight that you could lose the tee nut and set the snap permanently. It would function as intended and would look nicer.
I also think you need to make a decision on the sweat shield. You're kind of in between on it, and it's edge falls on a critical part of the weapon - the thumb safety. You need to either extend it all of the way up to the rear of the slide and mold it c&l'ed, or bring it down further so it doesn't interfere with it at all. The same edge also, as was already pointed out, falls awfully close to the mag release, if not on it. You may consider bringing the curve under it.
On the front, and this may be nitpicky, you may raise the leather in front of the trigger guard. I know some guys like to use short triggers, and because I can see yours leads me to believe it may be a tad low. Again, that may just be nitpicky of me, but I'd change it.

-
SOLD!
-
I'm using 7/8 HO and I like it a lot.
-
The issue with the trigger guard is that it's never the same width as the frame of the gun - it's always more narrow. I assume the results you're getting are that the stitch line is too far away.
I don't think there's a secret formula to determine where it should be, but you'll probably want to simply bring it in a bit and see how it works out. This is one of those things you may just have to eyeball until you get it right.
-
Particle, this looks fantastic. I see where you made the swell for the safety to sit on or off - I think you pulled it off quite well.
They just keep gettin' better from you!
-
Looks great, Bruce. That piece has some really awesome grain, too!
-
I think it's a very good start.
As others have mentioned, it's definitely too long. The stitch line should contour with the trigger guard as well, but I think you know that, too. My biggest critique, is that it has way too many hard angles. The holster looks unnecessarily large, and that elongated wing doesn't help. I know why you put it there, but it makes your holster wider that the gun is long, which is pretty big. I think you could bring everything closer, and kill all right angles and replace them with a nice curve. Not only will this be more comfortable to wear for extended periods of time, but it will wear nicer, too. I also think if you're going to use a reinforcement piece like you have, then you should extend it further over or shorter of the trigger guard. Where it's at now, it creates a little flap that doesn't look great and will start to bend and peel.
I look forward to seeing the next one!
-
I agree - great job!
-
Still available!
-
Dwight it looks great! Care to show a photo of a still-wet holster that comes out of that thing?
-
OK........Your not liking what you see with dipping.....WHY are you still messing with it?
I guess I'm too stubborn to let it beat me. I know people dip dye their holsters with awesome results - I'm just not one of them...yet. Ideally, I'm looking for the perfect light brown/tan and a dark brown that can both be dipped with even results.
Here's an example of what I'm trying to say:
I dyed 2 pieces of small scrap with some Fiebings saddle tan oil dye. I let it settle and dry for over 24 hours. I ended up with the *PERFECT* shade of light brown. I stitched the 2 pieces of scrap together, flesh to flesh, to simulate part of a holster. I took this newly stitched swatch to the sink and got it wet, just like I do with all of my holsters. I put a slight bend in it as my holsters are usually built on a curve and set it aside to let it dry. Immediately I noticed that the leather looked different than normal when it got wet. As it's been drying, it looks as if the edges are darker than the cetner - almost like the water is pushing the dye out toward the edges (whether or not that's the case, I'm not sure). After the scrap dries, it remains dark at the edges and somewhat blotchy in the center and much darker all over. This is the only brown dye I've been able to really submerge the piece in without the brown being so dark it's almost black.
I have zero issues with coverage and tone with the airbrush, but man, it's not the most convenient way to do it. Plus, like we know, the color is thin and doesn't penetrate like it does when it's dipped. Perhaps some leather goods aren't affected by this, but holsters get scratched and scuffed, and I'd like the dye to be as deep as possible.
-
I've been spraying my browns through the airbrush for a while now in tandem with experimenting with dip-dying them. I'm never satisfied with how the dip dye results turn out. It seems if they dye looks good and even after the dip, the moment I get the holster wet to start forming, it ends up blotchy and stays that way. So, what dyes and methods do you guys use to get that nice even shade of brown? I'm especially interested in knowing what you use for light browns like tans.
Thanks!
-
What's your spi on that machine? Are you concerned about the postage stamp effect with the stitches so close?
-
Sure is! Send me a PM if you're interested.
Thanks!

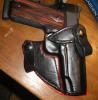
My First Iwb Attempt
in Gun Holsters, Rifle Slings and Knife Sheathes
Posted
I think it looks good, too. My only advice would be to mold it on a curve and to use a cocked and locked dummy.