
HondoMan
-
Posts
122 -
Joined
-
Last visited
Content Type
Profiles
Forums
Events
Blogs
Gallery
Store
Everything posted by HondoMan
-
Right then, I never really picked up the good habit of sharpening, much less polishing blades. No sure why, just never worked it into me life. Then I got into leather and no only did I need this wee proper skill, but have become rather good at it. Have several methods for various blades and all goes right well. The slight exception is the awl blade. I only use Blanchard awls. The normal routine is to use a Whetstone (with honing oil) firstly, then to a diamond stone. Once I get a good edge, I then use dampened (water) sandpaper (3600, 8000 and 12000 grit) and I get a lovely polished edge that goes through leather like butter. Been reading quite a bit about stones to be better educated. I use a ceramic stone (3000 / 8000) for me knives and a strop for polishing. Lately, I've been wondering if a ceramic stone would be good or better for the awl blades and completely forgo the whetstone and diamond altogether. I read on a few websites that if one plans to polish a blade, ideally skip the diamond stone altogether. Me concern is how one sharpens an awl blade versus a knife blade and whether it's wise for the ceramic stone and wee awl blade. I could easily purchase a ceramic stone to test, but don't wish to hurt either the stone or awl blade. Thoughts? Cheers!
-
No, not dyed through, which is why I feel it was no dyed at the tannery. It's black and will be dyed such. The bags are four years old and due to weather and sun, most of the sealing is gone off. I'll use the Fiebings Deglazer on a small hidden spot and see how it fairs. Cheers!
-
Right then, Have two rather large motorcycle side bags. Originally, these were to be cleaned only. Done. Saddle soaped them each, twice. Both are made from 2.5mm sides and have been dyed black - not from the tannery. There is no maker's mark or tag, so no idea where they were made or by whom. Some of the black had already worn off exposing the natural vegtan, albeit a wee darker brown. Cleaning them has made the contrast more obvious....and they no longer stink of road! Now it has been asked that I dye them. Grand.... Nothing else other than the saddle soap has been used. I planned to add mink oil over them, but halted due to this new request. To me question: As this has taken a different turn and to be honest, never done before. Should I go straight to dyeing or use something to prep the leather? To the 'wet noddle between me ears', it seems some type of sealing was used when these were dyed. While the saddle soap, road, and weather has changed the structure of the leather. Unsure if the dye will hold without a wee more prep. Thoughts and ideas are welcome. Cheers!
-
Good evening folks, near on 4-5 years ago, I bought the Osborne 84 splitter. Works an absolute dream when sharp and polished. Issue: Centering the bloody blade. I polish the blade roughly 2-3 times a month - sometimes more depending on the amount of use. I dread it each time. I tend to do it on a Sunday as I need quiet and time to get the blade aligned atop the roller. At the apex. Does anyone have a trick for this alignment? I don't mind going through a piece of rest leather to ensure it's straight and aligned, but there have been times when I've gone through several pieces of leather before the bloody thing is straight. I'd like to hope that after near on 100 years of this tool's existence, there'd be a wee trick to line the blade up quickly and correctly. Looking forward to the replies. Cheers!
-
Thank you! That was what I was after..... Cheers!
-
Greetings all, seems to the wet noodle between me ears, there must an answer to this involving maths. Someone wants a case for a mobile, but obviously cannot leave the mobile whilst being made. Also, does not want a wet molded case, merely a slip case. Should be fitted, but not too tight. Having an equation would resolve it and ensure the mobile fits properly into the case. Hypothetical: The mobile is 50mm wide, 100mm long, and 15mm thick. The leather used is 1,5mm and a stitch line 4mm in from the edge. Perhaps age, but I cannot seem to come up with a solution that could suffice this. Anyone have a thought or idea? Cheers!
-
Good morning, last year a new client spoke with me quickly on restoring old saddle bags for his bike. At the time, he had a few moments and I noticed the straps cracking due to the buckles. I tossed on some proper screw rivets and removed the buckles to take some pressure off the straps. There was no time to use NFO on the straps due to weather and the bike was parked outside. Well, he returned. He wants the bags restored, but doesn't want the straps replaced just yet. Unsure why. He just wants the bags dyed. The leather near on feels and looks like a 2,5mm pull up leather. Quite waxy, but also harder than the pull up leather I normally use. Could be there is much change to the leather from exhaust and weather. They stink like an exhaust pipe! I plan on using NFO on the straps. Won't help the cracks much, but better than nothing for now. The question: On redying this leather. As I am unsure exactly what type it is and don't want to hurt the structure of the leather. I am thinking to saddle soap both bags (no the straps) to remove the 'gunk' and to prepare them for dyeing. When dry, dye and top coat. Obviously no dye to the insides. Thoughts, ideas or critiques would be appreciated. Cheers!


-
@Hardrada, I've no clue why this is happening. Am also curious... I've seen the video (Terrick does a brilliant job!). How did you adopt your edge work from his? He doesn't use Tokonole and is using leather dye not Edge Kote.
-
I did a wee experiment as you described. Me first attempt I waited a day after the edge kote and on the second I waited 48 hours. Applying Tokonole after Edge Kote turned a disaster! The first time I applied the Tokonole (again after 24 hours) and me fingertip was completely black! I don't mean a little discoloured - jet black! On the second try, I used a cotton swab and it too was fully blackened and on both attempts I had yet to use wax. No good that. I did apply a second layer of Tokonole and while there was less bleed of the Edge Kote, obviously the Tokonole creates a wee reaction over the Edge Kote.
-
@chiefjason, I checked Amazon a number of months ago due to the Mop & Glo recommendation. Bloody 50€ for a bottle! No made in Europe. I used resolene on the weekend. Helped a wee bit, but there is still rub off. @Hardrada, wax puts a barrier on the open flesh of the leather. If you simply sew to pieces of leather together that only have edge kote or whatever, you're no sealing that wee seam. Moisture can seep in between the layers of leather. If you're using twine or linen thread, it can lead to a faster destruction of the stitch. @Handstitched, I also never use trag. Me issue is with harness or bridle, dyed from the tannery, leaving the edge natural (especially black dyed from the tannery), is looking....odd...even grey.
-
Tried Resolene (50/50 with water) over the Edge Kote. Better, but still rub off. Tokonole over Edge Kote.... that's new. Worth a wee try. Odd with the Tokonole are no instructions or recommendations. Found only one YouTube video. Nothing more than burnishing, sanding and Tokonole and then wax.
-
Cheers! Are you using resolene as a finish coat on the edges?
-
Ok, back on this topic.... sorry. This is driving me mad! I have on hand and have been experimenting with...Fiebings Edge Kote, Tokonole and Eco Flo Edge Flex (Fenice ?). While I have yet to find a solution, the problem seems to lay with using wax. Allow me to explain. Fiebings: Dyeing the edge, allowing to dry, there is little to no rub off of colour. Once I use beeswax on the edge, the colour rubs off on a cloth and won't stop, no matter how long I wait. Edge Flex: I have found this to be utter expensive shite! It just peels off like silicone. Rubbish! Tokonole: I have only the clear (or white version). I have deyed the edges and allowed time to dry. Minimum of one full day. No rub off of colour. Once I apply wax to the edge, the colour rubs off. I cannot for the life of me figure out what I am missing. I thought it might have had to do with burnishing, but not the case. I sand lightly before I dye or apply an edge coat or paint, so I know it is seeping into the leather. I have tried using the glycerine bar and not. I have waited days between steps, using and not using canvas, etc. Can anyone provide a solution to this? I truly do not understand what I am doing wrong or missing. I use only vegtan, bridle and harness leather. Cheers and have a nice weekend!
-
Solution found. Hate to admit it, but I had a bottle here in the shop and forgot it. Tested it on a piece and there is no rub off, no bleed! Solution in hand! Cheers!
-
Mop and glo is on offer in Germany, but at 64 Euros, not an inexpensive idea. But I'm sure I can locate a less costly equivelent. Cheers!
-
Aye, you are correct. The instructions simply state to apply the Edge Kote after the edges are smooth. Nothing more. And they offer near no instructional videos.
-
I don't think burnishing is causing the issue. Before the wax is applied I burnish with canvas and only a trace rubs off. Seems the Edge Kote does it's job well up to that point. Once I rub a wee amount of beeswax and burnish is when the issue starts.
-
Terrymac, I used the GumTrag once to see if it made a difference. I sand endlessly, it seems. Allow me a wee run through here mate. Leather freshly cut. Sanded. A lightly moist edge and burnished. I'll do that until the edge is free from any fibres. Then Edge Kote, burnish and sand. I'll do that about three times, sometimes four. I increase the grit amount on the sanding bother before and after Edge Kote (400, 600 then 800 - sometimes 1000). I then run the edge over with a piece of canvas. Very, very little bleed. I let leather sit for a minimum of 24 hours. I then add beeswax to the edge and burnish. I then go over again with canvas and it bleeds like a stuck pig!
-
Paloma, seems one of us is confused. This is what I am referring to and what I am using and what rubs off. Maybe it's me, but it seems you wrote to neutralise the contaminants of the Edge Kote, apply Edge Kote on it. Cheers Dwight. Done that in the past. Didn't really care for it. Aye, if the leather is dyed from the tannery, it works fine. But often I am dyeing the leather meself and to have a nice dark bag or belt with a lighter coloured edge just doesn't suit.
-
Varnish? Can you clarify that please?
-
Greetings all, this is getting on me last nerve and somewhere must be a solution. Fiebings Edge Kote. A large number of people avoid it and I fully understand why. I have been at finding a solution to the rub off and cannot for the bloody life of me find one. I have done all I can think to do and it continues to rub off - days and weeks later. I have tried two different techniques at the start aside from sanding and burnishing. I've used both water and Gum Trag separately of course. Applying a thin and thicker amounts of Edge Kote to an edge. Using canvas to burnish and there is little rub off or bleed. I mean very little. I can see a very light amount of black or brown in the canvas. The rub off comes when beeswax is applied. Scientifically, it does make a wee bit of sence. The edge kote lays atop the leather (aye, some seeps in) and it dries. With the wax and burnishing, it heats it and mixes with the beeswax. There is now a waxy, acrylic mix atop the leather. I have applied the edge kote and have waited up to 48 hours before applying wax. Still bleeds or rubs off. Polishing with a soft cloth and it is filled with rub off that seems endless. One wold think that Fiebings would know this and make alterations. Near on everyone waxes the edges. Using dye on the edge is not always an option. I often make items that are not dyed, but want to have a brown or black edge. Dye won't suit as it seeps in. Does anyone have a simple solution to the rub off issue. I've read Bob Parks write up on edge work. Not what I'm looking for. I have large bottles of Edge Kote that I'm not tossing in the rubbish. I'd prefer to find a solution to stop the rub off. Cheers!
-
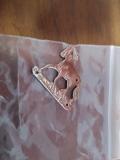
I do appreciate the input folks. I spoke with the client and explained this would no work. Rivets simply won't as I explained to her, using a rivet is going to look poor. Reason being, one of the holes is in the horse's head. A rivet of more than 2mm in diameter is going to cover the head. Bending the nails back is a non starter as they could potentially catch onto fabric or other items. Have a nice weekend. Cheers!
-
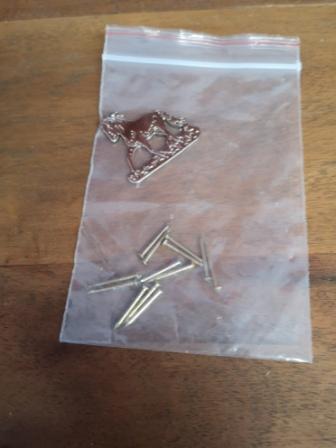
fredk, the holes are ca. 1,8mm. I checked with my suppliers this morning and the smallest is 2,2mm. A 4mm head is just too large. Grand idea though, I must say mate. This does truly seem a non starter. The washer idea is no a bad one. Might be worth considering if the client won't consider another idea. For the ornament you added to your mug, it looks good. For these horse ornament, no so much. It would have an unprofessional appearence as there are only for holes. Good idea should I have something like yours above.
-
Good morning folks, looking for a solution. A client has requested the below ornaments be added to an item. No promises made, but an offer to experiment. Seems a non starter. The brass nails are 15mm long and need to be cut down to 5,5 mm. The issue is having the nails peen (mushroomed or domed) in order to be held in place in the leather. I've tried various hammers to include a ball peen, each time the nail bends. The only means to hold or support the wee nails is within the leather (4mm harness). Heating the nails slightly did FA. It would seem a press would be in order to slowly put pressure down directly. Perhaps there is another means. Anyone have experience or ideas on this? Would be truly appreciated. Cheers!
-
https://leatherworker.net/edging.htm