


hidepounder
-
Posts
1,808 -
Joined
-
Last visited
Content Type
Profiles
Forums
Events
Blogs
Gallery
Posts posted by hidepounder
-
-
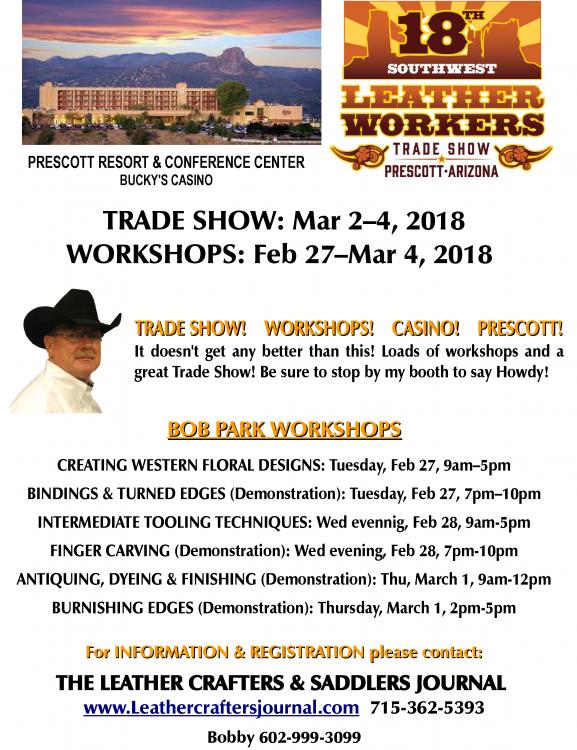
....Just a reminder. TRADE SHOW! WORKSHOPS! CASINO! What's not to like?
-
-
-
On 7/25/2017 at 11:36 AM, Jimmy McLaughlin said:
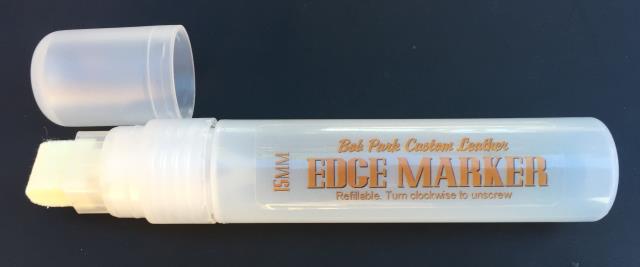
With all the talk being about doing edge work, I have to say that Hidepounder has one of the best edge markers I have ever tried. He is to modest to mention it. It is a plastic tube about 5 to 6 inches long with a felt tip and I think it has a marble inside that keeps the dye flowing. You put your own dye in it and paint it on the edge. It is very neat and works like a charm. Thank you Bob for a great product.
Jim
Jimmy,
I'm glad you like the product and thanks for the mention!
Best!
Bobby
-
It depends entirely on how wet it was when you put it in the plastic bag and the humidity in your environment. If it had turned partially back to it's natural color, then it should be toolable soon. But if it was very wet when it went into the bag, then you will have to wait and it won't be properly cased. To case properly, the leather has to breath a little but must remain in a super humid environment while it returns to color. Old ice chests make good casing boxes, especially if a couple of adjustable air vents are installed.
Hope this helps!
Bobby
-
Looking forward to a visit, Bruce!
-
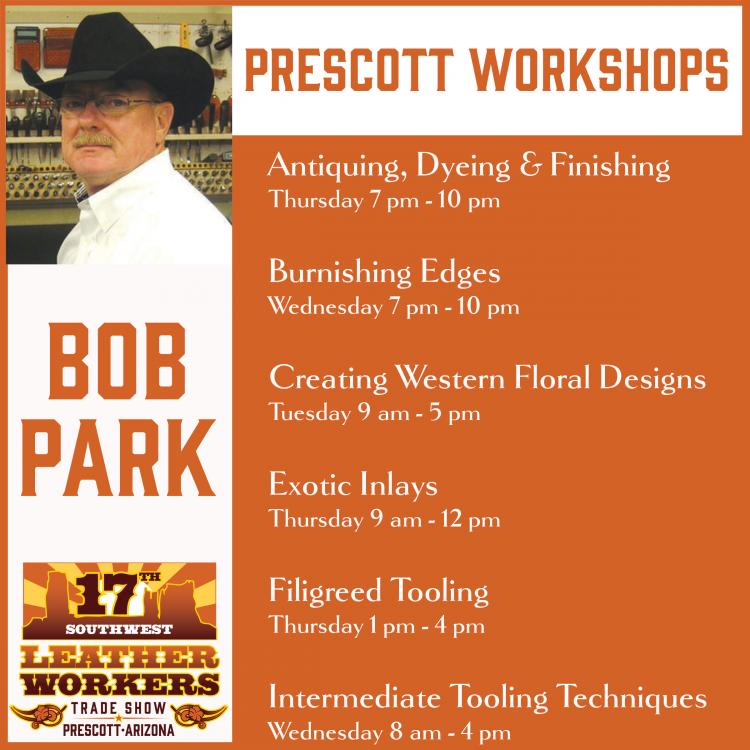
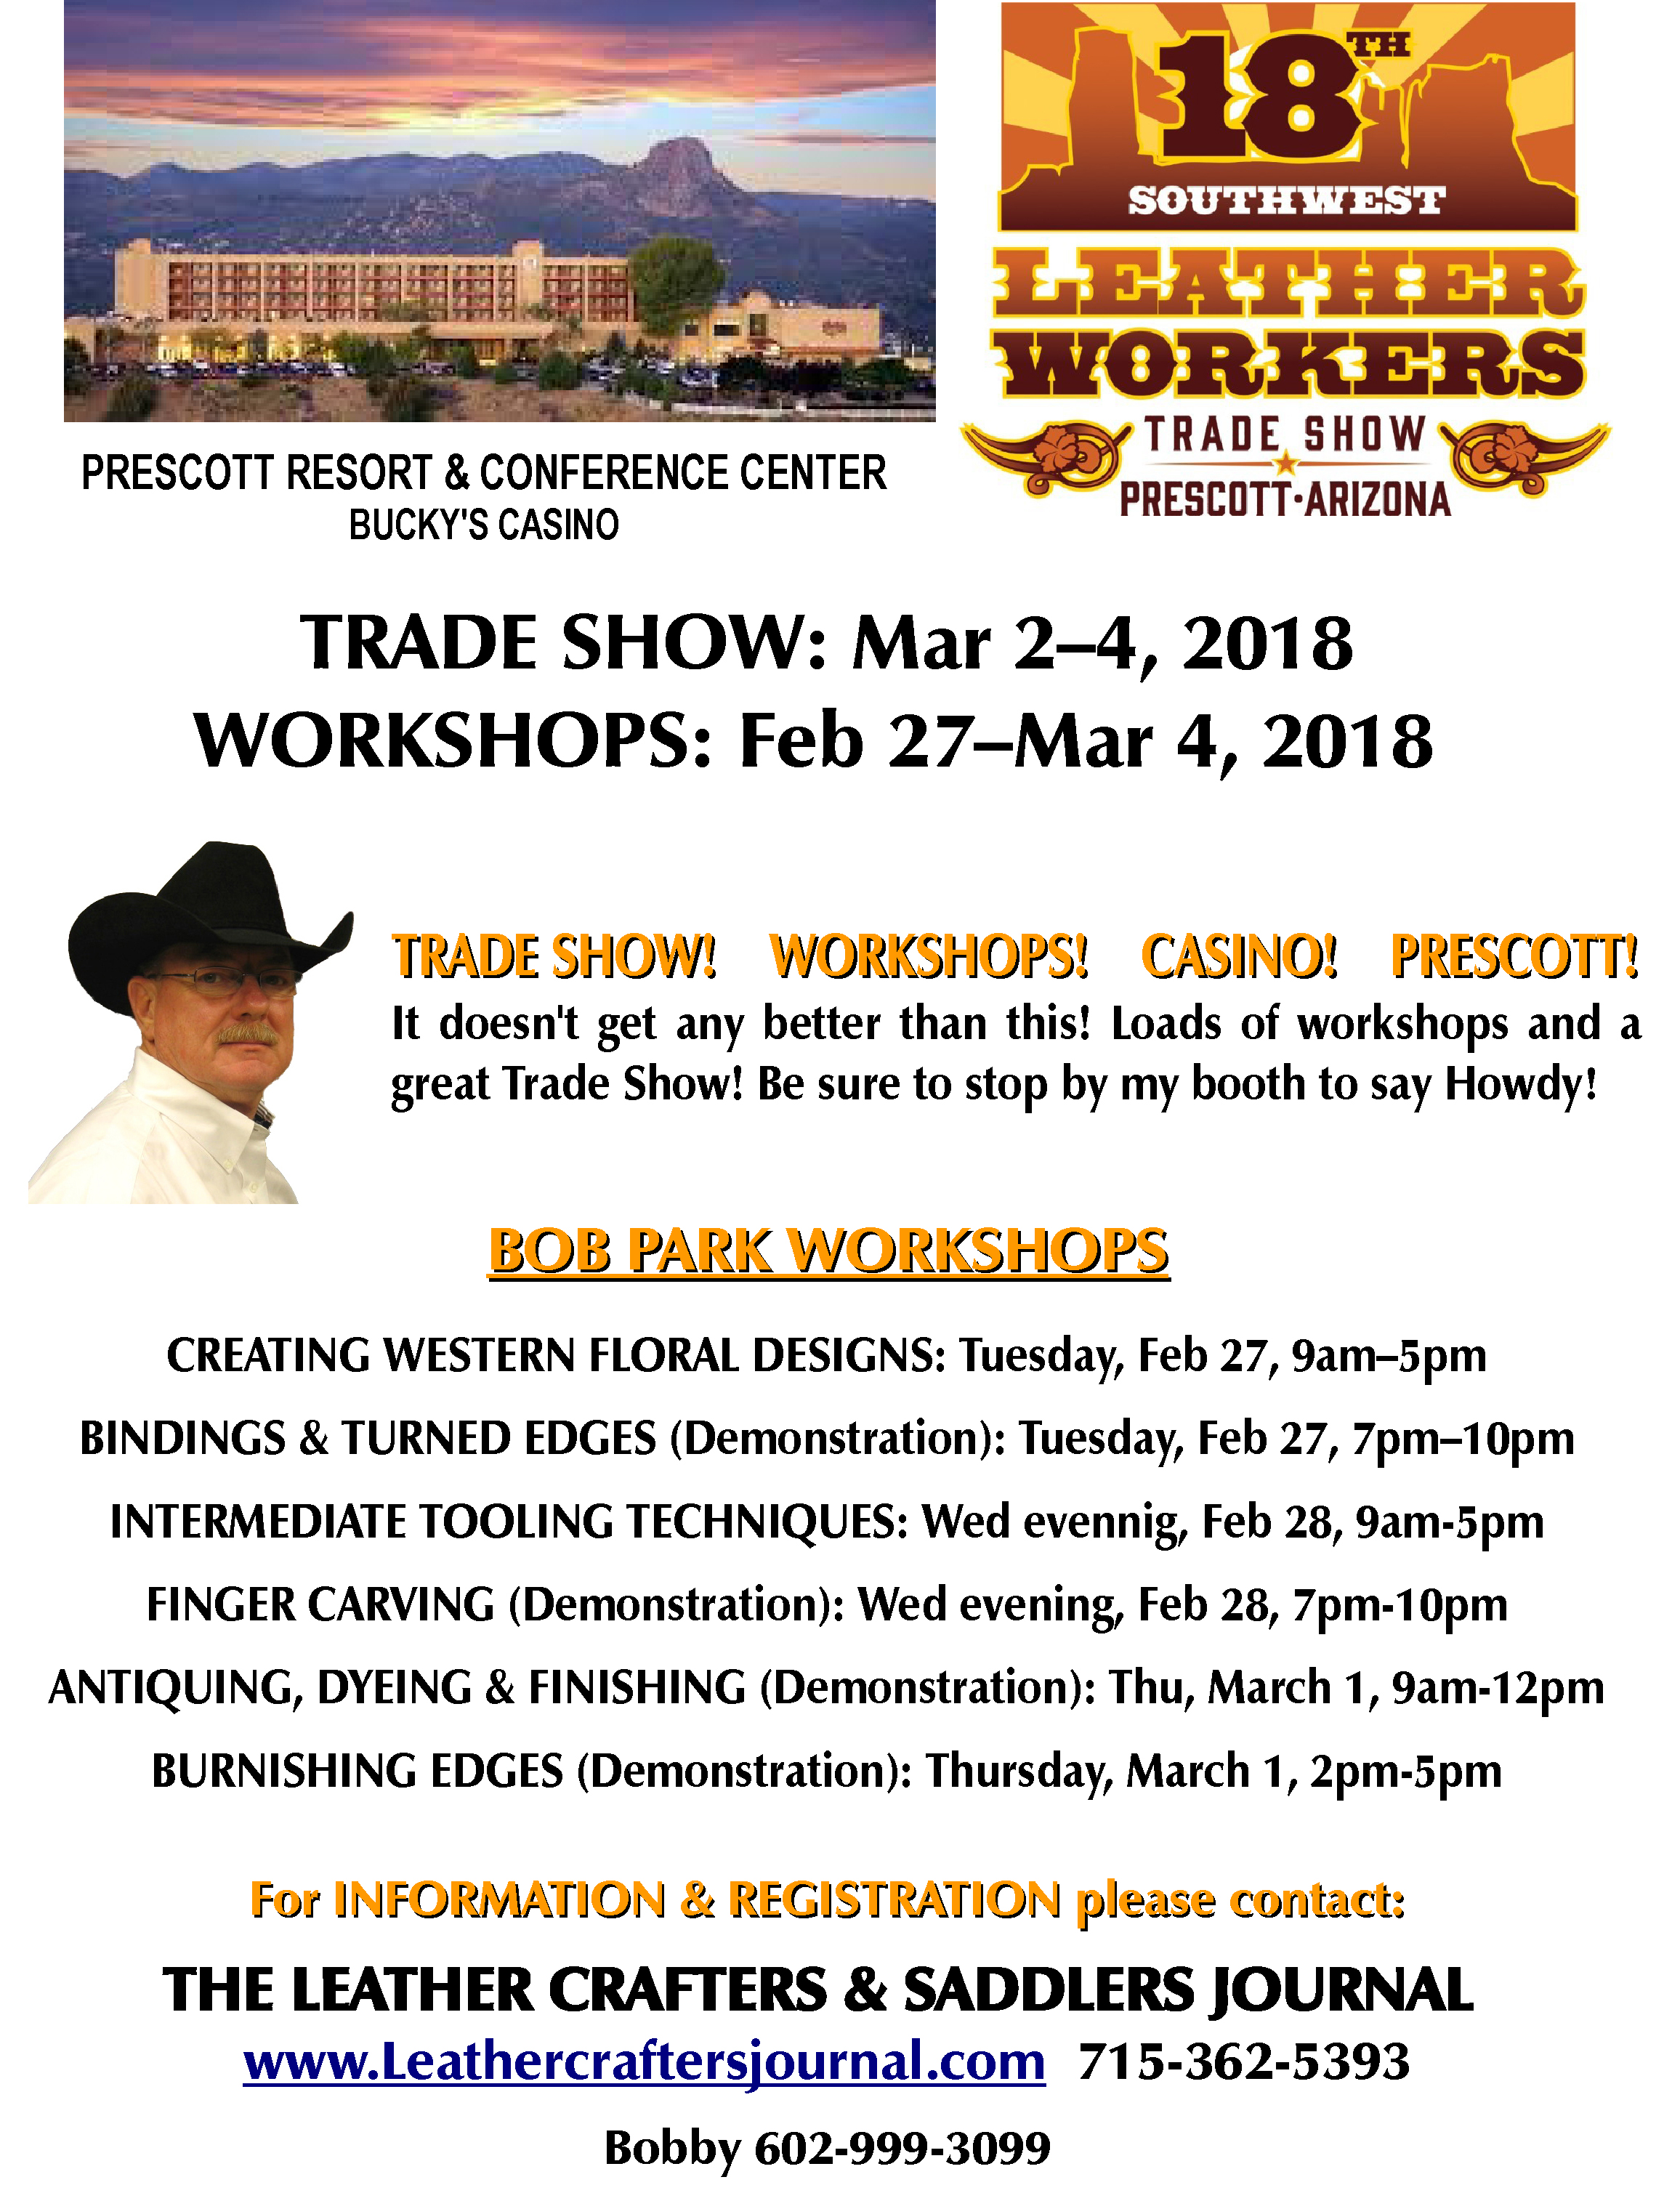
For anyone who might be interested, it's not too late sign up. I still have a few seats left in some of the workshops and I will be accepting walk-ins, first come first serve for any remaining seats. Contact the Leather Crafters & Saddlers Journal for more info (715) 362-5393. This is GREAT SHOW in a beautiful facility. Feb 21-26. Don't miss your chance to see a great variety of vendors under one roof. And be sure to stop by my booth, located in the foyer, and say hello! See you there!!!
y
-
Great post Michelle and very informative! And beautiful sewing, BTW!!! In case you haven't run across them, the best stitch groovers that I have ever found are manufactured by Bob Douglas in Sheridan, WY. He makes the Versa Groover which is a guided groover and he makes two sizes of hand groovers. All come incredibly sharp and ready to use. The tip provided on the Versa Groover is the best I've ever found. The hand groovers are also great to use as gouges in light leather to create fold lines. These are in a class of their own with regard to groovers. I also like to use the Horse Shoe brand groover which is a caliper style groover like the C.S. Osborn groover and I use a Versa Groover tip in it as well.
For me the down side of using a groover is that your are cutting the strongest surface on the leather which in principle is creating something of a weak point. And maybe even more important is that you are creating a track for dirt and sweat to catch in which is pretty tough on thread. So IF thread can be recessed into the leather by embossing a groove which does not cut the leather (you use a creaser for this), but helps to drop the stitch below the surface plain of the leather, that is probably a better alternative. This can also accomplished with a pair of dividers with tips that have not been sharpened. On western gear, the strength issue is a non-starter because we're talking about 15 oz leather. I do groove belts, however, because I have seen so many with the stitching worn completely off! In this instance I'm using 6-7 oz or 7-8 oz veg tanned leather with a lining which brings the belt up to around 12 oz total weight.
Has anyone ever wondered why stitching groovers were invented in the first place? There is a reason why creasers, skirt channelers, straight channelers, edge channelers and gum tools were developed in the first place. The were developed by companies like Dixon, HF Osborn, CS Osborne, Blanchard, Gomph and probably other companies that I'm not even aware of for use in the HARNESS industry! Gomph and Osborne were making them in the mid 1800's. During WW1, British and American saddlers boxes included both groovers and channelers. I'm sure they were included because it was unnecessary to use them, right? And for the record, Martyn, Americans used horses to perform all those same tasks both here at home and in the Military and in Europe!
Before I go any farther I want to make something very clear to everyone following this thread. I am NOT an expert of any kind on hand sewing. I hate to sew and there is no one in the leather industry who is worse at sewing than I am! I use a sewing machines and only hand sew when there is simply no other alternative. And my hand sewing always looks bad! I only wish I could sew as well as Martyn or Michelle! So I just want that on the record before I go any farther. And for those of you who are tired of reading the bickering between Martyn and me, I promise this will be my last post on the subject! Martyn can have the last word.
Martyn, I resent you putting words in my mouth! I NEVER said nor inferred that English saddlery is inferior to western saddlery! It is not inferior, and I sure as hell don't need you to clarify that for me! I have the greatest respect for the quality of craftsmanship which goes into English saddlery. English saddles are for more refined than western saddles. However, English saddlery is NOT as robust as western saddlery and it's ignorant to suggest that it is! That comment is in no way a criticism of English Saddlery, Martyn and I suggest that YOU are the one being defensive!!! An English saddle is not designed to the same job that a western saddle is. A western saddle cannot preform the same tasks as an English saddle. I believe most people would opt to use the right tool for the job. Why would anyone use their family car when the job requires a tractor? It's not a difficult concept! ?
I simply cannot understand why anyone would suggest that an English saddle could withstand the abuse expected from a western saddle! It is simply preposterous to compare the performance of the two. They just couldn't be farther apart when it comes to design or use! There is simply no reason for an English saddle to be constructed that way. Saddles are constructed differently for different types of work. It sure as hell doesn't mean that one is superior to the other! Who in their right mind would tackle a cross country jumping course in a western saddle? Where European style saddles are made of lightweight leather and are primarily used for pleasure riding and sport such as jumping, hunting and racing. Not working and roping cattle! Western gear was developed for the working cowboys who spend entire days in the saddle while working cattle in a harsh environment. The reason cowboys ride the much heavier western saddle is because the job cannot be accomplished with English style equipment!. Cattle ranches can span hundreds of square miles. Some are larger than our northeastern states. The cattle on these ranches are not domesticated animals which can be managed on foot with staffs as they primarily are in Europe. We are talking about ranches which are tens of thousands to hundreds of thousands of acres in size and have thousands of head of cattle. The point being that the difference in cattle management on a European farm is dramatically different than that of an American cattle ranch. You will NEVER see and English rider and horse cut or turn back cattle! You will NEVER see an English rider turn a steer running full out. NO rider could remain in the saddle performing those moves in an English saddle.
The western saddle was designed to withstand the rigors of riding day in and day out and withstand roping functions in order to perform tasks like capturing wild cattle, branding and doctoring out on the range. If you think an English saddle could stay together when connected to an 800-1000 lb steer strying it's best to escape, you delusional! It's the reason western saddles are constructed of 15 oz veg tanned skirting leather on heavy wooden bullhide covered trees instead of 6-7 oz. leather and very light trees found on European style saddles. Cowboys often travel many miles a day horseback while working cattle. In many parts of the western U.S. the geography is very rugged and one man may need to ride more than one horse in a day, in order to complete their job. The manner in which western saddles are constructed is also worlds apart from the European saddle! Western saddles have layers ofheavy leather that overlap and move against each other. European saddles are not made that way! There are more moving parts in a single western saddle fender and stirrup leather than in an entire English saddle! I'm not an expert in any of these fields, but having been involved with cattle ranching, I feel very comfortable in saying that there are no similarities for comparison between European and Western equipment!
So my hackles go up, Martyn, when someone with no knowledge of the demands placed on western style gear, suggests that English style equipment is proof that unprotected thread will outlast the leather it's in or the individual who's using that equipment. That's just silly! Remember, Martyn, that this little squabble came about when you so blatantly professed that there is just no need to recess stitching on ANY gear because the thread will simply outlast it! You put words in my mouth again when you professed that I said all stitching should be placed in a stitching groove! That's not true! You made assumptions beyond my intent! Oh and by the way, Martyn, it is generally accepted that horses were first domesticated in Eurasia, not England! And what the hell does that have to do with this discussion anyway? Is your point that harness work, which isn't used for western work, is somehow tougher? I suggest you visit a working cattle ranch where hundreds of head of UNDOMESTICATED cattle are being roped, branded, tagged, vaccinated, de-horned and castrated, while tied to the saddle horn and explain to me how well an English saddle would done the job!
I consider hand sewing to be a real art all in itself and I have tremendous admiration for all of you have been determined and dedicated enough to become good at it because I am not! I love my Adler and my Cobra and would be in serious trouble without them, LOL! Anyway, as promised I'm done bickering and arguing about this, LOL! I hope everyone reading this thread has been entertained, but I'm really weary of this discussion. I've tried to make a simple point and if I've failed I apologize for wasting time. Lets argue about something else, like maybe, which tool is better for beveling? A modeling tool or a beveler!!!
Bobby
-
Didn't say there was one. It either has an embossed groove (developed with a creaser) or is just pulled down tight enough so that the stitches are below the plain of the surface. To my way of thinking, that's superior workmanship.
-
1 minute ago, Martyn said:
You didnt. I'm just making the argument for the other side, because so many labour under the misconception that stitching should be recessed to protect it. Very rarely does it need it - maybe on saddle skirting where two bits of leather are constantly rubbing over each other, or the inside of a knife sheath where the stitching could be exposed to a knife edge, then yeah, it makes sense. But for the most part, it's cosmetic.
That's my point. For the most part, it's a cosmetic choice.
We all have our preferences, but you have to admit, there is a sort of blinkered obsession with following the Stohlman method when it comes to stitching? His method and the Western style isn't the only way. For most products and with modern bonded polyester thread, the stitching will probably outlast the leather (and the owner), grooved or not.
Martyn, I'm sorry, but I just can't accept your full statement! In my opinion you are still painting with too broad a brush. And by the way, who said Stohlman's methods or the western style was the only way? I certainly did not! Just for the record, the adaption of a stitching groove had absolutely nothing to do with Stohlman. The application was used throughout the harness industry and the western saddle industry LONG before Stohlman's time! That's not a particularly important point, but there it is none the less.
I don't understand why you are insisting to presume that the conditions and standards which you prefer are applicable everywhere. In fact, I would submit to you that the finest English saddler in the E.U. sews everything by hand and uses a relatively small thread with a high stitch count which is all recessed! Don't take my word for it, though! I invite you to visit the site of Jean-Luc Parisot in France. Here is an example of his work and a link to his site: http://parisotsellier.com.
I have no bones to pick with anyone who wants to stitch everything by hand or use thread which is over-sized for the job. There is a market for that particular look, especially among the hand stitching purists. If the craftsman does a good job of it, they have my admiration, such as I expressed to you in my first post. However, I will continue to utilize the finer recessed stitches on my products. I believe it makes for superior construction with a more refined appearance. And please, don't tell me that large unprotected stitches will outlast both the leather and the user! I hear you selling, but, I'm just not buying it, LOL!
Have a great weekend!
Bobby
-
OK, I'll bite! Where did you read that I said stitching HAD to be recessed? I simply stated a reason for recessing thread. Also, I don't recall making ANY statement regarding the durability of a linen saddle stitch! The backpack is really cool and obviously very well taken care of. The straps are only stitched where the leather is turned on the hardware, which is not an area that receives any abrasion. And what about the turned edge at the top of your photo where the stitching has definitely been recessed into the leather by pulling it down tight?.With regard to the backpack's possible 70 year longevity, I hope you're not suggesting that it has been in constant rigorous use for the last 70 years!
I do take exception with your comment about English saddlery! The stitching on any quality English or Hunt Seat saddles that I've seen, look nothing like the stitching in your photos. I am in no way criticizing your sewing! It is very nice and far superior to mine, I assure you. Nor am I any kind of authority on English saddles. But I've been around a lot of them and the three that are in my barn all have refined stitching at 10 or more stitches per inch with a much lighter thread, that is most certainly pulled down into the leather!
Your comment "....but for general surface stitching, even on items that are destined for extremely hard use, it's absolutely not necessary." may be appropriate in Great Britain, but I think you're painting with too broad a brush. Western gear construction and materials are much more robust than English gear because western gear is required to take a lot more abuse. It is not uncommon for saddle seats and fenders made of 15 oz leather, to be worn paper thin after just a few years of constant use. Anyway it has become somewhat traditional to place stitches in a groove to help protect them. It has become part of the western "look" which people are accustomed to seeing. So grooving is often performed as much for it's look as for necessity. Generally, the thickness of the leather used on western gear will usually tolerate grooving where it would be detrimental on the lighter, more refined leather used on English gear.
I personally like to see a stitching groove (cut or embossed) as long as it doesn't create weakness. And with the amazing contact adhesives we have these days, sewing is often only a back-up for the glue anyway. So I guess we'll just have to disagree about the durability and appearance of exposed or unprotected stitches. I think it would be fair to say it all hinges on the application.
Just my humble unqualified opinion.....
Bobby
-
The purpose for a stitching groove is to protect the thread from abrasion. Day to day wear can cause the thread to fray when it's not in a groove. A thread groove can be cut or simply "embossed" to help bring the thread below the surface level of the leather to protect it from abrasion. On heavier leather, the stitches can simply be pulled down tight enough to embed them and protect them from abrasion. Another frequently seen mistake is the use of thread which two or three times too large and completely out of scale with the project. Pretty stitches, Martyn!!
-
On 12/15/2016 at 8:04 AM, JenGranger said:
I have the same question about small projects.
Bennie Lovejoy & JenGranger...
Your logic is fine. As I've stated before, casing is not a requirement to produce better work. It's just another "arrow in the quiver" so to speak. Will casing small pieces of leather provide a better result? Probably, but that's something only you can really answer thru trial and error. You know a lot depends on your particular environment, the quality of your leather and the difficulty of the tooling pattern. You may very well discover that when doing small pieces that you can finish in a single sitting, just don't require casing. I think it would be a good idea to try both methods and then evaluate the results. As far as having inconsistent impressions goes, i'd have to see exactly what you're referring to. In general inconsistent impressions can be caused by a number of things such as moisture content, quality of leather and inconsistent strikes. Tool quality can take it's toll also!
Hope this helps!
Bobby
-
I've received several emails regarding this thread and so i'd thought I'd weigh in. There is absolutely nothing wrong with wetting the leather and then tooling it. To me that is sort of the norm and I often do that myself. The advantage to casing, as some of you have mentioned, is to (1) aid in cutting, (2) extend tooling time, (3) aid in the "burnish" or color you get with the tools. It is not necessary to case overnight. The process can take just a few hours, which is depedent upon the environment. Many of us case over night because it's convenient to prepare tomorrows leather, today. Also, it is not necessary to use the refrigerator. The only reason to refrigerate is to prevent mold growth. Mold growth only happens when the leather has been too wet for too long in a warm environment. Finally the true differnece between cased leather and wetting the leather is this. Leather is cased only when ALL the fibers contain the same amount of moisture when the leather is in a TOOLABLE state. To achive this, the leather must be placed in a super humid environment, where evaporation has been slowed to a crawl. So SOME evaporation is required. This is why casing boxes work better than plastic bags. If you are using a plastic bag, it's necessary to let the leather dry somewhat before it is sealed in the bag. Old coolers make good casing boxes, especially when small adjustable vents are added to the sides and top.
I hope this is helpful and Happy Holidays, everybody!
Bobby
-
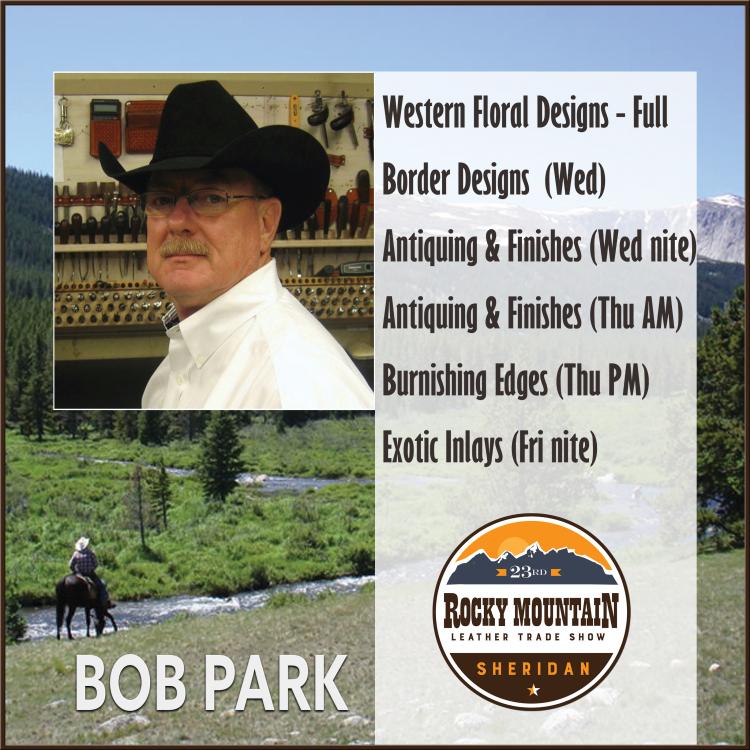
Hello everybody! I have a few seats left in several classes. I will be excepting walk-ins in "Antiquing & Finishes", "Burnishing" and "Exotic Inlays", so if you're on the fence or decide to change your mind, You're welcome to attend (until the room is full...first come first serve). See you there!!!!
-
That happens to me occasionally, too, but I've discovered that when it does I've usually used a little too much glue. It is also important to set the glue by using a wide faced hammer to pound the edges to insure a good bond. I'm assuming that you are using contact cement and not rubber cement. I also sand the the edge to insure the two pieces of leather are perfectly flush. That usually removes most of the residue.
Hope this helps...
Bobby
-
Bob,
I'm glad to hear that you have those available. I had looked for a good quality empty refillable marker on the internet and didn't see any that I felt would work for me. I'll send an email. Will these be available on your website in the future?
Thanks,
Chris
I don't have a website, but I'll always carry these and you can email me. I'm considering doing a website, but we'll see......
-
For anyone who is interested or hasn't already heard, I'm selling a new edge dye applicator that you fill with the water based or spirit dye of your choice and use like a Magic Marker. It's a high quality applicator and by far the best I've ever used! No more dipping into open bottles. Just remove the cap, apply the dye and when you're finished just snap the cap back on.

They are $15ea plus shipping. For anyone interested, just send me an email: hidepounder@gmail.com
-
Hi Scott'
When I use the Quick Slik or my own Edge Magic, I am substituting them for wetting the edge or using any soap at all. Both products work best for me with a cocobolo burnisher on a dremel.
When using the Feibings saddle soap, either the white or the yellow will work. Someone told be they were the same but that the white was designed to be used with rawhide. I have no personal knowledge of that but it seemed to make sense and satisfied me at the time. I really can't tell any difference.
-
I can't believe I never saw this thread! I just stumbled on it and read through all the great comments. Thanks to all of you for your kind sentiments. I hope I can continue to be of help to anyone who needs it.
Best!
Bobby
-
I use contact cement and I do indeed sand. It just seems when I do the glycerine and saddle soap the edge looks good but as soon as the dye goes on boom! Pits. Tiny ones but the samples make the edges look like glass...
Without seeing the before and after or watching you burnish, it's hard to say exactly what the problem is. However I have experienced some of those issues myself. I use Fiebings dye which is spirit based, and occasionally I think the alcohol takes it's toll. However, as saddle soap is water soluble, water based dyes may cause these issues too. I've also learned that the leather makes a difference, as does the cut of the leather. The bottom line for me is, when these issues occur, I re-burnish and that usually solves the problem. It also usually gives me a better edge than the first pass did. When I'm satisfied with the dyed edge I perform a final burnishing step which is applying paraffin to the edge and burnishing it well into the leather. Then I polish with a clean soft cloth. The paraffin will usually fill in a lot of those tiny holes and make them go away. With regard to the glued edge, be sure you are using a good quality glue, like Barge, Masters, Duall or WeldWood. Be sure you're gluing out to the edge. Don't glue heavy and be sure to pound the pieces when you connect them and then sand them to make them flush.
Hope some of this helps....
Bobby
-
the question that I have has to do with #3. If I rub glycerin bar soap into the leather doesn't it prevent the dye from being absorbed into the leather. I put dye on very thick first things after sanding the edges even and when the dye dries it is absorbed into the leather. Otherwise with bar soap first I would thing that the dye wouldn't absorb deeply into the leather.
The process of burnishing, by itself, and the process of burnishing with saddle soap, does impair the amount of dye an edge will absorb. The dye penetrates the saddle soap easily, however not as thoroughly as when you apply dye to the raw edge. On occasion you will have little sections which need to be re-touched. You have to decide for yourself, what your priority will be...dye absorption or crisp edge. You also have to decide on how much effort you are willing or able to put into your edges. The outcome is usually commensurate with the effort. You could add steps which might give you the best of both worlds but it might take double or triple the effort. A good example is the application of edge dressings such as the Fenice products which Tandy sells. Utilizing those products you can get amazing results, but they take hours to apply. I tend to go for the better finish and if that means I have to re-dye occasionally or re-burnish, then that's what I'll do. But I'm not willing to invest the time required to use the new edge dressings. I'm not THAT impressed with they way they look anyway.
Hope this helps.....
Bobby
-
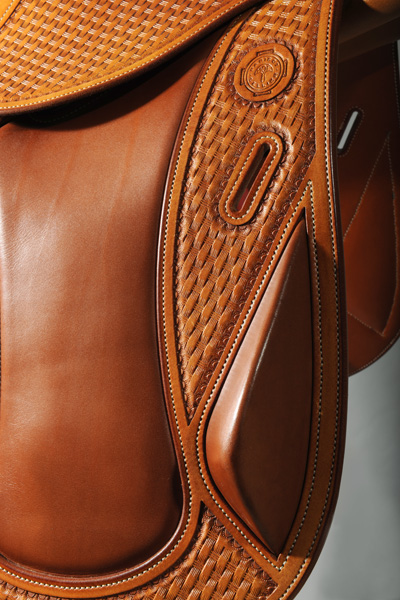
Really nice job. In response to your PM, I see no real problems to pick on. The comments I'm going to make are just about style. I would eliminate a lot of use of the camoflauge tool on the stemwork and in the flowers. Instead, use a very narrow viener like Barry king makes around your flower center. Also, I would pull your mules feet tighter together, use a lighter strike and taper them off more quickly. On your decorative cuts, for me they are a little deep. Work on refining them a little more. You have good control of your knife and so the next step is practice tapering them and lightening up a little. Good job on this!
-
I can't really answer that question because I've never tried to case latigo or harness leather, but my first thought would be that it would not case. My other thought is that neither of those leathers would be the appropriate choice for projects that need to be molded.Can any type of leather be cased (latigo, harness, etc)? To stretch and shape it? Like for a knife sheath? Maybe this is not the right place for this question??
I would think the answer is yes. The best leather for a project that needs to be molded is veg tan.If it is veg tanned and has not been pre loaded with waxes and or oils, or have a finish on it can be wet molded.


PRESCOTT WORKSHOPS - by Bobby Park
in Special Events, Contests and Classes
Posted · Edited by hidepounder
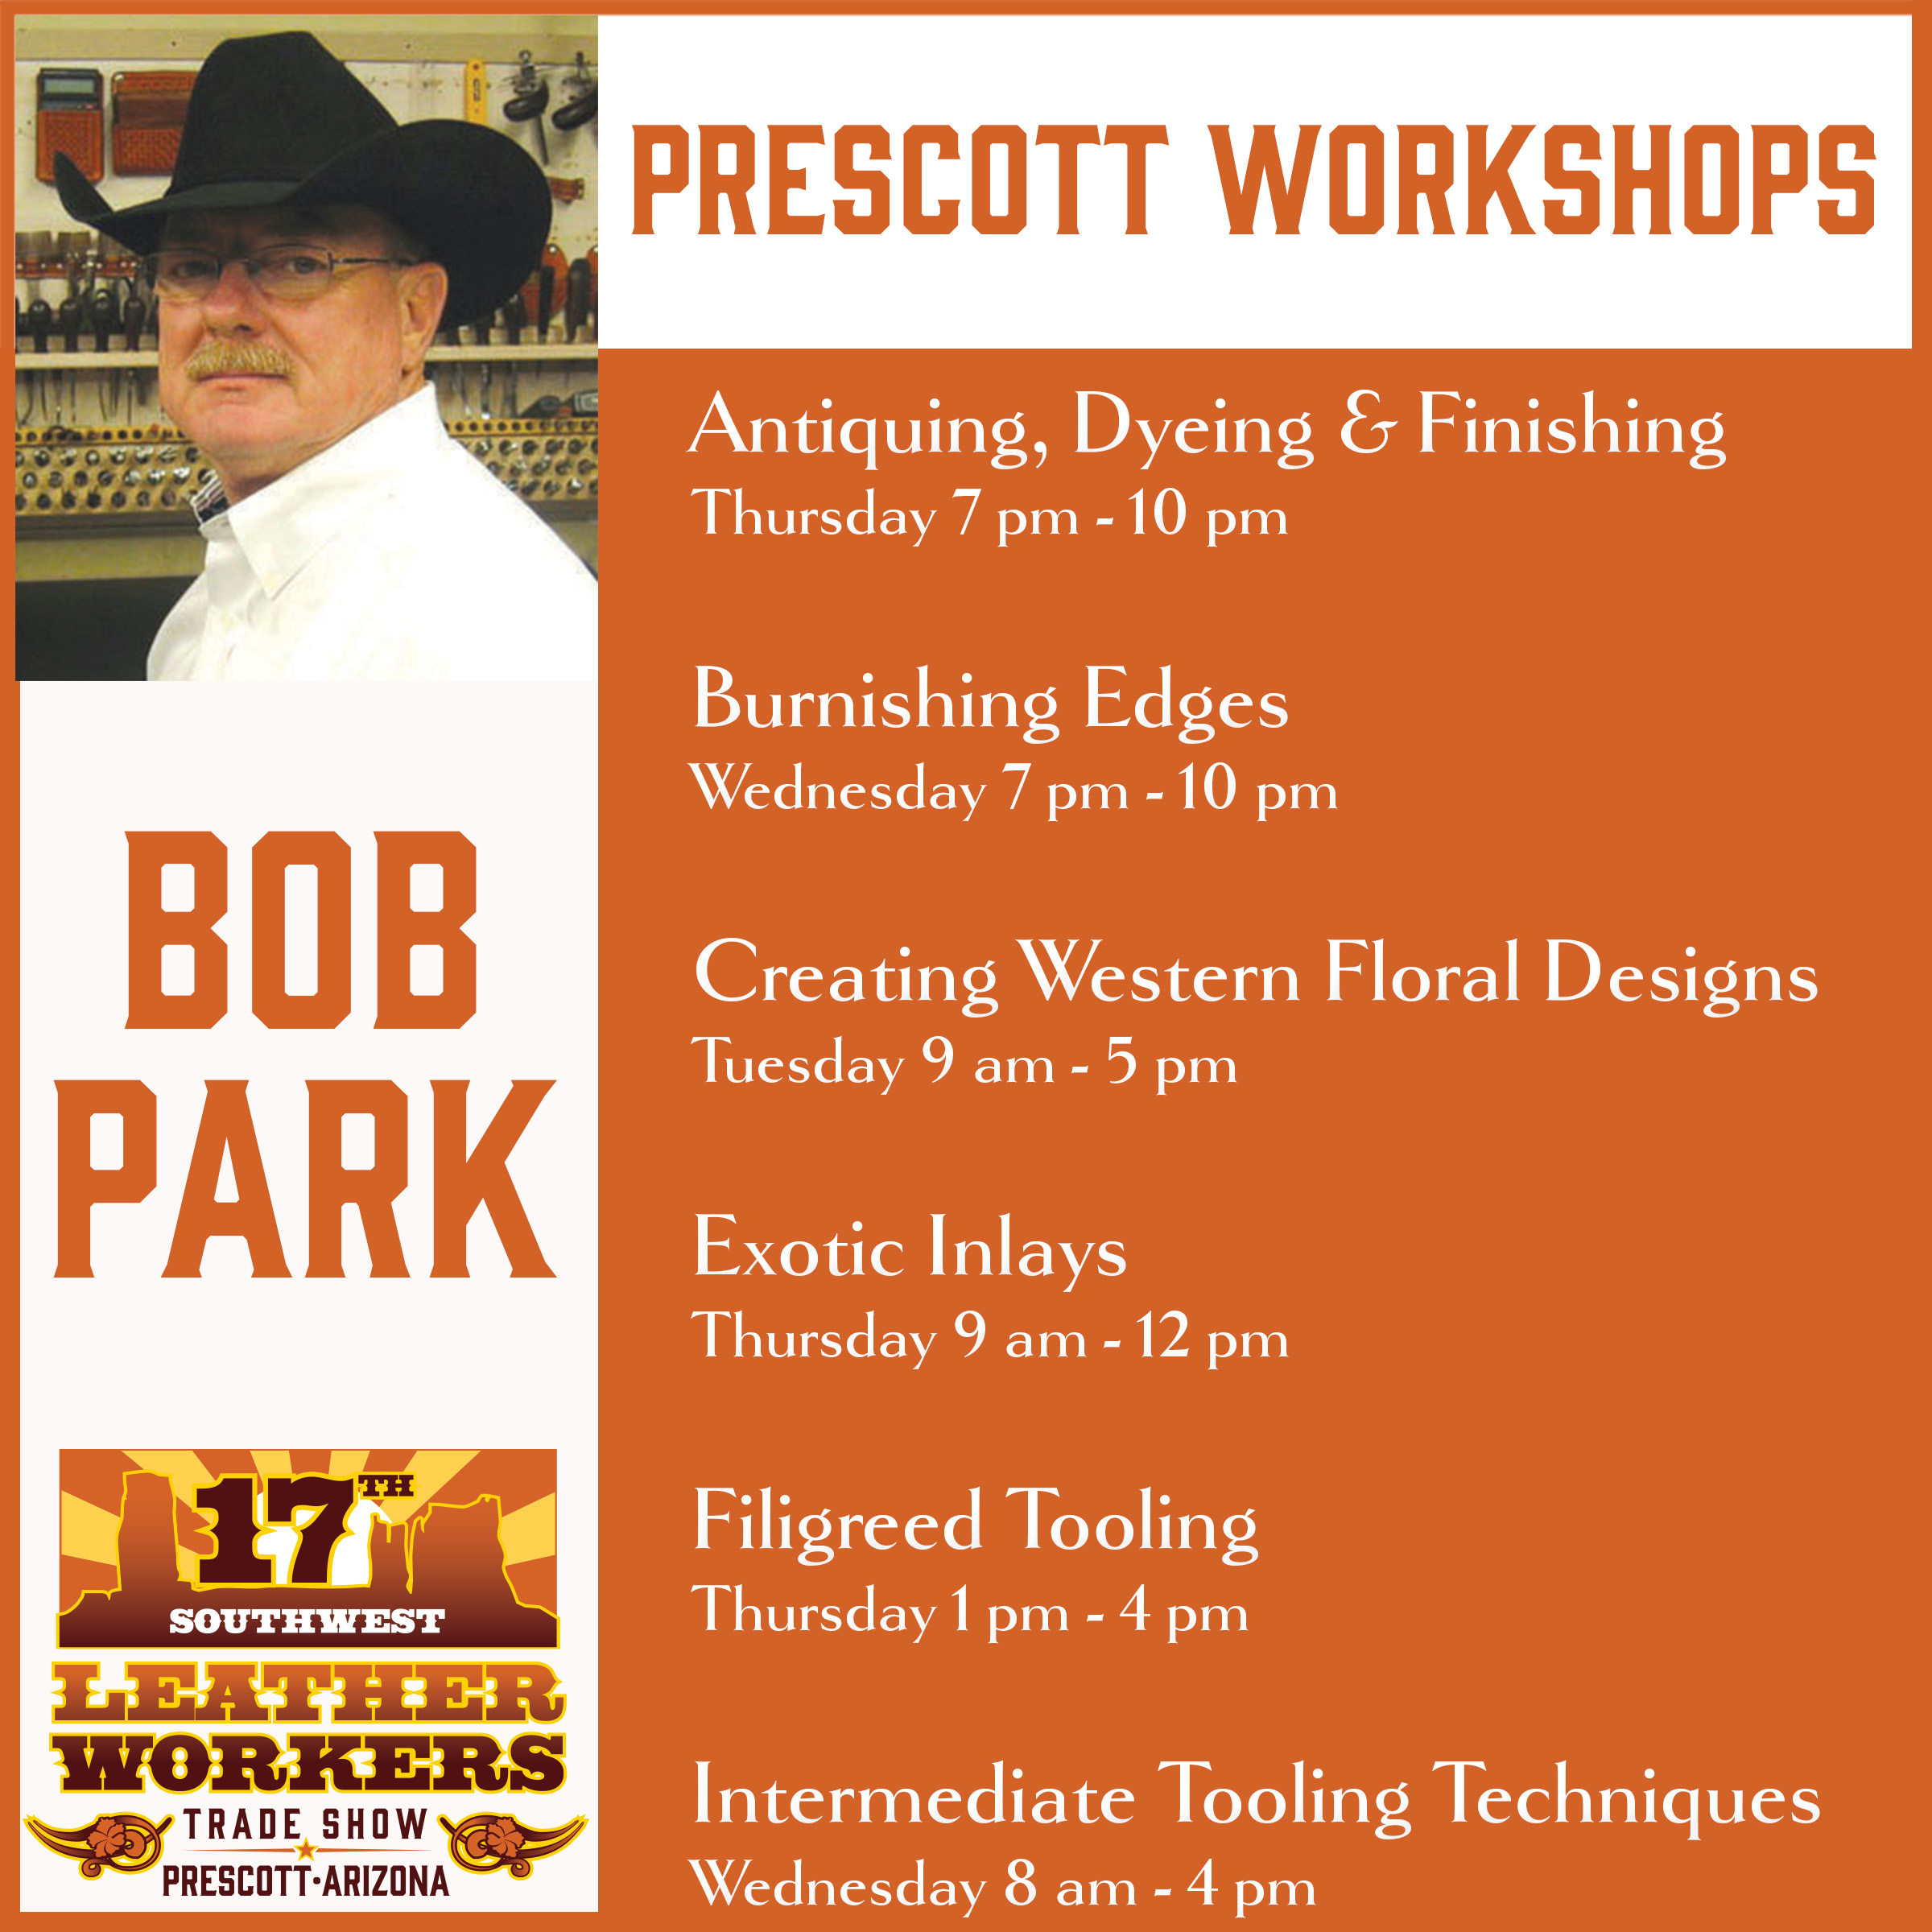
ADDITIONAL WORKSHOPS:
Bindings & Turned Edges Demonstration: Tue 2/26, 7pm-10pm
Western Floral Tooling: Wed 2/27, 9am-5pm
Filligree Backgrounds & Inlays Demonstration: Wed 2/27, 7pm-10pm
Antiquing, Dyeing & Finishing Demonstration: Thu 2/28, 9am-12pm
Burnishing Edges Demonstration: Thu 2/28, 2pm-5pm
Registration: www.leathercraftersjournal.com Bobby's contact info: hidepounder@gmail.com 602-999-3099