


sparctek
-
Content Count
45 -
Joined
-
Last visited
Posts posted by sparctek
-
-
3 hours ago, SUP said:@sparctek I thought all pricking irons are like the traditional ones. If the ones by Kevin Lee and Amy Roake and other allow punching through the leather, that is one good reason to buy their instruments. I do not use leather thicker than 5-6 oz anyway so they should work for me. Usually I avoid expensive tools - seem to do perfectly well with more reasonably priced ones. I am a hobbyist too and I guess if I was doing this professionally, the tools would matter more.
When you say 'and others', who else, do you know?
@Mablung I learnt how to use the edge of the leather for punching holes on both sides from one of the patterns I bought online. Don't remember where. If I have to do it, I use an iron with round tines since I do not have opposite facing angled irons.
Rocky Mountain has some: https://www.rmleathersupply.com/products/rocky-mountain-premium-pricking-irons?variant=33226012360813
But, so do other supplier like Maker's Leather Supply, etc. I think for the most part they come from the same manufacturer overseas. The key is the prongs are longer and narrower than the traditional ones. That let's you punch all the way through without making a huge hole in the front. I looked at the KSBlade ones when I was looking to buy mine, but the teeth on those seem to be wider.
-
17 hours ago, Mablung said:Related to that, do pricking irons generally make narrower holes than stitching chisels? I have some of the regular Craftool black-coated stitching chisels, and the holes end up fairly fat in veg tan leather. I have some of the Craftool Pro ones with thinner tines but in too-narrow a stitch length for most of my stuff. Been thinking about getting pricking irons in order to make less obtrusive holes for firmer stitching.
Stitching chisels are meant to be punched all the way through the leather you are sewing and do leave a substantial hole in the leather. they are good for heavier leather and larger items. If you are making wallets or smaller items those may not be a good fit.
As for pricking irons, the traditional ones such as made by Blanchard are not intended to punch all the way through the leather. They are intended to mark or "prick" the leather to guide your awl. The teeth are usually set at an angle of ~45 degrees, give or take a couple. If done correctly the resulting stitching is very neat with a pleasing angle to the stitch.
Having said that, there are manufacturers such as Kevin Lee, Amy Roake and others making "modern" pricking irons that you can punch all the way through the leather, up to a certain thickness. Using these modern irons removes the need to use the awl on one stitch at a time. With these, as long as you are careful to keep the iron straight up and down when punching through, you will have neat, straight stitching lines on the back.
I'm likely in the minority here, but I still like to do the traditional, one hole at a time with the stitching awl method. Granted I am a hobbyist. I'm sure if i was doing this for a living I would have to change that.
-
22 hours ago, SUP said:@sparctek, rather like I do with my laced bags, but that is much easier, since the lace is much wider. At this point, I am making items in which the beauty is in the pattern and leather itself and I keep the stitching discreet and in the background. Perfect time to practice until I get it right. Thank you for the detailed guidance.
Hopefully it helped some. I am still learning, and I still spend time practicing my stitching. I don't pierce the leather all the way through with pricking irons.So, I have to keep practicing with the diamond awl to make those neat straight lines on the back side. Learning to use the French stitching clam wast the hardest thing I've learned in leather work so far. LOL
-
I spent a lot of time practicing my stitching before I did my first project, so I made a lot of mistakes and figured out my own way of trying not to repeat them. One of the first things I do is make sure the first stitches lay flat in the slanted hole the awl makes. Both back and forward stitches. If I have to slow down and guide the thread flat I will take the time to do that.
Once those first stitches lay flat those that follow will tend to lay flat. Early on when I was practicing with long thread lengths I started to pull the thread slowly holding it with my thumb and first (pointer) finger. I watch as I am pulling the thread and if I see the thread starting to turn or twist I roll my thumb and finger in the opposite direction to counter act it. Once the stitch loop is really close to the stitch hole I adjust my hands so the thread is being pulled by my pinkies, and then I set the stitch with tension. That seats the thread flat. But, eventually the thread will tend to start turning when it gets dry. That's when I apply more bees wax. That usually works unless the stitching run is so long the thread starts to fray from friction.
Being completely honest I still miss a couple now and then.
-
I am a hobby leather worker and I've only been doing this for a couple of years. So, take this for what it's worth as my observations:
Ritza tiger thread is flat woven polyester so it has high strength and resistance to elements. If you are making items to be used outdoors this thread is a good fit for those items. Especially strap goods.
I like using it on larger items I make, i.e. book/bible covers, not because of it's strength and resistance to elements, but because it looks very nice paired with 8 spi french pricking irons. For that spi I like to use the .6 mm thread. The only time I've had an issue with it twisting and knotting, is when I have a long run and the thread starts to dry out. When that happens I just run the remaining thread through bee wax and it goes back to behaving normally.
For smaller items like wallets or card holders I like to use linen thread. I like the Meisi super fine M40 paired with 10 spi pricking irons. I tried the round poly braid thread but it didn't look as nice to me as linen thread. That is just personal preference.
One other thing to note: I did notice the tiger thread tended to dry out and kink more when I pulled the thread at weird angles when setting the stitch. If I pull the thread straight out with both hands, there is less friction on the thread and it seems to behave better. That goes for both linen and Ritza threads.
Just my thoughts...
-
The head is typically used for small goods, i.e. key chains, etc., since the scales are small and in odd patterns. But, depending on the size of the hide you can get enough usable area for a small card holder or two....
-
That does seem odd. I bought a whole hide not long ago and it was the entire hide, including the head. The one I bought happened to be a Grade 1 hide and is very clean, no holes or major scratches in the usable part of the hide.
-
Nice! Should be able to get a couple of wallets out of that.
-
To be completely transparent, I ran through quite a bit of scrap practicing before I attempted that. :-)
-
If I remember correctly that type of skiver is popular with book binders. So it does work well with flexible chrome tan leather. Search you tube for Das Bookbinding and Scharffix. He has at least one video showing how to set it up and test it.
-
I used light coats of edge paint with sanding and smoothing with electric crease in between coats. I think it was 3-4 coats IIRC. That was pure trial and error on my part since I had never done that.
-
Yes, lay out the pattern so that your stitches end up through the scales. You will absolutely have some that will end up in between, but try to keep those to a minimum. I think one you finish your first project you will enjoy working with the leather. It was just so nerve racking putting the knife into that skin the first time. LOL
-
I forgot to add that I used the Saphir Reptan cream on the wallet back once finished. That is what gave it that really deep, almost soft shine. That stuff really works well.
-
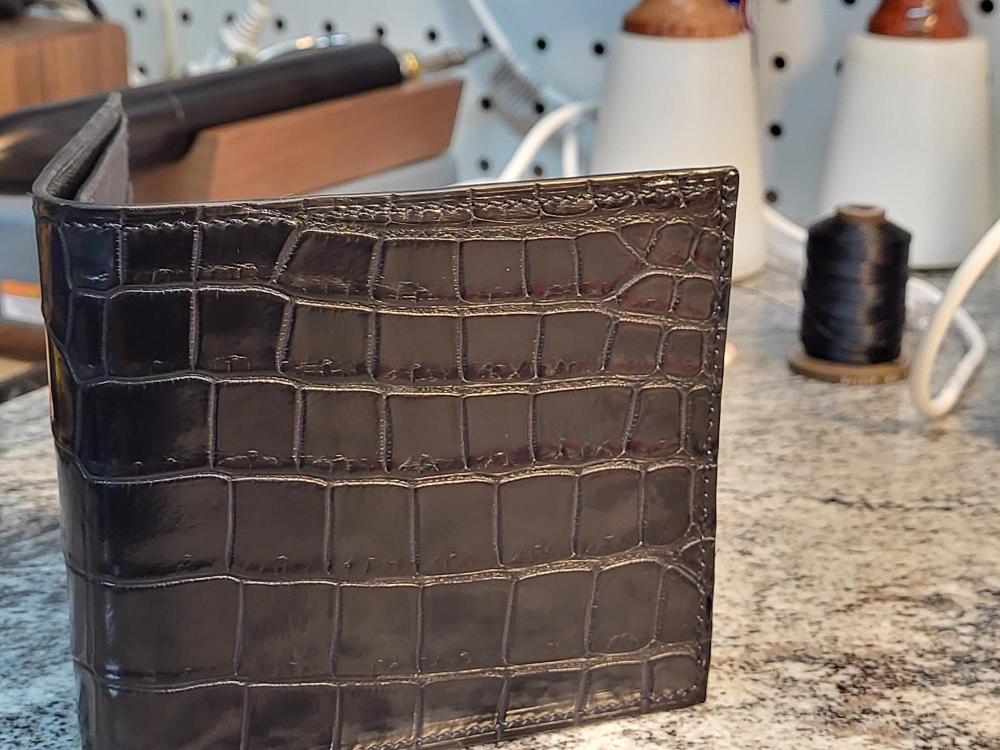
This was a black, matte finish skin from Rocky Mountain Leather Supply. This is a full size wallet so the wallet back was about 9 or 9.5 by 4 inches. if you make the minimalist, smaller wallets you'll get a better yield.
One thing to watch out for is be aware of where your stitch lines will end up. If the stitch line runs parallel and on top of the space between the scales, it will be harder to stitch, it won't look as nice and that part will tend to tear easier. Kind of hard to explain but you will understand as soon as you feel it. That area in between the rows of scales is really soft and pliable. I would suggest cutting out your wallet back template from something clear, (pattern vinyl like what is used for quilt patterns works well) so you can see where your stitching will end up.
Hope that helps.
-
I was asked by a close family friend to make a crocodile wallet for her husband. I was hesitant to say yes because that is way outside my comfort zone. But, I reluctantly agreed. The leather itself is not hard to work with, but it is nerve racking to cut into it, because is it is so expensive. I was afraid to to make a mistake and ruin the leather I needed. I bought a whole hide as well just in case I made a mistake. The challenge is even a larger hide only has enough room for 1-2 wallets from the belly (if you cut the piece across the belly). This is assuming you want the best part of the hide for wallets. You can probably get 1 maybe 2 more from the tail if you watch how you layout the patterns.
If you are going to thin/skive the piece, be very careful on how you do that. If you go too thin you risk cutting into the little spaces between the scales and ruining the whole piece.
This is what I came up with...my first croc wallet, and my first wallet period. The inside is goat skin.

-
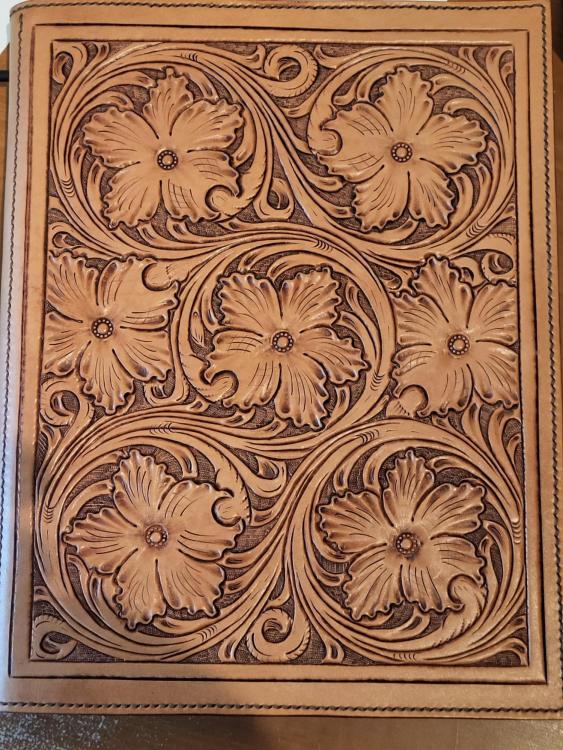
For youtube channels I recommend Don Gonzales saddlery and Joe Meling. Don is a more Sheridan based style while Joe has his own style. Both very good at what they do. Don has a 4 video series where he tools a free downloadable pattern and explains his process and why he does what he does and in what order. If you already know the basics and are looking to improve I suggest downloading his pattern, watch the videos and then tool the pattern going to reference the videos as needed.
I started with Tandy and simple tooling patterns, then watched Don's videos and started practicing on his patterns. Here is one of the first patterns I tooled after watching his videos and purchasing the pattern. It is a legal pad portfolio. it is not perfect by any means but I was pretty happy with the result.
I highly recommend Don's videos. Hope this helps
-
That is a very nice carving. I have been looking at Jim's website to try my hand at some of the regional styles, but I really like this one. I may have to give it a try.
Great job!
-
Leather Wranglers recommends 30 degrees. I have a Tandy and one of Leather Wrangler's swivel knives and the angles on both are almost identical.
-
Don Gonzales has a video explaining how he transfers belt patterns on to his belt. Basically, use tracing paper and a B2 pencil trace the pattern on to the tracing paper, flip the pattern over and trace again. Use the tracing paper with the image on both sides on dry leather. For a belt as you trace on the image on top of the paper, the pencil marks transfer to the dry leather, as keep flipping the tracing paper you keep refreshing the pencil marks and transferring the image on the dry leather.
I've started to use this process on every pattern. When it's not for a belt I use either Microsoft Word or any other image application to "mirror" the image, print it and then transfer it to tracing paper. This works very well, and for me a least it keeps my image on the leather really neat and easy to follow with the swivel knife.
Here is a link to the video. It is a bit long winder but the actual transfer process starts around the 14 minute mark.
-
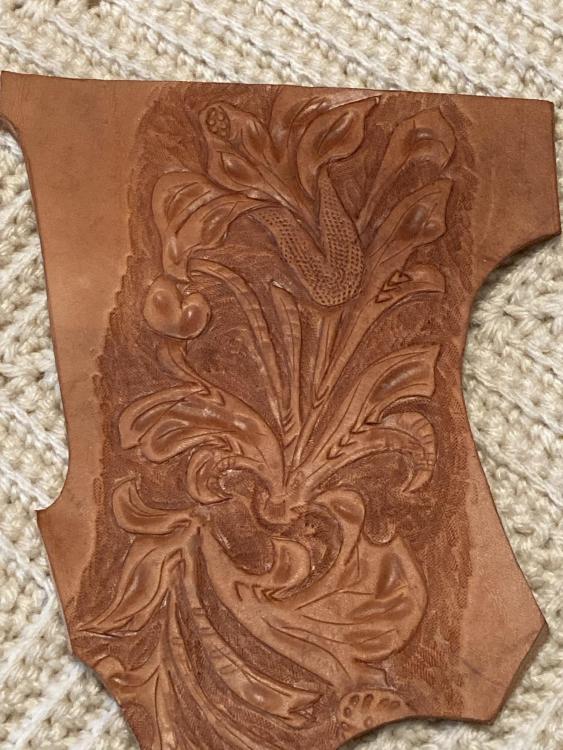
I could not find any of my early attempts at leather tooling/carving, but here is one of my projects from about 6 months ago. It is not perfect, but it's one of my better attempts. It's one of Don's patterns for a portfolio I made for myself. That lasted 1 day, my wife saw it and immediately claimed it. I guess I will have to make another one for myself...
.jpg.25cb29cd8bfef0d85e0e9908acb0f043.jpg)
-
@Frodo I was in the same spot you are in a couple of years ago. I started watching Don Gonzales videos and 2-3 years later, I can confidently say my work has improved. I am by no means an expert and I am nowhere near the skill level that some of the people on this forum are at.
But I can confidently say that once you learn what each tool does and learn at least one way to use them, you will improve them if you put the time in to practice. It took me that long because I still work fill time for an IT company. So, my time working with leather is limited. Give this video of Don showing his process and the tools he uses and why a try or 2... it should help get you going in the right direction. I know it did for me.
Hope this helps, and yes it is a 4 video series. If you don't have the same tools a she does (undershot, undercut) you can just use a beveler, angle it and use that to bevel those areas instead.
-
You are making progress for sure. Question for you: are you beveling your cut lines before you use the background tool? Or maybe beveling too lightly?
-
Rockler has one that is similar. Likely same one with different color handles/details. I bought a pair to use when cutting thinner leather, my wife promptly borrowed them. I had to go buy another pair. LOL https://www.rockler.com/10-extra-heavy-duty-scissors
-
1 hour ago, gregintenn said:While it's still a disaster, I feel like drier leather and a sharper knife did indeed help. As long as I'm improving, I'll probably keep practicing. Maybe I've found something I just can't do.
I surely appreciate all the suggestions and advice.
I am not an expert by any means, but can offer something that helped me improve my swivel knife work. When I first started, my hand would cramp up after just a few minutes of cutting. I finally figured out my knife was set too short and to compensate I had a very tight grip on the barrel with all my fingers. That made it hard to turn smoothly and it made my hand cramp up. I experimented with various lengths (adjustable knife) but it wasn't until I saw a video from Gordon Andrus that I was finally able to set a good length that felt comfortable and allowed me to turn and run the swivel knife with much less effort and no more cramping. Here is a link to the video:
The other things already mentioned are definitely important. I just thought this may help you as it did me.


Why Ritza Thread?
in Sewing Leather
Posted · Report reply
I agree with the list of Irons being huge. I started using the Tandy ones, but once I decided leather working was going to be a hobby I stuck with I started looking for upgrades. It took a long time and a lot of you tube video watching to finally settle on something. I chose the Pro Atelier Plus pricking hollow irons. They are nice and sharp out of the box, you can get a lot different tooth configurations and even chose to buy a set. They are good quality and I have punched all the way through about 5mm worth of leather to test how well they do. I have no complains on them so far, after about a year and half or so of use.
I am looking at this hobby as something that will keep me busy when/If I retire, so I am saving up while I can to buy tools so I don't have to once I do retire. I recommend taking a look at these if you chose to go that route...