


Vinito
-
Posts
58 -
Joined
-
Last visited
Content Type
Profiles
Forums
Events
Blogs
Gallery
Posts posted by Vinito
-
-
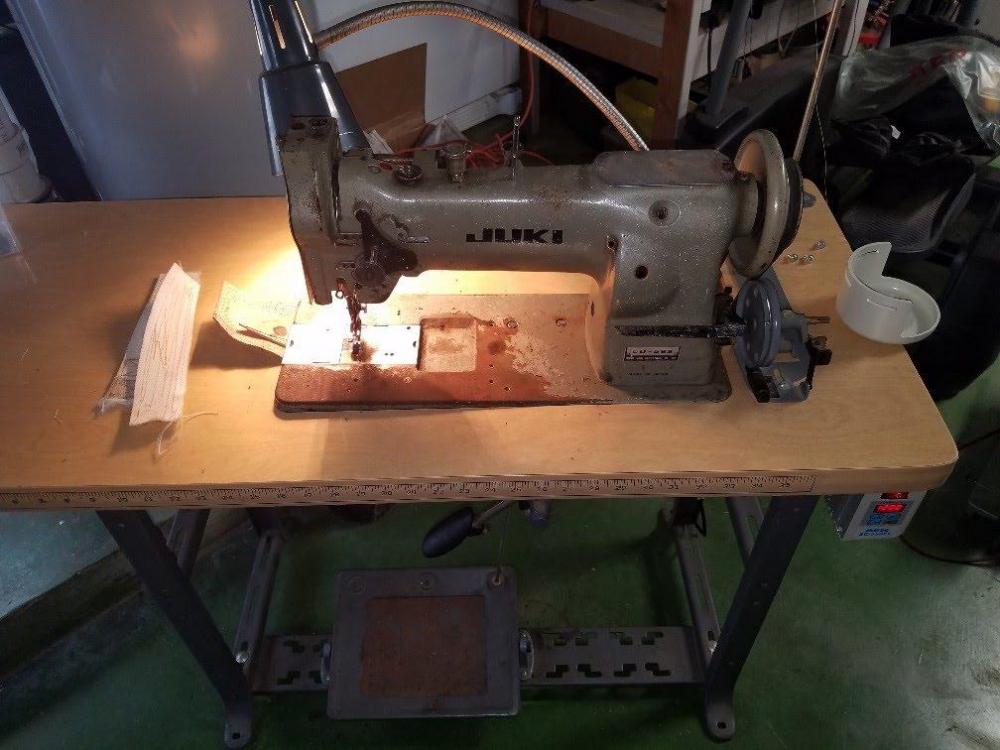
Well looks like I'm probably gonna earn this machine. Been fiddling now and then with mostly inspection with a smidge of cleaning here & there, but the deeper I look, the more muck I find. I've decided this thing really needs a complete disassemble and deep cleaning. You should see the area around the bobbin. Holy cow! It's totally packed in a mix of old oil and lint which has combined into a sludgy felt. So far I've found that even solvent in a parts washer struggles with dissolving it, but turns out gasoline is hard to beat as it cleans it up pretty good.
Since the color match didn't work out and the paint is pretty rough on the machine anyway, I guess while it's completely apart is a good time to just drop back and give it a whole new coat of something. I'll go with hammered just because I like it, but don't know what color yet. Might just do silver, but I have some dark-ish bronze hammered on the shelf and that might look cool even if it disguises the identity of the machine from a distance.I halfway want to have a go at changing to a large bobbin while I'm in there too. I am a machinist so if it needs any of that I can do it. I just don't know if it will be worth the money for the rest of the parts. They have hooks on eBay for under $30, but I'd bet they aren't worth the metal they are made from at that price.
I hope I can make sense of the service manuals I can find. The one I've been using at (I think it's the military 111 one IIRC) keeps referring to drawing numbers that aren't included in the thing and that's super frustrating. Why bother to scan a manual and leave pages out? Especially pages with drawings which are referred to over and over? If anyone knows of a full service manual for a Juki LU-562/563 (or clone, i.e. Singer 111, etc.) which is complete and really good, please link to it here. Otherwise, I will try to keep making sense with the one I have and fill the gaps with trial and error.
OK, here we go! I've taken the arm shaft apart and cleaned all those parts plus the hook stuff. What a total mess it used to was. But it's clean as a whistle now. Progress I guess. If it doesn't go as well as I hope, then I might have a basket of parts for sale coming up.
-
OK, just so ya know, even though ya knew before I said it...
The $13 Amazon tension assembly was NOT worth the $13, so even though it's a very basic mechanical thing, they can't get it right for $13. BUT... I was able to scavenge enough parts off the thing to put together a working tension assembly. So at the end of the day, I did get the tension parts working. I haven't tested it, but it fits well enough that it should I think.
I got this machine cheap enough that I'm tempted to convert it to the big bobbin, but I guess that don't make no sense until I start to hit the wall a few times I guess. Fitting the large bobbin would be kind of a fun project, but I haven't even run one bobbin of thread through the machine yet, let alone run a bobbin dry on some make-believe important project.
Next step - clean it up, lube it and give it an honest test.
-
Well looks like I'm probably out of luck on the color. I saw a project a guy did where he used both Hammered Rosemary and Verde Green and they are quite different.
.thumb.jpg.1216e26b413846e4671dd4a92808837d.jpg)
... though I guess I could mix them like this guy did and end up with similar look. Personally i don't like the mix of colors much, but heck, it's not awful i guess.
-
2 hours ago, JJN said:
Great find. Maybe you can mask it and only paint the bed. The upper part of the machine looks pretty good.
Thanks. Yeah, I was kinda thinking the same thing. There are a bunch of flecks of some kind of paint all over it. In the past I've had fairly good luck cleaning flecks like that off with rubbing compound, plus it cleans up the paint real nice while yer at it. But yeah, the top doesn't look bad. There is a bit of a scrape at the front inside corner of the upright, but otherwise the upper machine isn't bad. If the paint is even kind of similar, a non-exact match won't bother me none.
I have a can of the Verde green on its way. Prolly shooda got a couple. But supposedly a nearby Menards carries it too so I can maybe pick up more if I need it. I guess I probably won't though.
I ordered a couple pulleys too so I can rig up a 3:1 reduction with a timing belt arrangement, which can be pulled off with smaller pulleys instead of that 12" diameter setup they sell. It was significantly cheaper too. The bearings and shafts are kinda what I do for a living and I'm sure I already have that on the junk shelf so it should be free + labor I guess. I think I'll really like a 3:1 reduction!
The tension assembly was missing some parts so I ordered one of those too. Hopefully I won't regret blowing $13 on Amazon instead of getting a pricey one. Tension is a pretty basic mechanics thing though so I'm thinking it should work fine. If it was a hook or something, I'd pull the trigger on "real" parts.
I looked it over pretty good and it looks like the tension assembly is the only goof I could notice. The knee lift doesn't even come close to actuating the levers though so I need to figure that out. Honestly, it looks to me like the table didn't match the machine - the knee lever and stuff are nowhere near the same location. I guess I need to figure out how the pros set that up before I start reinventing the wheel though. I'm probably just mentally missing something.
-
Well that figures. Perfect color match, but out of reach. Evidently they sell that color in Canada, but I can't find it in the US whatsoever, at least not anymore.
I did find a color called "Verde green" so I'm gonna try that and see if it's close. Heck, maybe they just re-named the same paint. That particular green should be a highly sought-after color honestly. Seems like a good color to paint a bunch of different machinery-like things if a guy wanted to.
If the Verde green is a match, I'll report back (unless somebody else already knows it doesn't match and says so).
-
Not sure that it would have been sent to scrap, but they did just want it out for the cleanup. It's a little beat, but it does turn over smoothly and reverses fine. I'm sure there's been a lot worse
Picked it up for $50 with a table. I figger that's not too bad. Prolly take a teardown, cleanup and reassemble before I feel great about using it, but that's just my OCD.
Anyways, unison feed for cheap. The table and servo motor are worth three times what I paid I think. Woohoo!
-
haha. Yeah I wanted to test this thing out thus the patch, but I sure don't intend to make a habit of maxing out the power of this thing. Anything short of a motor rewind, I am pretty used to doing for a living, so even if I did mess it up I might be able to rebuild it with bionic parts. I'd rather it just keep working though.
But thanks for the warning. My intentions are to only put stuff together that is mostly well within the medium range of its capacity. Like I said, if I start to need something more powerful, I'll look into that then.
-
I got a little bug for leather lately and picked up a shoe patcher kind of by accident. That got me thinking along the lines of sewing machines and researching.
From what I've read, for basic straight stitching of lighter to medium stuff in general, there are a few vintage domestic machines out there in pretty high regard. I figured maybe rather than blow the savings on a heavy leather machine, I might do well to cut my teeth on something which can sew somewhat heavier things reliably and still be able to do light things well too. I know I can use something like that often enough to warrant the much lower cost. And if the future throws enough heavy jobs in front of me enough to warrant a need or even a want, then I can start to look at a heavy compound feed of some kind. For the low volume I will do as a newby anyway, I can hand stitch heavy stuff, the learning of which is probably not a bad thing in the first place.
Do this sound logical or just stingy? (keep in mind, I'm really green to working with leather to begin with)
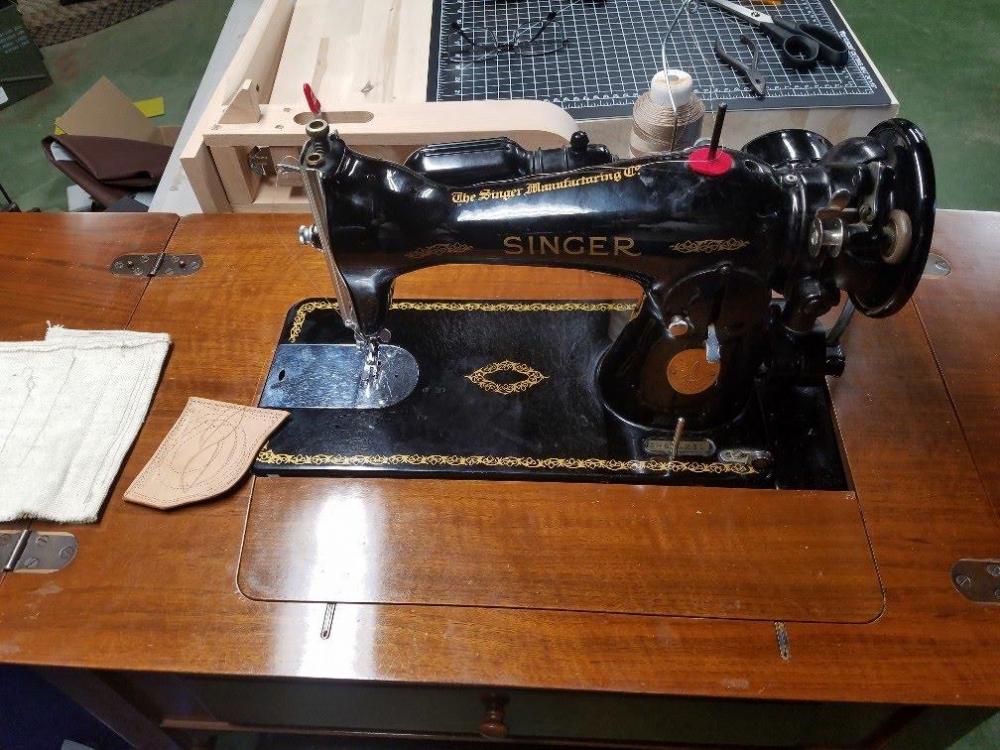
Picked up this beauty today, for $50. Singer 15-91. It appears to work like a champ and runs as smooth as... a sewing machine! (I figure that saying must have been coined before the 1970's when sewing machine design and build quality started to drop dramatically
 )
)
The investment didn't hurt at all, and even if I drop this hobby like a rock, the mechanical beauty of these things is worth keeping around just for the art (IMO). Wonderful piece of machinery. I'm a machinist, so this stuff is just awesome to me. Anyways... yep that's a single layer of 8-oz veg tan. Struggles too much going through 2 layers, but even one layer I'm impressed. The stitch itself in one layer is very nice. That'll do... for now.
-
Well so far for the past week or two, I've been placing an order or two every day. Sometimes it's small, piddly stuff, sometimes a bunch of stuff.
I could add anecdotes and long-winded story, but the main thing I wanted to post right here is...: if you all don't hear from me for a few weeks, start keeping an eye open on Kansas City craigslist. If I get called to Valhalla, my estate sale should really be something to behold. Not just leather stuff specifically, but I've been doing this tool and machine buying and making thing for forever, so it'll really be a big mess for whomever has to deal with all my junk.
I'm with Bikermutt and have been blowing fortunes on tools for decades so I can avoid doing things like buying $80 belts.
And no, nothing's wrong. It just hit me that I'm doing it all yet again.
-
Quote
I would like to remind you that "patchers" were built for shoe and boot repairs
That's all well and good, but in my case, as of today anyway, this is the only machine I've got so I've gotta make-do... if I can... for whatever stitching requirements might come up.
I do grok that there is a right tool for the right job, and this machine is most certainly not it for a lot. Let's face it, it definitely less than versatile compared to the modern, better designed machines. But you dance with the one who brung ya, and today she's a bit homely and awkward. If I take to this working leather thing enough to make it worth it, I don't have a problem investing in machine(s) which will make the process a joy to do as opposed to a wrestling match.
I guess the more I struggle with this Adler, the more I'll appreciate the newfangled sweetness should I decide to step it up in the future.
-
I did do what I set out to do the other night. Played around with a few squares and applied some dye and some conditioners & finishes, tried some burnishing. Then I even tried my hand at some basketweave stamping. On everything I did, I got a little better on successive attempts, dodging and weaving, tiring out the leather and running the clock down. I have just a tad more confidence now and a more focused, yet still vague, idea of how to approach a project. I do have an item in mind that has been bothering me not to have. Of course it's something that you just can't buy, and if you could it would be low quality, so it's a perfect thing to try. Plus, I'm happy to accept that I might thrash the first one or few attempts since i'm just learning the basics, so if it takes me several tries before I end up with something I'm willing to keep, then that's just fine.
I now have three or four different thicknesses & qualities of VT leather to play with, a couple brownish dyes, a half dozen stamp tools, generic blades & such, some basic stitching tools (needles, thread, grooving and scribing stuff). A cutting mat was an afterthought I ordered yesterday which seem like would be extremely useful, almost necessary - it's on the way. So anyway, just a basic set up tools to start with and a decent stock of material to work with. Not a bad situation.
I would like to order high quality tools out of the gate, but I don't even know how deep into this I'm gonna get so can't rationalize the really nice stuff yet. For example, I struggled choosing edge bevelers. It seems that a high quality couple of those would do a much nicer job of it, but the cost difference between cheap and high quality is a magnitude plus a multiplier. So in the end I opted for very cheap since I'm pretty good at sharpening stuff. Longevity of an edge is still a question, but I just figured I'd not lose much by dipping my toe in with come crappy edge bevelers and step it up a level later once I maybe have a better idea what the heck I'm doing. This same phenomenon kind of pops up pretty broadly across most everything I've ordered in the process of getting into this. I figure since leatherwork is the kind of thing a guy could do with a pocket full of tools on a park bench if he had to, I'll just give it a stab and let the weak links reveal themselves over time. In other words, getting a good match of acceptable quality tools as per skill level has proven to be more difficult than I anticipated. You can spend a fortune, but then if you don't take to the work like you expect, then it's a bit of a waste. Basically I decided you can cheap out on crappy tools and find out they don't work well, then they are a waste too once you bin them after purchasing something you can actually be happy with. But the waste is less significant. At the beginning, you suck anyway, right? So I figure as I go I'll just let the tools speak to me and tell me which of my cheap junk want to be thrown out and replaced.
I guess what i'm trying to say is I thought it might be nice to avoid struggling with crappy tools, but it turns out that for a beginner, the typical path of starting with crap you have to throw out later might be unavoidably just the way it goes. At least it seems that way for me.
-
Well wonder of wonders, the thing appears to be working now. So far just done a couple pretty short tests (a few inches of stitch) but it does a reasonable quality stitch with #23 needle + #138 thread and #18 needle + #69 thread. Woo-freakin'-hoo!
I have a couple parts on the way for possible future improvements or at least experimentation. One thing I'm looking forward to is a new presser foot which has most of the jagged tooth ground/filed away and coated instead with some flexible epoxy for a "rubbery" coating or at least something smooth and yet high friction to maybe imprint VT leather less as it feeds. I dunno if it will work at all, but I think it's a worthy experiment. I've seen some folks use tool dip or something like FlexSeal or something, but a closeup photo always looks like it's on the verge of peeling off if it hasn't halfway done that already. An epoxy should be more durable - that's my hypothesis.
Well thanks for the help folks. Good luck to Mikesc in catching that next incredible deal.
-
Shame. Somebody put black paint over that ferric chloride plating!
")
-
Good catch @RockyAussie on the thread & needle combos. I was conflating data from memory and not surprised I'm out of sync on it.
Tonight I'll try again as per Wiz's correct specs recommendation and I expect things to go much better.
Duh!

Much thanks!
I guess I was confused at Mikesc's confusion because I said the stitch (singular) is tight on the bottom and didn't word it as a bottom nor top stitch as if there were two different stitches. I would be happy to admit bad communication and clarify, but I think we were just talking past each other.
So OK, I'll keep this thing another day anyway and try it again before giving up and selling it off.
-
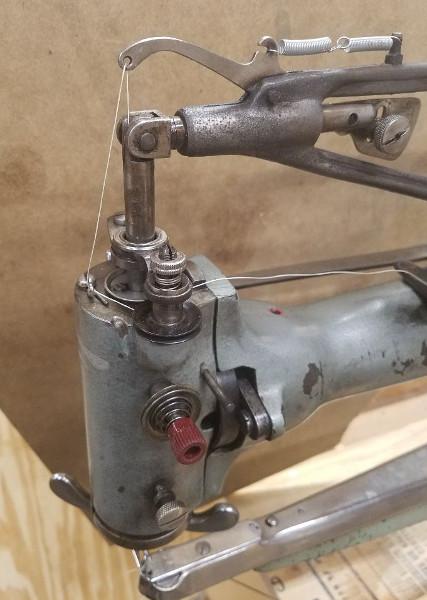
"Pick-up arm" - I meant the take-up lever.
Quotethe stitch is tight on the bottom again
Not sure what you're meaning is regarding bottom thread sinking in nor appearance ov being "pulled down" if you flip the material over. I looked and would be happy to correct myself, but I didn't mention a bottom stitch or top stitch. As quoted, my stitch, as a whole, being made up of a top thread and bottom thread, is tight on the bottom, i.e. the bottom thread is tight. And yes, to me that means the bottom thread is not sinking into the leather at all. Yes all I see is the nubs from the top thread and a straight length of bottom thread. When top thread is as high as I can set it and pull on it and compare to bottom thread, it is at least 4x tighter than the bobbin tension. Can't set it tighter and I think it would just start snapping thread if I could.
I could just punt and take up another hobby. Evidently I can't even communicate my problem, let alone troubleshoot and solve it.
-
Dangit. I need more help or more smarts. Dunno if either is possible... maybe more help for a fee or something.
I got the #138 thread and #19 needles and now the stitch is tight on the bottom again with top tension set as tight as it will go.
Questions:
1) if the pickup arm is not adjusted properly (spring, etc.) will it cause the tension to be goofy like that or is that more to just cause a hook pickup problem? (because the hook is picking up the upper thread just fine). At the moment, I have a substitute spring arrangement hacked on the pickup arm, which I can configure three different ways depending on how much tension I want to shoot for. Thus far none of the three configurations make a difference.
2) if shuttle timing is not correct, will that cause tension balance problems or also just hook pickup problem?
3) I'm pretty sure the paddle spring on the needle bar near the needle works OK, but I could be wrong. If that is worn or something can this also cause a stitch tension balance issue?
D) all of the above?
This is about all I can think of which might be causing a problem. Both the bobbin and upper tensioners are in pretty good shape (other than being primitive and low-tech)
In case it matters, when I pull the thread out manually from the bobbin and upper to compare, I can adjust upper tension to range between obviously a bit lighter than the bobbin to about 4x tighter than the bobbin (ouch!), thus the tension adjustment evidently works about right.
The bobbin is the new, higher quality Towa one and it was working same as the first one with the smaller thread and larger needle (though drastically better-made). So this problem only happens with more properly sized needle & thread. I should maybe switch out some parts so I have a more specific idea which thing illuminates the tension problem. But the previous needle & thread were a drastically bad match so I can't see stepping back to that and settling there. I'd really like to get the #19 needle and #138 thread to sew decent if possible.
Anyway, I'm rambling now. I could try to make a movie showing slow motion timing of the cycle if that would help. Can't see the bobbin unless the cover is off though, so it wouldn't be actually pulling thread for that video. Somebody let me know if you would be willing to take a look at that if willing and if it would be helpful.
Thanks for any attention on this.
-
While reading this thread, I couldn't help but wonder if your first video should be the proper approach to profitably make videos about profitably making leather goods...

-
I recently started getting interested in dipping a toe into working with leather a bit. It was kind of a one-thing-led-to-another story. Where I am now is I have some decent sized selection of VT leather bits to fiddle with and some basic new tools. I am old and have always been a tool junkie so I have a lot of other tool stuff already. I am also a tool maker so I figured I'd opt to make my own of yet other things..
So yeah, there's three movies going on with tools and another couple movies going on with orders arriving and others on the way for stufff like thread, needles, hardware, etc. I have plenty here already to get started fiddling with some things, but the mental noise is stuttering my progress I guess.
I have decided that tonight before I go to sleep, I'm gonna force myself to pick out a spot and just cut some 3" or 4" squares from some of that leather and just experiment I think. I can at least try some of the two colors of dye I got so I'll have a couple reference samples, then maybe burnish the edges on those samples for practice, then maybe just try out the half-dozen stamps I got to see what they do.
Just seems strange that for something I know I'll enjoy and have enough stuff here to play with already, I have to force myself to start instead of just falling into it like a kid on Christmas morning. Anybody else experience times like this? I kind of border on being autistic so maybe I can blame it on that... noodle is overwhelmed I guess. Advice and support are welcome. Mostly I would kind of like to hear stories of this happening to you folks too, hopefully funny ones.
OK I'm here typing and that's just stalling too, so off I go.
-
I've oiled my machines liberally a few times in the past, then came back out after fairly long stretches of time to see that now I have to clean off the oil as well as the rust, which the oil was completely underpowered to resist the progression of rust. Your mileage may vary.
Regarding the circuit board, you can get conformal coating to seal that for submerging in the ocean and only need to apply it once. Basically it's like a clear epoxy-ish silicone-ie paint you simply brush (or spray) on and let dry. You can apply more than one coat, but you only need to apply it once. Apply liberally to both sides and toss your worries in the bin.
-
Noted.
As I mentioned in my original post, I ended up with this machine kind of by accident, but it nudged me into looking at working leather for yet another hobby. So the patcher has served its nefarious collateral purpose whether it's the correct tool for what I make or not. This whole thing has opened me up to looking into more suitable machines as well though. Maybe someday I'll be looking seriously at one. I kind of need more space for that, but I'm working on adding some finished rooms to the house this winter, so who knows? In the meantime, I can always just hand stitch. I'm pretty good at working with my hands (50 years of doing it all the time) so I feel like I can probably pull that off OK. Plus the chances are highly unlikely that I'll make much for anyone but myself and a few friends maybe. You never know I guess, but I'll probably be a pretty low volume leather newby for quite a while.
Also, by "holsters" I just kind of mean generic belt-loop holders for things like cell phone, tools and knife sheaths, etc. mostly, although I might do actual holsters from time to time I guess. I have some other half-baked ideas rattling around my head as well. At any rate, if this patcher will do 1/4" I think that will work fairly well for some things I have in mind. We'll see.
Thanks for the recommendations though. I will, no doubt, be coming back to this post for reference and you've lined up some pretty good specs there in a short post. I appreciate it.
-
Thanks Wiz. I ordered a selection of needles, but dangit if I only ranged between #18 and #22. I would have thrown in some #16 had I known they might be good for the thread I already have! Well I'm sure I'll have enough to play with for a while. I'll be spending time starting down the leatherwork rabbit hole a bit anyway so no particular rush I guess.
I do have a need/want for a couple holster type items I'd like to make and some of the stuff I have coming should apply to those projects. I have a pretty large order coming from Springfield leather... a few tools but I guess most of the money spent on the order was different thicknesses of VT leather.
So pretty soon I'll be spending just a bit more time on the stitcher tying up a couple loose ends (no pun intended) and tweaking it to function a bit better, but there will also be a shift toward the meat & potatoes of some actual working of leather. I think it will be fun.
-
And for what it's worth, here's a quick couple photos which hopefully show a little clearer the way I'm routing the upper thread, in case that matters for something. Probably not much significance, but...

-
Well I fiddled and futzed with the shuttle until it kind of works now. It did indeed seem to be a problem with the rounded inner corners keeping the tension spring from seating. Why make a product that won't work at all when it takes about a minute longer to make one that works? Oh well.
Rather than mill the slot of a hardened thing and maybe break an expensive cutter as well as the shuttle, I simply filed away the edges of the spring a little until it was narrow enough to fit against what flat was there in the slot, avoiding the raised, rounded corners.
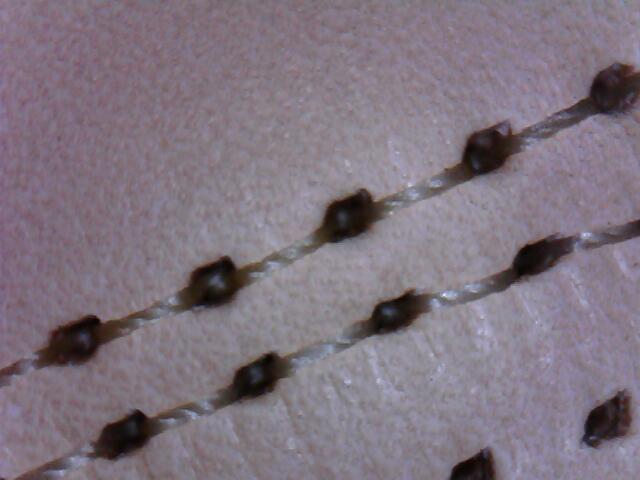
So I was able to set it to stitch evenly between top & bottom, but it appears to me that the needle is about 4 times too large for the thread I'm currently using. Take a look and let me know if you agree, and/or feel free to tell me anything else if you want to offer advice. I can maybe make machines function generically, but I dunnow nuttin' bout sewin' nuttin.
FYI, leather is ~8 oz V.T., the thread is #69 bonded nylon and the needle is marked GB 140, whatever that means. I have some 18 size needles coming so maybe that'll be a bit closer match for the thread? Also have some 138 thread coming too so I can see how that might go as well.
Fancy USB microscope capture
 :
:
-
I'm a machinist so have literally tons of steel machinery and tooling in a detached shop. I do have problems with rust and moisture because steel is pretty much everything in the shop, but one effective thing you can do for specific things is to simply put a small light bulb or low wattage heater of some kind inside, then cover the machine with something which will somewhat insulate the item and keep the heat inside just to make it more effective. You could use some sort of box rather than cloth. You don't need to make the machine hot, just warm it up a bit.
The way moisture attaches itself to metal is it migrates from warm air condensing on cool items. By raising the temperature of the item above the dewpoint temperature, you can mitigate most of the condensation if not all.
The only other way around it is to use properly sized humidifiers or air conditioners, which obviously cost much more to operate. If you can afford it, it's the luxurious way to go. Otherwise, I'd try a light bulb... incandescent by the way. LED bulbs create more light and less heat (more efficient) and what you're looking for is the heat - the light is just a by-product in this case. I guess my oldness is showing as light bulbs used to just be what they were until lately.
.jpg.86bcd59b25cea6c86a12917b4b52abd6.jpg)


Saved a Juki LU-562 from the scrap heap today...
in Leather Sewing Machines
Posted
Looks like that edited version of the manual that's floating around is the one to use. Found it finally!
I still find it awkward to have to constantly flip pages when they refer to a figure, so I edited further and printed up just the drawings separately so I can have them right there next to the text I'm reading with no flipping. Freakin' yay.