-
Posts
18 -
Joined
-
Last visited
Content Type
Profiles
Forums
Events
Blogs
Gallery
Store
Everything posted by Doxnet
-
I did a video on how to thread the bobbin here: https://youtu.be/0NIWKZkgad0
-
Under the machine, the gearbox that drive the hook as 4 screws. Unfortunatly 2 of them was missing. I try to find new one on internet using the part list but I didnt find a direct fit. Part are hard to find sometimes with vintage machine. I have as a main machine a Juki Lu-563 that needed a new needle screw. When I look at the part list I find that was the same thread screw that the screws missing on the 307G2. I test fit and it was true! The only thing is that a needle screw is in fact shorter, but long enough to be use. I order a pack of 10 screws and install 2 of them. Here are the result! The plate is tight and the grease inside the gear box cannot escape and drip away.
-
I order a spool pin to replace the one that was missing. Can't find a direct fit so I order one that supposed to be fitting Singer 16, 16U and Consew 118. In fact the pin was a little to big. I put it on a drill like it was a drill bit. I rub against the spool pin a file while spinning with the drill to make the pin smaller. The spool pin is now a perfect fit!
-
Install a new stitch selector lock. As I said in previous post, I have no screw to lock the stitch selector on my machine. So I try to find a solution...that not involve using a rubber band. I put a plate at the back of the stitch selector. I had to grind the plate to fit and drill holes to be able to screw the plate. I tap the holes to fit screw 6/32. The idea was to have a plate to screw against. There is not much place to drill holes so I choose small screw. The hole will be cover by the black plate so I don't worry. I have drill the selector and tap (1/4''). I choose a eye bolt at my local renovation store. I have to admit it's not the prettiest thing... Now I can turn the eye bolt until it hit the plate. It hold the selector in place. No more need of a rubber band.
-
Yes you're right @DrmCa the machine need a little bit of work. It's better now! Today I open the gear box and notice the grease was old and dirty. I clean the whole thing with Q-tips, Old t-shirt rag and brake cleaner. After that, I put new grease inside the gear box. If you look carefully there is flat head screw on each gear. Those screws need to be loosen if the timing of the machine is not perfect. I'm not going into detail, the machine is sewing correctly for now. Clean the needle plate is another thing that needed to be done. There is a lot of coat of old sewing machine oil on those plates. I use a product that I normaly use on my barbecue grill. It's called bar keepers friend. It works really fast and easy. Took me 2 minutes per plate to scrub the old oil. This is the final product. I also use it on the 307G2 plate. The previous owner did a bad paint job on the bed and spray the badge. It works great and it's gentle.
-
How to get maximum of the knee lift on the 307G2. On my machine there was a difference of foot lift between the knee lift and the take up lever at the back of the machine. I found two ways to resolve this problem. It's possible to get the same lift from the lever and the knee lift. I found it annoying that the knee lift do not lift enought to release the thread tensionner. First method is to take the maximum of lift in the linkage that goes from under the machine to the head. On my machine I was able to gain lift of 2-3mm because there was a little bit of play. Tilt the machine back and locate the lift mecanism. There's a connecting rod that goes to the top of the machine. The tip of the rod can be adjust. First we need to release the rod from the mecanism that is operate when moving the knee lift. Remove the cutter pin and set aside. Remove screw number 1 and 2. Set the mecanism aside. At the back of the machine there is an access door that is hold with two screws. Remove them and open the door. The connecting rod can be adjust to be longer or shorter. I need to get it longer. First release the lock nut on the tip of the rod. Unscrew the rod to get it longer in the direction of the bed. Retight the lock nut. Reinstall the mecanism under the machine using screw number 1 and 2. Dont forget the cutter pin. Now the knee lift as gain some height. Method number two is to gain lift from the other end of the knee lift near the foot: There is a collar on the presser bar that connect to the feet of the machine. First I mark with a sharpie on the presser bar. It's easier with a mark to see how much we move the collar. (Don't use anything that can damage the presser bar.) The collar need to be lower to gain 1-3mm of lift. But, we cannot take much more than that. There is a risk that the feet will not reach the lower point and do not contact with the feet dog. There is a hole at the back of the machine to access the screw on the collar. Push up the take up lever and put something under the presser foot. The hole is now align with the collar so its possible to loosen it. Lower just a little bit the collar. Try not to turn the presser bar as it will turn the presser foot. Keep it align. Retight the screw on the collar and put the foot of the machine down to make sure it contact the feed dog. Make sure the feet is align in straight position. Check how much gain you have when using the knee lift. It is possible to have the same lift from knee and from take up lever. How to align the needle in the center of the feed dog. On my machine when I set the needle in the middle position with the adjusting lever (Left, center, Right) the needle is not in the center of the hole. It is possible to adjust that. There is a screw to loosen on the needle bar to be able to adjust the needle to the center. After the first screw is loosen there is another screw for moving the needle. I tighten the screw to move the needle to the center. When the needle is in the correct position retight the first screw to lock the mecanism.
-
I want to thank you @Constabulary, without your help, advice and tips, I would not have buy this machine! Feel free to add informations to this topic! It would be nice to add a lot of tips. It's a really capable machine!
-
Hi! I want to give some valuable informations about the Singer 307G2 ZigZag sewing machine in this post. This is for helping sewing enthousiast that are trying to find informations, adjust, buy or repair this kind of sewing machine. First, i’m not a qualified technician by any mean. So if you find informations in my post that is not accurate, please share it with me. I will update my post. The Singer 307G2 is a 6mm Zigag sewing machine. It has 3/8 of foot lift. Can handle easily V69 Nylon thread and use 135 X 17 needle system and 11 to 19 size needles. The bobbin diameter measures 1" (25mm) and about 9/32" (7mm) thick. It’s the same the Singer 107W use. This is the same hook and bobbin case too.( Bobbin#210530) I found the take up spring is the same that the Juki lu-563 Juki Part # : B3128-051-000 (B3128051000) The tension spring of the Juki Lu-1508 fit perfect and it's stiffer ( Part: B3129-526-000) Presser feet are the normal Singer/Juki Industrial A little bit of informations about my personnal Singer 307G2. My machine was made in 1954. I buy it used. The bed was already repaint by a previous owner in gray. The machine need some work to make it sew perfectly. The spool pin on top of the machine is missing and the thumb screw on the stitch selector is broken. The first problem was a broken thumb screw on the stitch selector. Unfortunatly, to this date I cannot find a replacement screw. When tightening this screw, the stitch selector cannot move and holding the stitch lenght. I found a simple rubber band work to leave the selector in place. Not esthetic, but fonctionnal! Second problem was in straight stitch, the machine got a little zig zag. I found there is two way to adress this problem. Let see how the mecanism is assemble to understand how to fix the problem. I have written letters and number on pictures to help identification of parts. To remove any movement on the mecanism the easiest way is to remove the stitch lever by unscrewing screw number 5 and 6. With your fingers, move the shaft where the lever was mount. Move just a little bit the shaft (clockwise or counterclockwise)and after that, rotate the hand wheel. Look if there is any movement. (see picture) Take a closer look to this part: Once you have found the sweet spot, where there is no movement, reinstall the stitch lever carefully. You shall not move the shaft! Retight the screw number 5 and 6 on the lever. If there is a very little zig zag, it can be compensate by tightening screw ''E'' just a little bit.Do it half turn at a time. See photo: If you're not lucky there is another way. Remove screw number 1 to 6 and the thumb screw ''G'' ''H'' ''J'' . After that you can remove the black plate. The cover can be remove with a screwdriver. apply pressure near the ''J'' selector to push the cover out. I remove the black stop block lever but it's not necessary. This was to picture a side view and the adjustement screw. It's possible to find the sweet spot with zero motion by unscrewing letter ''L'' and ''K''. The ''K'' screw is a real pain in the a** to remove. I hade to cut the tip of a flat screw driver and hold it in a long nose vise grip to access the screw. Its near impossible to reach! After you have compensate a little bit, retight all screws and reassemble. Don't forget to adjust stich lever position using the easiest method. Adjusting the left/center/right lever position can be done. Set the lever to the right position. If the needle is to close to the side of the needle plate, tightening the screw ''A''. For adjusting the right position use the opposite screw ''B'' I hope this will help someone!!
-
Thanks for helping me. Unfortunatly I have not resolve the problem. A technician is going to tune the machine for me by the end of the week.
-
Thanks for helping me ! Really appreciated. I have a raised troat plate and feed dog for 3 weeks now. I use my juki for binding and sewing. The noise might come from that part. I have reinstall the original troat plate and feed dog and record a video sewing forward and backward. The binding feed dog from up: https://drive.google.com/file/d/1hlB36uA_x70hO58DDZrT1DXKp71RNRli/view?usp=drivesdk Feed dog from down : https://drive.google.com/file/d/1hpbkqCQeLNY-1_5URTYq7ZK-hmAN4oxk/view?usp=drivesdk The binding troat plate and feed dog : https://drive.google.com/file/d/1hfLqCGLj-zTgJYsoW5qaBZKPC6RwhGUF/view?usp=drivesdk The original part: https://drive.google.com/file/d/1hhi14UWX1nsBkdxjLzbujoXpEoDHQP2E/view?usp=drivesdk And last, the video :
-
@Uwe I have edit the previous post. I have use 3/32 measurment but written 3/16. My bad. Not use to post on YouTube. Thanks for helping me
-
Hello all! I have done the timing on my 1976 Juki Lu-563. I have done it using the superb videos of @Uwe . Thank you some much! It help me a lot! The machine is sewing good forward. Except when I back stitch it make a noise from the knot forming under the fabric. I think the hook is past the needle when I push the back lever. - Hook is close to needle - From BDC needle rise of 3/32 and needle is at hook (good timing for forward stitch) -Hook is 1/16 of needle eye when the needle have rise 3/32 up from BDC Here is a video when I backstitch: https://youtu.be/tAf3HVdkkag Front view of needle with 3/32 rise from BDC : https://drive.google.com/file/d/1hUuxXIYeRTKdtTcwQqc8uCohTZjKeC9V/view?usp=sharing Side view of needle with 3/32 rise from BDC : https://drive.google.com/file/d/1hUeaJa8dsoFVWneN7hK4vT5rxrOzMio8/view?usp=sharing Here a video of hook rotation : https://youtu.be/Gq-6kGUqt5E Here when I push backstitch lever at 3/32 rise from BDC : https://youtu.be/zuRPbTu486Q Can someone help me solve this problem please?
-
Hi! I have relaminated the top of the original table with a piece I buy at home depot. I have glued it. Then cut the best I can the inside for the head of the machine. After that the bottom of the table was repainted using some black metal paint. I have made a little box style on the bottom left to fit a little drawer buy from the dollar store. It has divided space to place foot and needles etc. The cost was low and it was easy to do. Hope it can help you!
-
The fact that the machine is sewing so slow is great. I can pretty much stopping it just like a needle positionner. I manual handwheel less frequently using the speed reducer. I will try to remove the brake from the servo to see if it helps. Thanks for the trick Wizcrafts
-
Hi, I recently install a speed reducer on my juki lu-563. It works really nice to slow down the machine. But the speed reducer make the handwheel really hard to turn manually. Even if I do push the pedal to release the brake on the servo motor. Is it a normal down side of having a speed reducer? Maybe the belt tension is too hard? Thanks
-
Hi, I do sew with nylon V69, V92 and V138 on my juki Lu-563. I live in Canada near Montreal. A lot of sewing manufacturer can be found near me. I have found that the price is not the same regarding the same amount of thread between manufacturer. Example: V69 thread can be buy for 25$CAD to 60$CAD for a pound of thread... Witch me let me think: do I waste my money paying too much for thread? Is higher the price equal to higher quality? I cannot always have the information regarding the strenght of the thread and specifications to compare between the manufacturer. What do you guys think?
-
Thanks for this procedure. It's what I will be doing.
-
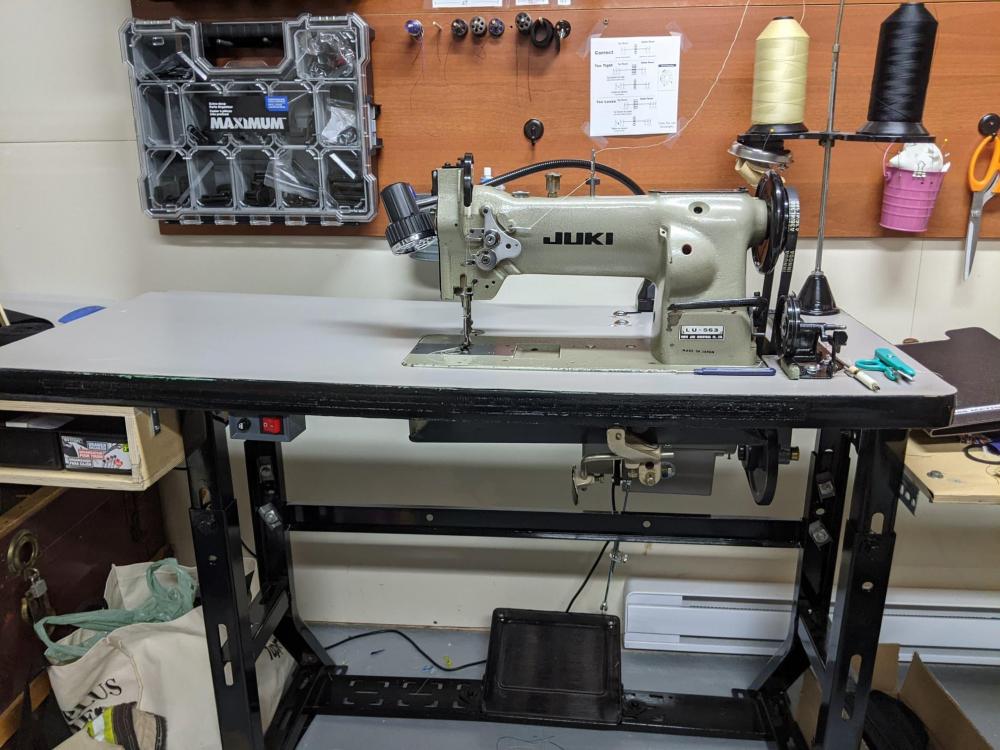
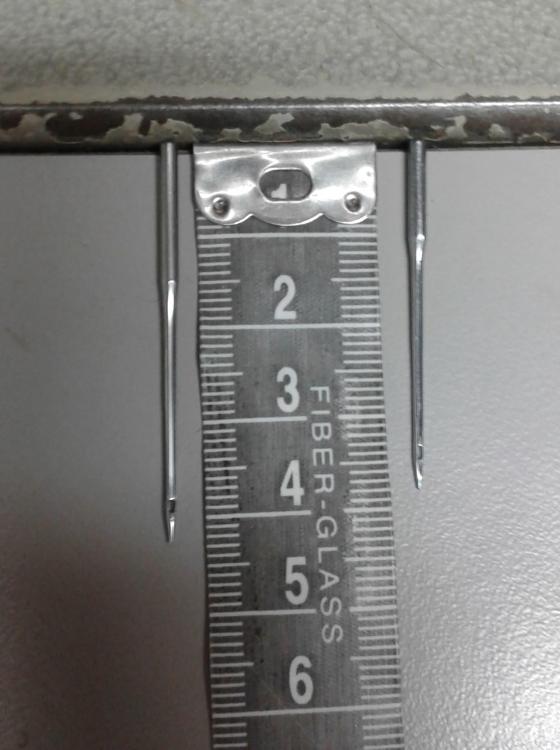
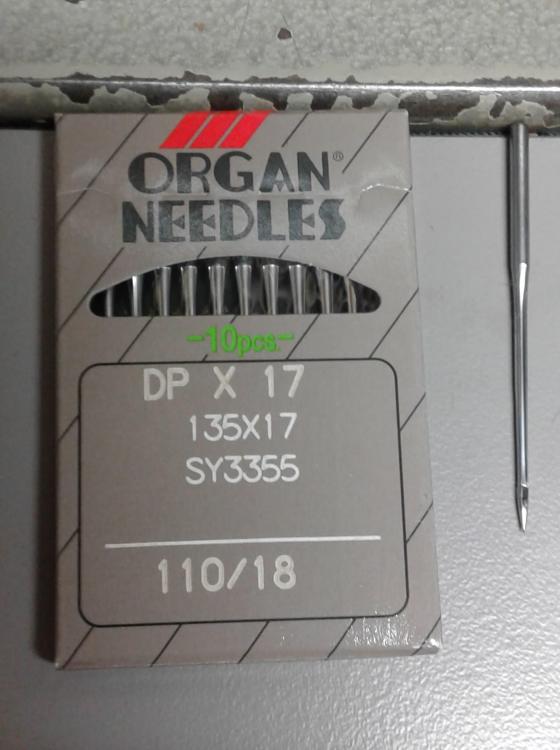
Hi everyone, in the past few months I have been sewing with a Juki Lu-563 that I buy used. I did time it and clean it using the video of Uwe Gross on youtube. It sew really well. Thanks to Uwe! Back when I bought the machine to the previous owner (the first and original one!)I had already a few needles with the machine. I did buy new needle (DPX 135 )but when I sew with them it just didnt works. I think the machine was time using shorter type of needle that the one I buy. Since the machine sew really well I was hoping someone can help me find the type of needle I was already using. If I can avoid retiming the machine using the dpx 135 needles it will be cool. Even if I do lost a little bit of clearance under the presser foot using a shorter needle. See the pictures Can someone help me please?


