


Rocksnake
-
Content Count
29 -
Joined
-
Last visited
Posts posted by Rocksnake
-
-
1 hour ago, Sheilajeanne said:Okay, have finally had the time to sit down and figure out just what you are talking about. The translation leaves a bit to be desired, but with the help of the English labels that are on the bottles, which you showed me in your private message, I now know what you were trying to say!
Please let me know if I've got this right:
First you apply a water based leather dye to the background areas, using a small paint brush (red bottle).
Next, you apply an acrylic resist coat, what the translator calls the 'craft agent' (green and white bottle). This is the equivalent of Resolene or Tandy Super-Sheen/Satin Sheen. You apply this only to the high areas of the tooling, as you showed with the diagram with the red markings. You apply 2 coats of this, using a cotton cloth. You let it dry between coats.
Third step, you apply the Fiebing's antique (vintage dye, also translates as retro dye) using a toothbrush. You use a cloth to wipe the antique away from the high spots of the carving.
I think the toothbrush will be a great help in getting the antique to fill in all the carved/stamped areas. You can see I didn't do a good job of that with the tote bag!Thank you for sharing this, and thank you for your kind words about my leather work!
Yeah, that's right. Good luck
-
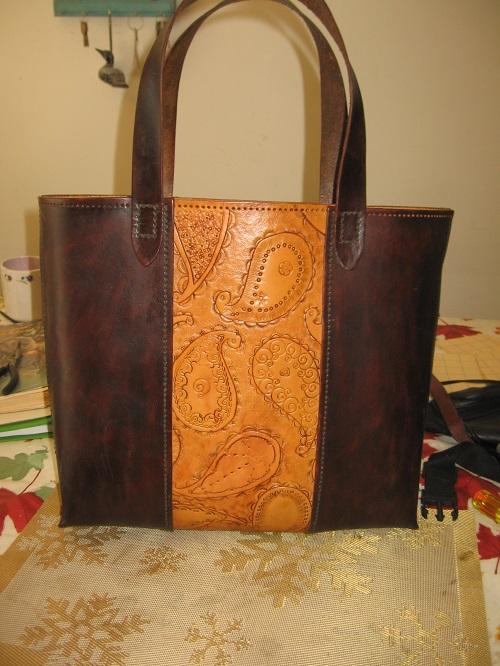
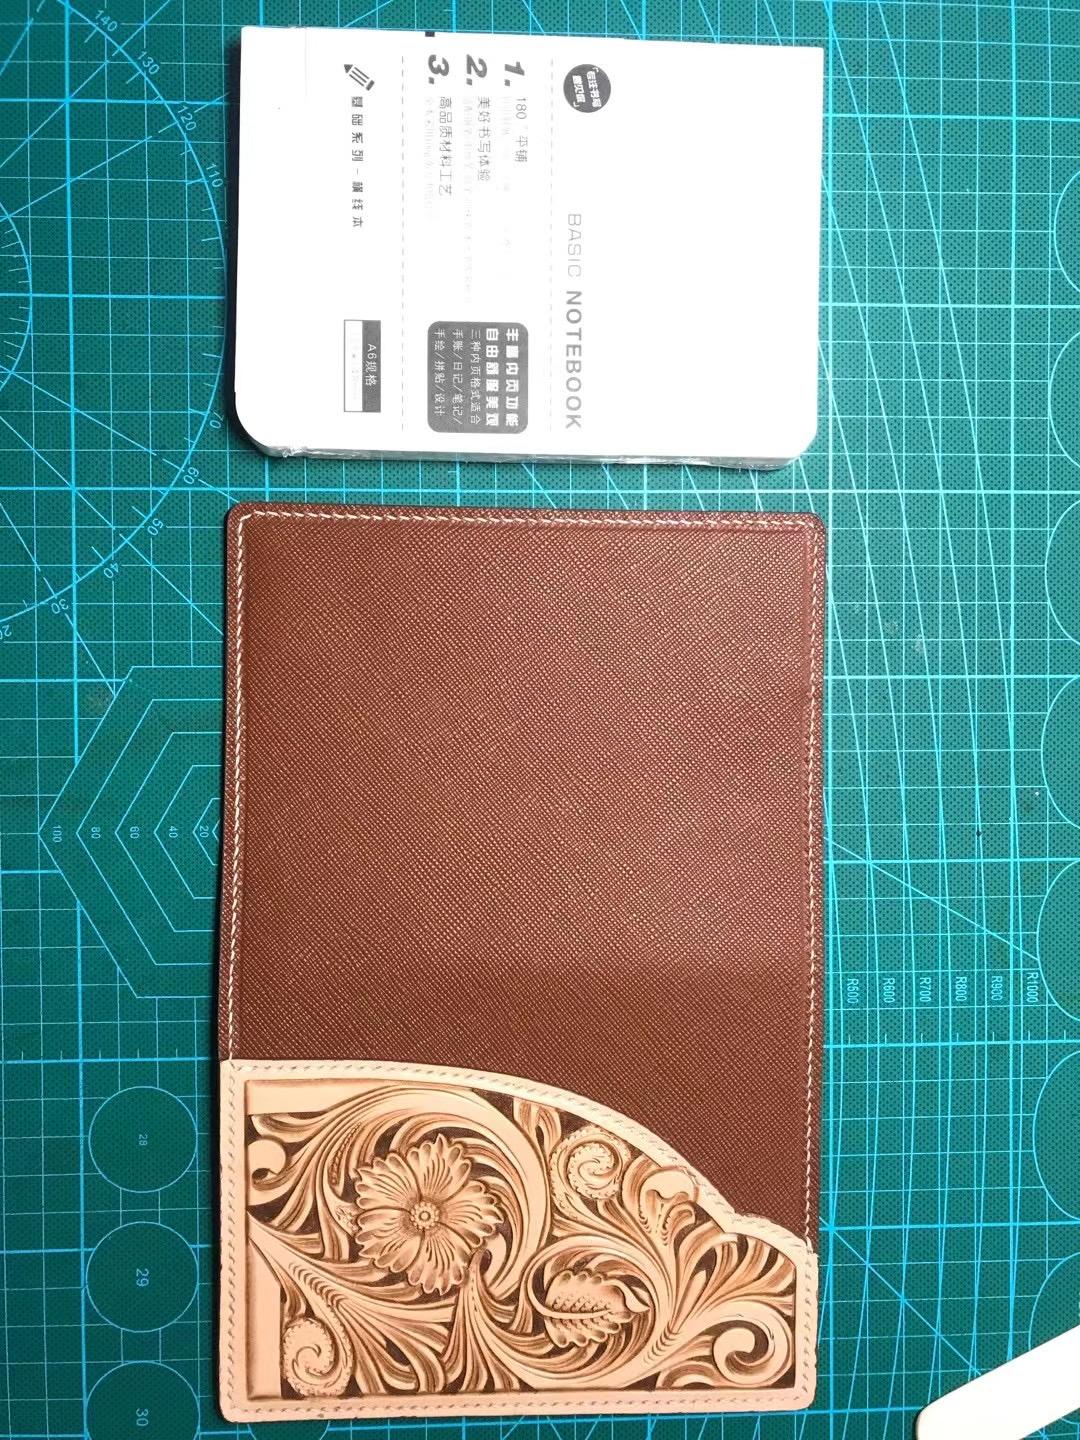
On 8/24/2021 at 1:19 AM, Sheilajeanne said:Okay, FINALLY got around to taking photos! The change purse and wallet are projects I had stashed away in a box because I was unhappy with the way they turned out. The tote bag is waiting for me to add a lining to it.
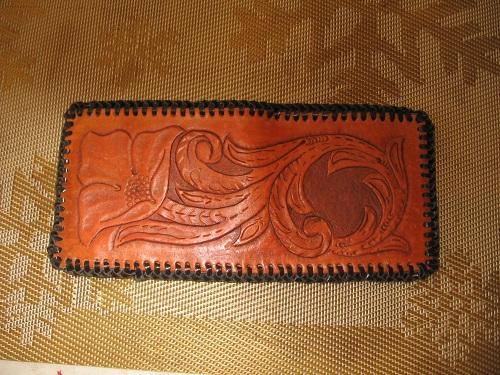
The wallet is about the way most of my projects turn out if I antique them. There is some contrast, but not nearly enough. I applied two coats of either Super Sheen or Satin Sheen to it before antiquing. I honestly can't recall if I applied the resist to the whole project or just the area I wanted to protect. It was a long time ago!
I know one of the problems with the change purse was the texture of the leather. It would have turned out better if the leather had been smooth veg tan. Also, the tooling could have been deeper, but again, I think that had a lot to do with the temper of the leather.
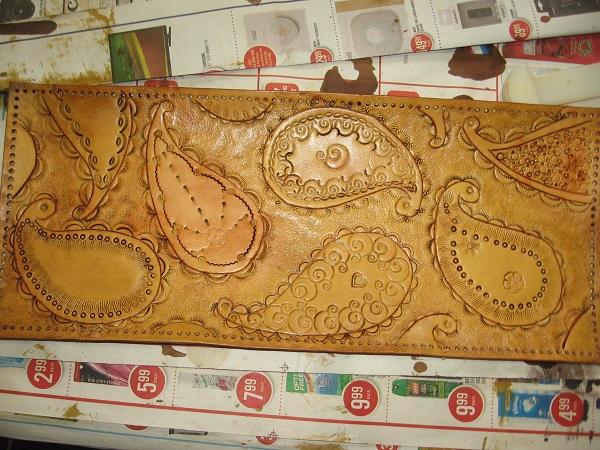
The Molly tote bag was resisted with Resolene. As you will see from the picture of the panels before I assembled it, the finish turned out blotchy, even though I left it to dry for more than a day. I had this happen with a dog collar I did, too, only MUCH worse. It looked so bad I tossed it. And this was with me diluting the Resolene 50/50 with water.
I've been so disappointed with the way the Tandy antiques turn out I bought some Fiebing's antique, but the results with it were no better. I can't remember which one I used on the tote bag. The other two were definitely Tandy.
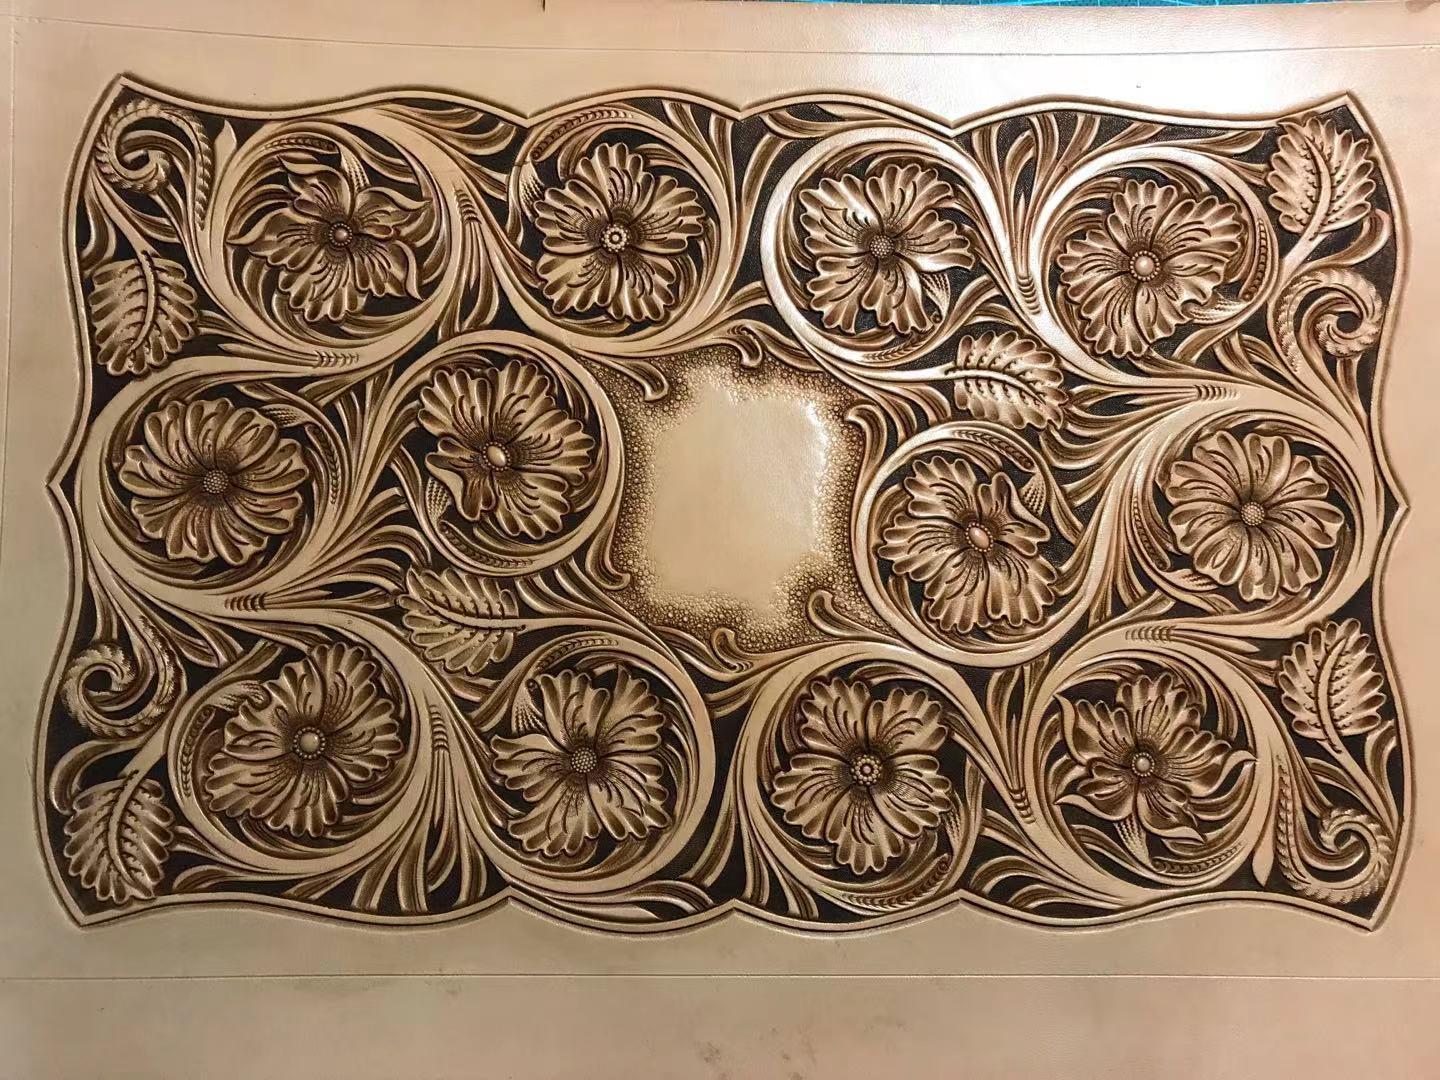
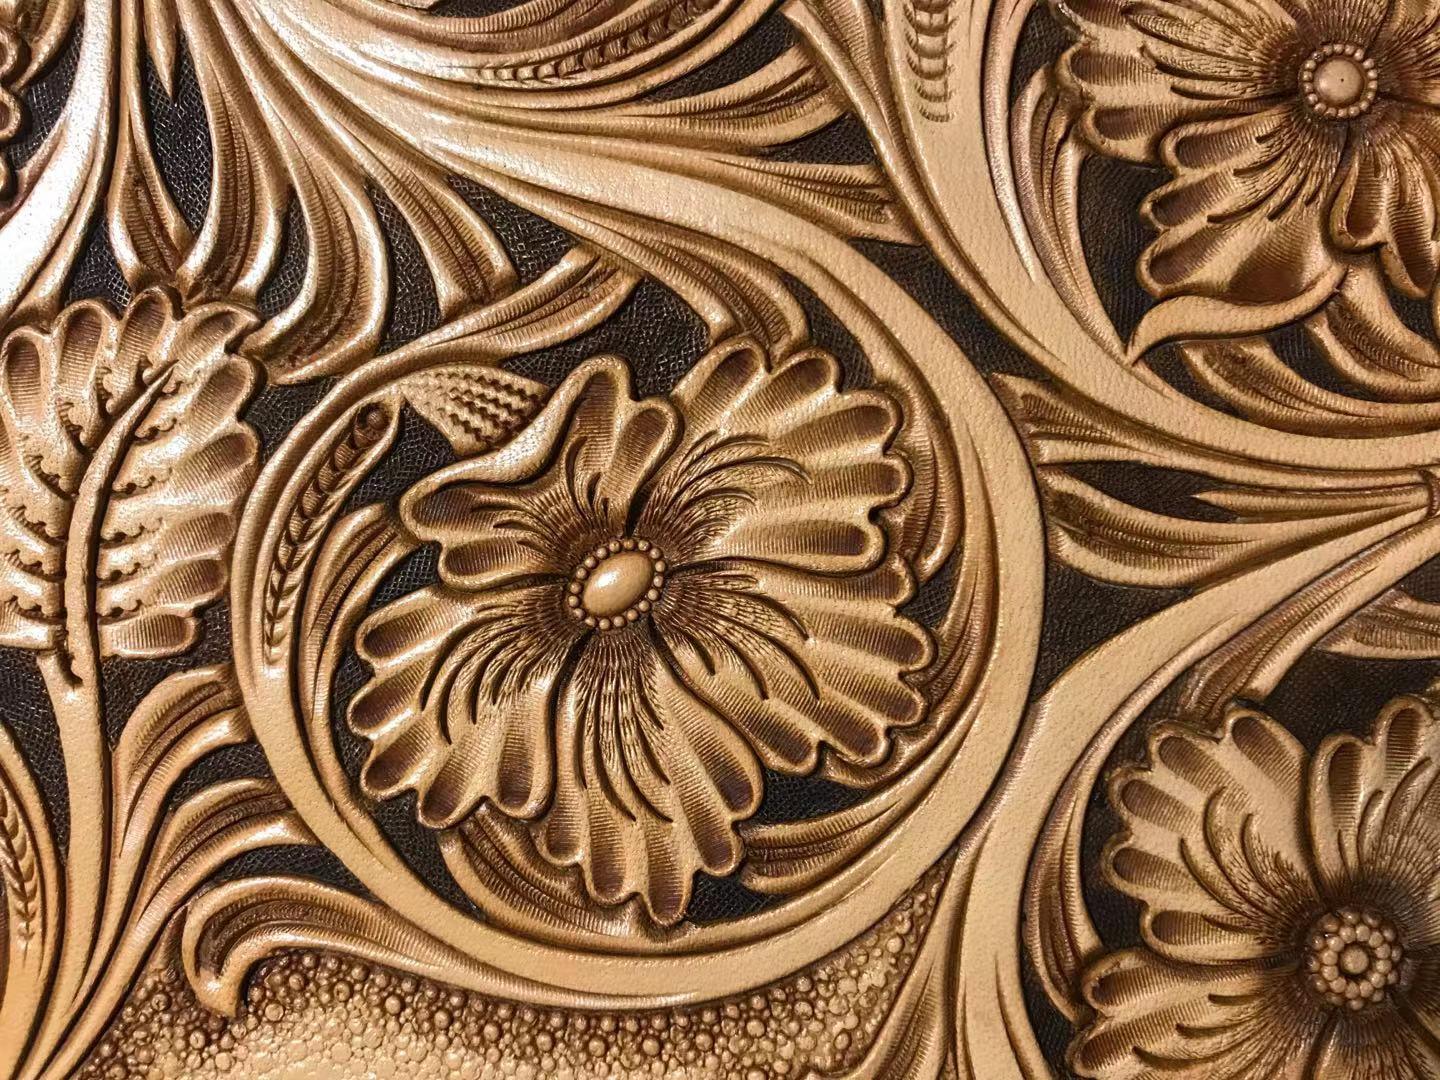
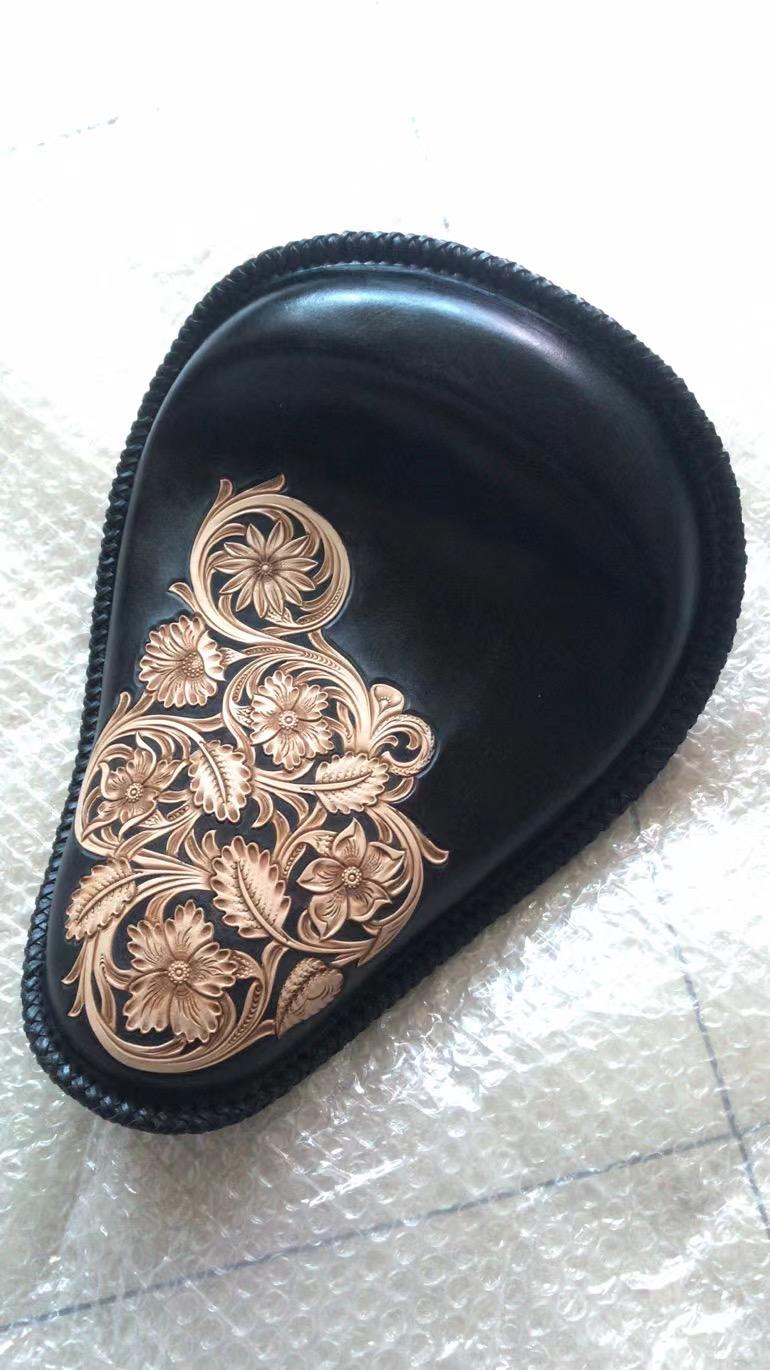
What I've done lately is gotten a dark background by painting it with dye and a small brush, as I did with the front of this messenger bag:
你的作品看起来还不错!
Your work looks good!
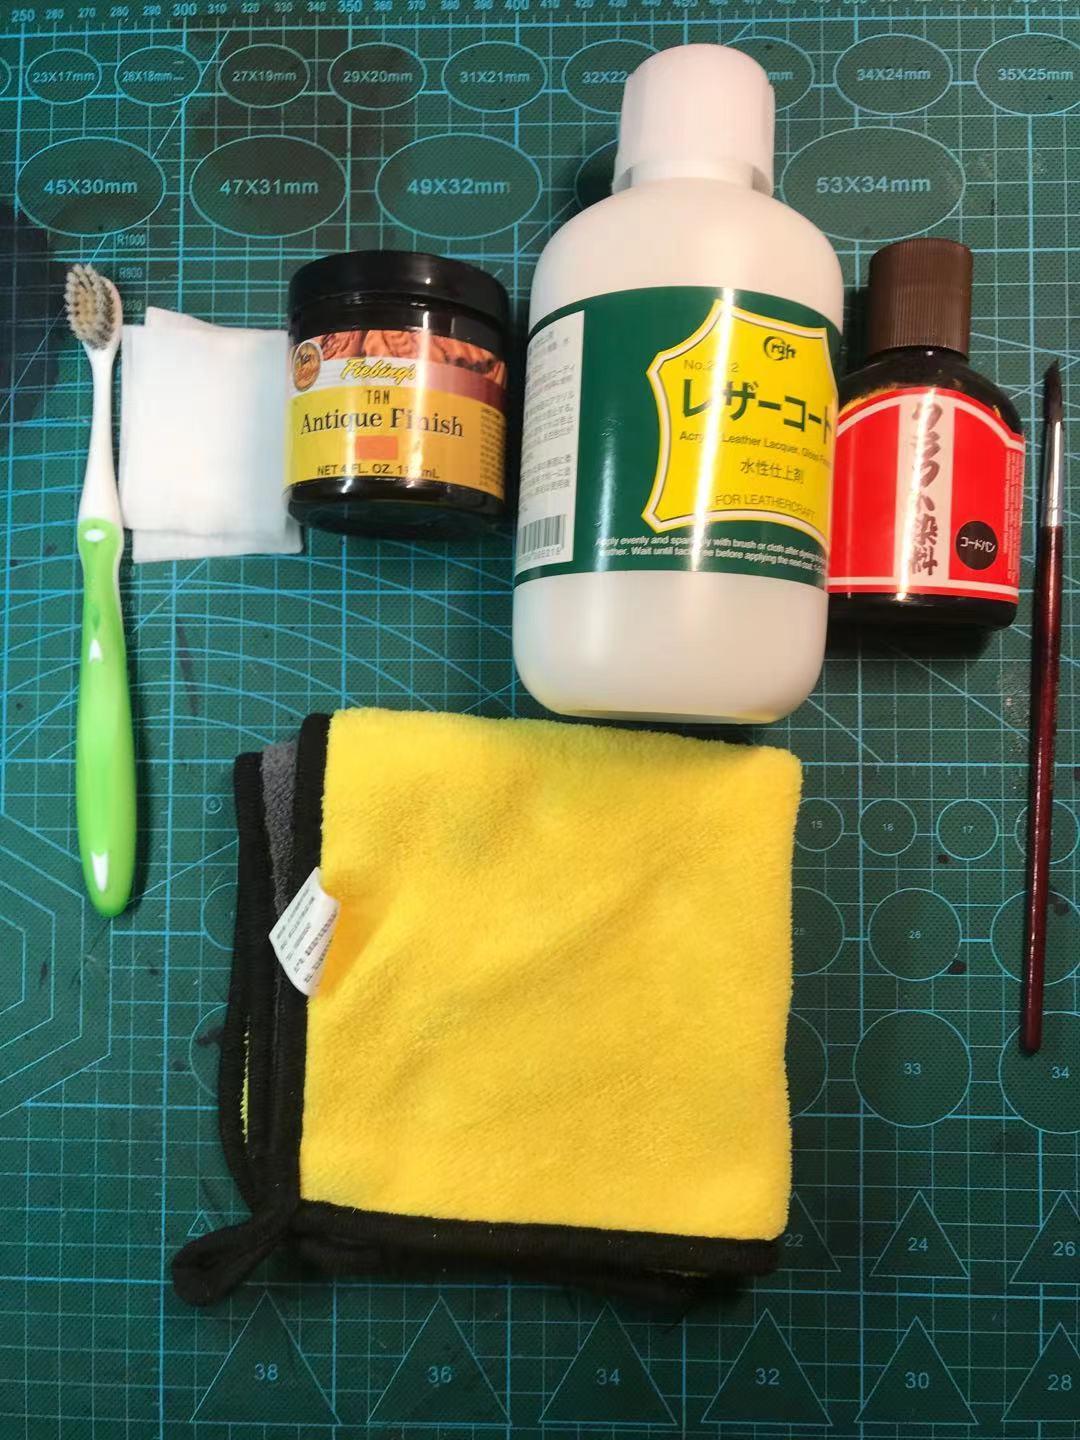
下面这些是我染出杂志封面的效果用到的所有东西,当然你可以在你当地买到可以替代的液体及染料,我会在后面给你备注出来。
These are all the things I used to dye the cover of the magazine. Of course, you can buy alternative liquids and dyes in your local area. I will note them for you in the back.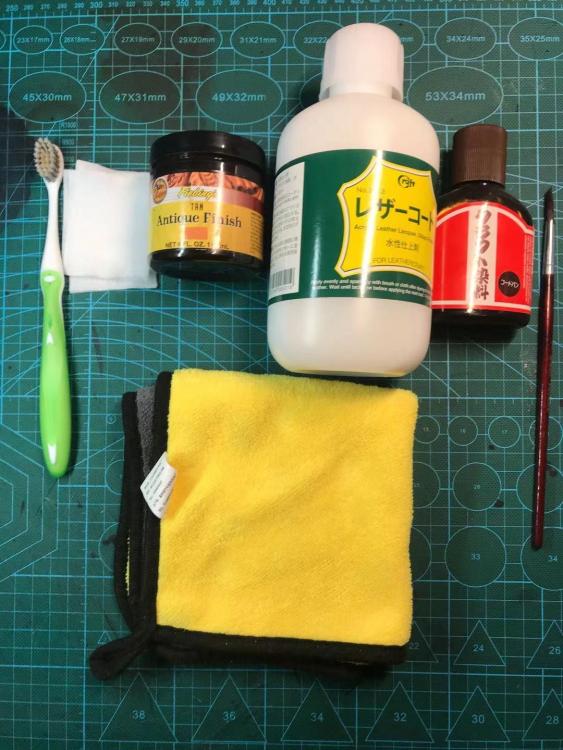
文字有点长,请耐心看,我会备注中文,如果翻译不准确的话,你自己翻译出来
The text is a little long, please read it patiently, I will note Chinese, if the translation is not accurate, you can translate it by yourself
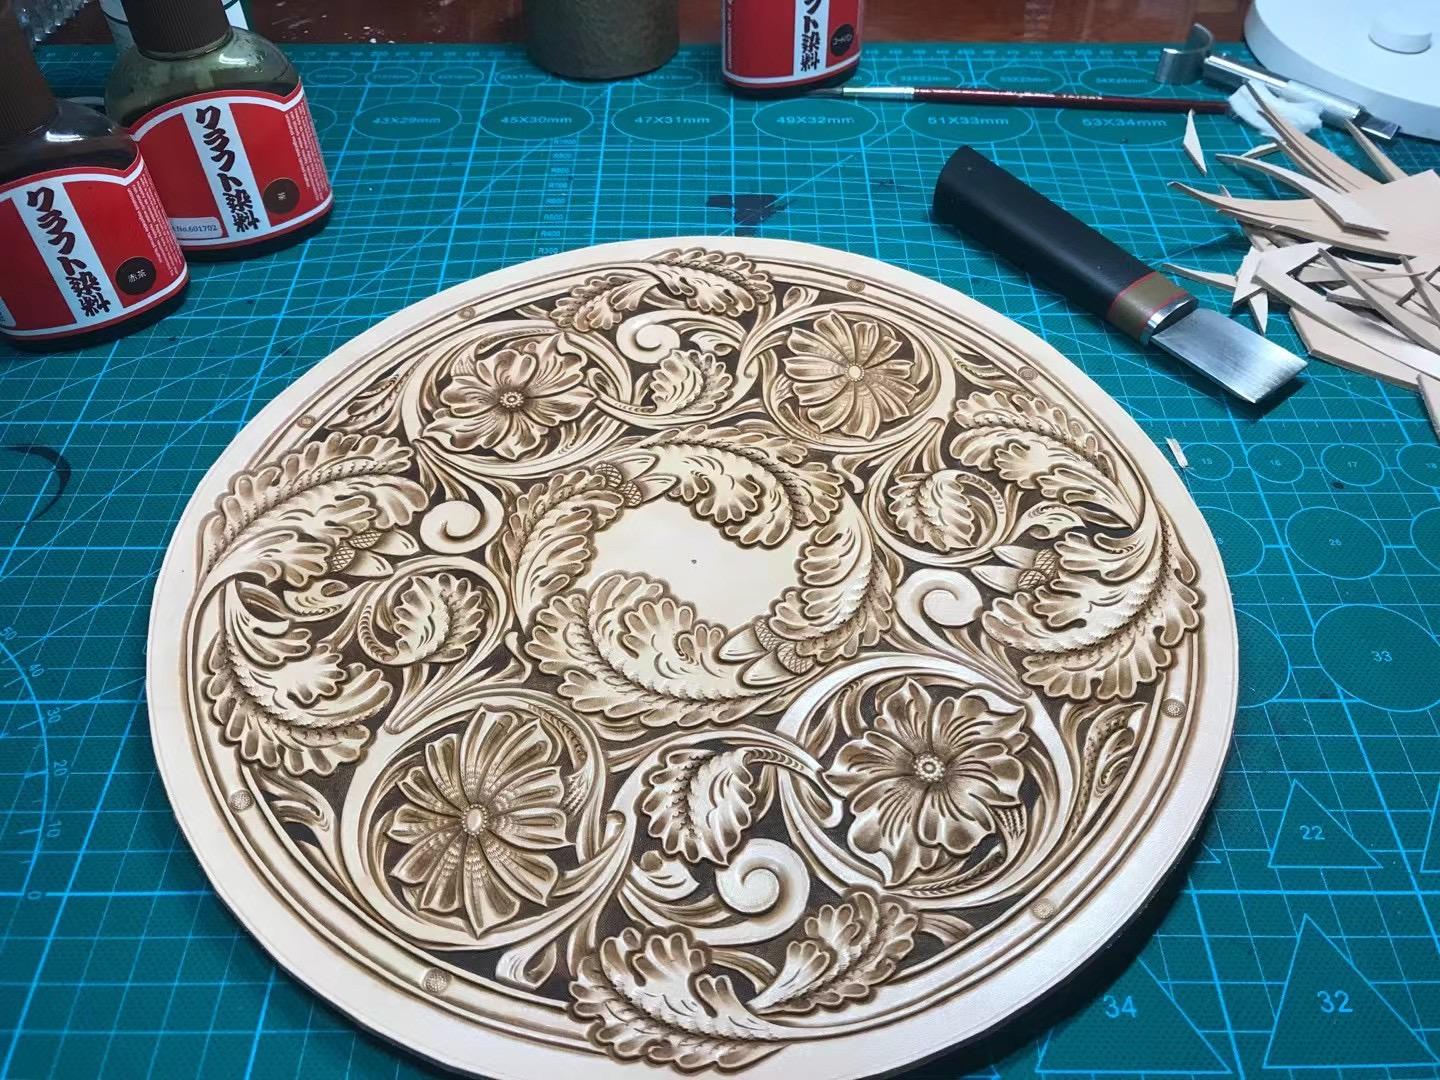
雕刻会使皮革有高低差,低的地方其实就是用来附着复古染料的,所以,雕刻时近可能的加大高低差,这个非常重要!
Carving can make leather has high and low difference, low place is actually used to adhere to dye restoring ancient ways, so, when carving near possible increase high and low difference, this is very important!
1.我使用盐基染料把背景颜色涂了.(如果你要整体皮革都要染色,请在雕刻完就开始,如果到了下面的步骤后面的话,颜色是进不到皮革里面的)
1. I used the base dye to dye the background color (if you want to dye the whole leather, please do it after carving, the color will not get into the leather after the next step)
2.将棉布裹紧实后蘸取“Craft”《水性仕上剂》涂抹皮革高处,我会涂抹2次,如果没有经验的话,你可以看皮革,第一次皮革会有潮湿的印记,第二次就不会有了,如果还有潮湿的印记的话,可以继续涂,这个液体的作用是在皮革上附着一层膜,
2. Will dip in with cotton cloth wrapped tight after take "Craft" "agent on water shi" daub leather high, I will apply 2 times, if there is no experience, you can see the leather, leather will be wet mark for the first time, second there would be no, if I have some wet stamp, can continue to, the function of the liquid is attached to a membrane on the leather,
颜色是进不去的。
Color doesn't go in.
(下面的图是皮革切面,红色地方是涂抹“Craft”《水性仕上剂》的地方)
(The figure below is the cut surface of the leather, and the red area is where "Craft" is applied)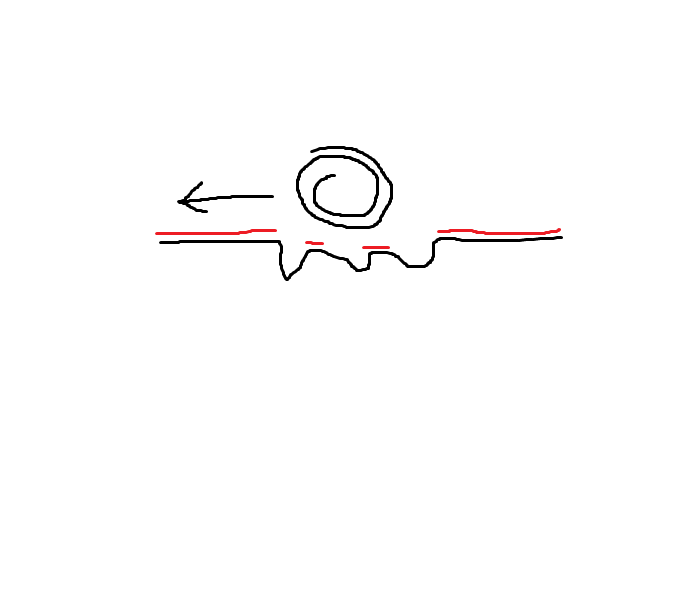
2.等待20分钟,让“Craft”《水性仕上剂》干燥,然后用牙刷蘸取“复古染料”开始染色
2. Let Craft dry for 20 minutes, then dip your toothbrush into the "vintage dye" and start dyeing
3.用毛巾把附着在高处的复古染料搽去
3. Use a towel to rub away the retro dye from the high spots
OK,下面是我的液体可以替换的
OK, here's what my liquid can be replaced
1,“Craft”盐基染料======》 Fiebing's<Leather Dye>
1, "Craft" base dyes ====== Fiebing's<Leather Dye>
Leather Dye>
Leather Dye>
2,“Craft”《水性仕上剂》=======》 Fiebing's<Leather Sheen>
2, "Craft"《水性仕上剂》 ======= Fiebing's<Leather Sheen> -
7 hours ago, YinTx said:Swivel knife maybe? Rotary knife would generally be used to cut all the way through the leather, not for carving... Really nice looking result, either way!
YinTx
Sorry, I just checked the translation of this tool. It should be this“Swivel knife”

-
On 8/9/2021 at 9:35 AM, JSage said:OH MY GOSH!!! Unbelievable!
What, do you sleep with those carving tools????
HAHAHA A good metaphor
On 8/11/2021 at 11:50 PM, NCbyJon said:Hand-tooled?
yes
-
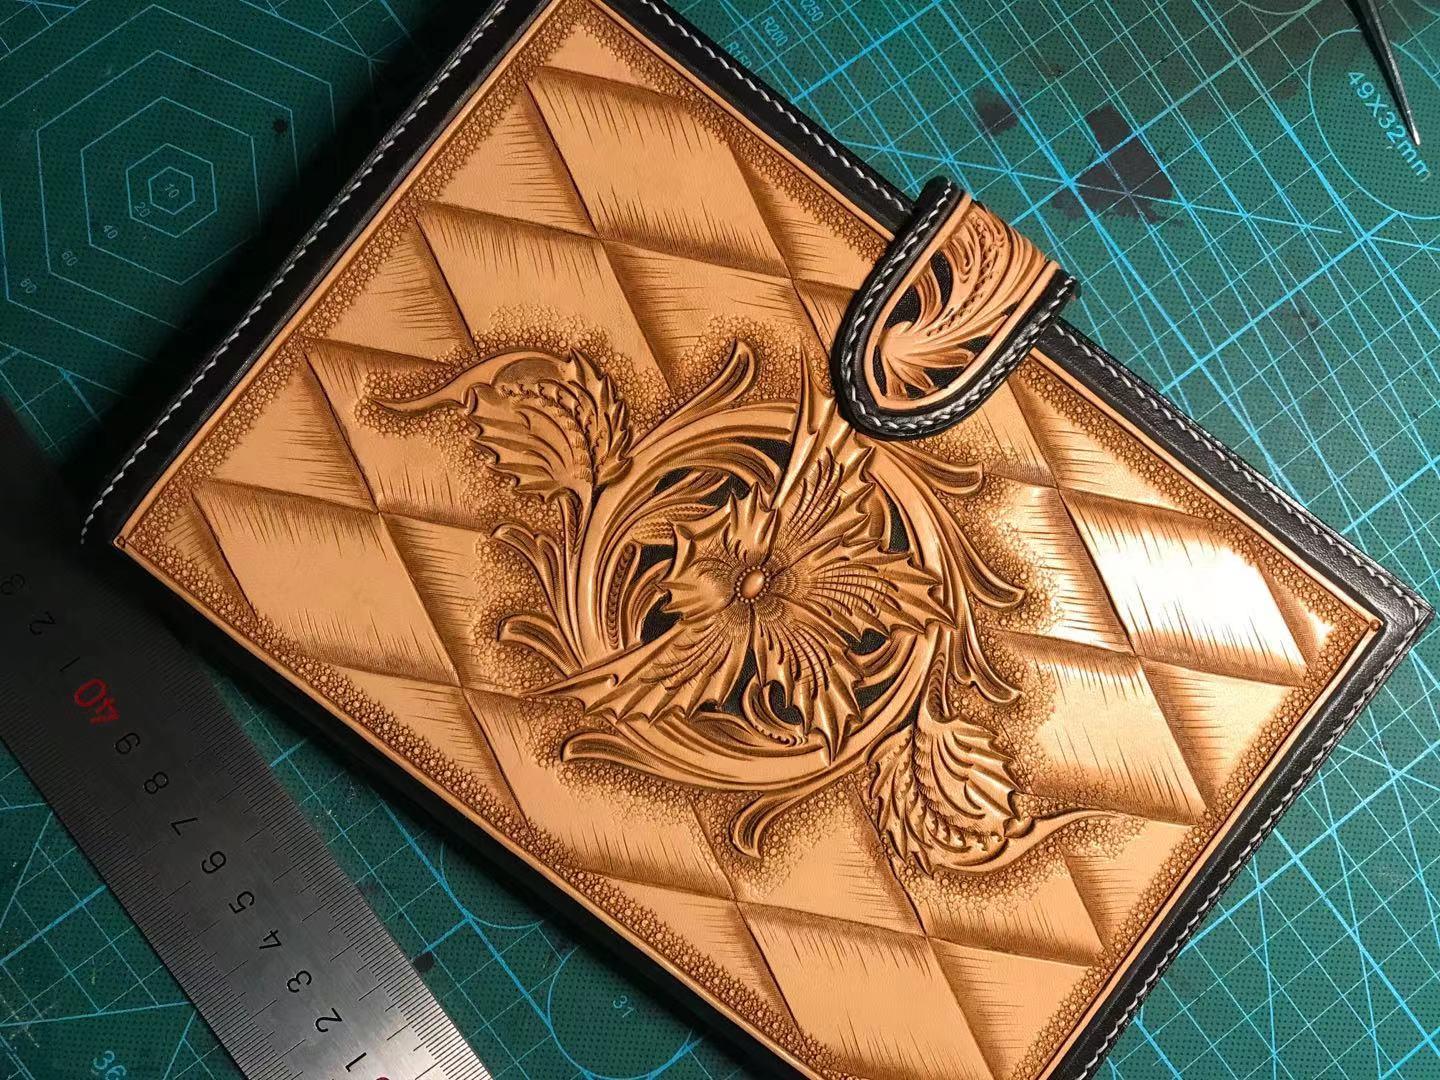
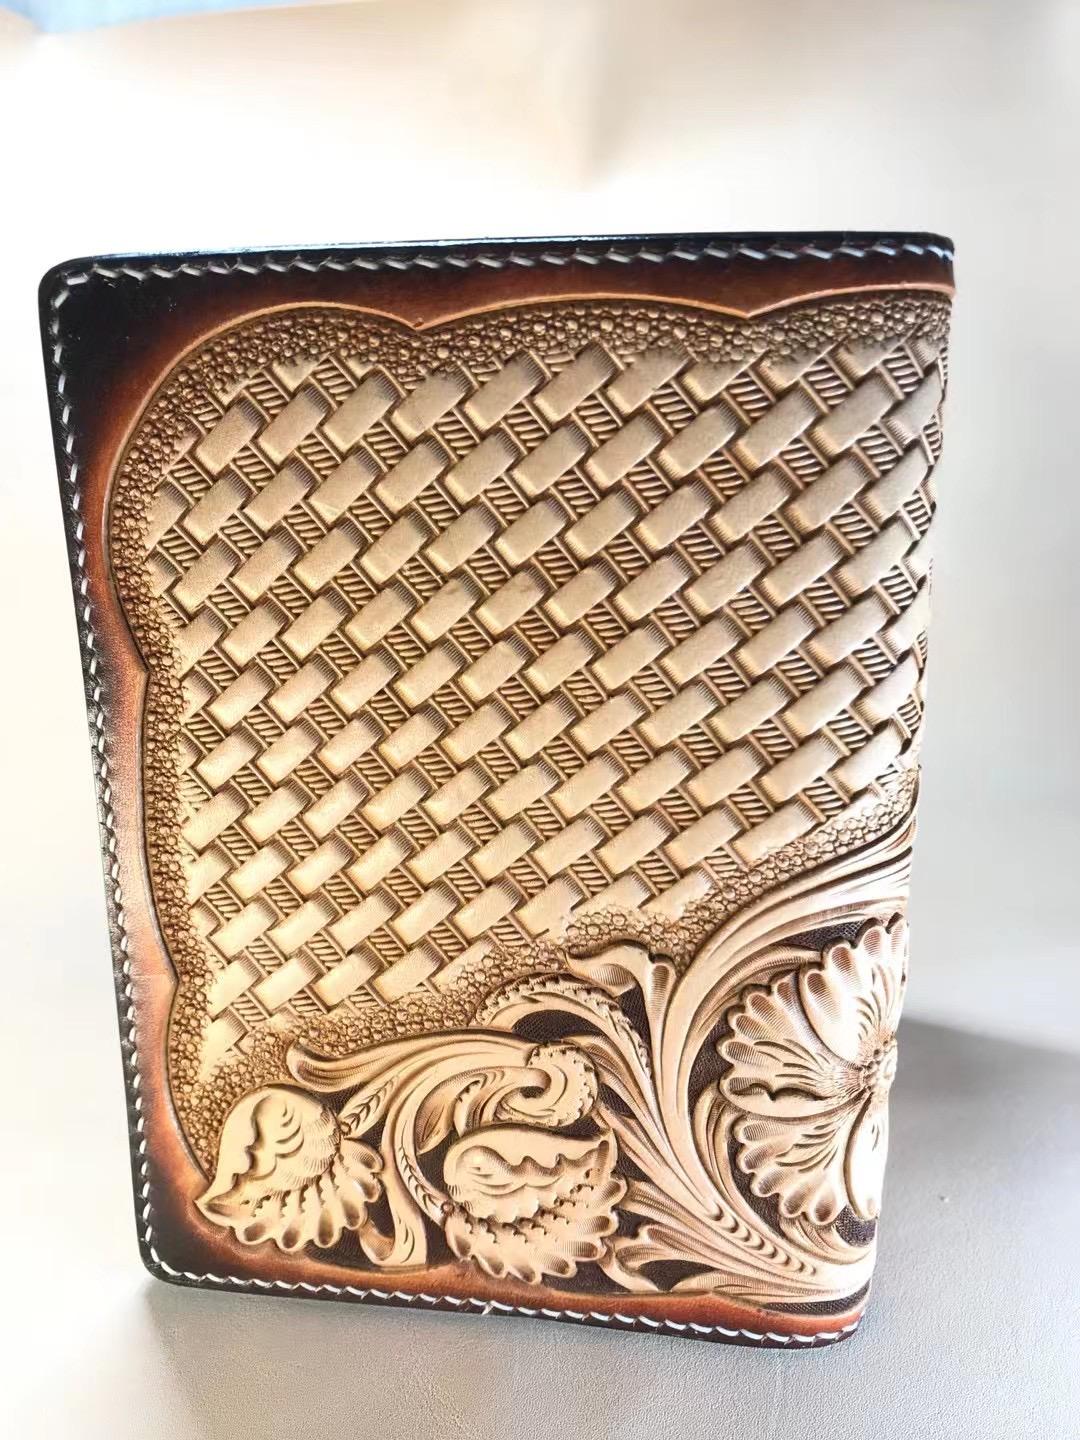
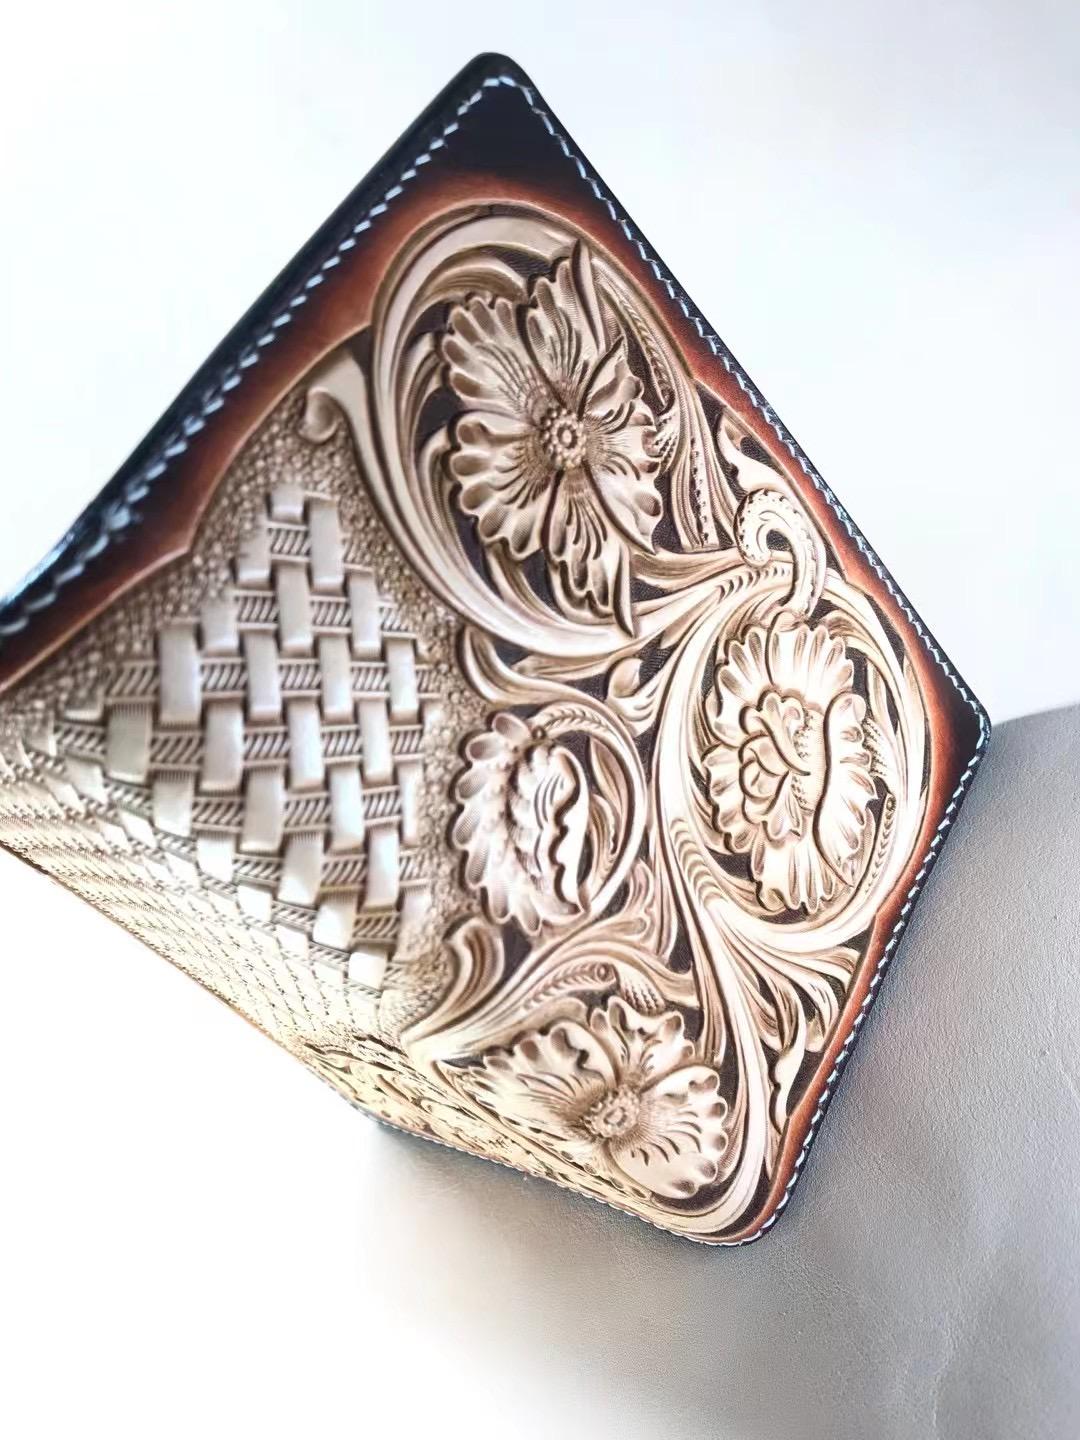
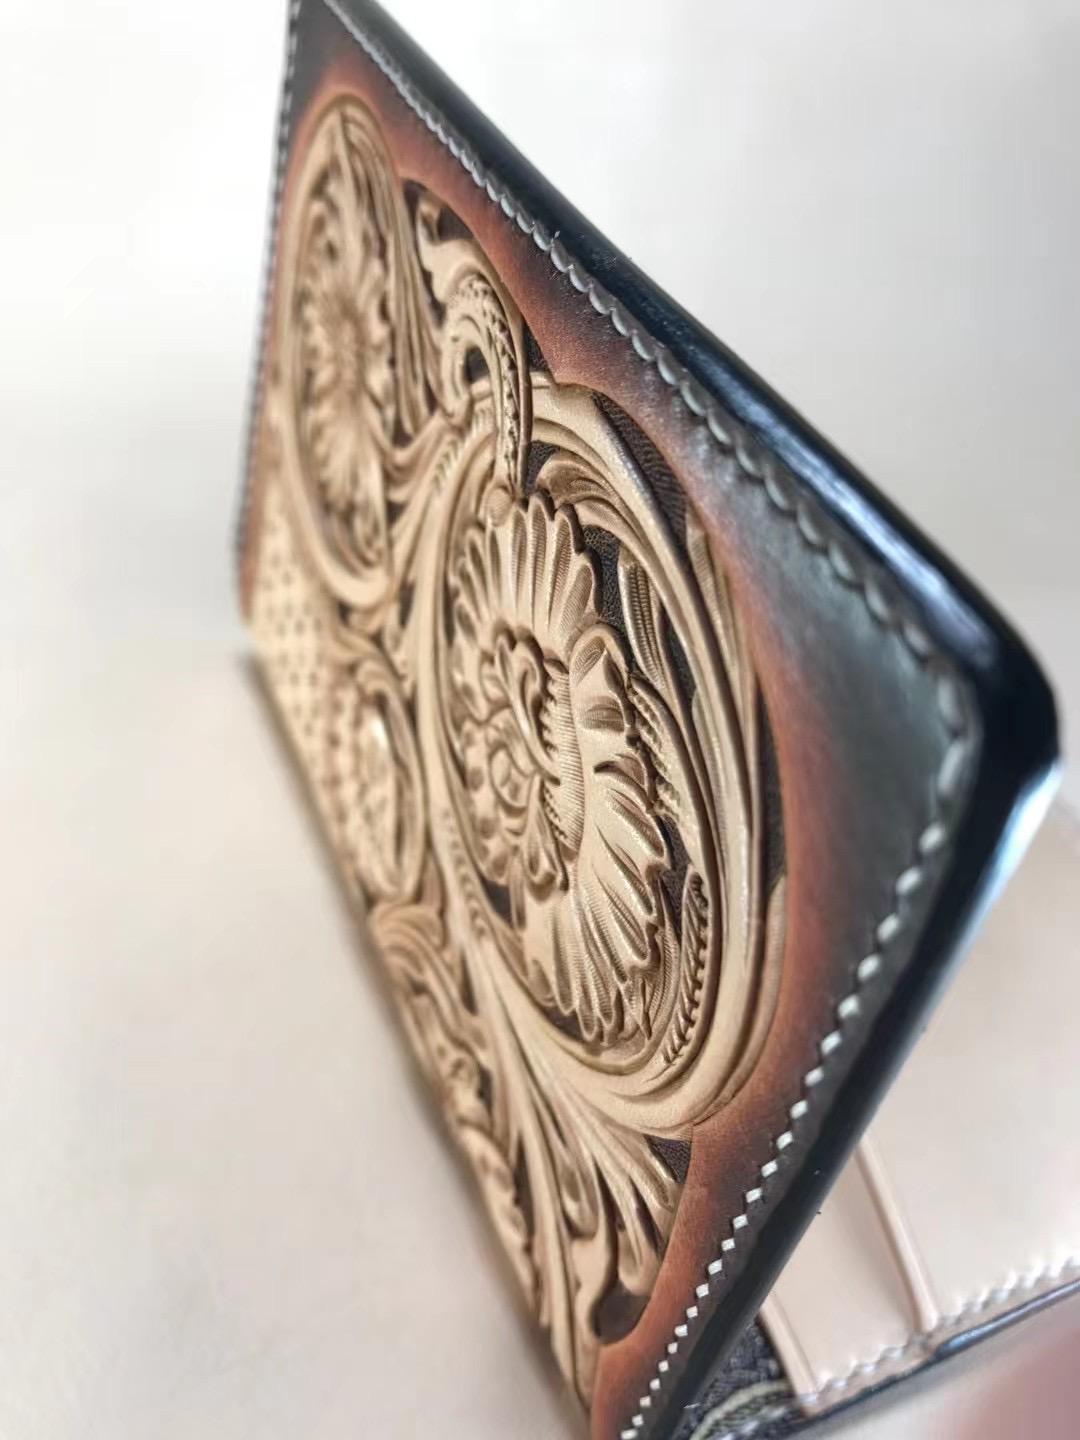
On 8/14/2021 at 10:01 PM, Minnesota said:I really want to try that diamond pattern with the shading. Where do I start with that? Do you lay out the diamonds first or the central image first then lay in the diamond pattern around it?
You can think of this diagram as a plane. Of course, it is also a plane. If you don't make the flowers inside and only make diamonds, here are the steps
1. Calculate the area you need to make, and then draw the diamond on the computer.
2. Extend the drawn diamond onto the leather.
3. Cut the line with a rotary knife.
4. Knock with the edge knocking tool, and pay attention to their relationship here.
5. Use the vertical grain tool to deepen the shadow.
6 cut out long and short lines with a rotary knife to make it look more natural. -
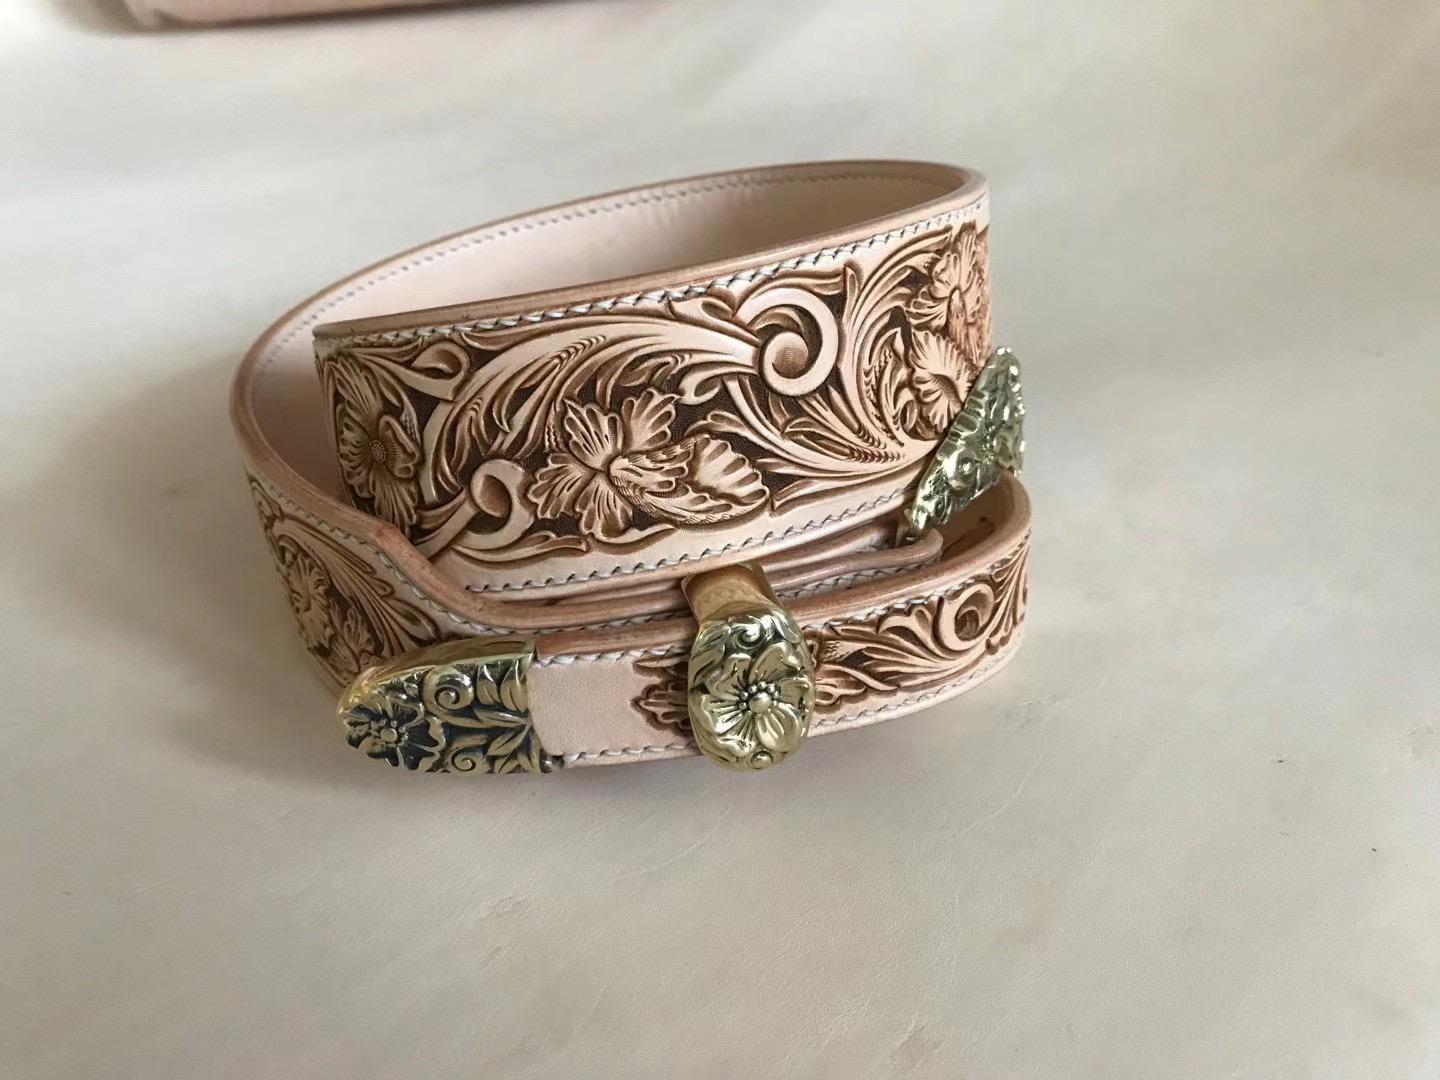
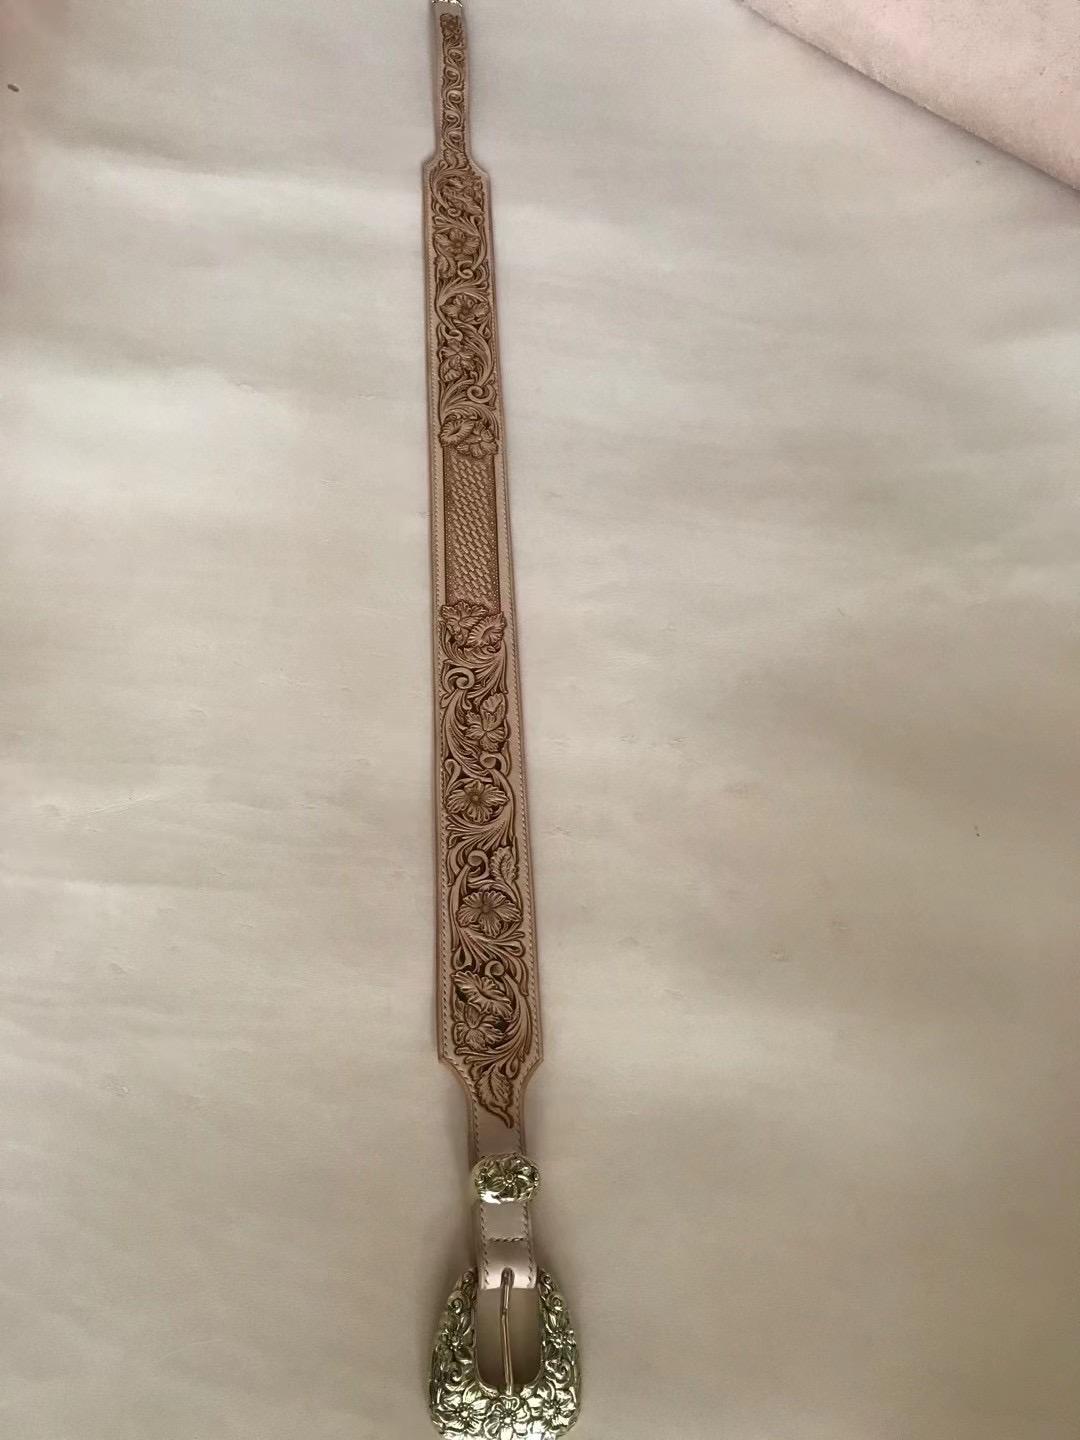
22 hours ago, Leescustomleather said:I have been doing leather carving for many years and have studied countless examples of other artists work and yours is the best I have ever seen. The precision , composition and attention to detail are amazing. Thank you for sharing.
19 hours ago, Minnesota said:I don't have the patience to tool leather. That is an absolutely amazing piece of art.
Thank you for your compliments. My work is not perfect yet and needs a lot of practice
-
On 8/10/2021 at 9:31 PM, Sheilajeanne said:I need to take some photos. Will get back to you on this!
I've been waiting for you
-
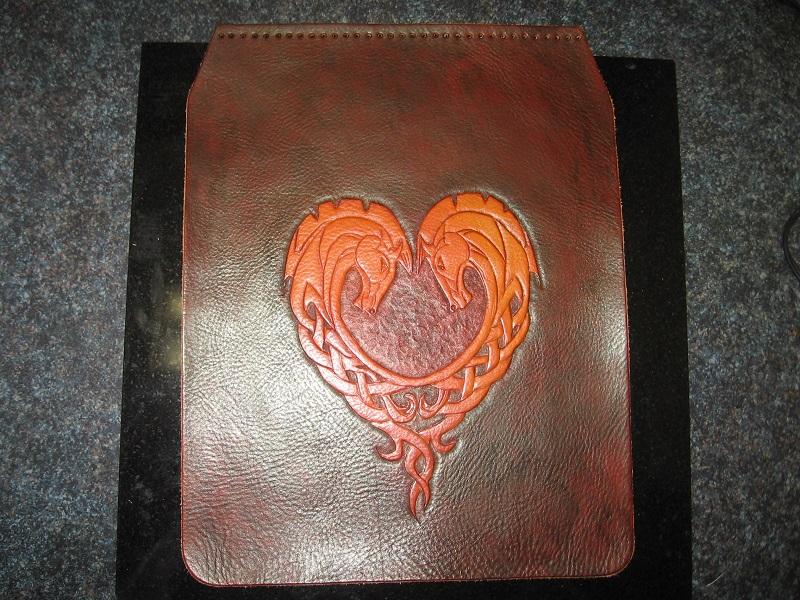
5 hours ago, Sheilajeanne said:I am curious to know how you got the very dark background in the journal cover. Did you treat the whole piece with antique, or did you just paint the background with dye, using a small brush?
I never seem to be able to get such good contrast using antique, even if I use several coats of resist on my carving!
I'm not sure what your work looks like, could you please show me, so that I can help you
-
22 minutes ago, Frodo said:correct dialect?
Yeah, it's about the same. Great
-
-
36 minutes ago, Frodo said:你的工作得到了称赞 [Your work has been praised]
Bad ass , gorgeous, beautiful, wowser,
这些都是俚语。 他们的意思是美丽的 [these are slang words, they mean beautiful]
HAHAHA Thank
-
28 minutes ago, Tim Schroeder said:Bad ass is red neck for gorgeous, beautiful, wowser, and anything everybody else said. Maybe some of the best tooling I've ever seen.
I'm sorry! Software translation only knows the general idea. I see you mentioned tools, and I can help you buy them if you need
-
19 minutes ago, Tim Schroeder said:That tooling is bad ass!!!! Makes want to make something to see if I can improve mine to that level.
I don't understand what you mean
6 hours ago, Frodo said:Not usually at a loss for words, only one comes to mind
WOWSER !!!!!
Thank you. It will be improved
-
8 hours ago, Klara said:Normally I'm not a fan of flowers, but these are beautiful! Great, amazing work!
3 hours ago, Tugadude said:Funny, I was going to say the same thing Klara said. I'm not a big fan of flowers either, and a lot of tooling I can take or leave. But then there are examples like this that make me go Hmmmmm. It is very well executed. I'm not an expert, but I would think it very difficult to improve on it. Congratulations!
7 hours ago, Sheilajeanne said:Gorgeous work!

Maybe there's something wrong with my browser, so I can't type English. It's normal now. Thank you
-
-
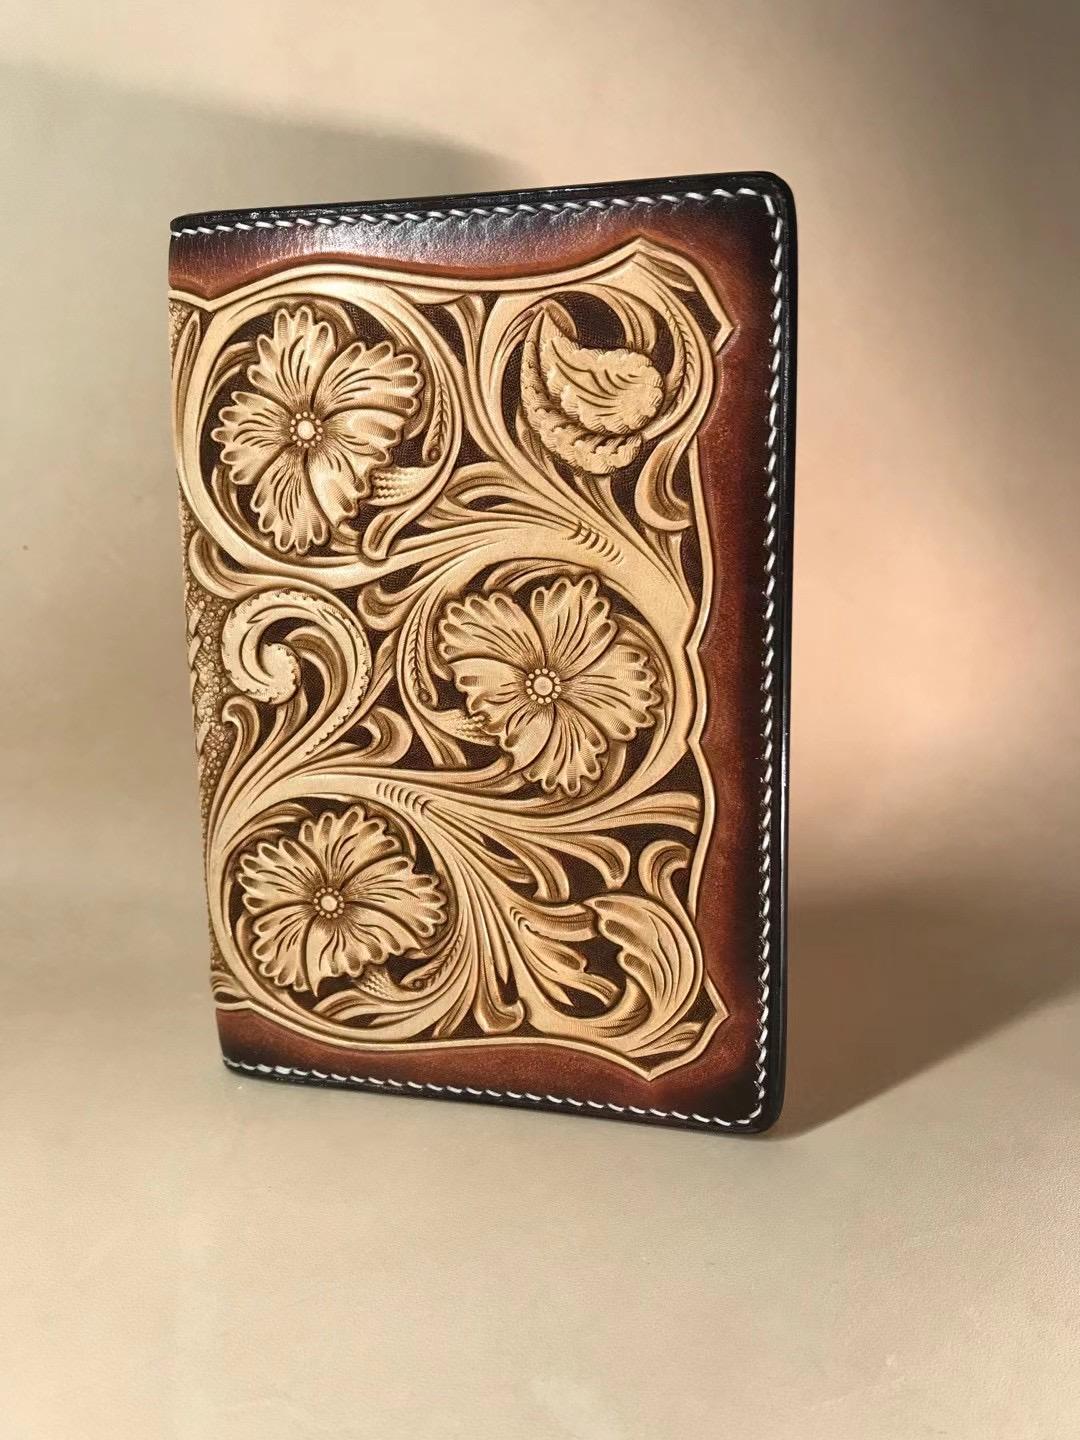
On 8/6/2021 at 9:16 PM, Sheilajeanne said:"Western floral style" You will usually see this called 'Sheridan style".
Excellent work!
So, the Chinese like this style, and this what they prefer to buy?
Would also like to see some Chinese patterns. Maybe North Americans and Europeans will buy those! I think dragons would look good on leather - you could maybe combine the two styles!
Ok. Thanks for the advice! I'll do some of that when I'm done, but I haven't found any sales channels in North America or Europe yet. I might need your help!
-
13 hours ago, PastorBob said:Very nice work. nice detail and lines look smooth
13 hours ago, spacedog said:Excellent tooling. Well done Rocksnake.
thank you
-
10 hours ago, WalterF said:Those are Rockin, well done.
1 hour ago, YinTx said:Excellent skills, fine attention to details, resulting in great art. Welcome, and thanks for sharing!
YinTx
thank you
-
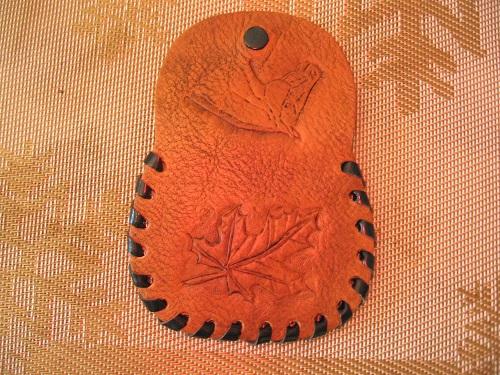
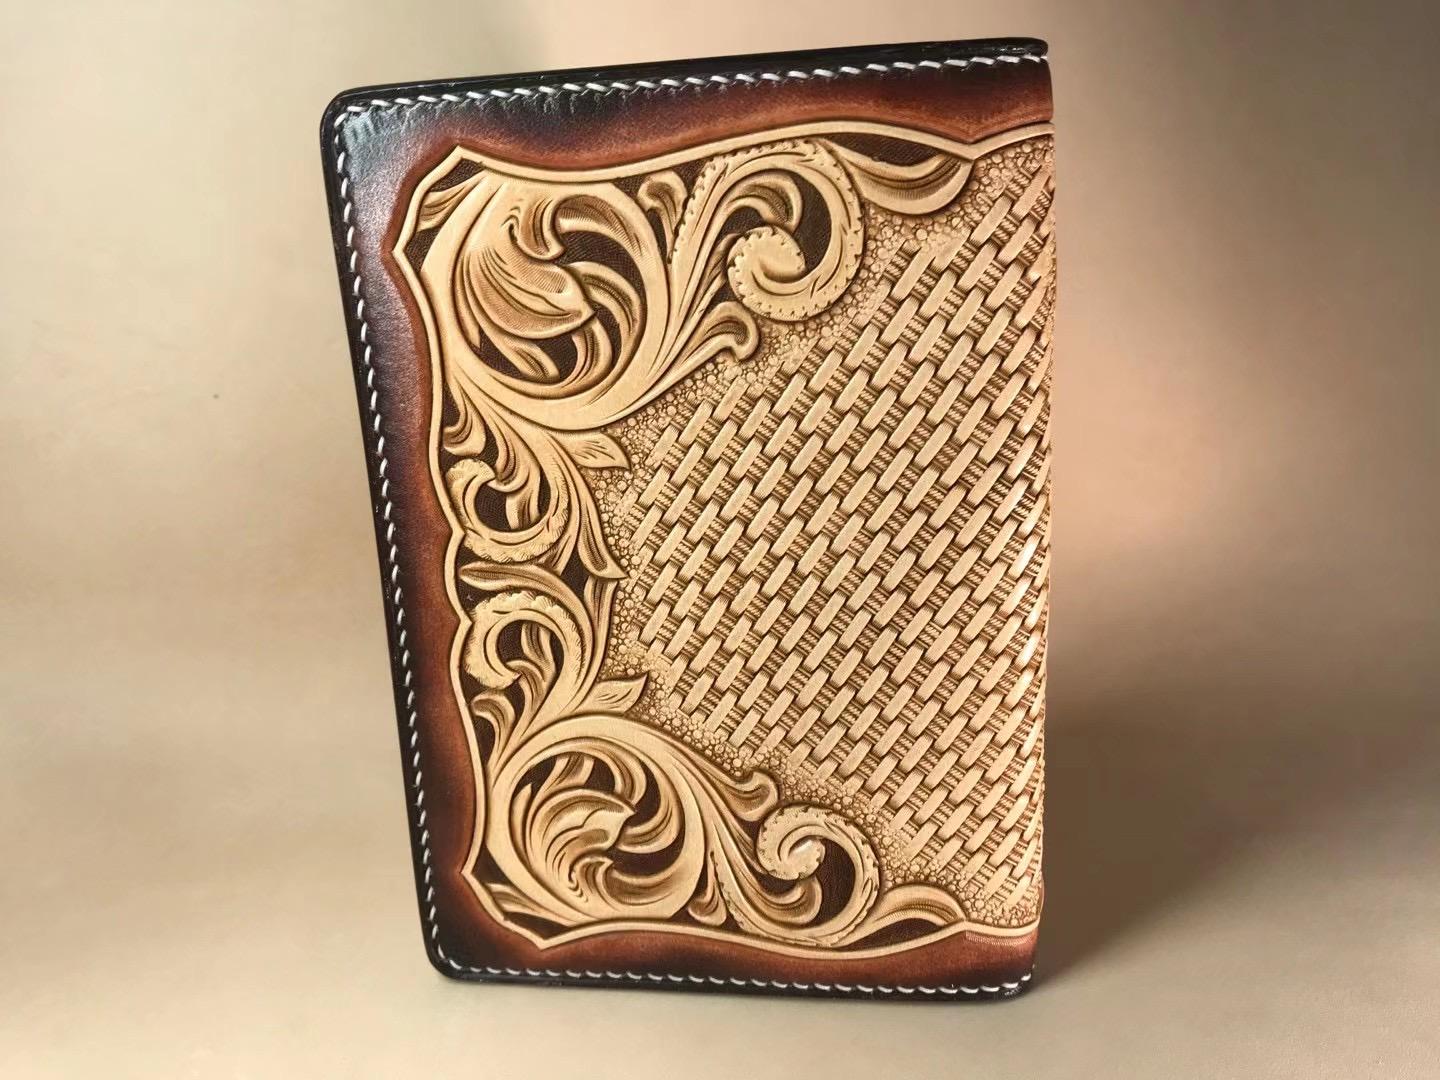
1 hour ago, dikman said:Those pics from rocksnake have some well thought out anti-snag features.
Munday, using it like that should avoid the problem of snagging thread.
Yes, thank you for helping me express that
-
4 hours ago, DJole said:非常好的作品!
我很好奇——你展示的所有工具件都是西方花卉风格。
你有使用中国图案和设计的吗?I will design some in the future, but the Chinese pattern may not be easy to sell
-
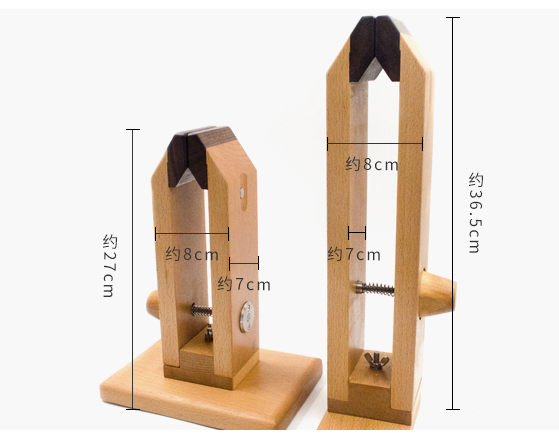
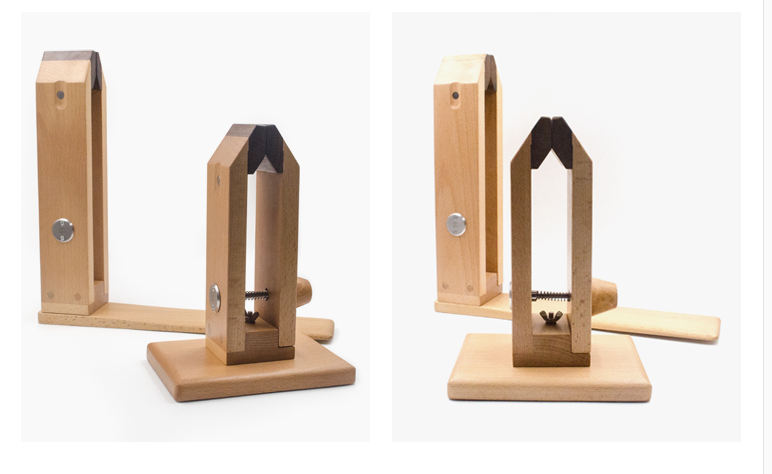
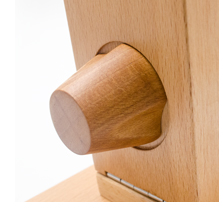
On 7/30/2021 at 4:01 AM, Munday said:I'm a woodworker and I'm building a stitching pony (I'm starting leather working). I'm looking for advice about a couple design features.
How big of a clamping surface is recommended? Should I add a piece of leather to the clamping surface?
I'll be adding a pair of magnets near the top. I think a needle will find a natural alignment on the magnet. Before I glue the magnet in I want to align it so the needle is in a convenient position. Is there a preferred alignment such as angled at 10 or 2 O-clock off the front or rear; maybe straight out the side (I'm guessing it is s personal preference but I want to avoid stabbing my hand grabbing for it).
I'm test fitting the maple parts in the picture. It is designed to work on a chair or clamped to a workbench and rotated off the side 100 degrees.
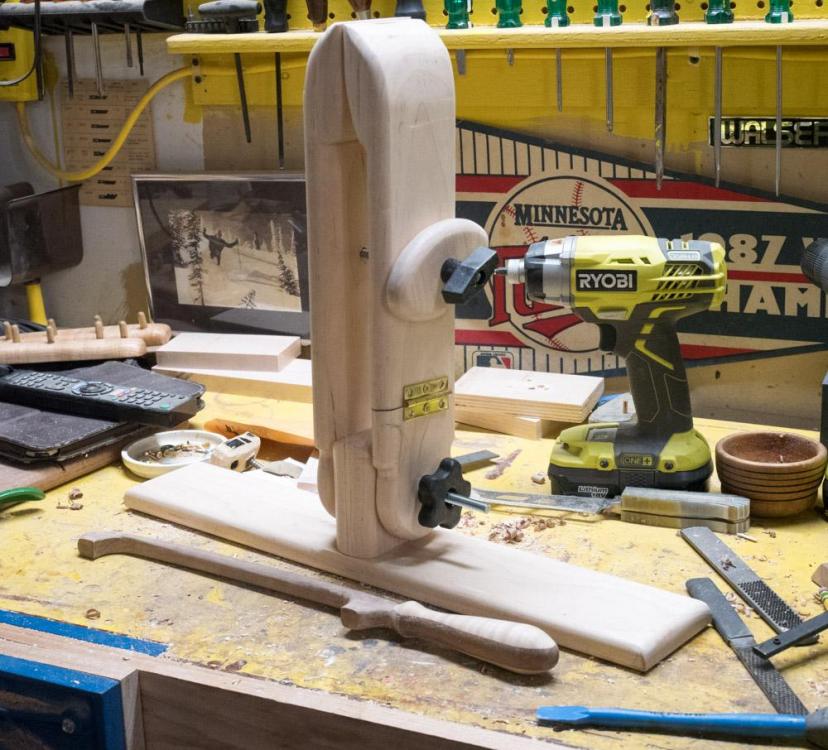
If I give you a suggestion, you look at the picture below, not too understand English, sorry can only help you to this
-
-
-


Scabbard
in Show Off!!
Posted · Report reply
nice