

Brokenolmarine
-
Content Count
319 -
Joined
-
Last visited
Posts posted by Brokenolmarine
-
-

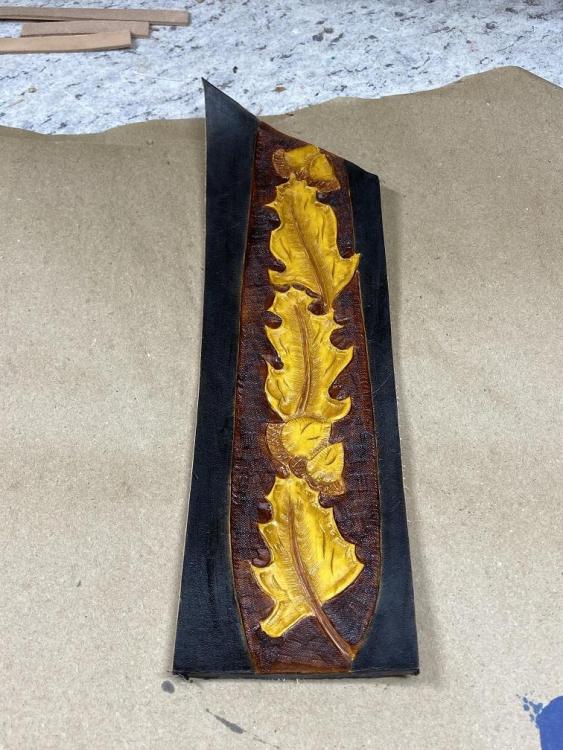
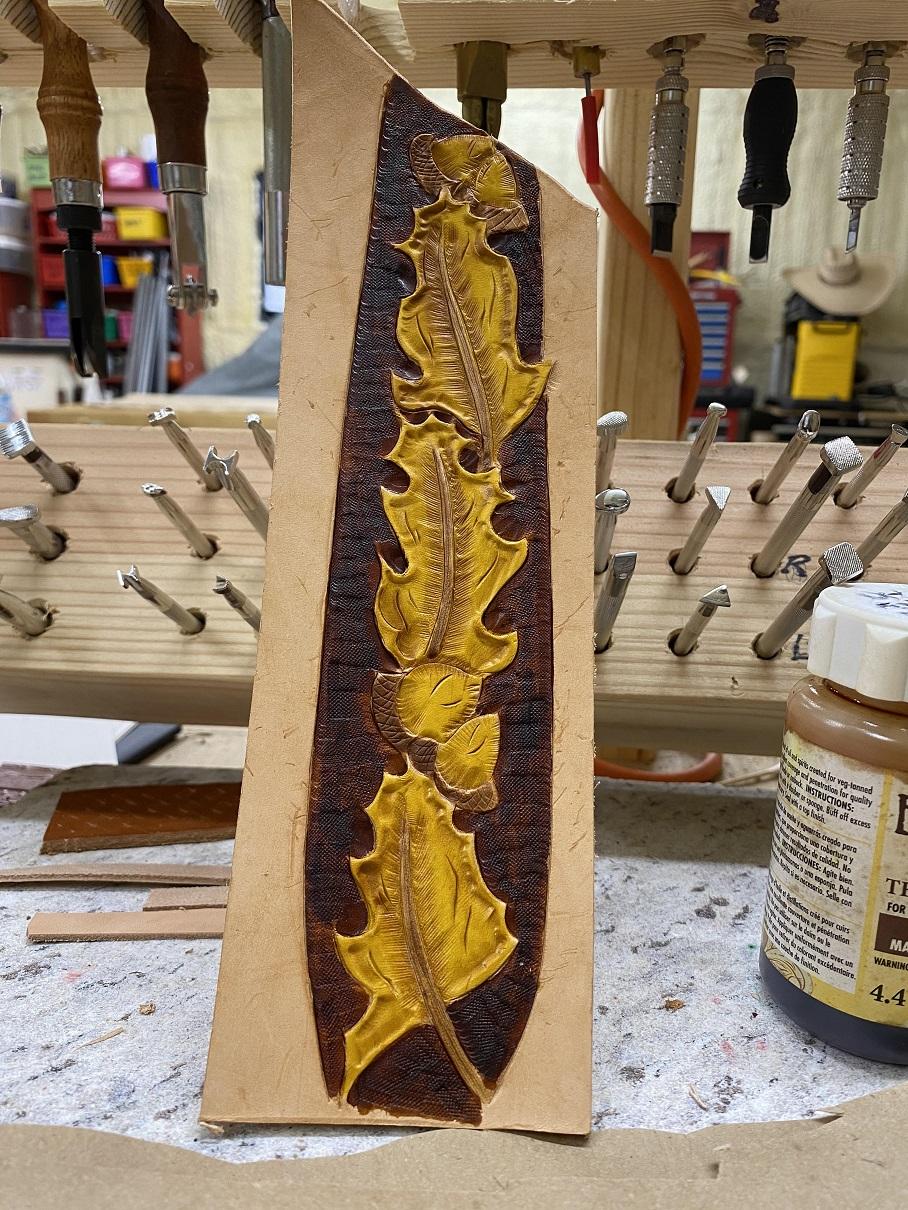
The dye in this pic is Dark Brown, but you'll note that at the bottom I don't have the edge properly defined and the dark brown bled as noted in the OPs initial post. The edge on the sides here were sharply defined by the cut and the bevel. I painted the dye up to the edge with a fine artist's brush, then up to the leaves the same way. Nice defined break in the colors. After first pass the dark brown was blotched and uneven, because I didn't try and overload the color forcing it to bleed. After the second pass it darkened it up nicely. This was just a practice panel for MY sling, but I try to do each practice piece as realistically as I can, and even when I make errors, or fail with colors I still try to complete them if possible, as there are still lessons to be learned. In this panel, I corrected errors I made, and took it to the end. Turned out fairly nice, and I was able to decide my design plan for the sling would work.
For the edges on the practice panel I used black. I used three coats of dye, taking the black to the edges where the cut kept the black from bleeding. I was careful with the artist's fine brush to go TO the edge but no further. The first coat I took my time and defined the border and didn't worry about a dark black for the rest of the natural leather just got the first pass of black dye on the leather. The second and third coats I made sure I didn't dye the leaves that lay over the edge and didn't slip into the brown background. Three coats did it..

I hope this helps. I am still learning myself, but I use every trick I can come up with to help me make my work look better. I am always open to suggestions.
")
-
When I put a black border on things, I cut a line with my swivel knife and then a nice sharp bevel. This leaves a defined edge for the dye. I apply the dye with a detail paint brush and paint it to the edge. I might have to make two or three passes, allowing the dye to dry completely prior to making the next pass, before getting to the "Black" that I want, but it prevents the bleeding you've seen. Or it has for me. so far. You can skip the bevel if it would be obvious, but the cut line will make a huge difference. It can be very fine.
-
Thanks very much for the input, never seen that technique before. I have learned ALL my leatherworking from YouTube or a few books I have found on line or in secondhand shops. I appreciate the suggestion. I'll try the technique as practice. What is the metal bar called that you squared your loop on? I just made a form using scraps from the actual strap cutoffs from the sling. LOL.
-
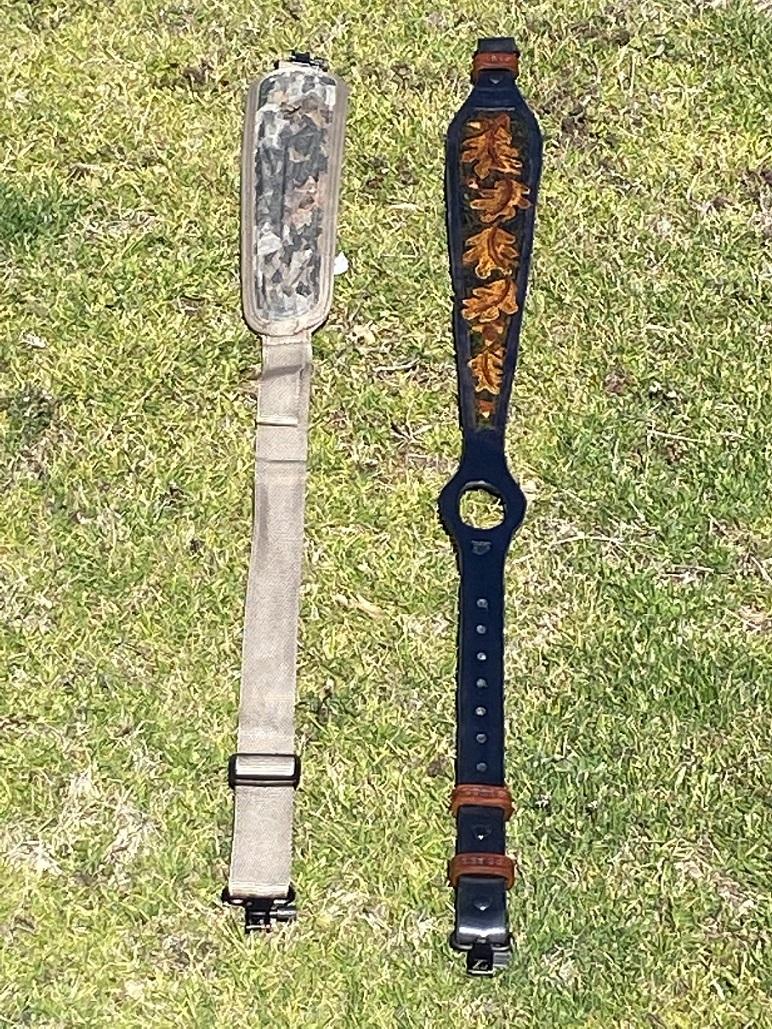
I mounted it on the Ruger American Ranch Rifle in 556. I chose this model and caliber for specific reasons. The Rifle will accept AR magazines, and the 556 caliber will also safely shoot 223 ammunition. Always a good idea to have versatility in the stable.
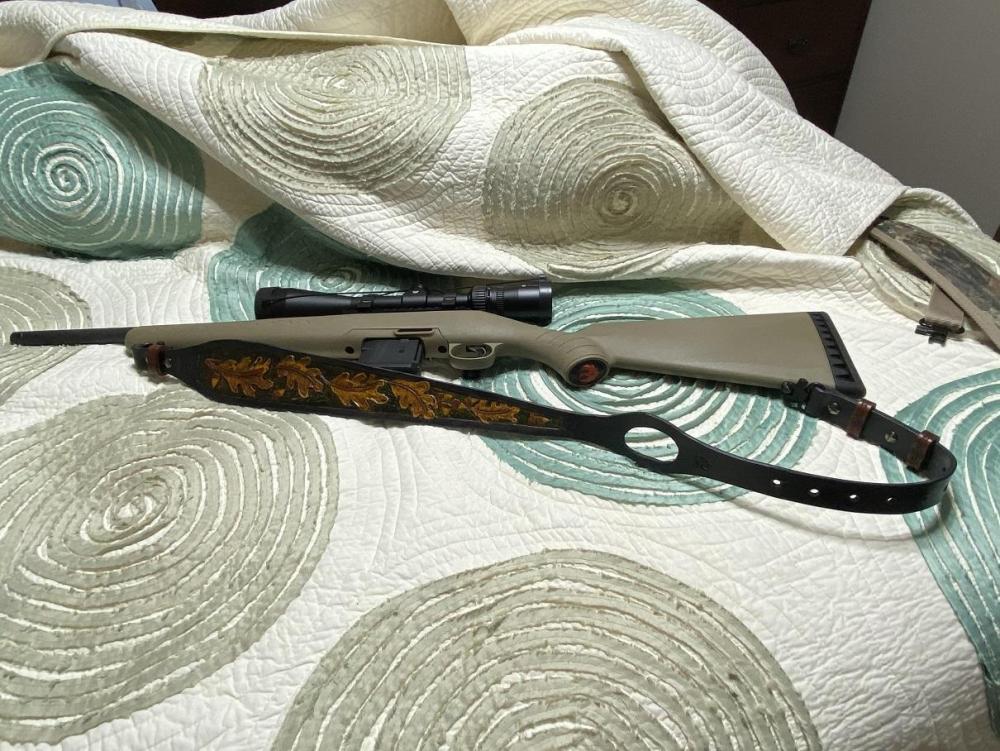
The thumbhole in the sling allows you to rest your thumb thru the sling and control the rifle on your shoulder without gripping the strap of the sling. Your arm is "resting" on the sling and not straining or fighting the sling to keep the rifle in place. Anyone who has humped a rifle for any distance knows this is a Godsend. As a former Marine, I have spent some time with a rifle on a sling. Luckily, as a helo crewman, Avionics Technician, not nearly as much as many of my brothers in arms.
-
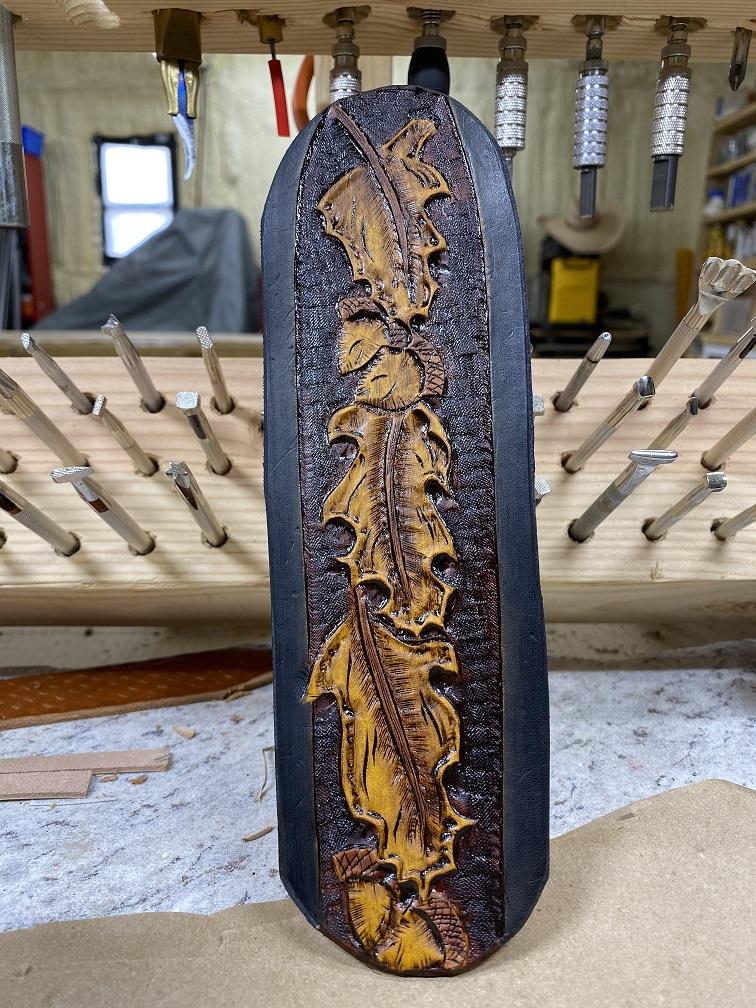
Using the Gonzales thumbhole pattern, just as I did for Miss Tina's Sling for the CZ455 Varmint 22, I made a sling for my Ruger Ranch 556 rifle. I carved the classic oak leaf and acorn pattern. First I carved several practice patterns. Rather than go with the natural color she wanted on the sling for her CZ, I chose to go with a black sling to compliment the light green factory stock on the Ruger, and used Autumn colors for the carving. I stained the keepers a light brown and antiqued them in dark brown to bring out the tooling. I am happy with the outcome, but like most of us, I certainly saw things that I know I could do better next time around. Don't we always.

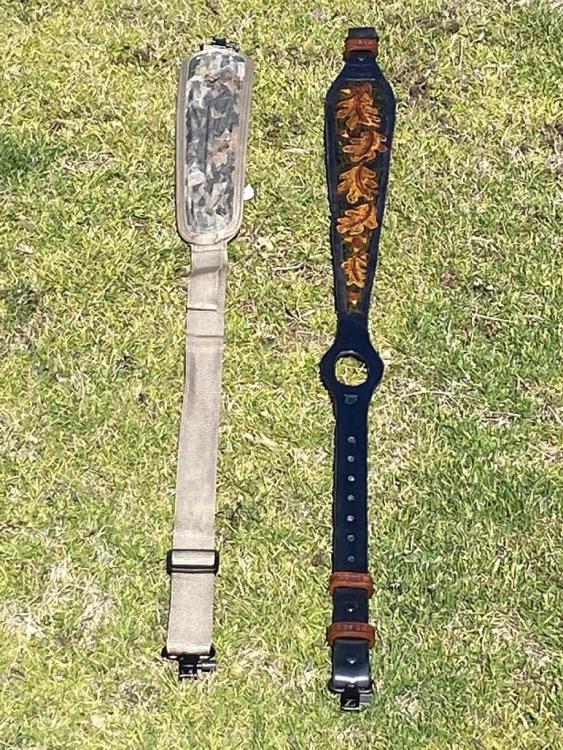
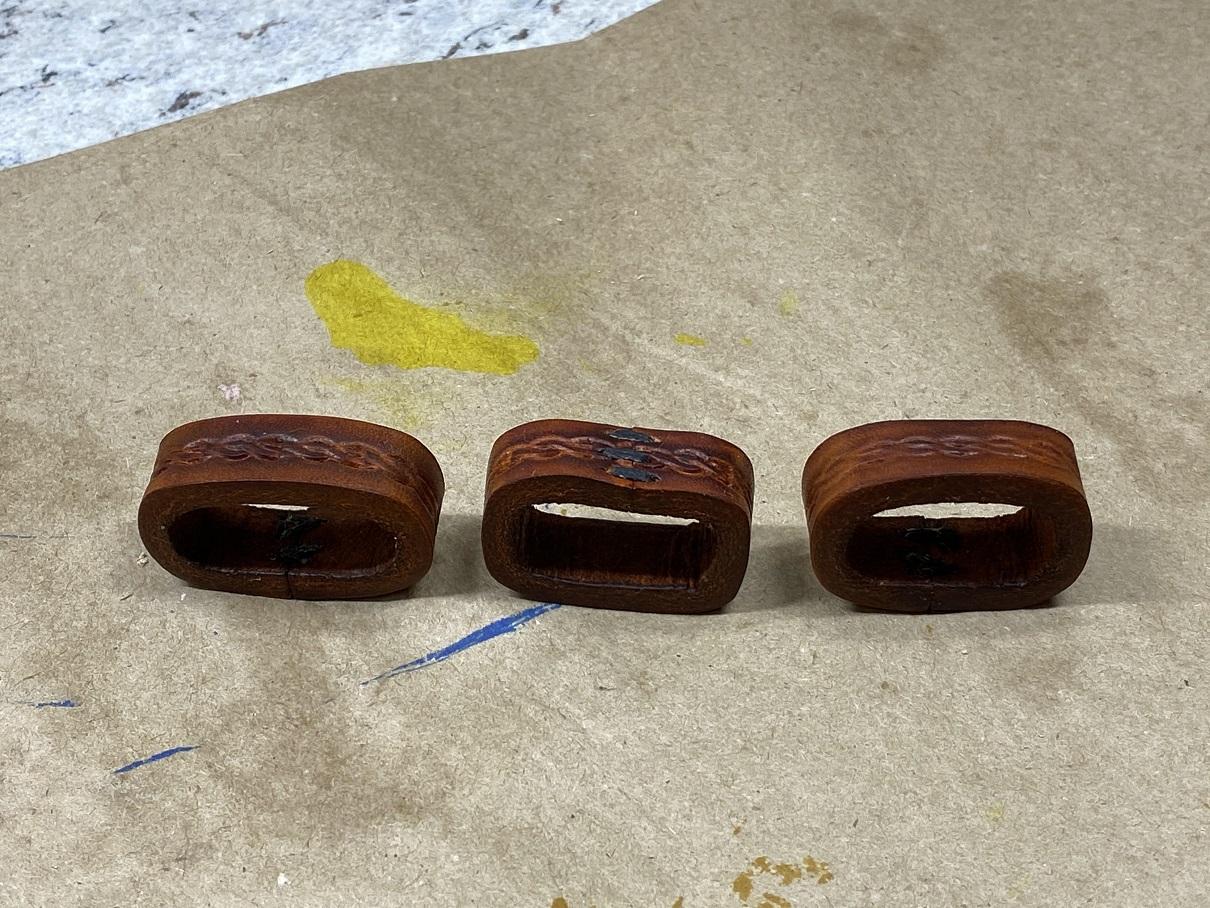
The keepers. The center keeper is upside down, you can see the stitching holding the loop in place. I burnished them around a form made from two scraps cut from the strap of the sling to form them to get the shape. I burnished the edges prior to cutting the three lengths, learned from the first time.

The completed sling: I was happy with the outcome, but always room for improvement. I ordered a set of half round end cutters which I will use on not only the ends of the sling straps, but to cut the inner loop of the thumbhole on future projects. Should give me a much cleaner cut.
-
Great Job. I'm thinking of doing one to hang in front of the seats in the UTV to hold either a rifle or shotgun. That way when you bail out to take a shot at either the Coyotes or Feral Dogs harassing the livestock, the firearm is Right There. I have a handgun holster with a magnetic mount I made, but Miss T isn't as good with handguns as I am... up close, 15 to 20 yards, she's on target. Longer shots... not so much. Rifle or shotgun, she'll get 'er done.
-

Finished the practice piece. I'm happy with it. Will start on my sling.

-
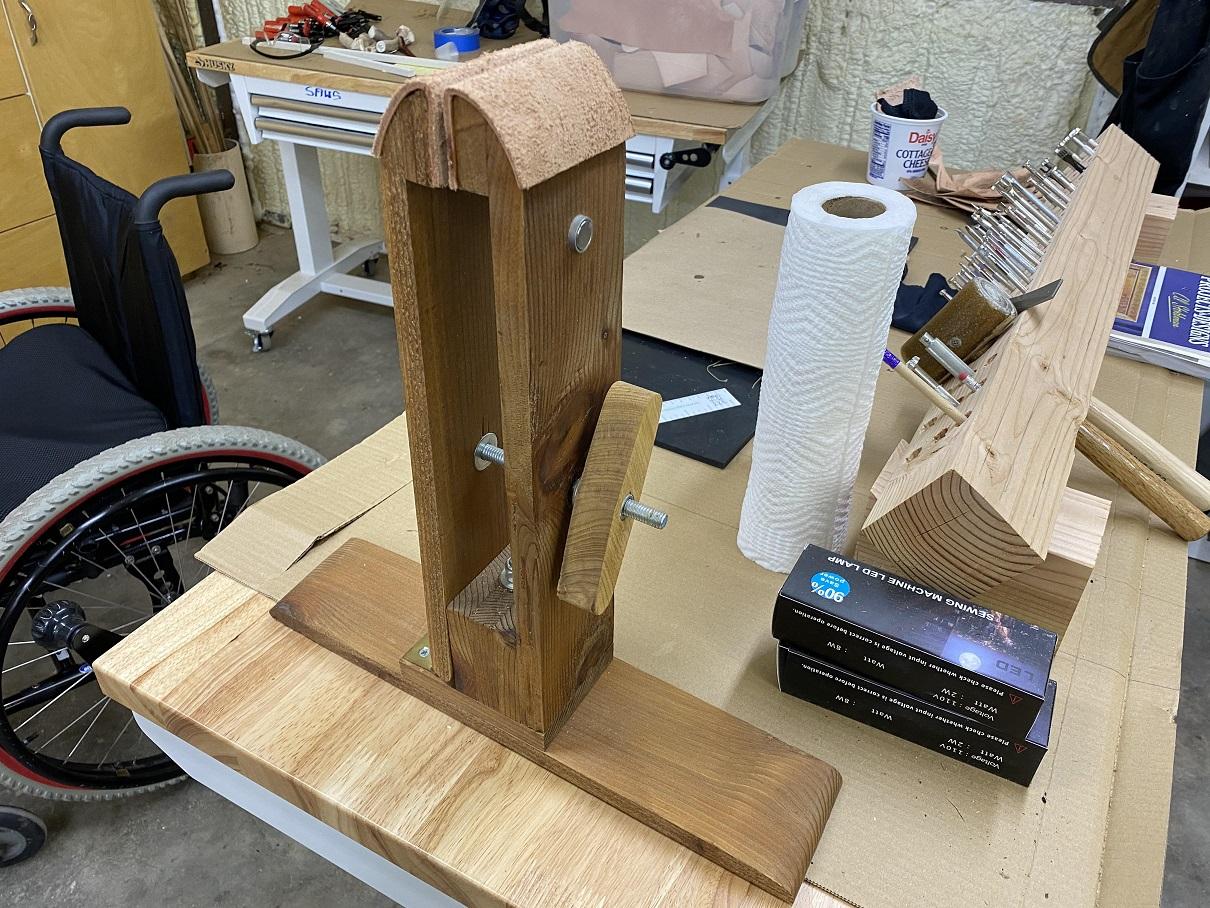
I made myself a stitching pony, makes all the difference. I saw various designs on the net and took what I liked and made various mods.

Note that I put a swivel base on mine. I put the wings under my legs and can turn the vertical center to see both sides or turn the project completely around if need be.
I didn't want to use just a wing nut, I cut the wooden oversize wing and just tapped the nut into it. tightening it just pulls the nut farther in. I did put wood glue around the edges of the nut after tapping it out and then pulling it back in to seat it.
I put thick leather on the jaws to pad them, don't want to scar a project while sewing it.
An late addition after the first few uses, were the magnets on either side to hold the threaded needles anytime I needed to put them down. I DIDN'T countersink them intentionally, so that the needles were easier to retrieve when I was ready. This works well.
I may decide to make a base for it to allow it to sit on the floor, and I can put my feet on the base and hold it in position. A future project. I'll use clamps to attach it to the base so it can still be used watching TV on the sofa etc.
-
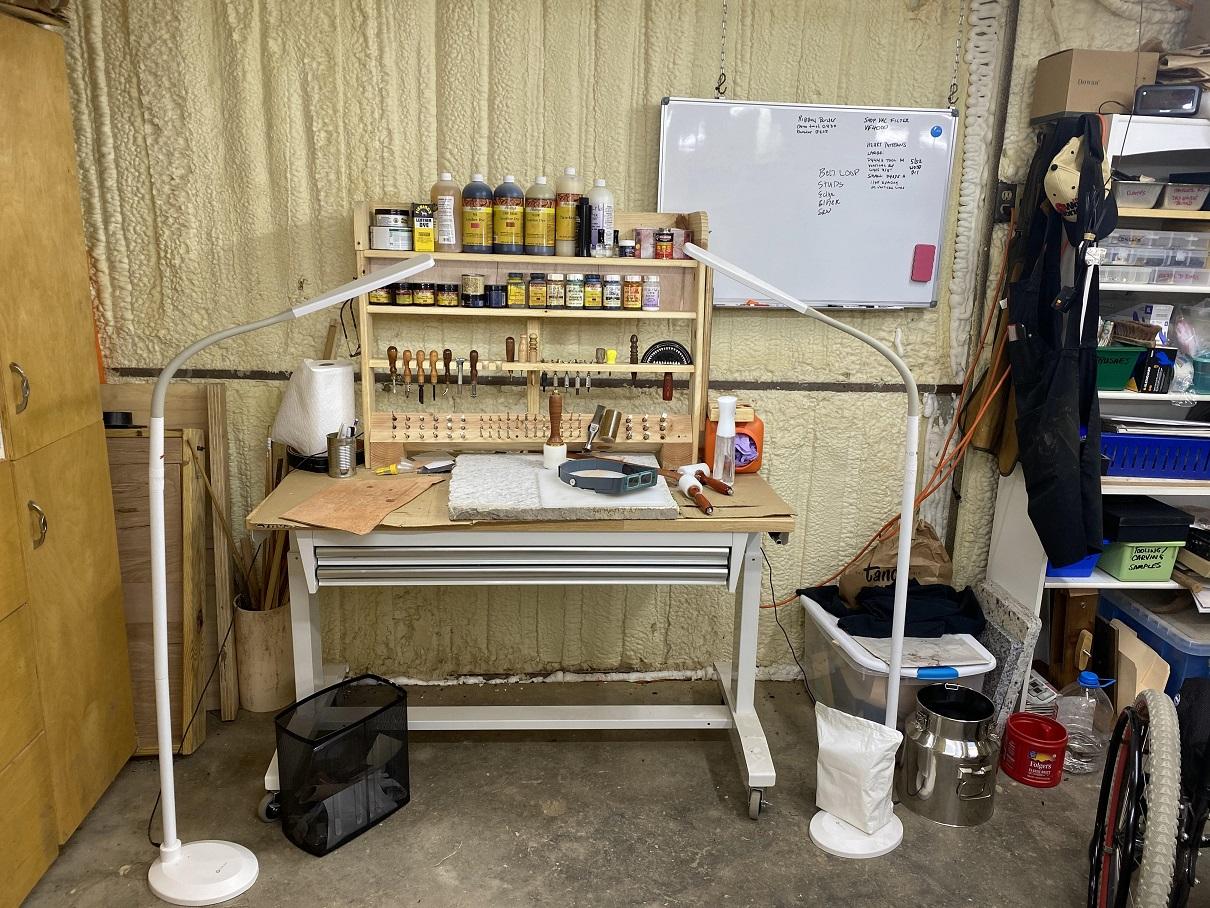
Dwight, I like the mod to my design of adding the rod for the lacing and thread for hand sewing. I'll have to add that to mine when I expand the design to cover the width of the workbench, great idea. I'll use a wooden dowel. I think I have several. Very Nice! I'm liable to add TWO 4x4 blocks to the bottom with an inch break between the groups of holes so I can cluster the types of stamps together. Shaders, Basketweaves, Camos, etc. Then slots for the cutters, bevels, etc on the next shelf, and the top few shelves for dyes, paints, etc. Probably summer.
-
I made mine with scrap 4x4 fence post and some shelving board. It fits on my bench. I told the wife this past week that it's almost time to make a new one, that will extend the width of the bench so that I can put some L brackets on the ends HOOKED under the end of the workbench to avoid drilling the bench to secure the tall structure.
 Also, the extra width will provide MORE space for stamps. I'd add a few additional shelves and rethink hammer storage, and add slots for mallets.

-
I'd go with a heavy duty belt. You know, to hold up a holster and mag pouch.. but I see the poster is from CA... he may not need to do so.
I see why you went with Blue thread, picks up the buckle. Could have gone with Orange as well. Both would have looked sharp. Great Job.
-
Thanks all. I have started on a practice plate for the sling for MY Bolt gun. I had been waiting for the pattern books from Joe Meling. I have had three sessions on the practice piece to work on the oak leaves and acorns, but we are in the middle of a winter storm, and have two more days. Our property is a sheet of ice and the boss won't let me out on the ice. I'm unstable in good weather. I can't use my chair to get out there, it's uphill. THAT would be a Winner on America's Funniest Home Videos.
Anyway, here's where the practice panel is so far. It's a representation of the upper section of the carved portion of the sling. MY sling will be black, so I dyed the border black. Of course the sling will have 1/2" borders around the carved section. I still have to antique and finish this panel. I started posting a step by step of the practice panel in "Resources" as I had asked where to get a good pattern for the Oak Leaves and Acorns. I felt it only fair once I got the pattern to share the outcome there.

If the finished panel works for me, I'll start on the sling. If I think I need more practice... I'll do another practice piece before starting on the sling. Wish me luck.

-
Third Session.
Went out and corrected my pattern error, touched up some of the background dark brown, added a second coat of light brown since the first coat faded almost natural again. Then dyed the edges black to see how the sling was going to look in black. Finally I added the resist coat, using tan coat and went back inside to allow it all to dry. I'll think about sneaking out to antique it this evening if the Ms. will allow it. It's 20 degrees out and we are in the middle of a winter storm.
-
very nice. Like the color a lot.
-
Hey, I have one of those!
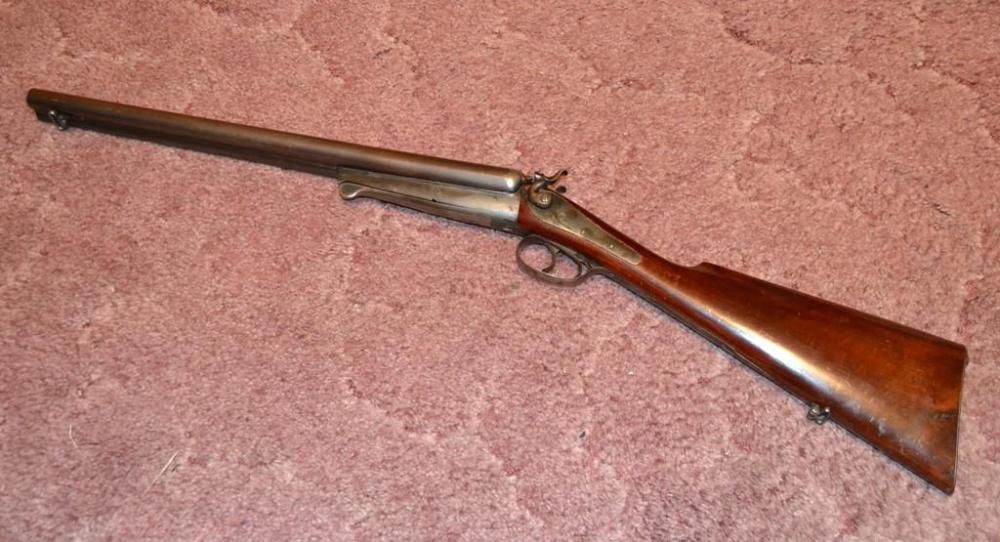
Nice job on the cheek piece.
 I don't shoot mine though. It was a wall hanger over my armorer's bench in my den in VA. It is capable of being shot, I just didn't.
Now it stands in the corner of my home office. No wall space. Much smaller room.
-
I got all three of Joe Meling's books in this week. I started a practice plate yesterday and worked on it again today. The practice plate is basically the upper half of the carving area for the Thumbhole Sling. I adapted one of the Oak Leaf patterns from one of Joe's books to fit the area I have. I'll finish this plate and if I'm satisfied, I'll use this template on the sling. If necessary, I'll do another practice plate or perhaps put a little more wiggle in the design.
The first day I got the design cut in and did some basic tooling.
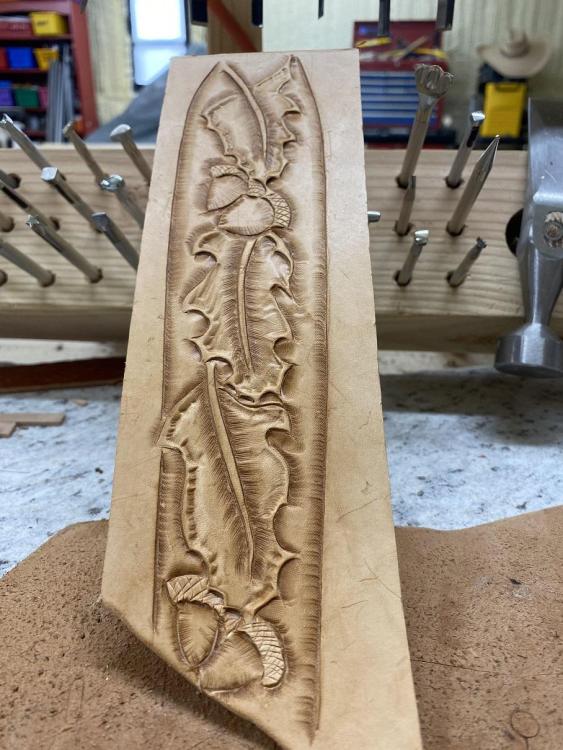
I went out this morning and did a bit more tooling, adding detail and lifting on the edges, then dying the background and the various components of the pattern. I used a detail brush and my opti-visor.
I am pretty happy so far. Tomorrow I'll put on a resistor coat and dye the outside edges black, which will be the color of the sling itself. If it dries in time I can antique and see how it looks.

I am getting better at achieving the 3D look I am shooting for.
Note: That bottom leaf in the bottom pic is MY error not an error in Joe's pattern.
-
I just started on the practice plate for my Thumbhole Sling. Oak Leaves and Acorns. I'd love for them to turn out that well.
-
I agree, very nice. Inlay is my goal on the gunbelt I plan to do in the very near future.
")
-
Thanks everyone for the advice. I'll certainly be investing in the 23+ books, one here, one there until I have them. HIS videos have taught me a lot over the last year. Several others as well. I'll look for that Belt book too. You can't have too many references.

-
I learned a lot from both those guys. The hard copies of Joe's books are rather steep, have you seen them? If they are quality I'll spend the money.
I have just finished the Thumbhole sling from Don's pattern, but didn't like the Oakleaf and acorn pattern included. The others were okay.
If I don't find another source, I'll likely buy at least one pattern book from 23+, the one with the oakleaf and acorn belt pattern.
thanks....
-
I bought the ones from Tandy, and they recommended the Stohlman books, a couple others. To be truthful, the quality of the patterns in many of the "Old Standards" were less than impressive. The books I bought from Tandy had patterns that were .... disappointing. The quality of the design was not what I expected and the reproductions were often blurred, like it was the tenth printing off the original.
I'm looking for Carving Patterns for Oak Leaves and Acorns, Belt Patterns and the like that someone of intermediate talent can build on and up to. Suggestions?
Thanks.
-
I have watched several videos of the folks in India making a living sorting thru the dumps, collecting trash and recycling it into real actual usable products.
-
need something like that for the milk cow. 20 acres, she's always wandering into the woods to cool off in the shade.
-
nice job, like the design.


Sling for the Ranch Rifle
in Show Off!!
Posted · Edited by Brokenolmarine · Report reply
Oops, sold.
Thanks for thinking of me, but the funny thing, by the time the bidding ended, they paid as much as a new set, with shipping.
Since I have a complete woodshop, and after looking at the prices... I think I'll make each one of my loop irons out of hardwood as I need each size from Walnut or oak. I have plenty of both and being retired, I also have plenty of time to get them right.