-
terrahyd's Blog
-
Johanna's Blog
-
joet's Blog
-
CitizenKate's Blog
-
Badlands Leather Art
-
broncobuster's Blog
-
That boys not right.
-
Cow Camp Saddlery
-
3DArcher's Blog
-
rdb's Bench Notes
-
nopension's Blog
-
leatherman1457's Blog
-
Wizs' Leather Work and Sewing Machine Blog
-
Bob Stelmack's Blog
-
dawn's leather Blog
-
Dusty chap Leather Blog
-
Jbird's Blog
-
Tom Banwell
-
KnotHead's Blog
-
Fewments and Observations
-
rodeomic's Blog
-
joet's Blog
-
bvb knives' Blog
-
DAVID W's Blog
-
*
-
WyomingSlick's Tools and Tricks Blog
-
elkdog555's Blog
-
Leather Masks
-
elkdog555's Blog
-
Leatherimages' Blog
-
Leatherimages' Blog
-
WarEagle Leather Works' Blog
-
Cursos de salsa en Malaga
-
billio8's Blog
-
DJ1935's Blog
-
Heather R Nord's Blog
-
Heather R Nord's Blog
-
katsass' Blog
-
CarolinaTackMan's Blog
-
CarolinaTackMan's Blog
-
DGum's Blog
-
MaddCelt's Maddness
-
Chained Lightning's Blog
-
Chained Lightning's Blog
-
AnAce's Blog
-
AnAce's Blog
-
Information and Communication
-
kleefan's Blog
-
bentley's Blog
-
Painting Cow Studio Blog
-
Brent S. Tubre Custom Saddles
-
rambo's Blog
-
rambo's Blog
-
Fellowsgarden's Blog
-
Fellowsgarden's Blog
-
hacken94's Blog
-
MasterLeatherCraftsman's Blog
-
?
-
marine mp's Blog
-
marine mp's Blog
-
starving artist's Blog
-
drkuhn's Leather Blog
-
Roy Cook's Blog
-
Roy Cook's Blog
-
Roy Cook's Blog
-
Roy Cook's Blog
-
Roy Cook's Blog
-
GChordLeathers' Blog
-
8ball's Blog
-
Airship 67 Leather
-
DJordan's Blog
-
Chiwit Design Blog
-
chiwitdesign's Blog
-
diamondbleather's Blog
-
John Wayne's Blog
-
The Flying Ostrich's Blog
-
The Flying Ostrich's Blog
-
The Flying Ostrich's Blog
-
John D Dennehy's Blog
-
Damn Eskimo's Blog
-
Hollywood's Blog
-
darak's Blog
-
cottoncreek's Blog
-
Charlie K's Blog
-
Diane B's Blog
-
Kellog's Blog
-
landy's Blog
-
landy's Blog
-
OrchidNoir's Blog
-
withsilverbells stitch o' rama
-
Balto Joe's Blog
-
Davis Leatherworks
-
capsterdog's Blog
-
henry's Blog
-
john mattingly's Blog
-
hass' Blog
-
hass' Blog camo print
-
1911 Jerry's Blog
-
DWHarrelson's Blog
-
Zilla's Blog
-
Crazy K's Creations
-
flstenner's Blog
-
flstenner's Blog
-
cchichueng's Blog
-
aeinaleather's Blog
-
alagar's Blog
-
Cg Leather's Blog
-
Cg Leather's Blog
-
smileha's Blog
-
Salazar Leather's Blog
-
Salazar Leather's Blog
-
Jxtime blog
-
Freeze
-
Maverick Leather Company's Blog
-
Legacy Leathercraft's Blog
-
Legacy Leathercraft's Blog
-
leezza2's Blog
-
redsolara's Blog
-
fashiang's Blog
-
Tinneal's Leather Work Portfolio
-
Tinneal's Blog
-
sunnyfel's Blog
-
Quanr's Blog
-
Greybeard's Blog
-
bobocat's Blog
-
Cubezombie's Place
-
theprestigeshop's Blog
-
Colombian Leather Products
-
CJ leather Blog
-
Blackey Cole's Blog
-
TomWI's Blog
-
ayn's Blog
-
Jessica S' Blog
-
ayn's Blog
-
Leathercraft
-
Art's Blog
-
Armor boy's Blog
-
Armor boy's Blog
-
Ebay Blog
-
El Paso's Blog
-
El Paso's Blog
-
DoubleC's Blog
-
Tod Schertzer's Blog
-
Loot's Blog
-
eLw's Blog
-
MadMorbius' Blog
-
MadMorbius' Blog
-
Square Bear's Blog
-
Square Bear's Blog
-
WinterBear's Blog
-
shedhunter's Blog
-
mariobin's Blog
-
chipp's Blog
-
chipp's Blog
-
Miller02
-
Jimbob's Blog
-
Jimbob's Blog
-
gene l's Blog
-
gene l's Blog
-
tackmantoo's Blog
-
bluesman1951's Blog
-
bluesman1951's Blog
-
TMCARDS' Blog
-
TMCARDS' Blog
-
A Journey in Leather
-
SandSquid's Blog
-
maury sewing machinex's Blog
-
buckeroo1's Blog
-
terry and joanne's Blog
-
MirandaDee's Blog
-
leathersculptor's Blog
-
BILL FORBES' Blog
-
White Gate Leather LLC's Blog
-
White Gate Leather LLC's Blog
-
CicadaLeatherCompany's Blog
-
CicadaLeatherDesigns' Blog
-
metaljoe57's Blog
-
missdaisy2006's Blog
-
missdaisy2006's Blog
-
webothfarms' Blog
-
Wyldflower's Blog
-
wyldflower's Blog
-
Ryan Mitchell's Custom Leather Works Blog
-
BLUEGUN Store's Blog
-
stitchnwizard's Blog
-
Teja's Blog
-
vintage clothing lover's Blog
-
Ezio's Blog
-
Second Hand Cowboy Leather's Blog
-
jimmyo's Blog
-
jimmyo's Blog
-
jimmyo's Blog
-
hunio's Blog
-
Brooktx's Blog
-
Kurtman's Blog
-
boodle's Blog
-
EthosCustomBrands' Blog
-
flathead5's Blog
-
StLouis Falconer's Blog
-
Zelikovitz Leathercraft's Blog
-
hotrod's Blog
-
hotrod's Blog
-
Westernartist
-
ted 777's Blog
-
BorisVanJr's Blog
-
Dan Markell's Blog
-
wlg190861's Blog
-
limbs' Blog
-
limbs' Blog
-
daniel yepez's Blog
-
Gainesvilleman's Blog
-
Robert Hulshizer's Blog
-
waterwizzard's Blog
-
RaeNae's Blog
-
weavrdan's Blog
-
POOLCOWBOY's Blog
-
bokehz's Blog
-
Christian Louboutin Belle
-
trikerd1952's Blog
-
Fowlingpiece's Blog- James Rogers
-
srb008's Blog
-
summeryang000's Blog
-
lena4570's Blog
-
lena4570's Blog
-
gainesvilleman's Blog
-
pijushroy1000's Blog
-
pijushroy1000's Blog
-
dana13's Blog
-
cliffordsaddler's Blog
-
boma's Blog
-
jinggu's Blog
-
HandBag Designer
-
DenHar's Blog
-
christianleather's Blog
-
leathertailor's Blog
-
Lisheen's Blog
-
probiotics' Blog
-
Newbie News
-
Learning Leather
-
Leftovers Inc.
-
charles canillas' Blog
-
charles canillas' Blog
-
Woodentop's Blog
-
rexberger's Blog
-
rexberger's Blog
-
hunio's Blog
-
Smokey Allen's Blog
-
darksdeebar's Blog
-
Weazer's Blog
-
Keable Leather Blog
-
crisp2's Blog
-
Keable Leather Local Blog
-
schmara's Blog
-
schmara's Blog
-
schmara's Blog
-
Confused's Blog
-
jimmyb96's Blog
-
bigred85's Blog
-
gypsy1980's Blog
-
gypsy1980's Blog
-
mdntnmtgmy's Blog
-
BeltFctry's Blog
-
rkeron's Blog
-
Lym's Blog
-
borlinoleather's Blog
-
Atif Anwar's Blog
-
Atif Anwar's Blog
-
S R C's Blog
-
S R C's Blog
-
LoriLee11011's Blog
-
LoriLee11011's Blog
-
cowboygear1's Blog
-
Gemini1950's Blog
-
sierrasaddle's Blog
-
sierrasaddle's Blog
-
woodman58777's Blog
-
papadan4's Blog
-
MrV's Blog
-
How do i create a chestplate
-
manny60's Blog
-
Johnny Giles' Blog
-
Johnny Giles' Blog
-
himanshiets02's Blog
-
mene's Blog
-
komaletrade's Blog
-
ranjeet14's Blog
-
etskamlesh123's Blog
-
Nedingham's Blog
-
Nedingham's Blog
-
tom offner's Blog
-
quartercircleoveruleather's Blog
-
artisan1's Blog
-
artisan1's Blog
-
stangman645's Blog
-
manny60's Blog
-
Silverylight's Blog
-
Best Custom Essay
-
skae's Blog
-
Second Saddle Project
-
wintek's Blog
-
Keestarsew's Blog
-
Keestarsew's Blog
-
ElConquistador's Blog
-
ElConquistador's Blog
-
Cowboyhap's Blog
-
Cowboyhap's Blog
-
bigwill23's Blog
-
Illusion Lane's Blog
-
Bookbinders Bench
-
wtf's Blog
-
kenneth gituro's Blog
-
bcflyguy's Blog
-
gunnerdoc's Blog
-
Craftsman Made's Blog
-
Craftsman Made's Blog
-
Torito's Blog
-
EternalHeritage's Blog
-
MaggieS' Blog
-
smokerofstars' Blog
-
Michael Z's Blog
-
Amateur Saddle Maker
-
GD Frippery's Blog
-
Carroll Leather's Blog
-
stropping's Blog
-
Leather bags store first sale
-
Spadacini530's Blog
-
kamerzell730's Blog
-
jshill's Projects
-
jshill's Projects
-
cjcolbyjack's Blog
-
RD Ranch Leather's Blog
-
evaeyeth's Blog
-
New to this! And new to leather work!
-
jennytaylor's Blog
-
ruthleather's Blog
-
Mill Iron J's Blog
-
campingpitter's Blog
-
campingpitter's Blog
-
campingpitter's Blog
-
Francesca Jones' Blog
-
Eben's Blog
-
abbysimpson's Blog
-
cowboyedout's Blog
-
cmenca's Blog
-
Jwsedberry's Blog
-
Jwsedberry's Blog
-
Help Identify My Saddle
-
Tony W's Blog
-
Fischer Workshops Blog
-
taokai's Blog
-
taokai's Blog
-
Fireflyidaho's Blog
-
Flora on Fauna
-
Patsy's Blog
-
Patsy's Blog
-
Daneo's Blog
-
Morningdove's Blog
-
Morningdove's Blog
-
Bohemian Sandals' Blog
-
william friend's Blog
-
Deb Brink 15's Blog
-
Tromek's Blog
-
Tromek's Blog
-
kanadakeith's Blog
-
Colourful Mannequins' Blog
-
Buttons' Blog
-
mustangsmith's Blog
-
jmkjmk2's Leather Tools
-
Leather and Mildly Leather-Related Stuff
-
rnuo2011's Blog
-
evsleather's Blog
-
Skiving machines
-
Freeman15's Blog
-
Professionals dealing with amateurs
-
KristenLeigh333's Blog
-
penguineer's Blog
-
rnuo2011's Blog
-
ewayne53's Blog
-
RafterD4's Blog
-
beyondcomfort's Blog
-
HumanToughDesign's Blog
-
Merianny's Blog
-
fconnection's Blog
-
Ensz saddlery's Blog
-
horsewisperer's Blog
-
Sewing Machine
-
thunter9's Blog
-
fjohnson's Blog
-
fjohnson's Blog
-
Amyb32's Blog
-
Chief31794's Blog
-
Johnboy Richter's Blog
-
Quality Saddles
-
bravefifa's Blog
-
Kieth's Blog
-
Handmade Leather By Rick Blog
-
Nouventi's Blog
-
thePassenger's Blog
-
fat face's Blog
-
jesippel's Blog
-
yourfifagames11's Blog
-
onathread's Blog
-
Tio's Tips
-
Tlhines
-
Looking for SELF
-
Gritty Rustic Leather
-
Ponderosa
-
laser cutting different materials
-
Leather - Billfold's - ( Hand - Tool'ed ) - Specialist - Want'ed . . .
-
Hannahrain
-
Leather Hides
-
Barbed Wire Leather
-
Phoneman916
-
zazzle.com/santoshadh
-
Leather Jackets & Gloves
-
Danno90's Blog
-
Safety Gloves
-
rockingmooreranchllc
-
Cutting Table Opening for a Walking Foot Machine
-
Jano
-
Kaitlynpage
-
Rhale
-
Do You Ever Tried Any Fun Builds In Path Of Exile 3.2?
-
Matthew Wilson
-
High Quality Leather Lace - Hand Tools
-
BrotherRon
-
Don
-
teemack
-
Colin.
-
Football at the end of the evening
-
Madden 20 is designed to simulate
-
Highlight plays look fantastic and crucially
-
TECHSEW SP-20 vs cobra class 14 leather splitters
-
luxury swiss watch
-
Patterns
-
Hannah
-
ew
-
The Versatility of Leather in Fashion: From Jackets to Handbags
-
Unleashing the Fashion Potential of Leather: From Handbags to Jackets
-
Cork Leather
-
RHC
-
Designer Watches
-
My Journey into Leather Crafting: Exploring the Art of Leather Molds
-
The Leather Tanning Process
-
The Influence of Control System on Fiber Laser Cutting Machine
-
P2Pah WoTLK:You will be able to acquire an excellent set of gear
-
Mix and match!
-
The Influence of Control System on Fiber Laser Cutting Machine
-
How Does a Hot Foil Stamping Machine Work?
-
Handmade Leather Apron
-
Introducing Shkira – A Ukrainian Family-Run Leather Workshop
-
Which site will be good for buying OSRS gold?
-
Exploring Medical Marijuana Seeds on Amazon
-
How to Get Ember Lily Seed in Grow a Garden
-
State of the Servo Motor
-
Leather Repair Center
-
Riq


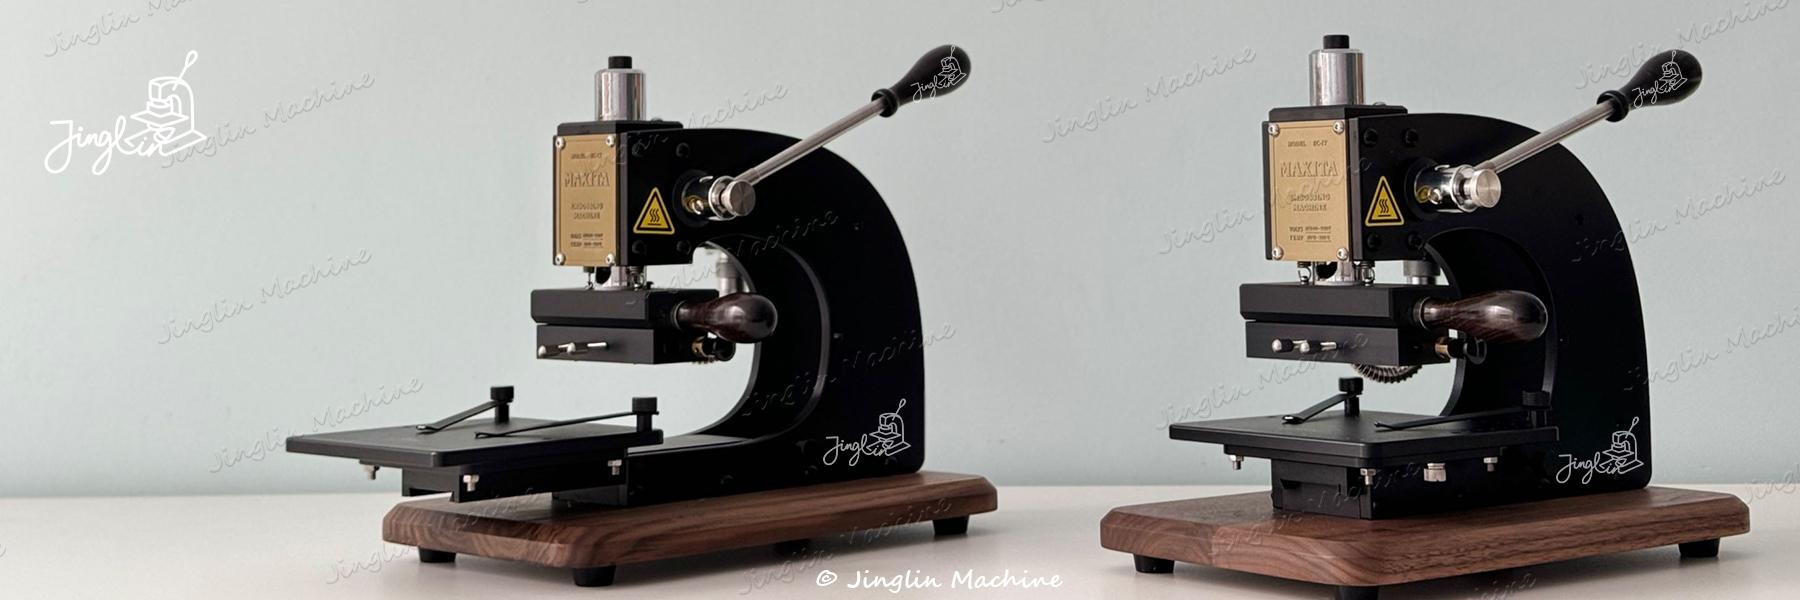
 The Maxita Hot Stamping Machine is designed for professional leather crafting, featuring infrared positioning, a push-pull worktable, and a detachable worktable for precise and stable embossing. If you want to imprint logos, initials, or unique patterns onto leather goods such as wallets, belts, cardholders, luggage tags, and bookmarks, this step-by-step guide will help you achieve the best results. Step 1: Gather Materials & Equipment Before you start, ensure you have the following: Maxita Stamping Machine (with industrial-grade temperature control) Leather items (vegetable-tanned leather, PU leather, textured leather, etc.) Hot stamping foil (choose the right foil for your leather type) Custom brass stamping mold (for logos, initials, or patterns) Heat-resistant tape (to keep the foil in place) Step 2: Set Up the Hot Stamping Machine The Maxita hot stamping machine offers precise temperature control, and the recommended temperatures for different leather types are: Leather Type Recommended Temperature (°C) Notes Vegetable-Tanned Leather 100-130°C Use lower temperatures for light-colored leather to prevent scorching PU / Synthetic Leather 90-110°C High temperatures may cause melting; test before stamping Textured / Coated Leather 100-120°C Moderate temperature ensures proper foil adhesion Infrared Positioning: Adjust to ensure accurate alignment Pressure Setting: Moderate pressure ensures strong adhesion without over-embossing Time Control: Typically 2-5 seconds; too short may cause weak adhesion, too long may overheat the material Step 3: Start the Leather Stamping Process 1. Attach the Brass Mold Secure the custom brass stamping mold onto the Maxita hot stamping machine and align it with your leather piece. 2. Preheat the Machine Set the appropriate temperature and wait for the machine to reach the set level (usually 1-2 minutes). 3. Position the Leather & Foil The push-pull worktable makes it easy to position leather items Place the hot stamping foil over the leather and secure it with heat-resistant tape 4. Perform the Stamping Gently press down, ensuring full contact between the stamping mold and the leather. Hold for 2-5 seconds, then release. 5. Peel Off the Foil Once the leather cools, carefully remove the foil to reveal the embossed design. Step 4: Pro Tips for Better Hot Stamping Results Use high-quality foil to enhance durability and shine Test different temperature and pressure settings to achieve the best results Regularly clean the brass mold to prevent residue buildup and ensure crisp embossing Final Thoughts Using the Maxita Stamping Machine for leather embossing allows you to create professional, high-end finishes for custom branding and personalized designs. Whether you're making bespoke leather goods or branding products for your business, this machine helps you achieve consistent and elegant results. Have you tried hot stamping on leather? Share your experiences and questions in the comments. WELCOME TO SHARE YOUR STAMPING DETAILS