CowboyBob Posted January 15, 2024 Report Posted January 15, 2024 Yes,I think you understand what is going on here.The best way to clean it is & take it to a car wash (with hot water) use spray some degreaser all over,then soap it spray all the parts & rinse off.Then when I get back to the shop blow out all the oil holes & everything else off with air.When people take them apart they can damage or loose parts & some of these are impossible to find.It really doesn't need to be super clean as people might like them to be. Quote Bob Kovar Toledo Industrial Sewing Machine Sales Ltd. 3631 Marine Rd Toledo,Ohio 43609 1-866-362-7397
Members 1985 Posted January 16, 2024 Author Members Report Posted January 16, 2024 18 hours ago, CowboyBob said: Yes,I think you understand what is going on here.The best way to clean it is & take it to a car wash (with hot water) use spray some degreaser all over,then soap it spray all the parts & rinse off.Then when I get back to the shop blow out all the oil holes & everything else off with air.When people take them apart they can damage or loose parts & some of these are impossible to find.It really doesn't need to be super clean as people might like them to be. Okay , no car jet for me the car is down but do under stand what your getting at, with dismantlement , So iv put it on its side on table, and started giving a clean , I am checking out the forked bit on the rear that rocks back and forth it is pretty slanted not straight and looks like its to close to the stitch adjuster two pieces of metal, that move when adjusting for stitch length, the forked bit is just skimming them by a Rizzla paper thickness,which worries me , this might be the reason why the forked part has fresh rub marks where some of the metal is or has rubbed just like the front cam marks as shown in pics earlier on The forked part at top leans toward the back hand wheel and the bottom leans more toward the front of the machine,so I am cautiously studying the mechanism,to why?its not straight down, I also sending picks because there are no adjustment STOP collar`s that you usually find on this bar, well on a 7-33 there`s at least one, but not sure on this suspected double needle 7-39 , should there be any ,?and pic of the slated forked at back, I have removed pin and grub screw holding the race basket because I do want to remove it as some one had done some weld to the ends and not smoothed of well for my liking ,but also means removing the outer feed dog moving things , Quote
Members 1985 Posted January 16, 2024 Author Members Report Posted January 16, 2024 21 minutes ago, 1985 said: Okay , no car jet for me the car is down but do under stand what your getting at, with dismantlement , So iv put it on its side on table, and started giving a clean , I am checking out the forked bit on the rear that rocks back and forth it is pretty slanted not straight and looks like its to close to the stitch adjuster two pieces of metal, that move when adjusting for stitch length, the forked bit is just skimming them by a Rizzla paper thickness,which worries me , this might be the reason why the forked part has fresh rub marks where some of the metal is or has rubbed just like the front cam marks as shown in pics earlier on The forked part at top leans toward the back hand wheel and the bottom leans more toward the front of the machine,so I am cautiously studying the mechanism,to why?its not straight down, I also sending picks because there are no adjustment STOP collar`s that you usually find on this bar, well on a 7-33 there`s at least one, but not sure on this suspected double needle 7-39 , should there be any ,?and pic of the slated forked at back, I have removed pin and grub screw holding the race basket because I do want to remove it as some one had done some weld to the ends and not smoothed of well for my liking ,but also means removing the outer feed dog moving things , also just realized now why the forked thing is leaning on the two picks it showing the adjustment is looking to far over to the right Quote
Members 1985 Posted January 16, 2024 Author Members Report Posted January 16, 2024 7 hours ago, 1985 said: Quote
Members 1985 Posted January 16, 2024 Author Members Report Posted January 16, 2024 Just now, 1985 said: So after examining all part the left feed dog holder is slanted, does not really show on photo, the forked is slanted and the first rod just after hand wheel is slightly slanted, it is like every think needs moving over to the left ,I have a feeling who ever set this never had a good eye for alignment, or thought it works so its okay,or the casting is out slightly out and all been adjusted to the casting to work, So ignoring where I point my finger that is not what I thought on first looking ,my bad,the play in the shuttle holder that bar i think may of had a big collar with grub screws ,there is also a groove in the metal bar where I thought cir clip may of gone but to wide for that, , its puzzling that bit, any one now how to get rid of photos i don`t want in as I keep accidentally allowing duplicates Quote
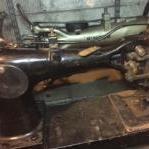
Members 1985 Posted January 17, 2024 Author Members Report Posted January 17, 2024 (edited) 18 hours ago, 1985 said: So after examining all part the left feed dog holder is slanted, does not really show on photo, the forked is slanted and the first rod just after hand wheel is slightly slanted, it is like every think needs moving over to the left ,I have a feeling who ever set this never had a good eye for alignment, or thought it works so its okay,or the casting is out slightly out and all been adjusted to the casting to work, So ignoring where I point my finger that is not what I thought on first looking ,my bad,the play in the shuttle holder that bar i think may of had a big collar with grub screws ,there is also a groove in the metal bar where I thought cir clip may of gone but to wide for that, , its puzzling that bit, any one now how to get rid of photos i don`t want in as I keep accidentally allowing duplicates Have had to remove parts to get the drive hook out, On removing the Lower rock shaft crank part number 58335 belonging to the possibly singer 7-39, I noticed a crack, I suspect might be cast iron so may be tricky to weld,so looking for alternative , I seen some pics similar to my damaged one but not sure if they will fit, but they seem to be mostly in America sites ,when putting in for this part these come up on the web,does any one know if any of these can be a replacement,but I will show pics of my cracked part , and what comes up on web, Edited January 17, 2024 by 1985 Quote
Members 1985 Posted January 19, 2024 Author Members Report Posted January 19, 2024 On 1/17/2024 at 12:44 PM, 1985 said: Have had to remove parts to get the drive hook out, On removing the Lower rock shaft crank part number 58335 belonging to the possibly singer 7-39, I noticed a crack, I suspect might be cast iron so may be tricky to weld,so looking for alternative , I seen some pics similar to my damaged one but not sure if they will fit, but they seem to be mostly in America sites ,when putting in for this part these come up on the web,does any one know if any of these can be a replacement,but I will show pics of my cracked part , and what comes up on web, Well decided to make one from mild steel from my old multi gym plate , Using a press drill, an hacksaw , Disc cutter disc, sander disc ,files and wet and dry, I wish I had a metal lathe but never learnt to use one, it was the exact size as the original until I got carried away with the disc sander on the out side on the smaller section ,but worked great,after I gave it a final polish with compounds, A bit worried about it rusting so might have to quench in warm oil then wax and grease it, Quote
Members 1985 Posted February 18, 2024 Author Members Report Posted February 18, 2024 Thank you so much, to all of you for great advice and assistance and specially to some in particular who stuck with assisting me with several concerns I had with this singer twin needle 7 class. Machine is running smooth stitches well so all great now, But one of my question were ` why is there shiny marks on the rear and front cams this was one of my major concerns as it looked like metal on metal rubbing in certain areas causing or wear on these spots and because they looked new from the rest of the cam material, I had been told its normal wear, But in my case this info was not correct as I later found why this happened, When I got the machine the hand wheel was bolted quite away from the back of the cast body, this allowed to much play forwards and backwards on the horizontal shaft that had the cams were on, it was`t until removing the wheel and replacing it back I realized it would not go up to the end due to a nick in the horizontal shaft,after removing the nick on that part the wheel went up to its correct position,butting up to the rear end of the cast body. "knowing that now, this stopped the play back and forth to the shaft and stopped the hand wheel having to much intermittent stiffness and ease while rotating when not under tension and no load, So obviously not knowing that the hand wheel was not placed all the way up to its correct position and I not recognizing this being new to sewing machines, could of been seen as wear if all fixings were in place correctly and given its age very understandable from the answer given, but sorted now, And I think it was Bob who said when cleaning don`t bother stripping parts all they can break, well in my quest to clean and adjust , you were correct,I never realized that one of the parts were cast steel and it had a crack in it ,I assume I over tightened that part,hence pictures above me making another from steel, This material is not cast iron and possibly Will be prone to rust more than original piece . but if could not find a original replacement, but all good in the end. Quote


Recommended Posts
Join the conversation
You can post now and register later. If you have an account, sign in now to post with your account.
Note: Your post will require moderator approval before it will be visible.