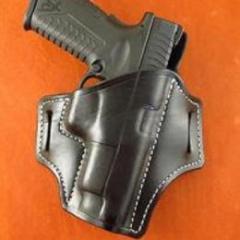
Contributing Member SooperJake Posted August 13, 2012 Contributing Member Report Posted August 13, 2012 (edited) I made this one for an XDM 4.5BBL .45ACP I've ordered an oblong punch because I'm not happy with punch/knife cutting. I just can't seem to get a clean look. Hand stitched Hermann Oak with neetsfoot oil/ tan kote finish. I finished the inside with Resolene . Crummy cell phone camera...I need to shop for a good camera. Jake Edited August 13, 2012 by SooperJake Quote Once you know what the magician know.... it isn't magic anymore.
Contributing Member TwinOaks Posted August 13, 2012 Contributing Member Report Posted August 13, 2012 Looks very nice! The only 'structural' thing I would alter is the amount of leather on the outside of the belt loops. A thin section there might be subject to more stretching than a thicker piece.....probably would depend on the circumstances. Quote Mike DeLoach Esse Quam Videri (Be rather than Seem) "Don't learn the tricks of the trade.....Learn the trade." "Teach what you know......Learn what you don't." LEATHER ARTISAN'S DIGITAL GUILD on Facebook.
Members katsass Posted August 13, 2012 Members Report Posted August 13, 2012 (edited) I made this one for an XDM 4.5BBL .45ACP I've ordered an oblong punch because I'm not happy with punch/knife cutting. I just can't seem to get a clean look. Hand stitched Hermann Oak with neetsfoot oil/ tan kote finish. I finished the inside with Resolene . Crummy cell phone camera...I need to shop for a good camera. Jake From the grump: Well, I use the punch method, but use a set of inexpensive wood chisels from Harbor freight to cut between the punched holes. They go from about 1/4" up to 1 1/2" in width. One whack with a suitable mallet, hammer, large rock or Ma's kitchen mallet on each side works well. Nice clean cut, and perfectly straight. As to your loops I'd move them in a bit -- that skinny chunk of leather on the outside of each loop is all that holds the weight of the gun, and in this case, more is better. That skinny strip will stretch out in a hurry. Mike P.S. Round that stitch line under the trigger guard -- it'll look a pot-load better. Edited August 13, 2012 by katsass Quote NOTE TO SELF: Never try to hold a cat and an operating Dust buster at the same time!! At my age I find that I can live without sex..........but not without my glasses. Being old has an advantage.......nobody expects me to do anything in a hurry.
Contributing Member SooperJake Posted August 13, 2012 Author Contributing Member Report Posted August 13, 2012 (edited) Yes, I agree...I altered the pattern to add leather to the outside of the loops. I punched an end hole and then it dawned on me I was too close to the edge, so I made it look balanced anyway. Thanks TO! Thanks Mike! Jake Edited August 13, 2012 by SooperJake Quote Once you know what the magician know.... it isn't magic anymore.
KAYAK45 Posted August 13, 2012 Report Posted August 13, 2012 STOP YOUR BITCHEN. No need for a camera. Just keep makin good stuff. Looks good to me. Quote Once believed in GOD and the DOllAR...... Hello God!
Contributing Member SooperJake Posted August 13, 2012 Author Contributing Member Report Posted August 13, 2012 (edited) The left hand picture is more true to color BTW...It is a nice fawn brown color. Jake Edited August 13, 2012 by SooperJake Quote Once you know what the magician know.... it isn't magic anymore.
Contributing Member SooperJake Posted August 13, 2012 Author Contributing Member Report Posted August 13, 2012 LOl Thanks Kayak! Too late though..I just order a Canon S100. I want my damn Nikon back, along with the rest of my stuff some mofo stole from me back in 2010!~ Jake Quote Once you know what the magician know.... it isn't magic anymore.
Members renegadelizard Posted August 13, 2012 Members Report Posted August 13, 2012 LOl Thanks Kayak! Too late though..I just order a Canon S100. I want my damn Nikon back, along with the rest of my stuff some mofo stole from me back in 2010!~ Jake Hey Jake, 2 things for whats it worth...watch your tool marks when molding...if you slip and get a line thats not exactly right, rub it out with your fingers until the leather is smooth again or use a modeling spoon to smooth it out, and fingernails are hell on wet leather, so trim them stupid close to the quick...the second thing is the stiching groove...ive played with making the stitching groove all the way around the holster, and it just looks odd to see a groove with nothing in it...even if its nonfuntional, throw some stitches in there to make it look finished.. Quote Havoc Holsters
Contributing Member SooperJake Posted August 13, 2012 Author Contributing Member Report Posted August 13, 2012 Thanks,Lizard. On some of my earlier holsters I did just that...stitch all the way around. And I agree. Without that little bit of stitching it looks "unfinished". But there is a reason why this time I didn't do it. I've been trying to come up with a way to get a more accurate stitch line on the first try, and I think I may be on to something. Normally I would make the pattern in the usual fashion, just like you would see in Eric's AWL videos, for instance. But every time I made a pattern I seemed to lose the crispness of form in the stitch line along the trigger guard. In particular, the area at the front corner of the guard where it transitions back to vertical. It always ended up with too much space left over. Which got me to thinking " How can I make this mimic the gun lines better, and make the pattern a little easier than guesswork?". So what I did this time was to trace the trigger guard area with a .5mm mechanical pencil lead extended out far enough for the pencil body to clear the gun. Just the pencil lead touched the gun. Very carefully trace around the lower area without breaking the lead. Then, I marked the upper slide line in the same way. Next I added the full gun width plus 2 leather thicknesses to the upper slide line, shifting over that distance. Pretty darn near perfect fit. Almost too good, as Mike points out on the unrounded corner at the trigger guard in that stitch line. I even fudged out a lot of the detail I had traced to get the current line. Like the rail mount area, which all showed up on the pattern. It may not be revolutionary, but it worked for me. So I didn't stitch those areas at the mouth and toe, because I was anxious to see if my idea would work. Now, there is no need to adjust the curved stitch line which mimics the gun's line well. You just tweak the straight line on the other side for fit, except I need to round that one corner. Jake Quote Once you know what the magician know.... it isn't magic anymore.
Members D Fingers Posted August 14, 2012 Members Report Posted August 14, 2012 I like the stitching groove without stitches I do it on all my holsters now. I might be more inclined to stitch it if I had a machine but I don't. It looks more finished than if there is no groove at all that is for sure. Quote


Recommended Posts
Join the conversation
You can post now and register later. If you have an account, sign in now to post with your account.
Note: Your post will require moderator approval before it will be visible.