Jazznow Report post Posted April 18, 2013 Very cool stuff you did Regalto. Cant wait to See it dyed. Btw. I think I have that stamp in my collection. Wil try it definitely. King domino: that harlequin is so cool. Keep us updated how you go on. Share this post Link to post Share on other sites
Jazznow Report post Posted April 20, 2013 Hi folks I did some detail work today and matted the areas around the moon and the gravestone. I'm thinking about matting the area around the hand too. What o you think? Here it is: Thae I did some experiments on texture for the gravestone. Have a look and tell me what you thin looks best. Pear shader E294 Ball point modeling tool Sandpaper Have a nice weekend Jonathan Share this post Link to post Share on other sites
DoubleC Report post Posted April 20, 2013 Hi Jonathan. I can't believe how far you've come on your project. I'm really feeling bad about mine now I really really like your design. As far as the shading on the grave stone I liked the sandpaper a lot if it doesn't run outside of the stone. And I also liked the E294 a lot too. Actually all of them looked good. I'm sorry I can't be more help on that but I just really like all the looks, don't think you can go wrong no matter what you do. Cheryl Share this post Link to post Share on other sites
KingDominoQ Report post Posted April 20, 2013 I think the sandpaper looks pretty darn good. Can't wait to see it finalized On another note, with the way my month has been I am going to have to push the steam punk challenge back a month... Too much going on with my normal job I haven't had time to work leather and I will barely be able to start this months challenge. Share this post Link to post Share on other sites
DoubleC Report post Posted April 20, 2013 Don't worry about it Q, I'll see if Rae Nae will step in with her lesson she's going to do on portraits. I can't do people at all and she's pretty amazing. Then we'll just move the schedule forward a month. I have been cleaning and organizing my house for two days now, I just couldn't work in the mess anymore. Not hard but time consuming when you leave things lying around instead of putting them where they belong Cheryl Share this post Link to post Share on other sites
Harley Corns Report post Posted April 23, 2013 Here's what I've accomplished so far on the whale tail. I didn't get quite the depth I'd hoped for with my beveling. (Might have needed more casing) Some light embossing gave me a little more 3D effect. I'm hoping that with a little creative use of some stamps and petal lifters, the water will come to life Still contemplating how to create the texture of the whale skin...possibly a hair blade? Share this post Link to post Share on other sites
DoubleC Report post Posted April 23, 2013 Hi Harley. I went back and looked at the picture so I could see if I could help. Since that it as pencil sketch the lines were drawn to shadow the parts that are shaded from the sun. I don't think they should be lines in leather though. You want the underneath of the tail more burnished than the top where the sun would hit it. I think I would use something smooth to do that since a whale doesn't really have lines on it's skin. I think I'd practice with a pear shader used lightly on all of the underneath or a spoon, or maybe even a background tool which might add dapples from the water and sun that would hit in spots on the underneath. Practice on something else first though to see what looks the most natural for whale skin and sun shaded. And the top curve of the tail would be shaded like in the picture if the sun is coming from the left or straight down. If the sun is coming from the right the underneath wouldn't be as shaded as in the original. I hope I'm making the least bit of sense. If you even use a lamp and play around with say something that stands upright maybe it will make more sense, like a glass or a vase. look at where the shadows are if you use a glass and a small piece of cardboard or a playing card, anything to indicate the end of the tail shadowing the side of the glass. You did an excellent job on this and I'm very excited about seeing it done. Cheryl Share this post Link to post Share on other sites
Jazznow Report post Posted April 23, 2013 Hi harley corn. I agree with double c. A hair blade wouldn't look natural. Here tips are great. What you could try on some scraps is roughening the leather in the parts that arent hit by sunlight. USe ome very fine sandpaper I think it would turn out darker after dyeing. Best wishes Share this post Link to post Share on other sites
DoubleC Report post Posted April 23, 2013 This is ground control to major Tom. I had a couple of things I wanted to say about this challenge. I'm making a portfolio and I've punched 152 lacing holes in each side of it. 1, well because I hate doing that so decided to get it out of the way. 2, because it allowed me to put off doing my actual design a little longer. I want to tell you what a pleasure it's been getting to know each one of you a little better. You've been absolutely fearless about this in a way I'll never be about a new project. I always approach it with excitement and anxiety. I have watched each of you throw yourself into this with abandon and I hope that's something I can personally take away from this. Reg even streamed his tooling of the project which I would never think of doing at least not where I am at this point in my life. I've put off everything for as long as I can so I am actually setting up to start the design but I just wanted to thank you folks. Cheryl Share this post Link to post Share on other sites
DoubleC Report post Posted April 23, 2013 OK horse needs help, any and all comments from you guys welcome. Share this post Link to post Share on other sites
Harley Corns Report post Posted April 24, 2013 (edited) Nice start Cheryl. ...your tough design decision is now history. If it were me....I think I'd do some really forceful beveling on the outline cuts. Double bevel all the lines where the horse is exiting the glass. Emboss the central portions of main body/Lt .shoulder boldly...then in a diminishing degree down the Lt. leg. Emboss the front chest ...& Rt leg. Save the rest of the mane until last.... with light uniform Swivel knife cuts and/or hair blade. Edited April 24, 2013 by Harley Corns Share this post Link to post Share on other sites
Harley Corns Report post Posted April 24, 2013 Thanks folks for the input. I hear what you're saying about the hair blade and burnishing. Still contemplating my approach on the surface texture of the tail,and the water . I attached a couple close up pics to show what I'm looking for. The top one has distinct lines flowing out toward the tips ends of the tail.(which are counter to the water flowing off) Where as in the lower example the lines appear to be just the water flowing off the tail Ultimately,(another challenge down the road) , my plan is to try and finish-highlight with colors, in hopes that I can create a wet look and bring the viewers attention-focus to the splashing,flowing,dripping, water. But right now I'm still toying with how best to texture the tail to represent the water flowing off..into a spray....and droplets. And By the way.... Thanks Cheryl for ram-rodding this challenge.... Its my first time to participate,and probably not my last. What I've already learned through seeing and reading about what you and the other participants are doing, has been well worth the price of admission. A tip of the hat to you ! Whale tail texture.doc Share this post Link to post Share on other sites
DoubleC Report post Posted April 25, 2013 Nice start Cheryl. ...your tough design decision is now history. If it were me....I think I'd do some really forceful beveling on the outline cuts. Double bevel all the lines where the horse is exiting the glass. Emboss the central portions of main body/Lt .shoulder boldly...then in a diminishing degree down the Lt. leg. Emboss the front chest ...& Rt leg. Save the rest of the mane until last.... with light uniform Swivel knife cuts and/or hair blade. Thanks Harley, the tooling isn't done yet and I have a lot to do. I was discouraged by the image itself and just plain sick of it so put it up for a day, but will be back at it by Friday. I know what emboss means but not in this context. Can you explain? Thanks, Cheryl Share this post Link to post Share on other sites
DoubleC Report post Posted April 25, 2013 (edited) Thanks folks for the input. I hear what you're saying about the hair blade and burnishing. Still contemplating my approach on the surface texture of the tail,and the water . I attached a couple close up pics to show what I'm looking for. The top one has distinct lines flowing out toward the tips ends of the tail.(which are counter to the water flowing off) Where as in the lower example the lines appear to be just the water flowing off the tail Ultimately,(another challenge down the road) , my plan is to try and finish-highlight with colors, in hopes that I can create a wet look and bring the viewers attention-focus to the splashing,flowing,dripping, water. But right now I'm still toying with how best to texture the tail to represent the water flowing off..into a spray....and droplets. And By the way.... Thanks Cheryl for ram-rodding this challenge.... Its my first time to participate,and probably not my last. What I've already learned through seeing and reading about what you and the other participants are doing, has been well worth the price of admission. A tip of the hat to you ! I see a whale actually does have lines and I love the shadowing on those pics, excellent example. If you could find one facing the direction of yours it would show you what I tried so ineptly to explain. As for the wet look you could burnish it, leave the leather naturally colored and just put a finish on it. Or you can paint the picture which would be awesome using color and light but quite another lesson I hope to have on here. Thank you for your kind words. I've been told I'm running this 'wrong' because I didn't do it the way it was done last year. If people are having fun and learning then how can it be wrong? Thank you for joining us on this journey. Cheryl Edited April 25, 2013 by DoubleC Share this post Link to post Share on other sites
Harley Corns Report post Posted April 25, 2013 I know what emboss means but not in this context. Can you explain? Thanks, Cheryl Like what I did on the whale tail... I used a modeling tool with two different sized ball tips on the ends.... rubbing it on the flesh side within the beveling... raising and forming the shape of the horses body. Share this post Link to post Share on other sites
DoubleC Report post Posted April 25, 2013 Oh Harley that will make it easier to give it definition. I use a stylus with a ball end to trace the patter, then go back over it with the stylus after i have the pattern on the leather so I'll just do that again next to the cuts to make them stand up more. What I good idea, wouldn't have thought of that. Thanks Harley. Cheryl Share this post Link to post Share on other sites
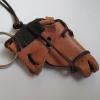
Regalto Report post Posted April 25, 2013 So here is my fully finished submission as well as a perfect example of how paint in my hands absolutely ruins a good carve and tooled piece of leather. This is why all my projects are usually 1 single color.... However here it is. Did not apply a finish to it yet but will probably put acrylic resolene on it then nail it to the workshop wall just because.... So yea...enjoy.... -Chris Share this post Link to post Share on other sites
DoubleC Report post Posted April 25, 2013 Chris I hope you do put it on your workshop wall because you did an excellent job. The only thin I could suggest is you put some brown in your red to make it look more 'dried' on the ground. I'm so impressed and glad you joined us. Please join us again next month when Rae is going to tech us to do people or faces, your choice. Great job, cheryl Share this post Link to post Share on other sites
Regalto Report post Posted April 25, 2013 Didnt go for dried since it is pooling due to dripping off hammer Share this post Link to post Share on other sites
DoubleC Report post Posted April 25, 2013 Oh well that makes sense Chris. Share this post Link to post Share on other sites
Regalto Report post Posted April 26, 2013 Johnathan my submission has the E249 for the hammer. There it is with acrylic paint over it. Gives that nice rocky texture. Share this post Link to post Share on other sites
Jazznow Report post Posted April 26, 2013 Thanks Regalto I like your carving very much. You should definitely put it on your workshop wall. And i think you Did a good job on painting it. I'm thinking on how to paint my stuff. Currently I think I will give the cloud and the hand itself a resist (will several layers of resolene resist oil dye?). Moon will be dyed with deluted yellow, earth with different shades of brown. Background black maybe with a coat of blue under it. Stone maybe black too but with a coat of white under it to make it gray. Do you all have any suggestions or different ideas? Greetings Share this post Link to post Share on other sites
Harley Corns Report post Posted April 26, 2013 Your project worked out well Regalto. Not sure what your mental image was for the coloring...but I think what you've done works fine. The colors enhances your tooled design. And since you're finished with 4 days to spare....there's still time for a second entry.... Share this post Link to post Share on other sites
aguilerag Report post Posted April 26, 2013 I know its the 26Th of April but I have this sketch of mine that I think would work for this breakthrough challenge. The concept when I did it is of someone freeing there mind so that would be the breakthrough LOL!!! Does that count? I have never done a womans face before so I think this will be interesting. Share this post Link to post Share on other sites
Harley Corns Report post Posted April 26, 2013 Greetings aguilerag Nice drawing . It'll be cool to see in leather too. I've never done a face before either....so I'm interested to see what I can learn from your experience with this project. Share this post Link to post Share on other sites