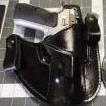
Members OLDNSLOW Posted February 21, 2016 Members Report Posted February 21, 2016 2 holsters, 1 of the holsters is the second holster I have made the one that doesn't have belt holes punched has since been finished and is out on display in a shop. Since the completion of these, I have been working on more of the pancakes, these are all my own patterns and now have more molds to work with. I picked up a box of 12 molds from multi molds, every now and then they will sell of a box of what they call their rejects for 100.00 so I scraped the cash together to get a box. Although none of these came from those, I just now have something to work with so that I can get some done and out on display in some of the shops where I have been spending money with. The pancake was airbrushed along with a highlighter, when wet formed some of the die shifted that created the finished color. Quote
Members katsass Posted February 22, 2016 Members Report Posted February 22, 2016 (edited) Well, OLDNSLOW, (I be the same, only more so lately) you are on the right track. There are a few points that I feel just might give you a hand in your efforts. First off -- No sharp corners Pointy corners will, in very short time. get bumped, banged, and frayed. That don't look good. Round those puppies over and make nice smooth curved changes in direction when drawing and cutting your patterns. Next, you obviously spent a good deal of time in doing the stamping. tooling, (whatever you want to call it) the working of your pattern into the face of your project. Let's look at it. It is your artwork, it's not just a bunch of impressions stomped into the leather -- it's artwork. For artwork, you need a frame. I suggest that on your next one you mark a line about 5/16 to 1/2 inch in from the cut edge of the leather OR where you will stitch on the inner portion of your rig. . Whip a swivel knife along that line then use a beveller to sink the inside edge of the cut. Bingo you now have a frame -- sort of. Make a frame around each area that you will apply your tooling. You have not marked where the belt slots will go and these should be marked and cut prior to stamping. I think that you would be much happier with your effort if you split up the area to be stamped into three separate sections -- the center (main area) and each side, where the belt loops should be. Each area will need it's own 'frame' like I mentioned. Do your work inside of each 'frame' for a more finished look. When you are pretty well done cutting, stamping and stitching you would then smooth the edges and burnish. I don't do much (if any) tooling anymore -- used to -- but I prefer inlay work. You seem to have done a pretty good job in that area but since I don't do that sort of thing, I don't comment on it. I kind of know a bit about hand stitching ,and strongly believe that stitching is supposed to be seen. I can't see your stitching at all since it blends into your stamp work, so again -- no comment. The one thing I would suggest, if you plan on doing more holsters, is get Al Stohlman's book on 'How To Make Holsters. It has all kinds of good info and 'how-to' stuff for around $15 or less. Most all of the holster makers I know own their copy -- mine is a bit creased, crumpled and coffee stained since I bought it in the 50s. You are well on your way, with a bit of 'tweeking' here and there you will be really doing work to be proud of. Keep it up. mike Edited February 22, 2016 by katsass Quote NOTE TO SELF: Never try to hold a cat and an operating Dust buster at the same time!! At my age I find that I can live without sex..........but not without my glasses. Being old has an advantage.......nobody expects me to do anything in a hurry.
Members doubleh Posted February 22, 2016 Members Report Posted February 22, 2016 Katsass said everything I could and probably better than I. +1 on the Al Stholman book. If you need an answer for something concerning leather work Al has a book about it. Quote
Members OLDNSLOW Posted February 22, 2016 Author Members Report Posted February 22, 2016 Thanks for the input, I was beginning to wonder if I was going to get any, even if it was a you suck. But I have been working on the rounding off the corners, as well as the stitching, I was under the impression I could go 1 thread size up with my machine but for what ever reason my machine wont pick up the bobbin thread when trying to us the next size up, I have thought about buying that book but every time I get to Tandy's I forget about it, but I do need to get it and a few other books, this is only my third belt with tooling that got to the finish line the others ended up in the trash, even I could see the terrible in them. As well as the holsters these are the third and fourth that made it to the finish line. Thanks for the comments please keep them coming as again I am just a noob and a little old and slow. Quote
Members katsass Posted February 22, 2016 Members Report Posted February 22, 2016 (edited) Well, for what it's worth, I'm a little strange maybe, but I MUCH prefer hand saddle stitching over machine work - even if I do have access to a good antique machine for use anytime I would want or need it. Hand stitching takes a pot load more time to do things by hand, but I prefer the appearance. mike Edited February 22, 2016 by katsass Quote NOTE TO SELF: Never try to hold a cat and an operating Dust buster at the same time!! At my age I find that I can live without sex..........but not without my glasses. Being old has an advantage.......nobody expects me to do anything in a hurry.
Members OLDNSLOW Posted February 22, 2016 Author Members Report Posted February 22, 2016 (edited) I have tried my ( hand ) at some hand stitching but, my hands are not what they use to be. One too many cold nights of picking up frozen wrenches to get something rolling, is now taking its toll and after a few hours of stitching it takes me some time to recover, maybe a day or two, so to try and do it day in and day out, I would probably be out of the game so to speak. So the next best option is to machine sew, at least for me at this stage in my life. However I want to be able to crank out the best product I can with what I have. The learning curve hasn't been to bad but even doing the hand stamping takes it's toll on my wrists as well so not sure how much of that I would be doing unless I spread it out over a few days, but then again therein lies another question, will letting the leather dry and then wetting again have any negative impact on the leather? Thanks Edited February 22, 2016 by OLDNSLOW Quote
Contributing Member JLSleather Posted February 22, 2016 Contributing Member Report Posted February 22, 2016 these are all my own patterns and now have more molds to work with. I picked up a box of 12 molds from multi molds, every now and then they will sell of a box of what they call their rejects for 100.00 so I scraped the cash together to get a box Nice.... good to see a guy jump in and start - that's where the REAL learning comes from. I WOULD agree that the book is worth having, but in the end you learn it by doing it. And long as the molds are dimensionally correct, that's one step from stealing Pitted composite, or trigger that didn't mold in all the way, or sight that didn't form so great .. so what?@#!@#!! Good find! Quote "Observation is 9/10 of the law." IF what you do is something that ANYBODY can do, then don't be surprised when ANYBODY does.
Members OLDNSLOW Posted February 22, 2016 Author Members Report Posted February 22, 2016 Thanks JLS, and thanks for the wallet patterns I downloaded all of them that are up, ya I went and checked the molds of the guns against what the actual was suppose to be and some were thicker or just under in either the trigger guard or slide area but only by the thousands, ya I am the kind of person who learns by doing I can read all ya want and watch a whole bunch, but until I do it that's when it all sinks in and learn from the mistakes and sometimes repeat till I get hit in the head with a wake up moment. Quote
Members SLP Posted February 23, 2016 Members Report Posted February 23, 2016 I'm fairly new to this whole thing as well, but in the spirit of repaying the debt I owe to everyone on this forum I will add my two cents. As far as spreading the tooling out over several days, I have had fairly good luck with placing the piece in a plastic bag to retain the moisture. When I have allowed it to dry and then re-wet it, I have not noticed any ill effect, but it seems a bit easier to seal it in a bag and let the moisture remain. Quote


Recommended Posts
Join the conversation
You can post now and register later. If you have an account, sign in now to post with your account.
Note: Your post will require moderator approval before it will be visible.