


ThisIsMyFirstRodeo
-
Posts
64 -
Joined
-
Last visited
Content Type
Profiles
Forums
Events
Blogs
Gallery
Posts posted by ThisIsMyFirstRodeo
-
-
On 6/30/2025 at 4:29 AM, TomE said:
It's been a few years since I priced pricking irons. These particular irons are well made and should last a lifetime for marking, not punching, holes. An overstitch wheel will do the job as well.
Have you found a quality wheel? I’ll admit that mine are bottom-of-the-barrel price and most likely quality to match, but the few I’ve found don’t necessarily match the spacing of my irons, and tend to wobble on the axle.
AZR
-
On 6/30/2025 at 5:43 PM, DJole said:
Okay, that certainly helps narrow down what you need! You don't have watch straps on there, for example, which use much smaller irons and thread.
So, it looks like maybe 4 to 5 mm would match the leather thicknesses required for those items, for strength and visual proportions.
It's unclear if you're going for a set of pricking irons (which merely mark the holes with a slit, which are completed by a stitching awl), or a set of Japanese style diamond chisels (which go through both layers, making a narrow diamond hole that usually doesn't require an awl).You also need to make sure to match your needles and thread to the hole size and spacing.
Here's a quick chart that I cribbed from somewhere else, which helps me match them up:John James Needles Threads Size Size Length (mm) diameter (mm) Tiger/Ritza (mm) Lin Cable 4 004 48 0.4 0.6 532/632/832 2 002 54 1 0.8 432/332 0 1/0 57 1.1 1 00 2/0 57 1.3 1.2 000 3/0 62 1.6 Most of what I do falls in the middle range -- for my 3mm diamond irons, I use the 1/0 needles, with either .8 or 1 mm thread.
For thicker projects, the 5 mm irons are what I pull out, with correspondingly larger needles and thread.Thank you for the table, great reference. I use almost strictly 1.2mm Ritza myself, but still use basic blunt harness needles. My hand stitching is improving though, so it may be time to start practicing with more delicate techniques.
As far as the range of irons, I’ve seen a few different descriptors, and per Nigel Armitage, there are a handful more that I haven’t come across yet, primarily of various European styles.
Any insight into this? I haven’t bitten the bullet yet to experiment myself , as $60-$100+ per iron is a rather pricey let’s-see-what-happens, and I don’t know any other leather workers enough to ask to borrow their tools… Primarily, I guess between stitching chisels vs stitching irons, and stitching vs pricking (though that’s a little more obvious). Or to step up my overthinking skills, Jap vs French vs Brit vs etc. Nigel does have a detailed text comparison of irons here https://armitageleather.com/wp-content/uploads/2021/12/Pricking-Iron-Review-Jan-2020.pdf, though he doesn’t define here the styles, or identify which irons are what.AZR
-
On 6/24/2025 at 4:27 AM, TomE said:
I use an overstitch wheel or these pricking irons to mark holes https://www.rmleathersupply.com/products/rocky-mountain-premium-pricking-irons. I make the holes with Osborne sewing awls of various sizes. A sharp awl works well for thick leather, irregular shapes, and sewing under fixed loops/keepers. The awls get smaller as they are repeatedly sharpened, so I can match a range of thread sizes.
Is that the price point to expect for stepping up from entry-level? Clearly they can go much higher, but just to know what to expect…
AZR
-
On 6/15/2025 at 1:36 PM, ThisIsMyFirstRodeo said:
As a follow-up, my steel wool vinegaroon has turned dark gray, with a fair bit of sediment, and the wool, though floating (air contact), has minimal orange oxidation. If I give it a swirl, it’s opaque almost black, but it settles again pretty quickly.
My SS jar turned a golden color, still letting it roll to see where it goes.
I also started a fresh jar today of steel wool to attempt the clear ‘roon, as well as a jar with a copper scrubbie, but I may have had a little soap left, as bubbles came to the surface. Spooned out, hoping for the best.
I had read somewhere about sunlight speeding the process (maybe going back to the note about heat…), so I have all 4 jars sitting in the AZ sun right now. After a few hours, my 1st steel wool ‘roon is staying much closer to an opaque charcoal gray right now, and for some reason, my SS jar has lost all golden color and is now clear again. (Thoughts from the chemist crowd?)Hooray observation analysis!
AZR
-
Hey all,
So I broke my arm a couple weeks ago, and I’m tired of teasing myself by just staring at my workbench. I do at least have use of my dominant hand, so I did luck out in that department, but all of my hobbies seem to require 2 hands.
I’m sure there are some of you with a similar experience, but how do I modify leatherwork to be conducive to 1 working arm until I get my cast off? Is it even feasible?
Unfortunately, my bandsaw is disassembled to repair, and I can’t break the nut loose on my grinder to replace the stone with a buffing wheel, so I feel like I may be SOL (hope im not censored) on the power tool side.
Any tips/tricks/hints/advice welcome, even if it’s not to bother.
Guess it’s back to my first rodeo,
AZR -
Hey all, question for those smarter than me…
Is there a way to adjust the color of the edge paint to a more desirable shade? I’m stuck somewhat housebound for the time being, so I’m trying to work with what I have…
(Insert “first rodeo” line here…)
AZR
-
Mask off the edges with tape, making sure that the edge being painted/glued is pressed down tightly. If you get an overbrush, give it a quick wipe with a damp rag. Take the tape off quickly before it dries to keep the edge line sharp. If it dries, it may pull some of the paint away.
It might as well still be my first rodeo, but it’s what has worked for me so far…
AZR
-
So I did the dollar tree run, but the scrubbies I grabbed were SS not steel wool. Finally got some wool today to start over, but lo and behold the vinegar was tinting! Yellow, not black, but hey. So I’ll let that go and see what happens while I start another jar with wool
clearly my first rodeo,
AZR
-
Back to the drill press…
Troubleshooting 101: Grab a level and square to test the surface geometry…
Sure enough, the press plate has a 4”crack visible, and although the area at the post is square, the rest is off-kilter, and therefore is currently impossible to give a vertical drive in relation to the plate.
So yet another waste of a sheath…EXCEPT I was able to cut the welt loose along the glue line (and who says you can’t separate Barge lol…), and perhaps I can salvage the body with a fresh welt, though at this point, the stitch lines may be purely decorative and the body secured with more Barge and some rivets… We shall see…
-
Thank you all for the input.
I wound up dying when it was just shy of damp, still cool to the touch.
I dyed what I guess is becoming my “signature” finish, but in a different method than usual.
Didn’t turn out bad, by any means, but not exactly how I was intending. I don’t know if it was moisture, method, or a combo of the two. I think I nailed it down pretty close to my others though.
Thank you again,
AZR
-
Hey all, I have a somewhat hypothetical question about dying leather…
Has anyone attempted to dye while the leather is still damp from casing? What were your results?
I imagine it would be different results for water-based than oil-based, and while I have used water-based (Eco Flo), I usually work with Fiebing’s Pro.
Right now, I’m staring at a sheath I just finished tooling, and I’m getting antsy to keep working, but it’s still relatively saturated (rookie move, still learning). Which is where my question comes. I’m still going to wait until it’s dry, but I was hoping to hear (and learn from) other people’s successes and failures on the subject.
Still feels like my first rodeo,
AZR
-
1 hour ago, larry1096 said:
Yes, as I mentioned you can use gum trag or other edging compounds to 'paste' the flesh side of leather. (I understand the confusion, by the way; generally, when folks say 'suede' I think the average leatherworker thinks of a split piece without a grain side remaining.)
Still, to make it weather/wear proof, you're going to need a topcoat on it, like Resolene or M&G.
Larry
Will edge paint do the trick to seal the flesh? (I use Fiebings leather sheen or eco Flo super shene for a top coat on the grain…)
-AZR
-
20 hours ago, DJole said:
I have one set of Japanese style 3mm irons with a matching set of 3mm REVERSE irons, in which the slots are angled the other way. (/ / / and \ \ \, to roughly illustrate.)
I have found the following steps useful, especially on thicker pieces:
1) Before putting the 2 pieces (or edges) together, use dividers to get a nice straight line, and use the irons to punch one side of the piece, not both. I'll call that the front side. Be sure that the irons are VERTICAL, so the holes go straight without any wobbling. I find that I am much more consistent with the irons running along the line away or towards me (rather than across), since I can just see the vertical better.
2) Tape/glue the front and back sides together.
3) Use the pre-punched front side as a GUIDE, and re-punch every 5th or 10th hole with a single prong, or a diamond awl, going all the way through the pre-punched front layer just enough to show on the reverse side.
4) Use dividers on the reverse side to mark a stitching line equal to the front side margin. That line should consistently cross the guide holes.
5) Use the reverse irons, and the guide holes, to create the stitching line on the back side. The reverse irons should match the pre-punched front side holes, since they are a same spacing.
6) Now I am ready to stitch, using the advice given above about consistency in needle technique.Where did you find the reverse irons? Inquiring minds are blown! I had been thinking about why reverse irons weren’t a thing, and this is literally the first time I’ve heard of their existence.
As far as your process, I had been using a similar method (I think). On my next piece, I’ll try your method. As far as my stitching itself, it’s adequate enough to be acceptable, but I’m not going to focus on it until I can get the holes right. Baby steps…
Just tossing out the method variation that I used on my current piece, last night I marked/drilled the stitch line on the welt first, and used it as a template to mark the holes from the grain on both sides before I punched. This particular piece I am only riveting, and so far they line up, but rivets don’t need the accuracy of stitching. Still need to dye it, so I haven’t actually set the rivets yet, but so far I’m feeling positive about it.
Just a continuation for Dwight and Dikman, I was playing with the press punches again last night. It does seem that the torque from the rotation can pull on the leather closer to the edge and give a more oval hole. On that basis, I do prefer normal drill bits.
I’ll play with using a maul punch (probably not the correct terminology, but just to quickly differentiate from the press punches) in the chuck. I question if I’m going to beat the press up, as I’m not in a position to replace it. (cheap benchtop model from harbor freight, definitely not the best engineered, but it usually gets the job done…)
Thank you to everyone for their input,
AZR
-
2 hours ago, Northmount said:
So why use suede?
The flesh side of the leather, not suede specifically. Am I mistaken with terminology? Real question, no sarcasm from me. Please do educate me if I’m out in left field.
-
My current/recent projects that I’ve considered have been: dog collar, a couple sheaths, and a dangler. I’m attempting to make them as environment-resistant as I can, as the pieces will be subject to a fair bit of use and abuse.
-AZR
-
On 5/3/2025 at 8:14 AM, Dwight said:
For straight holes . . . hands and punches will be hard pressed to beat a drill press.
Remove the drill bit . . . put a needle in it's place . . . unplug the machine . . . and punch your holes.
If you really . . . REALLY . . . want them to look good . . . punch them from the top first . . . into a piece of hard wood . . . with the drill press stop set 1/8 of an inch below your bottom edge of the sheath.
Then turn the sheath over and punch from the back side all the way thru.
Makes right real pur-teeee holes for stitching
May God bless,
Dwight
On 5/3/2025 at 4:39 PM, dikman said:Or, if you've got a spare awl bit put that in the drill press and use that to punch your holes. I made a fitting using an awl bit to attach to my arbor press to do the same thing.
Dwight and Dikman, I actually found a set of drill press punches at harbor freight. The first thing I noticed was that you have to have the drill running, which bothers me for some reason, but as it punches, the friction does burnish the hole at the same time. Jury is out on if I prefer drill bits or the punches…
For my work surface, I actually have a scrap of 10oz that I cased and hardened, and put another piece (not cased) on top of it, and that it what I put my working piece on. So far, the punches/bits haven’t gone through and hit my table (yet). I also use it when I’m stamping.
Dwight, you mentioned putting a needle in the press… are you using glover’s needles? My diamond-point needle doesn’t seem to be long enough to fit in the chuck and still have enough travel to punch through. And Dikman, of everything that I have, I don’t actually have any awl bits. Are you referring to the little interchangeable ones?
Thank you for your input guys, I’ll play around.
-AZROn 5/3/2025 at 4:58 PM, fredk said:No problem with symmetry when using these;
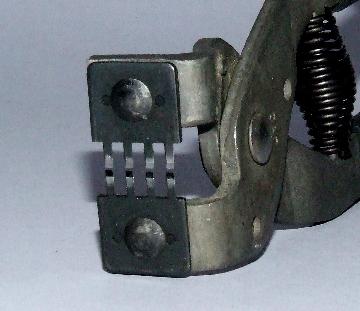
If you punch one side of the sheath first with them, then glue up and use them again the sewing holes will match in direction. This will go thru about 4mm of leather, and even if they don't they leave a hole deep enuff on both sides for an awl to finish off
WHAT is THAT?!?! Whatever it is, I want one!
-
Ok supposedly there are no stupid questions, so let’s test the theory…
I’ll take for granted that you aren’t supposed to use gum trag on suede.
Why? What happens? If I’m burnishing the flesh side anyway, wouldn’t it help? In the meantime, I’ll be using edge paint and hope for the best.Still feels like my first rodeo,
AZR
-
Chuck, thank you for the advice. I’ll definitely be giving those techniques a try.
Al, I’ve noticed the same with the chisels. Makes me wonder though where I’m going wrong with my drill press…
-
Okay, so I know this is a basic technique, but I seem to have regressed back down the learning curve. Or I just had early luck.
(Working with basic foldover knife sheaths), I cant seem to get the holes for my stitch lines to match up on either side. To be clear, I have successfully made several in the past, which is why I’m even more frustrated.
I’ve made templates from multiple kinds of paper and from EVA foam, and I’ve tried directly on the leather as well (sometimes I get brave).
I’ve used edge-guided groovers, rotary spacers (the little wheel that pricks the leather as it rolls), wing dividers, punching the welt and using it as a template, overlapping the prongs of my punches, and even my drill press, and I’m still failing.
I’ve tried punching them flat, punching them folded, even punching with the welt glued in place.
It really does feel like my first rodeo again. Please help.
Thanks,
AZR -
Wow that is a beautiful and well-considered holster!
Love the hockey game idea!
Anyone know if a kendo stick would work?
-
You have given me the idea of caning it with some rebar or a mesquite branch, and if I had access to the leather to try it, I totally would just in the name of research.
My biggest hesitance at the moment is that I don’t have any scrap big enough to test. I’d go for an econo belly from Tandy, but they’ve been out for about 3wks now -
I guess I should mention that, outside of the rivets, there is no decoration or ornamentation for the breastplate, just the patina and wear.
-
So it’s for cosplay, not LARP. (The difference I’m not sure. Maybe watching, not playing?)
But, who wants to show up in brand new armor without a single knick on it?
Which begs the question: how do I mimic battle damage/wear without swinging an actual weapon at it?
I had been using my test swatch for the dye to try different methods of abuse, but the marks left even the spine of my heaviest cleaver just look like I got into a fight with a box cutter.
All help appreciated
-
Dusting off a long-dead thread, but yeah, those look incredibly well done! I salute you, sir!
My guide to the best vinegaroon you've ever made.
in Dyes, Antiques, Stains, Glues, Waxes, Finishes and Conditioners.
Posted
Further observations:
SS: color hasn’t returned to liquid yet.
Dipped a swatch this morning. At first, started to darken. As it dried, some light staining on flesh, only a hint of shade on grain.
Cu: surprisingly vibrant color, similar to a new penny, but can clearly see through.
Dipped a swatch last night. Darkened some initially, now a slightly pale blue color wash.
Tossed outside again today, color seems to be fading from jar.
2nd Fe: Still relatively clear, nothing to settle out.
Dipped a swatch last night. Initially turned relatively dark. This morning, disappointingly faded out.
Outside also, almost seems to be a soapy dishwater appearance.
1st Fe: Black at top few inches, black sediment settled, gray-black but translucent.
I cheated and dipped the faded Fe swatch from last night. A rather hazy navy blue color.
Outside also, the jar is an opaque charcoal gray.
All swatches buff veg tan.
Will update observations as I think about it…
AZR