


Wizcrafts
-
Posts
7,715 -
Joined
-
Last visited
Content Type
Profiles
Forums
Events
Blogs
Gallery
Posts posted by Wizcrafts
-
-
I've never used an Adler patcher, but I have a Singer and the hand wheel must turn clockwise to operate.
Tony.
That is incorrect Tony. The wheel on almost all modern sewing machines turns counterclockwise. This is towards the operator, when pulled from the top in a downward direction, when facing the machine in the working position (in front of the machine body, lengthwise).
-
I don't know if this has been tried yet, but let's go over it in case it hasn't been done yet.
- Thread the needle
- Raise the pressor foot with the lift lever
- Open the bobbin case cover plate and remove the bobbin from the bobbin case
- Replace the empty case in the hole
- Place a narrow piece of 1/8" thick firm leather under the needle (vegtan or latigo leather will do)
- Lower the pressor foot onto the material
- Slowly rotate the hand wheel toward you from the top until the needle penetrates the material
- Shine a light down from the right side and position it so you can see the point of the bobbin case and the needle below the material
- You should rotate the wheel until the bobbin case's pickup point move just past the needle and halts
- As you continue to rotate the wheel the needle should raise slightly, forming a loop to the right side, in front of the pickup point
- As you rotate more the bobbin case should reverse direction and move towards the eye of the needle, as the needle stays in position
- The thread loop should be captured by the point as the point wipes past the loop
- The top thread should be pulled over and under the bobbin case, then released as the needle moves up
- The foot should pull the material back for the next stitch.
Please perform these actions, slowly and report if the thread is indeed looping to the inside (right) and if it is picked up by the bobbin case pickup point. All stitching depends on this happening as described.
By the way: A #22 needle is best used with #138 thread. What size is the thread you are using now? If you are using #69 thread with that large needle, chances are good that skipped stitches will result.
PSS: A 29x3 needle measures a tish over 1 3/4" length. If your needle is shorter than 1 3/4" it won't sew. If it is measurably longer it would feed the looped thread under the shuttle that drives the bobbin case, jamming the machine.
-
Ginny;
I just saw how you mistook my phrase "lowest position" for the stitch regulator as being based on the numbers on the bars! I meant physically lowest point, downward, which would be around number 5 on the bar.
With the pressor foot and needle up, carefully grab a-hold of the bottom of the foot and see how much wiggle there is forward and backward. If there is a fair amount of movement possible when you push and pull the foot forward/backward, the part that causes the stitches to advance is worn out. I can't give an exact amount of motion, but I would feel confident in saying that if that foot can be moved 1/8" or more, the drive mechanism is worn out. A machinist who bronze brazes may be able to reduce the slack, or, you may be able to buy replacement parts somewhere.
-
Zamir Sewing Machines states in their eBay ad that they ship to the US and Canada and Mexico. They may not be willing to ship to Europa.
-
Hello
Can u provide me with Bob's number or e-mail....I am also planing to buy just that kind of motor for my Adler 105-64.
Tnx a lot!!
James
You can contact Toledo Industrial Sewing Machine Sales, at: 1-866-362-7397 - for information about these variable speed foot controlled servo motors.
-
Ginny;
I looked at your recent photos of the needle regulator. It is set way too high. Lower it as far as it will go, with the pressor foot in the lifted and locked position. You lift the foot with a lever on the back. When it reaches a certain height it locks in the up position. That is the height where the butterfly disks in the thread tensioner are released. With the foot locked in the lifted up position, loosen the screw on the sliding bracket behind the foot and slide it down as far as it will go, then tighten the back screw. In that position you should be able to get 5 or 6 stitches per inch.
If you move the stitch length regulator bracket down and still get little or no feed, and the long spring on the back is exerting sufficient pressure to secure the foot on the material, then the mechanism that the pressor foot rotates within (the ring with the big butterfly knobs, over the needle assembly, which turns the foot) may be worn out beyond usefulness. If that is the case the machine is shot. The worn parts will need to be replaced, or built up with brazing or welding to reduce the slack.
Everything else look like it is setup properly. However, the failure to stitch is not resolved, despite all of our efforts. You should seek out a knowledgeable sewing machine mechanic within driving distance and take the machine to him or her, for evaluation and possible repairs.
Note, that replacement parts for Adler patchers are usually much more expensive than for Singer patchers.
-
The pressor foot has a knob on the back of it. The know sets the stitch length. I usually raise the pressor foot with the lifter lever, loosen the screw behind the foot, lower the foot as far as it will go, in the raised up position, then tighten the screw. When you drop the lifter lever the pressor foot should be pushed by the two protruding steel brackets, pulling the material backwards, creating the stitch length.
Failure to feed can be caused by a slider on the back of the machine. It has a butterfly knob and it moves a device left or right, along the main tensioning leaf spring. I usually set it all the way to the notch in the spring, giving maximum lift to the foot and length to the stitch. I have to go out for the rest of the night. Perhaps another sewing machine mechanic will be able to assist you until I return tomorrow.
We will get this sorted out, unless the machine is broken, or totally work out.
-
Ginny;
The needle is now correctly aligned and shifted close to the bobbin case assemble. Good! It looks like it is ready to sew. All you need to do is rotate the hand wheel towards you one full turn. The needle should go down, hopefully form a loop, then capture the bobbin thread and pull it up through the needle hole.
I usually push the bobbin thread up through the hole after inserting the bobbin. This removes one point of failure from the equation. It matters not which way the bobbin thread lies while waiting to be picked up.
The pickup point is the part of the bobbin case that is tapered into a narrow, sharp point. That is where the top thread's loop is captured, then pulled over and under the bobbin case. Yes, the top thread forms the loop, in the eye of der noddle (a movie title).
You should be able to place material under the pressor foot and sew. Have you tested it?
-
Ginny;
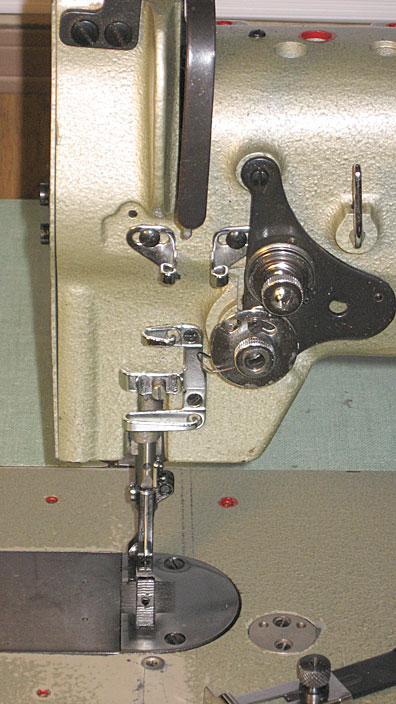
The needle is in wrong! You have it with the eye facing forward. The eye of the needle must be on the right side, facing the inside of the machine. The thread goes in on the left side and comes out on the right. Further, do not lower the needle in the needle housing. Insert it all the way up in the housing and tighten the bottom screw. The movement described by a previous poster was for the upper screw. That upper screw on the housing allows you to move the needle sideways, closer or farther from the shuttle.
When correctly set, the needle goes down as the bobbin case turns clockwise and the pickup point stops behind the needle. Then, the needle lifts momentarily to cause a loop to form on the right side. At that moment, as the machine turns, the pickup point begins turning counterclockwise, grabbing the looped thread, pulling it under the bobbin case and forming the lockstitch. If the thread does not loop on the right side of the needle, there will be no lockstitch!
If you lower the needle in the housing the eye may feed the thread under the shuttle drive and around the center post on its bottom, binding up the machine, tearing the top thread through the work.
Try these changes, note the timing process above and post your results.
-
The top thread must go around the tension disk, then up to the the hole in the takeup arm, down through the hole in the needlebar, and into the eye of the needle, from left to right, with the eye facing to the right. The bobbin should be setup as follows:
Load the thread tightly onto the bobbin. Insert the bobbin into the bobbin case so that the thread pulls backwards, from the right side. Pull the thread into the slot in the case, then underneath the tension spring, then through the tiny hole in the case, then through the hole in the top of the post in the case. Leave enough thread to pull up through the hole in the throatplate. Pull the thread up through the hole and seat the throat plate in its detent stud. Rotate the hand wheel to raise the needle, then raise the pressor foot with the lift lever on the back. Insert some material and lower the pressor foot lever, ensuring that the foot is in firm contact with the material. Spin the hand wheel towards (counter-clockwise rotation) you with some material under the pressor foot and see if it sews a stitch or skips stitches. If it still skips, check the spring on the top or back, to ensure that there is good pressure on the pressor foot.
Some things that will affect stitching on a patcher include all of the above, plus: wrong needle length, or size for the thread, to much bobbin tension, jammed top thread, or machine out of time at the bobbin. If the machine has gone out of time you should not mess with it, but contact a qualified repair person.
-
Bob Kovar contacted me from Toledo Sewing Machines. He has exactly the servo motor I described. Huzzah! From 1 stitch per second up, all foot controlled, with a built-in 3:1 reduction gear, yielding 500 rpm max at the shaft, with 3x the torque of a straight servo motor.
-
I have always had clutch motors on my sewing machines and currently have one driving my walking foot machine. It serves me well, but is hard to control at very slow speeds. It wants to either stop or run, when I want it to tick-tock around curves and strap tips. I am considering buying a servo motor to replace it, but am curious about how they are controlled. I want one that will go from about 1 stitch per second, with the floor pedal backed nearly off, smoothly up to full speed (as per my pulley ratio) with the pedal fully down.
It seems that every servo motor I read about is controlled by a pot on the back of the motor, with no mention of the foot pedal having any control over speed (or am I mistaken?). Are there any brands of 1/2 HP servo motors that are speed controlled by the foot pedal, rather than just by a knob on the back of the motor? In other words, behave the same as a clutch motor; from a dead stop at heel down, through variable very slow through medium speeds as you toe down, up to the motor's full speed at full toe down. If so, what are those brands or models and who has the best prices for them?
If there aren't any such animals, are the pot controlled motors just switched to full on when you press down of the floor pedal, with the pot determining the one speed at which they run? Do they come to a dead stop when you heel down, like a clutch motor?
-
I have craftaid #2940 available for sale. It is in excellent condition. The price is $3.95 plus postage.
Al
Great! I'll take it! How do we get this done on this forum?
-
I am looking for a discontinued Tandy CraftAid #2940 (I think), of a crouching leopard in a tree. This is a billfold size tracing pattern. If anybody here has one in good condition please let me know how much you want for it.
Also wanted is a Midas/Kelly stamping tool #291 (a border design about 1/2" x 1/8"), as shown below.
Further, I am looking for a Neva Clog stapling plier, with staples, to make belt keepers.
Thanks in advance; Wiz

-
Thank you all for your replies. I now have a new bobbin case from Bob Kovar in Toledo! It works perfectly!
I also got a pound of #138 nylon thread from him at a very good price.
-
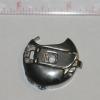
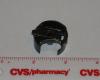
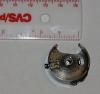
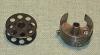
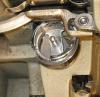
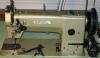
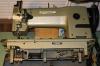
Howdy;
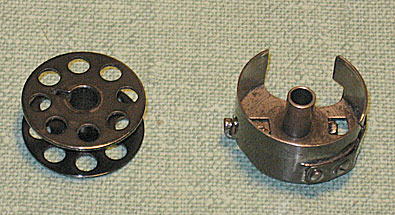
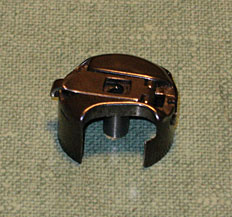
I have a National brand model 306N (Made in Japan) walking foot machine used to sew vinyl and leather. It came with one M size black bobbin case. I usually pre-wind a bunch of bobbins with whatever thread I am going to use on a job and would like to obtain some extra proper bobbin cases for this machine. The bobbins are large M style (1" x 3/8"). The machine has some parts stamped Seiko and is made in Japan. It looks sort of like a Consew 206 series machine. I bought some M bobbin cases on eBay, supposedly compatible with my machine, but they had to be ground down at the upper-left opening, to allow the cases to fit into the shuttle. Also, the thread comes out of the springs in a jerky flow and causes the stitch knots to move up and down.
Apparently, this machine uses a non-standard bobbin case, with a much wider opening on top. This is because the case has to clear two tiny screws on top of the shuttle assembly, about 1/4" apart. The cases I bought do not clear the left screw head and cause the case to jam, unless it's left tab is ground off at the opening on top (which I did, with limited success).
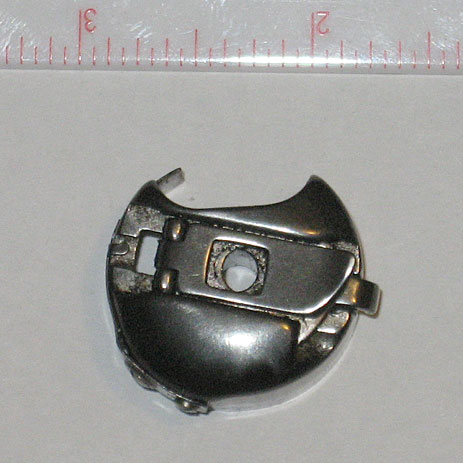
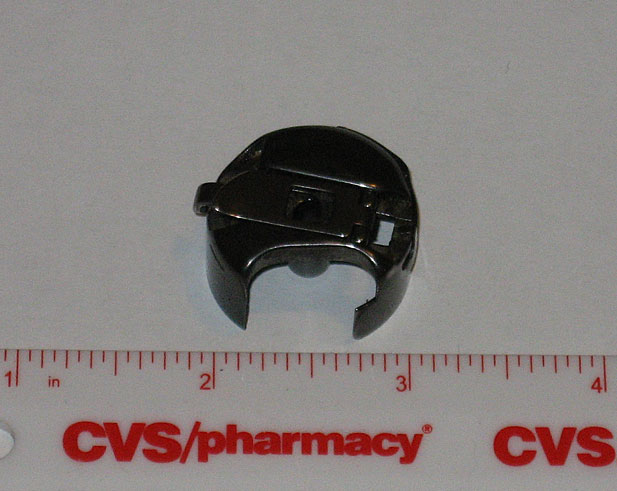
I have posted a group of pictures below to show what the OEM bobbin case and the machine looks like.
Hopefully, somebody here has a similar machine and/or knows where I can get the proper bobbin cases for this machine. If you have some you don't need I'll be happy to buy them from you.
Thanks in advance, Wiz


Adler 30-1 Threading Problem
in Leather Sewing Machines
Posted
Oops! I completely forgot that some patchers had the wheel mounted on the front. I have never seen one in action, so I didn't know that the wheel turned clockwise. I'll keep that in mind in case I do encounter such a machine. I apologize for the error.
I should now ask the question, "Does this Adler patcher have the hand wheel on the front or rear of the machine, when you sit in from of the long free-arm?" If the wheel faces the operator and rotation is supposed to be clockwise and Ginny is turning anti-clockwise, that would cause a failure to acquire the bobbin thread.
What I should have said was that most modern machines that have a wheel on the back of the main shaft turn counterclockwise.
Aside from that error it appears from the latest video that the shuttle is retarded in its action and needs to be advanced. Maybe the screw is loose that holds the gear on the underside of the shuttle assembly, or, maybe the shuttle gear needs to be advanced one tooth, in the rear rack. Once we know if the wheel is turning the right way, based on where it is mounted, we'll know if the timing is out or not. I think! Maybe.