


TN leather
-
Content Count
38 -
Joined
-
Last visited
Posts posted by TN leather
-
-
Thanks..just what I was looking for..

-
Very nice. clean work.
-
Where did you get the molle clip?
-
I have an old...1930-1940's leather craft book that suggest waxed (beeswax/ paraffin?? It does not say) canvas. I think it says linen not sure it matters what it is, so long as the weave was tight.
You could always make one without a lining and use a plastic bag inside it if you are worried about freshness.
-
http://bagntell.wordpress.com/tutorials/
Not sure if it is useful or not but thought I would share.
-
CMantz
I have used sting ray a little the past few years and in my experience it has been best to hide the edge of the sting ray. If you try to sew it without covering the edge/ stich line, it is easy to get uneven stiches or a far more bothersome issue is those little beads come off leaving unsightly white spots. I covered them with dye once and it is noticeable up close.
Most of mine I have done as in post #7. But I like the combine #9 idea…..
Warning though after some use the pretty color comes off (unevenly) and you are left with a off white bone color. ( this according to the wallet in my pocket at the moment.)
-
Nice work.....I have some of that same leather.....hmmm?
-
Ok . I am trying to make a plan to build this bag. I have most of the assembly figured out. What is stumping me is what order to attach the outside/ side pockets. Understand there is a pocket behind the top flap of the side pockets.
I was really debating just Chicago screws all the way around inside the pocket stitching. I guess one could sew the backing/flap on first then the outside pocket but that seems like a very difficult job.
Also understand this will all be done via hand stitching. I have not put pattern to paper and this project is becoming a PITA.


-
^^^^
what they said
-
LOL....I recalled I have about 6-9 pounds of glycerine soap. in my candel making/ soap making pantry. I was going to due some heat and pour that I never got around to.
So that should be easy. I think I need more sleep. Also have pure glycerine as well but that is for skin care lotions.
-
is saddle soap ok for this?
-
how are your retaining the knife. just molded tightly? I have never seen one quiet like that.
-
Ok I'm finishing out a knife sheath, and wet molded it to the knife last night. I knew the leather straps were quite dried out from the dye, but when I wet the sheath the straps bristled out at the edges (with lots of the little fibers sticking out.) I had finished the edges of the straps prior to assembly using gum Tragacanth with a nice shiny slick finish, and it was a few days before I attached them.
Any way to save this?
I am thinking of conditioning with neatsfoot oil or lexol, but I am fairly sure that I will not be able to re slick the edges with it assembled.
Even if I cannot save this one how does one prevent this in future projects? I have never had this issue in the past.
-
Thanks yet again to this forum, you are all so helpful.
After some further research I found that a common use for this kind of thing is bookbinding.
Here's a place in the UK that sells bookbinding screws: http://www.joyce-pm....92rafdddgvvghu3
Problem with the above is that I only require small quantities therefore will be investigating the options you've all mentioned so far as well.
You are brilliant…..you just solved an issue I am having with a couple of sheaths that the customer wants “extras” on……you would think I would know about them too. I used to do print work,finishing and binding , but never saw these gems.
I have a local small job printer I will check and see if he has a few to sale to me.
-
I am having some similar issues right now. I am thinking of trying crown bolts and crown nuts...... not so pretty but if they work.
same color of course......you could cut the post an recondition the threads if you needed shorter.
-
-
Ok. I have made a knife sheath, and want to put a grommet/eyelet in the end. The place I want to put it in is just over 3/8" thick, and I cannot find a grommet or eyelet that will work. So I am inclined to make my own of brass tubing. Does anyone know how? I would guess lots of peening but not sure how to get the right shape......I will like also epoxy it in palce.
-
Well as I feared……finished work is a little over 3/8" so the ¼" CS would not do it (the work was skived so it was not clear on exact weight/thickness at the edge.) However when I went to Tandy the only 3/8 they had was plated not solid brass. WORD OF WARNING: plated does not tarnish up well at all (it gets a weird anodized look)! On the he solid brass ¼" CS, that I already had, I used a homemade sulfur/acid solution and got a great looking aged brass. I think that I will use the aged solid brass head on the front of the work from the ¼" and on the back side use the "aged" plated 3/8 post. In my mock up last night is seems to work ok. I just wish I had solid brass all around…..sometimes Tandy's hardware really lets me down.
One time I used some "solid" brass rivets from them….and it did say so on the packet, but after a year of wear all the brass has worn away to a shiny silver.
-
I am making a horizontal carry knife sheath similar to this one.
(Beebe knives, excellent tutorial for sheath makingas well. Thank you Mr. Beebe)
I have a decent amount of experience but I have not used Chicago screws before. I am looking at screws in case I must replace wear parts later on (belt loops) since in theroy the screws would allow me to do that. The customer does not want anything flashy (i.e. no tooling, shiny buckles etc.) the black coated screws only come in ¼ inch size (from the local tandy, and quick turn around does not give me time to order from elsewhere.)
1. How much leather thickness can I use 1/4inch screws on?
2. If I must go to a larger size due to leather thickness; with all brass screws how can I dull them down?
3. Any other issues I need to worry about or that you have experienced with Chicago screws?
-
I do not know much about it but there is some great creative art that has come from it.
I think the game Bio shock had a steam punk influance. http://en.wikipedia.org/wiki/BioShock
-
I would love to see a good design for this because I have the same need for a brace.
-
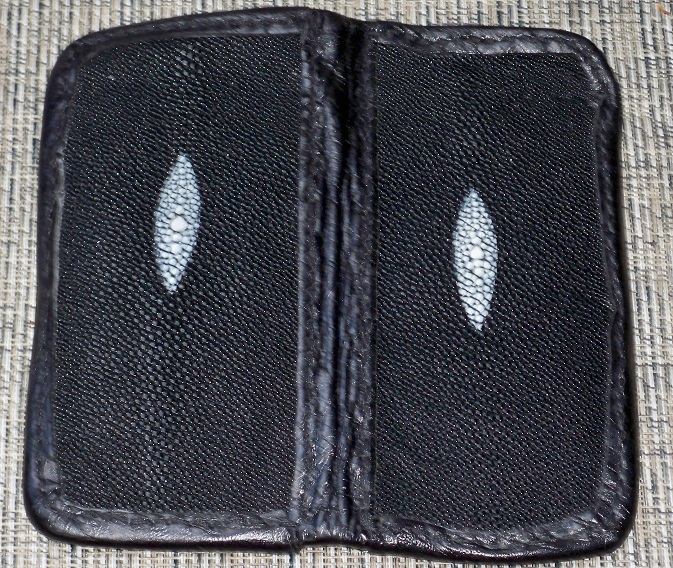
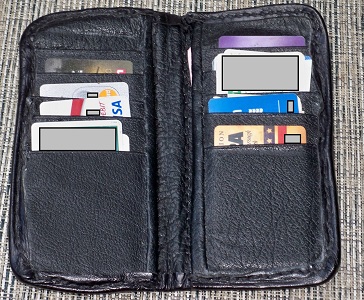
Kevin,
Great post, I used it to make a wallet awhile back, was too busy to post then, so the wallet has a few miles on it in the pictures. Just wanted to share and say thanks. I used two stingray skins and a scrap of leather I found in the trash at my local Tandy. The inside is pig skin. If I had it to do over I would not align the pockets on both sides as it creates bulk in the middle. I have no sewing machine so I had to do it by hand.


-
Any idea where I can get a generic pattern for the helm? Not sure about sizing and cuting the panels.
-
great work.....but that is no copperhead
Most likey a cornsnake or milk snake


Stingray Knife Sheaths
in Gun Holsters, Rifle Slings and Knife Sheathes
Posted · Edited by TN leather · Report reply
From someone who has used some stingray.....GREAT JOB!!
I find I alway must cover my edges due to "beads" falling off during cuting/sewing.
Great looking knifes as well.