


steve mason
-
Posts
275 -
Joined
-
Last visited
Content Type
Profiles
Forums
Events
Blogs
Gallery
Posts posted by steve mason
-
-
I think lacing the skirts is a personal preference kind of thing, if done properly both methods will work. As long as the back line of the skirts are cut proper and are blocked in enough they will not rub a horse's hind end. Many very good saddle makers lace all the way, and many don't lace all the way. Usually if you lace all the way you have square points on the back of the skirt tips, if you don't lace all the way usually you have rounded points. Now this is not written in stone, do whatever you like, just do it clean. Personally I like to lace most of the way, I stop lacing about an inch from the skirt edge, and have a rounded point, I do the same line on the jockeys. I like the same line on my skirts and jockeys, so I do not use a square point or a frog on my jockeys. As I mentioned before, as long as there is enough relief on the back of you skirts, either by the skirt line and blocking or by leaving the skirts split, you will not hurt a horse.
-
I drill, I feel the pros out-way the cons. I have also seen a few saddles that have been rotted from moisture, but it seems that if that is the case they usually are rotted throughout the whole bar pads, not just from the string holes. I've never been sure if the cause was neglect or climate poor rawhide or just hard use that have caused the hide to rot. Now I have seen many more saddles that have the same age and use or even much more age and use and the integrity of the tree is still there.
The reason I drill is for a couple reasons, one is the skirts are held to the bars better, and the other reason is for the integrity of the saddle strings. Over the years I have seen far to many saddles with strings that are screwed in, that the screw have been pulled out. Once the strings have been pulled out I have found no way that the strings can be screwed in again to maintain their integrity, if someone knows of a way I would be interested in learning your method. Another reason to drill is, a saddle I saw years back had screwed strings with the rope strap also screwed off the front seat jockey, the rope got hung up in the bush, the horse jumped forward, then the screw pulled out of the tree but not the seat leather, the seat was tore in half to the ear. of course this was a freak accident, but it never would have happened if the strings were drilled, it would have been a rope strap repair not a whole seat that needed replaced.
I guess I feel that saddles have been made with drilled strings for many years with a lot of success, so if it ain't broke don't fix it.
My method of drilling strings is to;
drill holes, cut rawhide between holes, have the strings going though the skirts but not the shearling, once assembled pound the strings into the recess. I have been taught this method by both Dale Harwood and Matt Eberle, both highly respect saddle makers in their own right. they both have hundreds of saddle that get cowboyed in every day without this being a problem. I am sure that some of their saddles have rotted out in the string hole area, but I but they are also rotted in other areas of the bar pads also. this is mainly due to neglect. I wonder if I was to spar varnish between the string holes if that may help as a moisture barrier?
-
Jason;
the oiling/finishing technique I use for small items like this is as follows,
1 oil with 100% neatsfoot oil
2 rub in fiebing's antique finish paste, then rub off the excess paste with sheepskin
3 use neat-lac finish (I only use neat-lac on small personal type items, I do not use it on saddles or any horse gear. Neat-lac will seal the leather completely, any gear made to go on a horse will need to be oiled in the future, therefore neat-lac will not work on those items.)
for saddles and horse gear I use 100% neatsfoot oil as always, then when the oil is evened out I put on Tan-kote.
-
Bruce;
I glass the grain side on the leathers, on the fenders I glass the grain side for smooth fenders and flesh side for ruffouts.
-
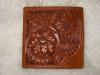
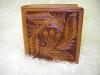
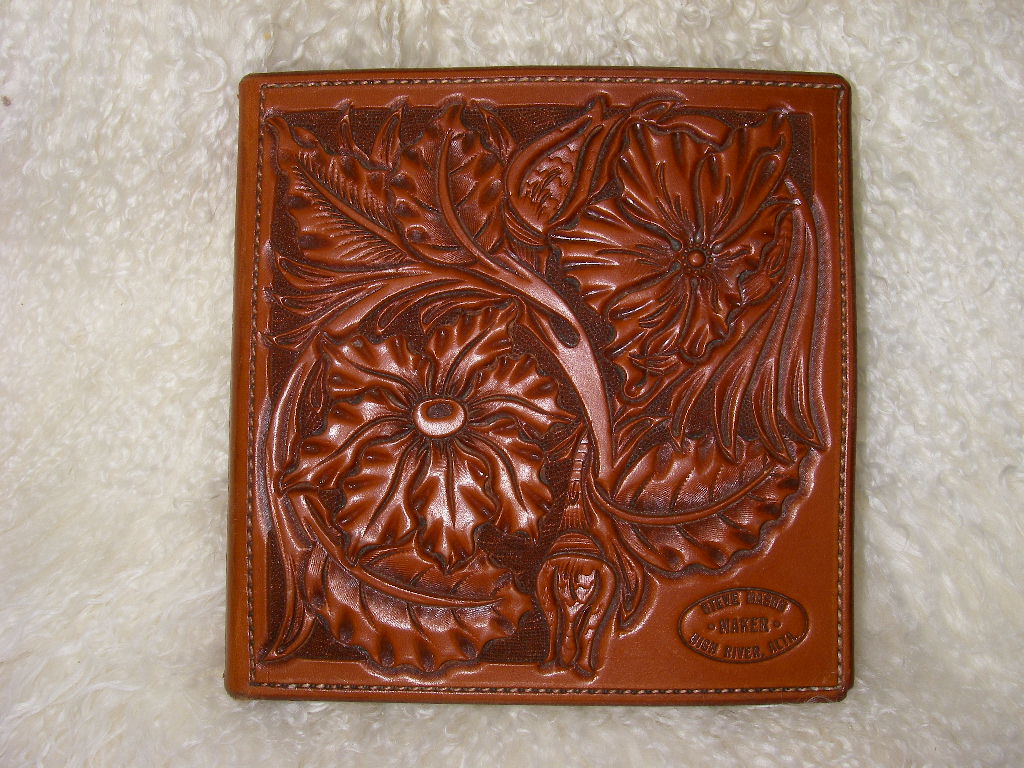
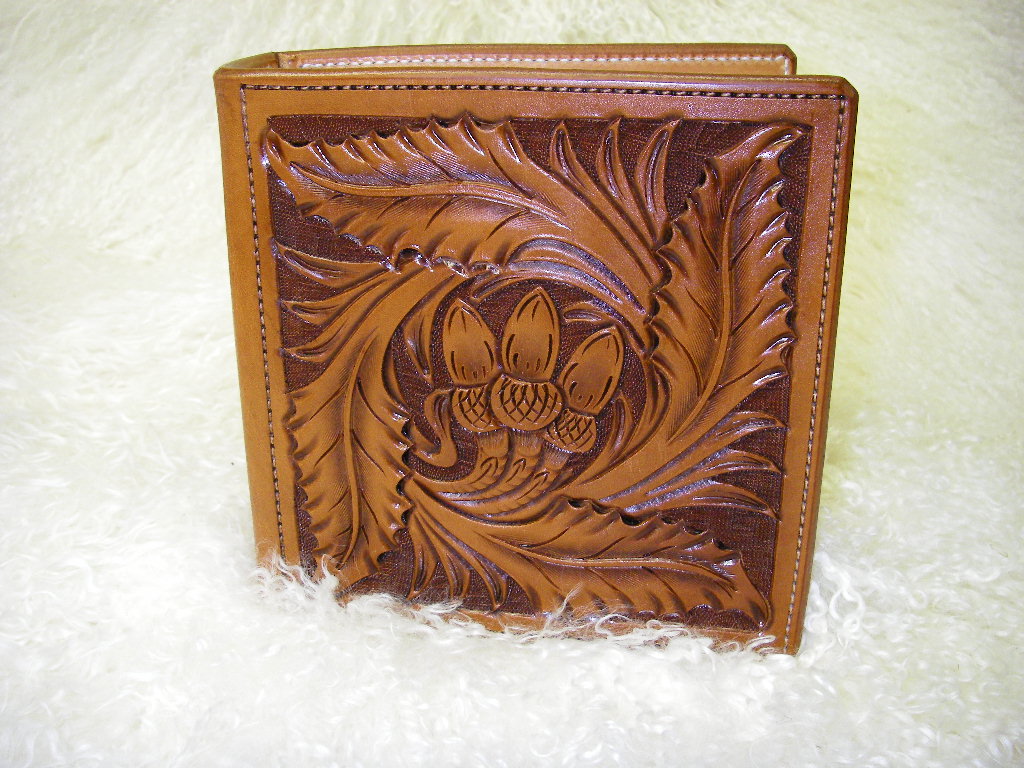
Thanks for the kind words, the album is only the second time I have carved an oak leaf/acorn pattern. For some reason I have always resisted carving them, they can still use some improvement. I thinks with all things leather there is a never ending evolvement of your style and methods, for the better I always hope.
I will post a photo of an album I have made a while ago also.
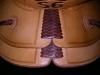
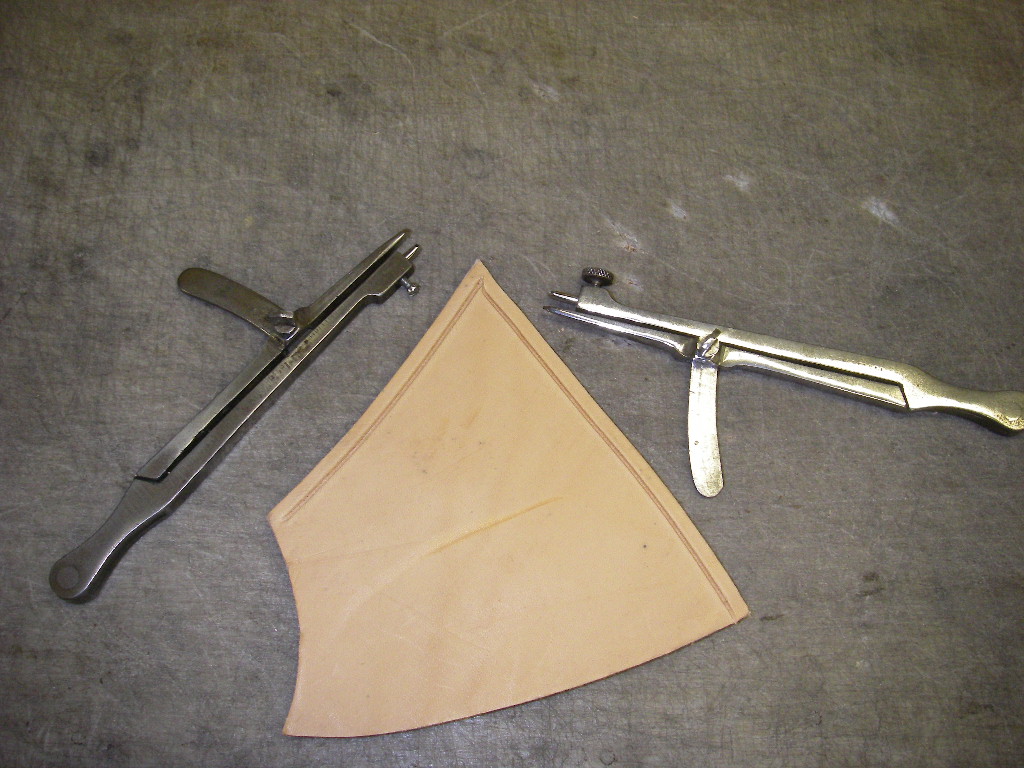
There have been a few comments and questions about the stitching, I will post a photo of my stitch groovers. I use old Osborne stitch groovers with the bits or races from Bob Douglas, I use two different sizes of races, one for smaller threads and one for larger. I have always felt that a narrow deep groove will look and work the best, I think that if the groove is narrow and deep the thread will be protected by the leather a little better than if it is a shallow wide groove. These items were grooved with my smaller stitch groover and sewn with a size 160 needle and 207 thread.
-
In most cases I put the grain side down, or against the tree. When doing a twist and wrap, the grain side of the leather will be facing forward on the tail end, I seem to twist and wrap just about all saddles that I make.
To give this tread yet another turn, what do you all call the twist and wrap? I have heard many different names for this method over the years and would like to hear what you call it.
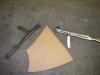
On the topic of pre stretching leathers, I have been taught a few methods and I combine them all, first off I soak the leathers, then nail one end on a board, then glass or rub the leathers hard, and by hard I mean put some effort in to it, then I will spike the ends until I can get no more length out of them. the leathers are allowed to dry at room temp. I also soak the fenders and glass the heck out them. Once they are both dry I assemble them, and get moisture into everything with the exception of where the holes are in the leathers(I do not want to stretch the hole out) I then put the fenders/leather in my stretching/shaping device and crank down on it. This will do a couple things including helping to take as much stress as possible out of the fenders and leathers and it will also train the fenders/leather so the stirrup hangs in the right position.
I will attach a photo of the stretching/shaping device. Bob Douglas sells something similar as do a few others. Another tip is to put the best stirrup leather on the left side as it will take the most abuse.
-
Howdy;
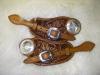
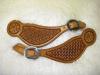
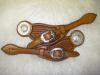
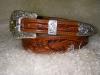
here are some photos of some cowboy gear I have made this week,
a pair of flower carved bib style spur straps with 2" handmade conchos by Richard Brooks,
a set of crazy stamped spur straps,
some basket stamped bib style spur straps with handmade conchos by Richard Brooks,
a flower carved belt with a buckle set from Olsen's Silver
and a small photo album.
I have also posted all these items on my saddle blog along with a couple saddles I have finished recently,
-
I have been using a wooden drawdown stand that I have modified and rebuilt a couple of times over the years, I guess you could say it is an old stand since it was my grandfathers, not sure, but it could have been used by my great grandfather also, I do use his stitching horse though. Anyways back on topic, I am finally getting up with the times, I just got a barber chair yesterday, has anyone made their own stand from a barber chair, if so I sure would appreciate some photos of what you did. I have seen some barber chair stands over the years but I don't recall how they should be made. So if anyone could help with my quest and give the pros and cons they have seen on homemade stands that would be great.
-
I also use a tunnel style seat. I have been trained a couple of methods to make the cut out plug style seat, but for me the tunnel style has always worked best, I don't have to worry about cutting out the plugs and nicking the rawhide or damaging an edger by hitting the tin on a tin seat. For me it is kind of "solving the problem before it is created", if I don't have to cut the plugs, I don't have to worry about those problems. I also find for me that with a tunnel seat I am assured that I have the proper relief or room for my stirrup leathers, when i used one of the cut plug style seats it was easy to shave a little to much then you would not have room for your leathers which would create a lump in the seat. Once again ''solve the problem before it is created".
In regards to seats in general, To quote Watt in is video "no matter how the seat is made, a good seat is a good seat and a bad seat is a terrible seat" I think seats can cause a lot of controversy between saddle makers, tin or all leather, tunnel or plug, and whether the seat is made dead flat or has a slight pole to it, etc. Each maker is going have some very valid pros and cons to each method. I guess what I am trying to say is I don't think it matters what style of a seat you put in, as long as the method works for you and when you are done you have a seat that a guy can sit in and make his "bum smile"
-
go2tex;
I have use casters on my saddle stand for years with no problems, there are a very heavy duty locking caster, the stand does not move at all while I am working on the saddle. I have used the locking casters on a cement floor and I now use rubber horse trailer mats on my shop floor, did not make a difference on how well the stand stays put. I sure do like the rubber mats as they a much less fatiguing on my back when I am standing all day, another good benefit is when I drop a tool on the floor I do not worry about the edge getting damaged.
In regards to lighting, I was just talking to a local braider this week about this very subject, he has started use some lights called "T8" and said they are much better than regular fluorescent lights, they give you more light, less shadow and no flicker like some fluorescent lights do. Now I have not used them yet but i am going to try them out. I did Google "T8 lights" and found some info on them.
-
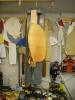
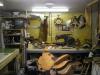
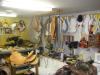
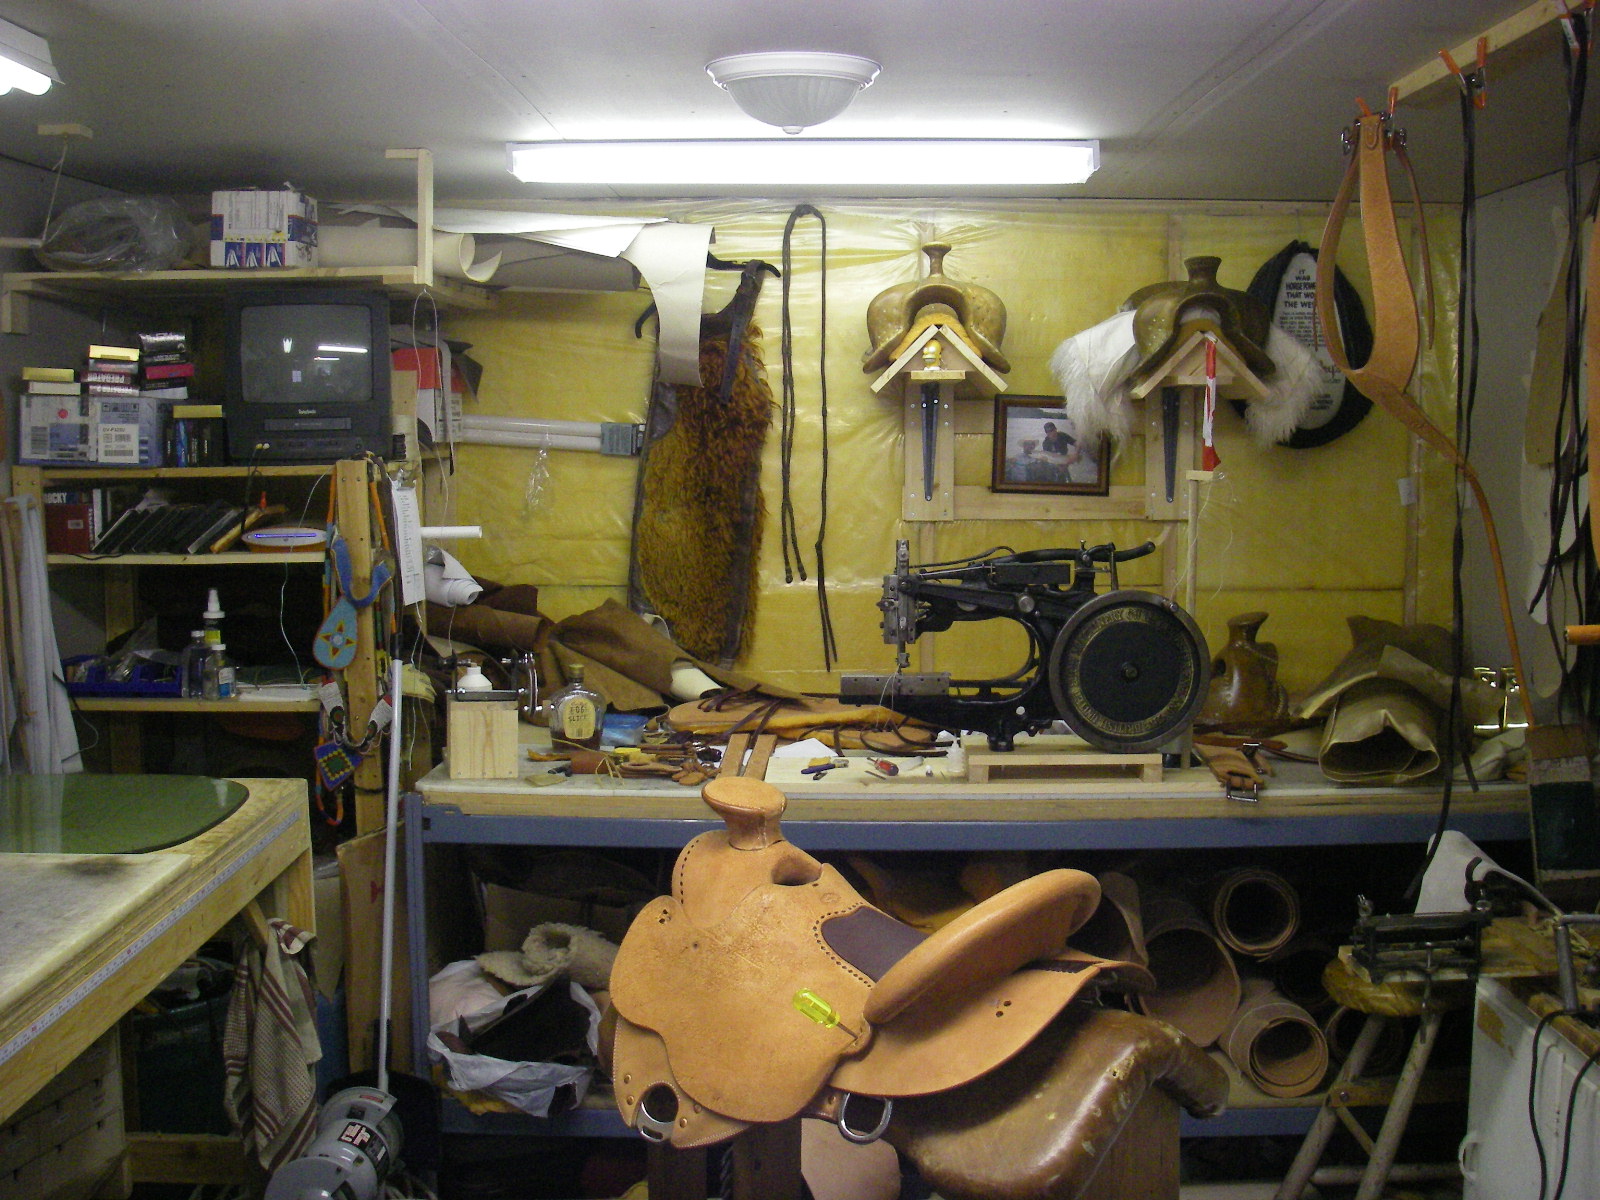
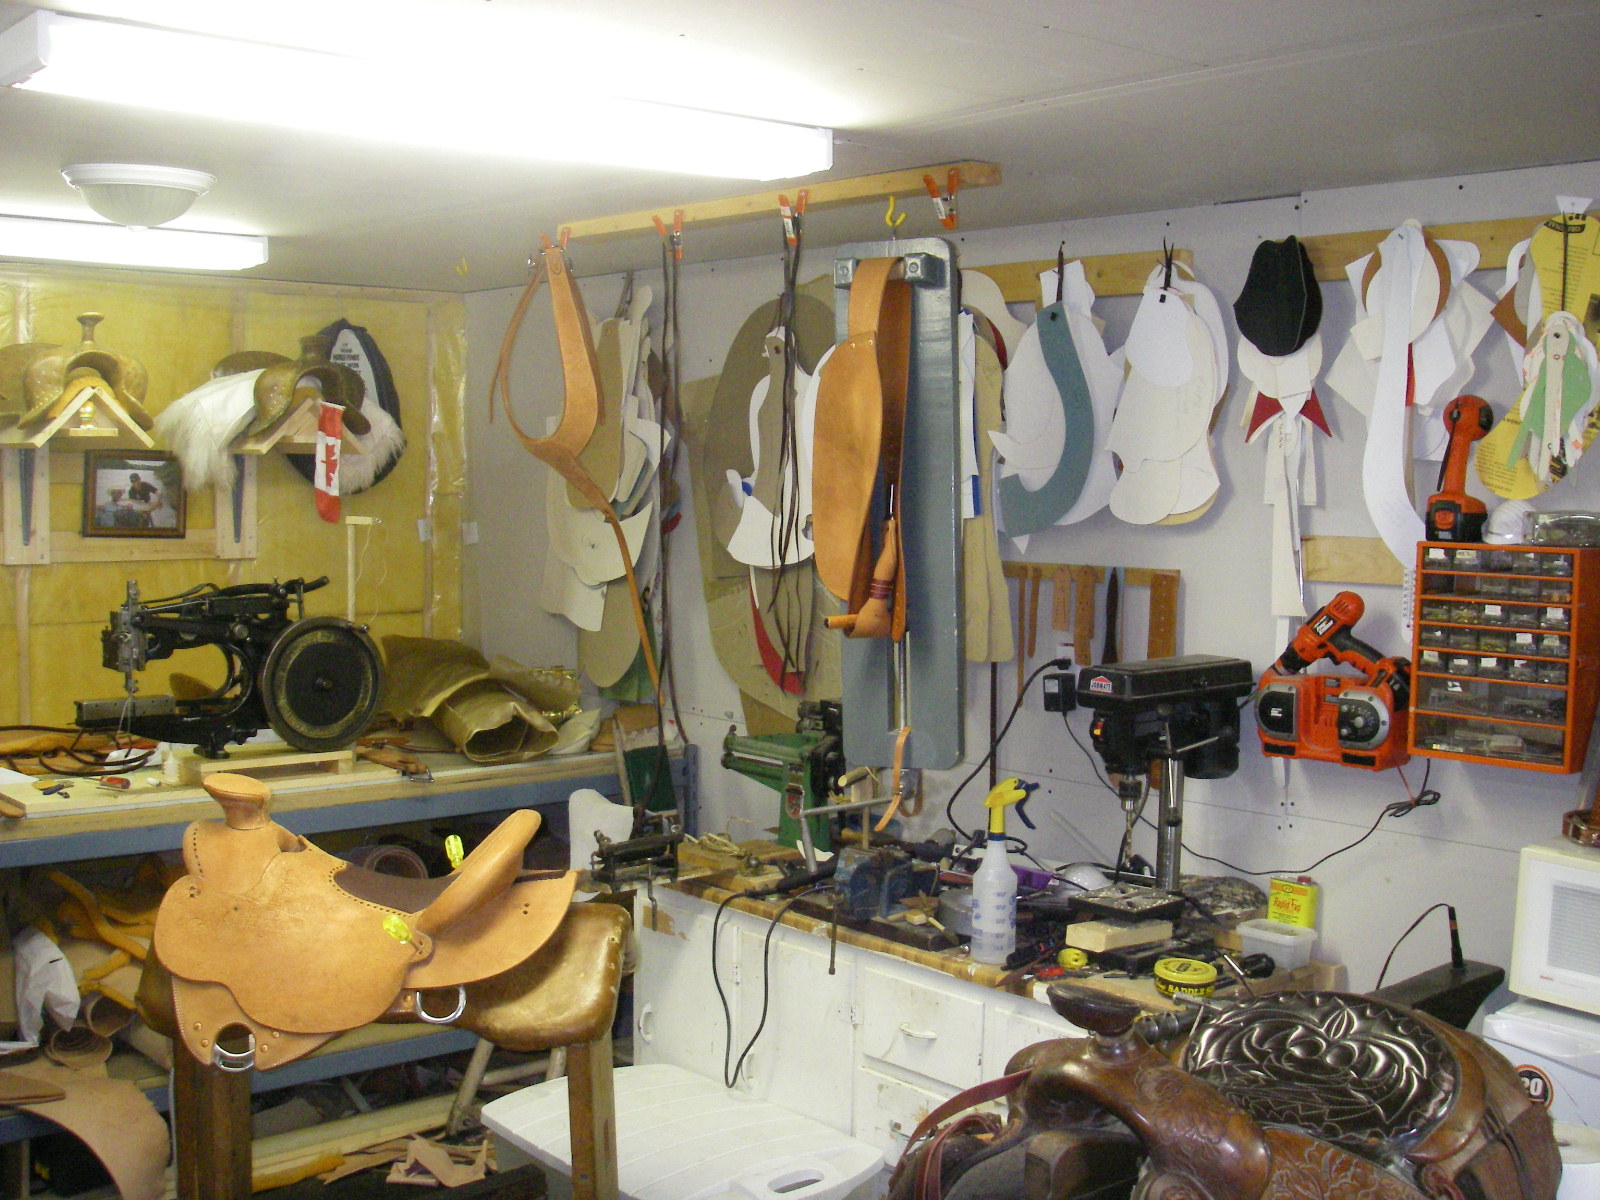
Here are a few more shop pics,
my 4'X8' cutting/leather storage/sewing machine bench, my main work bench(notice the sign in the top left corner "rush job policy, if you want it bad you will get it bad, the worse you want it the Worse you will get it") and a view of the whole shop.
I sure would like to see some photos of your shops, I think we all could learn something about shop layout from each other, and a picture says a thousand words.
-
Steve,
What are your thoughts on stamping/carving benches? You must have tried and seen a lot of different arrangements, what has worked out the best for you?
With all the granite counter tops rage these days, I'm thinking it would be fairly easy to pick up some seconds from a local installer, builder, etc. Any thoughts on using granite for a carving surface?
Hey K-man, where do you get your dummy guns? I make a few custom holsters and my biggest problem is obtaining the right model to use for a mold if the customer isn't local.
howdy Go2tex;
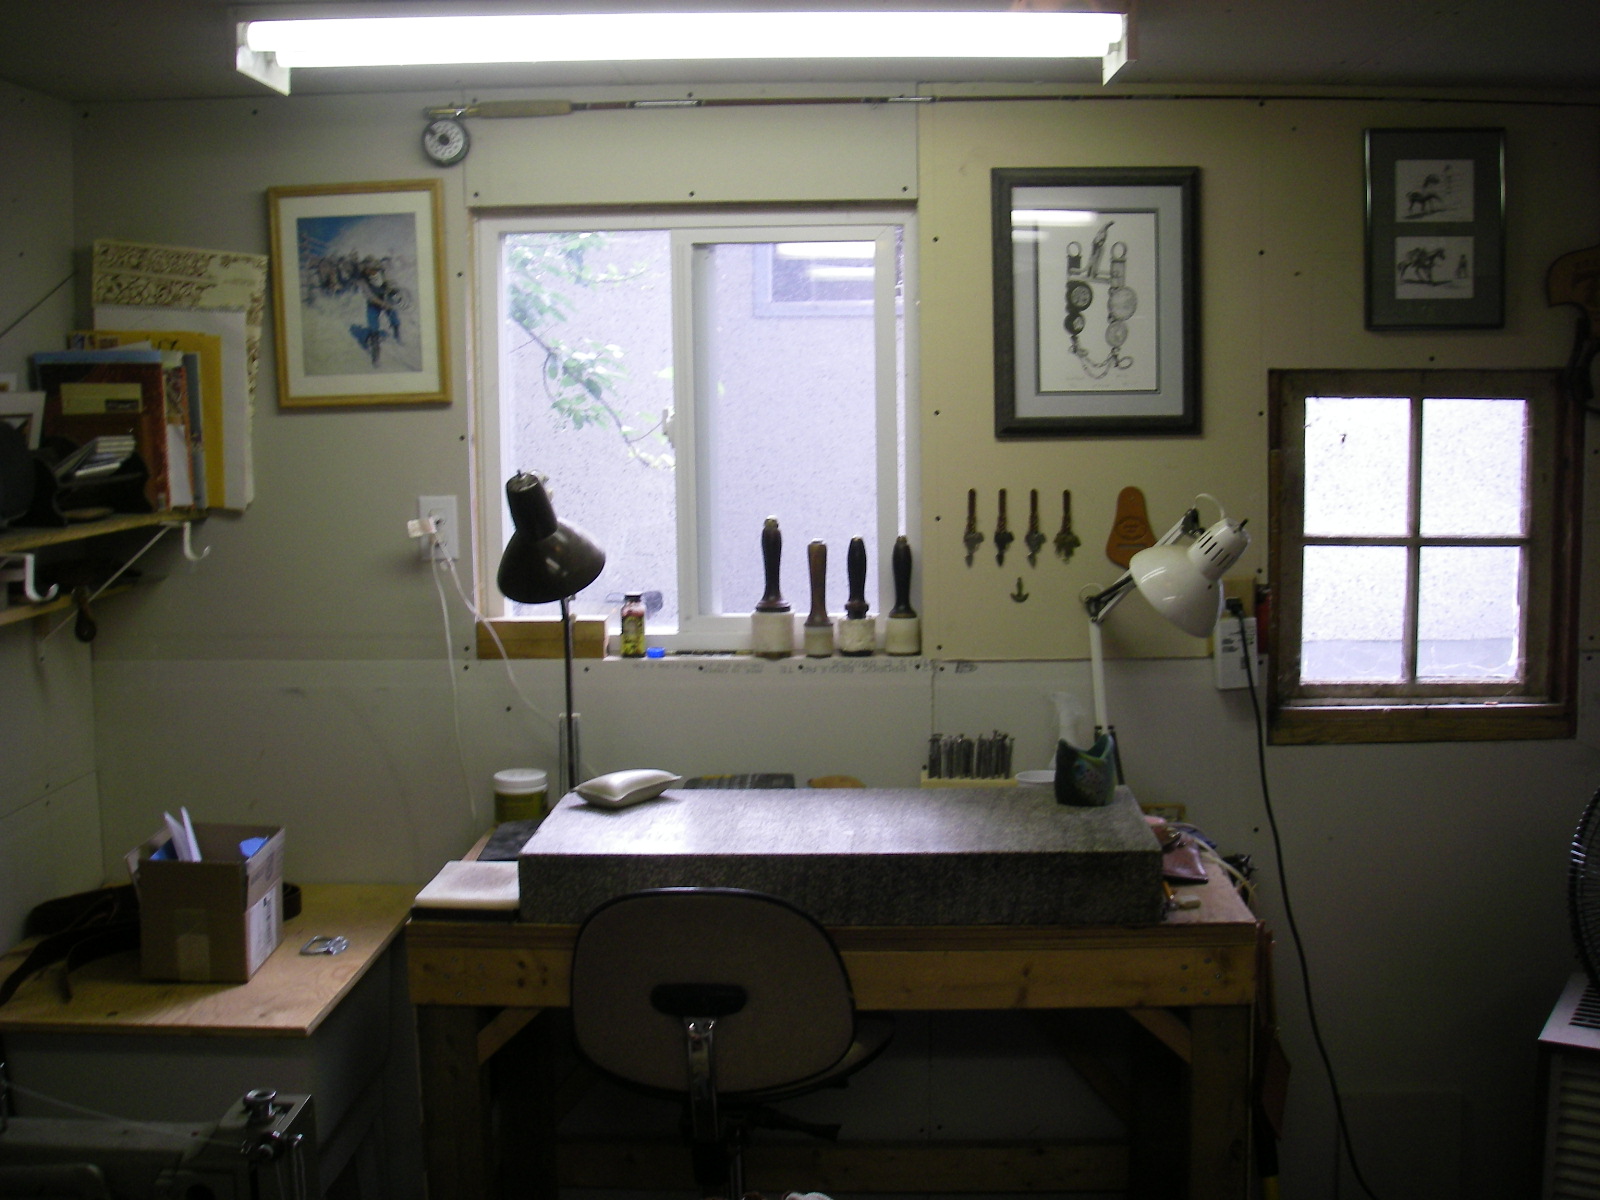
I have used some different style of benches over the years, I now like a stamping bench that is separate from my main workbench, mainly so I can leave my stamping tools set up and ready to go, when I used a bench where the stamping and main workbench were one and the same, I would always have to roll up my stamping tools when I was done tooling. the combination stamping/main bench was nice because the rock had a polished surface to it so I could use it to skive leather on. The rock was level with the rest of the bench surface as it was countersunk. Now I have a large piece of 3/8 glass to skive on. A bench where the rock surface is countersunk to the rest of the bench surface is nice to work on, if I had one thing to change on my current stamping bench that would be it.
The rock I now use is an honest to goodness used gravestone, I am friends with the local funeral home owners, this rock was returned after the husband died, the wife did not like the rock so she traded it in for a new one. before I could take the rock home I had to grind his name off the rock( that side is turned down on my bench) I then has to smooth the bottom surface so I could stamp on it. It is too rough to skive on, but it is very flat and true to stamp on. The gravestone is 4" thick and 36"X16". I do very much prefer a thick rock and a very strong sturdy stamping bench. I use this bench not only for stamping but for all my riveting and all my drive punches., it sure is nice to rivet and not have my steel bouncing all over the place. The bench is made with 4"X4" corner posts and two layers of 3/4" plywood. there is no movement or bounce at all with this bench. I have heard of a few guys who put a thin piece of cork under their rock to lessen the bounce. but if you get a rock as heavy as mine she won't bounce at all. I am not sure if a counter top would be strong enough to work on, I would be worried about using big set stamps or your maker marker, I have a seen a number of guys rocks crack, even rocks up to 2" thick. personally I would think that 3" would be a minimum thickness for me, although I know that many stampers use rocks that are much thinner. Buying a new rock that thick will cost you some $$, but in the end you will need one anyways, I have already talked to the local funeral home about it, When my time comes I already own my gravestone, I figure as much time as I have spent over this rock, that it should spend the rest of time over me when I'm gone.
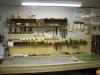
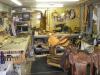
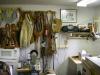
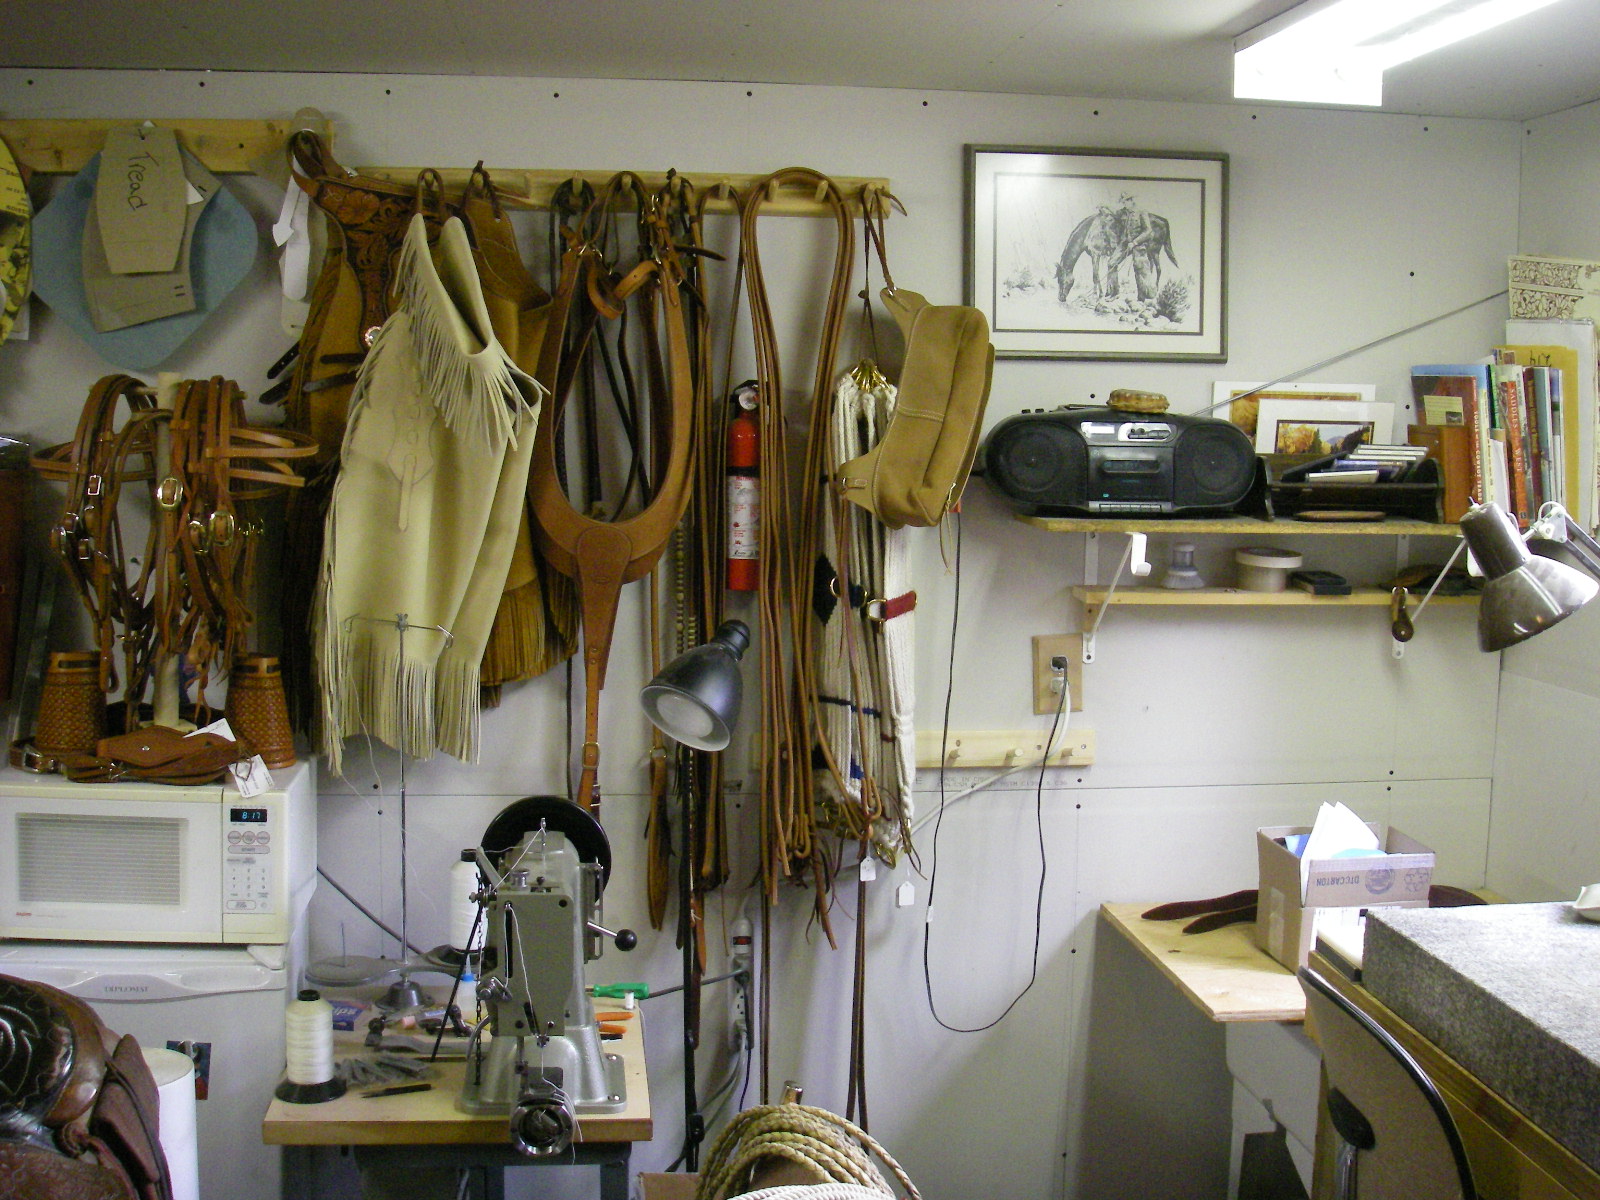
here are some pics of my shop.
my stamping bench, all my inventory( I am a mainly a custom order shop so I have very little inventory on hand), my pattern wall and saddle stands,

-
Howdy Barra,
I also have a small shop, 12'X19'. My shop is packed pretty tight with a 7' X 30" workbench, 4'X8' cutting bench, 6' X 24" drill press/vice/storage bench, stamping bench, piss tank, anvil, two sewing machines, a couple storage shelves, spare saddle stand and a beer fridge. So I must use space very wisely, I have all my patterns hanging on the wall, all my skirting, latigo, harness stores under my cutting bench, my chap, mule hide and gigantic Australian field mouse (kangaroo) goes in my storage shelves, my hardware is kept in small shelving units under my workbench, which has two shelves under it, my oil/glue/dyes etc go under my 6'X24'bench.
A few tips I could give for shop layout are:
- make your workspace small so you don't have to waste steps picking up tools etc
-make sure all the tools you use regularly are very handy to grab so you don't have to waste time looking for them, it will become muscle memory to grab a tool of the bench
-once you are done with a tool put it back where it lives
-have your saddle stand in the centre of your work area, so everything is just a step on either side of your saddle
-keep your patterns handy to get at, again don't have the patterns in another room or stored in a hard to get at area or time is wasted looking for them
-use your spare shop space to your advantage, in my shop you can barely see the walls since I have something or other hanging on them, under every bench I have a shelf or two, I even have a shelf hanging form the roof.
-you can hang a couple saddle stands high on the wall to store spare tree, a repair saddle etc
-make sure everything in the shop has a home and is always put back when you are done with it
-keep the shop very organized, if you know exactly where every tool, pattern lives you will not have to waste time looking for anything
- a few tips on your workbench,
-if you move ofter due to outside work, put the bench together with screws and mark/number the pieces so reassemble is easy
-make a very sturdy bench, that has no movement or bounce in it
-hang your tools on the back of the bench so they are is easy reach of you
-put shelves under your bench
-if it does not interfere with your lighting put a shelf above your bench
-put a stick on measuring tape on the front of the bench so you never have to look for one
-something that I see in a lot of other makers benches is that they are all made to low, in my opinion when you are at work on you bench you should not be bent over, you should be able to stand up straight while you do your work, I am 6' and my workbench is 43.5" high, it could be an inch higher if I was to build a new bench.
-your shop does not need to be spotless clean at all times, just well organized with everything in its place, if your shop is spotless clean at all time I envy you.
-another very important shop rule is, make sure the beer fridge is always loaded with a few cool ones.
when I get time I will post a few pics of my shop.
Steve
-
Greg, thanks for the leads to check out. I appreciate your help. Just for asking do you have the Clint Fay book on Sheridan carving? Tell me it is worth getting. I want it
 Thanks again stephanie
i have to agree with Greg here, I also have a few Don King swivel knives with extreme alloy blades in them, you will be amazed at how long you can use these blades and not have to sharpen them as long as you keep stropping them.
In regards to the fay book, I think it would be a great asset to anyone wanting to carve Sheridan style, there is enough good info there that even if you don't want to carve Sheridan style, you will still learn a bunch from the book.
-
By the way, if you would like to have a look at some great pieces of work, have a look at the website where I got the Lloyd Davis photo from, tools of the trade you will see work by, Don Butler, Lloyd Davis, Steve Mecum, Cary Schwarz, Jeremiah Watt and more. If you have not seen this site before, have a good look around it, you can see a video of harwood carving, and a lot more good info.
this is my favorite piece from the contest

ps. I'm not sure how you all post a photo in the small popup window like most of the photos I have seen on this site, when I post this photo it is full size, could someone enlighten me.
thanks
-
I have said it before, but I am glad we have these guys to look at their work and borrow (steal) from.
Bruce Johnson
Bruce;
An old saddle maker that I respect a ton used to tell me that if I'm looking at someone else's work and see some good ideas that I can use, "I am not stealing his idea, because it's not my fault that he thought of my idea first" LOL
Darc & Greg, Bill Knight is the name I was looking for. Thanks
Darc, I agree that Lloyd Davis did produce some incredible work. Like this piece from the western folklife website>

-
Thank You Johanna and Ashley,
I will still stand by my statement a few months ago, and expand it a bit. Chester Hape is one of the top two carvers all time in the Sheridan style. It is arguable who is the other, but Chester is one of the two.
Bruce Johnson
So I wonder who is the other, I do agree that Chester should be in the top two, should number one be Don King, Billy Gardner, Don butler, or Jim Jackson, maybe the guy who got king started with the style, Lloyd Davis. I think the best all time should go to Don King, since he is the one who made the style what it is today. I do think that Don's Mother hubbard TCAA saddle is one of the best pieces of Sheridan style carving I have ever seen. I think of guys who are active in the business,(Both Don and Chester are retired) the top would be Don Butler and Jim Jackson. Don carves traditional Sheridan style to perfection and Jim has almost evolved to another level with his carving.
Did I miss anyone?
I guess someone whom I did miss was a fellow who worked for Ray Holes, I do not recall his name now. he carved the large mixed flower piece and all the sample fenders in the Ray holes catalogs, simply incredible. he carved more of a California style, with a little more depth and life than Sheridan style, not quite so structured and with many crossovers and turn-backs. this man was the inspiration for Dale harwoods style of carving, who in my opinion is one the best California Style carvers of our time. if anyone recalls the guys name please post it.
-
Howdy;
I was wondering what you all do in regards to oiling the skirts before you put them on the saddle, I have always oiled the whole skirts, including that area where the bar pads are. This is where my question arises, should a guy oil the bar pad area of the skirts or not? I have felt that due to all the moisture that will come from the horse that this should be a good thing. Just about every saddle maker that I have worked with or have been mentored by has done the same. I have talked to a couple other saddle makers lately that have say they never apply oil to the bar pad area of the skirts because they never want oil against the rawhide. I know on Watts video he does not oil the bar pad area of the skirts before the final assembly. What are your thoughts on this?
thanks much
-
Howdy Allen;
If you want some true custom made trees there are some great tree makers you could try, I use the same treemakers as Greg, Rod nikkel and Glenn Christman. Both excellent tree makers, so they have long waiting lists, or they are not taking orders from new customers to keep the waiting list down.
But there are still other options out there. You can try give Ben Swanke of Billings, Mt a call. I have not used his trees personally, but I have heard good things about them, I do know that Don Butler uses them and I think Chas Weldon does(not a 100%positive of that) so if those guys are using them that is a pretty good recommendation. If you would like to try a tree from a custom maker, give Sheridan leather outfitters a call, I know they try to keep a few trees around from custom makers like Rod Nikkel, Rick Reed and Bill Bean, maybe some others to. If you need some contact info for some of these tree makers just PM me.
I guess my point is it doesn't matter where you or your tree maker are from, the trees can be shipped to you, for example both of my tree makers are from Canada and ship around 1/2 of their orders to the US. If my tremakers lived in Italy or Australia I still would get trees from them. Their trees are just that good.
-
Howdy;
I use both rawhide and nylon/poly mauls, I do prefer the poly over the rawhide for a few reasons.
1- the nylon will wear for just about forever, the rawhide mauls will breakdown and get smaller with use
2- while stamping the rawhide maul always seemed to leave behind a little bit of dust or specks of hide that would come off and the would get stuck behind in the carving.
To deal with the poly mauls slipping off the tools, I encountered the same problem when I got my first maul from Don King years ago, I asked him about it and the fix is, take all your stamping tools and just touch the ends to a grinder, (or use a file) and get a nice flat crisp edge to the tops of them, this will stop the tool from spitting out as you hit them.
hope this helps
-
Howdy;
I am new to the forum, I am a custom saddle maker and have been so since 1989, I have been very lucky to have worked with some very talented saddle makers through the years, I started with a year long apprentice at King's Saddlery in Sheridan, working 6 months in the repair shop and then 6 months working with John King. Since then I have been mentored by an excellent saddle maker by the name of Matt Eberle, then I had the opportunity of a lifetime, I worked for Dale harwood for a couple years, myself and John Visser made saddles for Ray Hunt under Dale. This was a learning experience that advanced my saddle making ability more than I could have imagined. Since that time I have been building saddles and cowboy gear in my own shop. I build mostly for working cowboys, which is exactly who I want to build for. One of the things I like best about building saddles is knowing that I can never attain perfection, I can always do better on the next one. I hope this site will help me in my quest for knowledge, and maybe I could help someone else in the process.
ps; I have started an online blog, it shows a brief outline of the process I use to build a saddle, if you go back in the blog archives you will see the build of a couple saddles from start to finish.
-
Howdy;
I am new to this forum, looks like a great place to exchange ideas and learn some.
Now in regards to this post about Rod Nikkel and his trees, I have used Rods trees for years, about 80% of my customers are working cowboys, they spend almost all day, every day in a saddle, on many different horses that are in all kinds of condition and age etc. These guys use their horses and saddles hard, they must have saddles that fit, and fit well, that is why I use Rods trees, because I have to use trees of this quality to meet my customers needs. Simply put ROD NIKKEL'S TREES FIT HORSES.
So when I read something like "In this statement he is essentially telling you that none of his trees will fit a real horse." That is just plain wrong, why don't you insult his mother while your at is. Rod and just about every other good craftsmen I have ever met including myself, build because it is our passion, not because it is our job. Sure we make a living at it but the real thing that keeps us going is the passion and desire to continually learn and make better gear, whether it is saddle trees, saddles or whatever. So when you tell another craftsmen that his product which he puts his heart and soul into does not work, well that's just a low blow, and Rod and Denise should get an apology. And to say something like that about Rods trees when you have never made a saddle on one and put it to hard use to find out if it works or not just shows your ignorance. Now I am not trying to start a fight or get into and argument here, I just couldn't sit by and say nothing because what was said was wrong on many levels.


Learning Resources
in Resources
Posted
I have the video Introduction to Rawhide Braiding "The Cowboy's Craft" by brian neubert. I don't think there is an easier way to learn how to braid. You can get the DVD and go frame by frame on the knots.
The video will show all the necessary knots and braids you will need. It is one of the most straight forward learning tools I have.
here is a link to his site
http://www.bryanneubert.com/HTML/videos.htm