


thesergeant
-
Posts
54 -
Joined
-
Last visited
Content Type
Profiles
Forums
Events
Blogs
Gallery
Posts posted by thesergeant
-
-
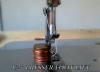
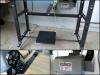
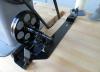
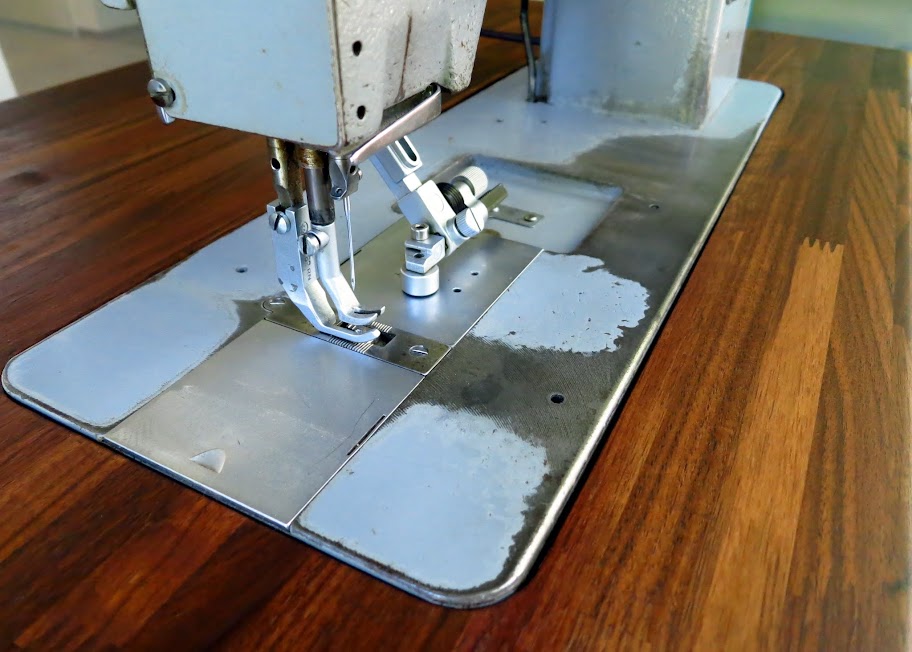
Well, I figured out the last piece of the puzzle (the footpedal) and thought I'd share with those that may be interested in doing the same thing.
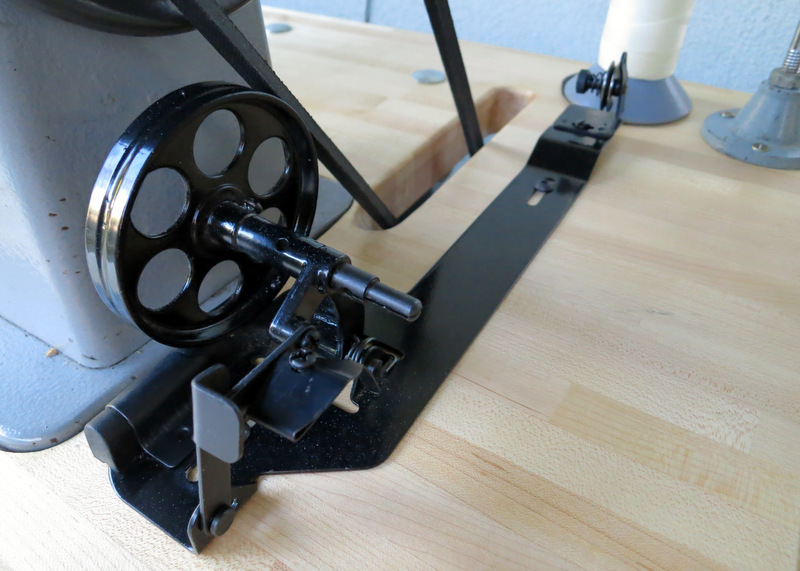
The footpedal assembly is made using (2) U-bolts that are covered in a vinyl tubing of the same diameter. I drilled out the frame and installed the u-bolts as shown. The pedal is a standard foot pedal with ~3/4" holes. I cut a piece of 3/4" EMT conduit to act as the support the bar for the pedal. Then just slide the conduit through the u-bolts and the footpedal. The whole assembly removes super quickly but just loosening 4 of the crown nuts on the u-bolts.
To keep the pedal from moving side to size I bought a PVC nipple with an interior diameter of 3/4". I cut it in half and drilled and tapped a set screw in each of the pvc pieces. I installed them on the tube underneath the pedal and butted each piece up against the sides of the pedal. This locks the pedal in place but still allows it to operate smoothly.
-
For Sale:
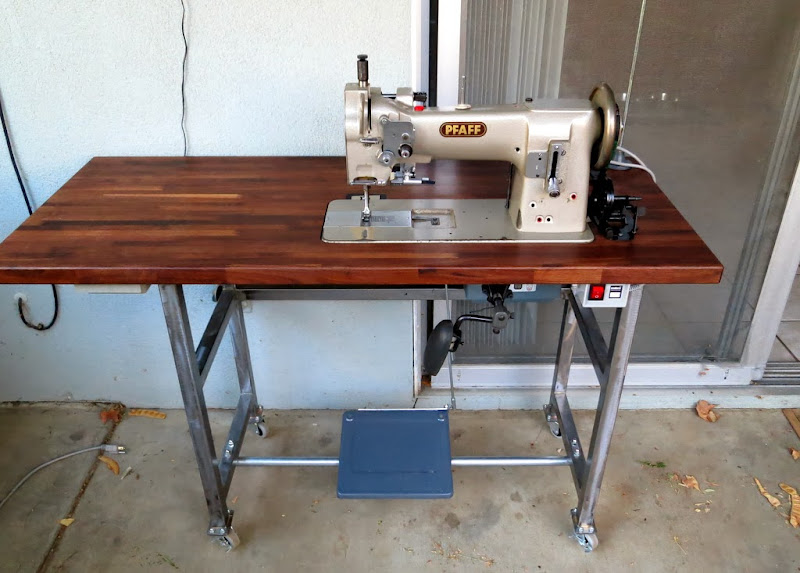
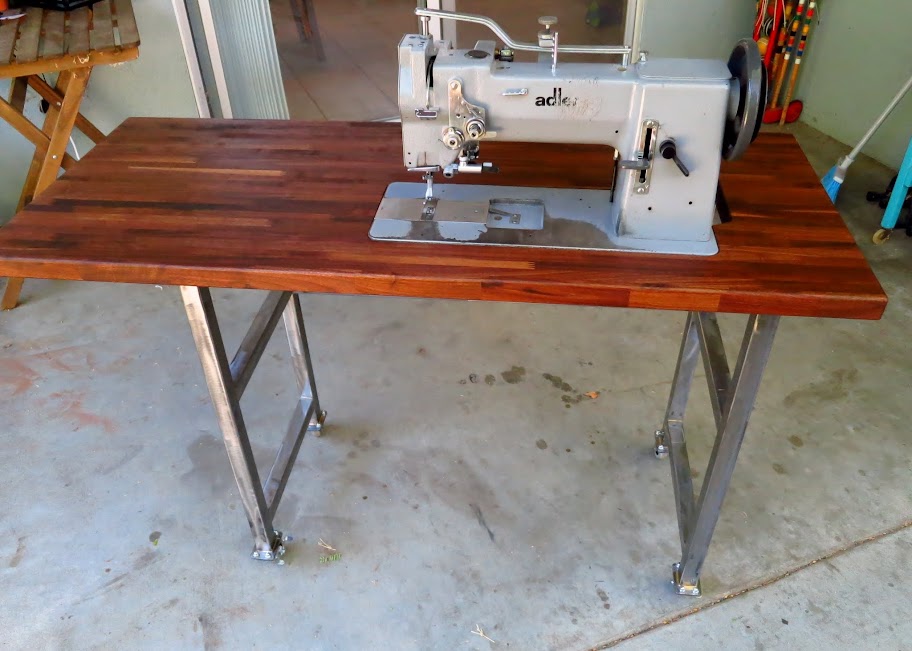
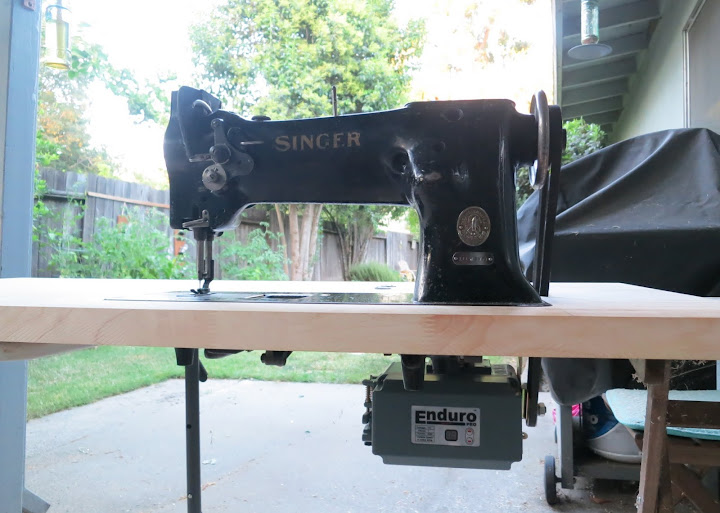
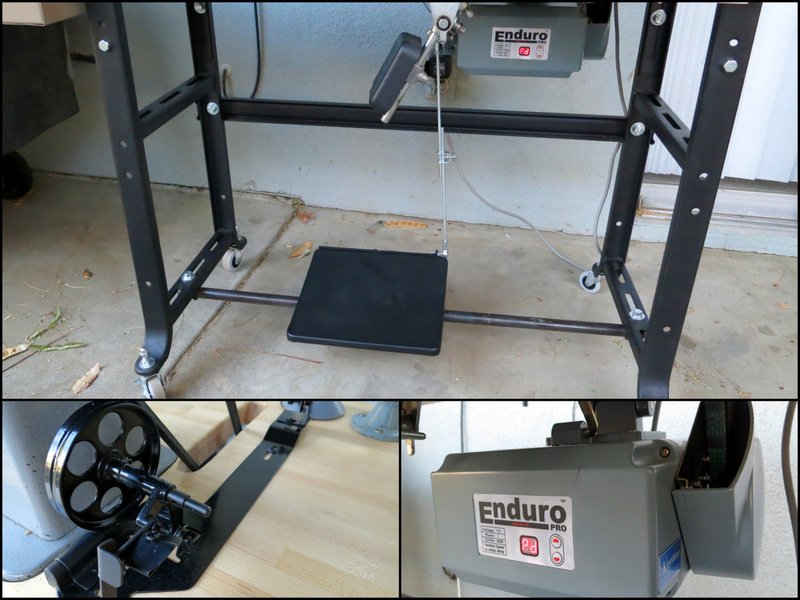
What: Adler 167-GK-373 (Leather Model) w/ new Enduro SM645-1P Servo Motor & Custom Hardrock Maple Table
Where: Davis, CA (95616) - Pick Up Only
How Much: $999 for everything Pictured
--------------------------------
Video of Machine/Table/Motor and All Accessories:
http://www.youtube.com/watch?v=teJvohKneGk
---------------------------------
This is the Rolls Royce of the sewing world. If you're in the market for a walking foot sewing machine for upholstery, bag making, leatherwork or other heavy duty applications you won't find a machine that runs smoother, quieter or is as reliable. They simply do not make machines to this quality level anymore. Everything is made is China with sub standard materials, sloppy tolerances and lax assembly. This machine runs like a swiss watch.
The machine sits solidly in a totally custom, handmade, hardrock maple solid wood table. You literally can not find a high quality hardwood table anymore -- they're all compressed particle board or plywood boards with venner tops. Overtime they sag and fall apart. This custom table is made to last. The table is 1.5" thick hardrock maple with a polyurethane finish.
The legs are vintage singer that have been reinforced with welds at the joints, sandblasted and then painted a matte black. All of the hardware is brand new. 2" locking caster wheels are bolted to the feet so you can move the machine around when necessary.
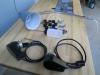
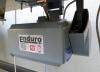
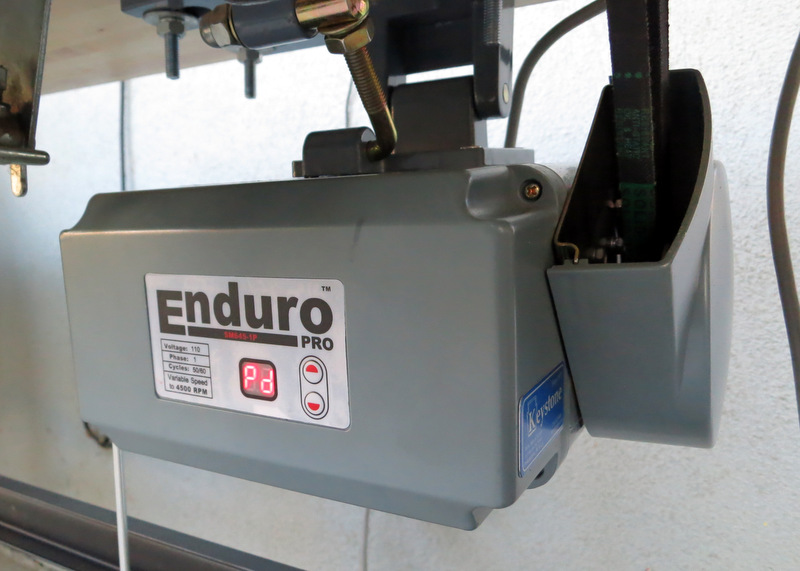
The motor is an Enduro Pro SM645-1P premium Digital Servo Motor. The speed is highly controllable and adjustable. The motor has a needle position sensor that can control the position of the needle at the end of a section of sewing -- your choice of up or down position. The motor is totally silent but still produces 3/4 horsepower (800w). The belt is new and the motor has been upgraded with a 50mm pulley for better slow speed control. The motor is about 1/5 the weight of a standard clutch motor, weighing only ~11 lbs.
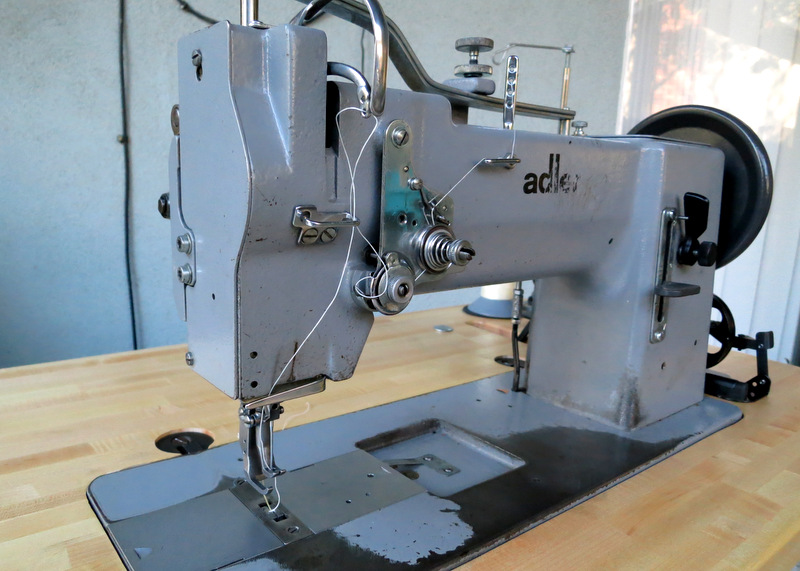
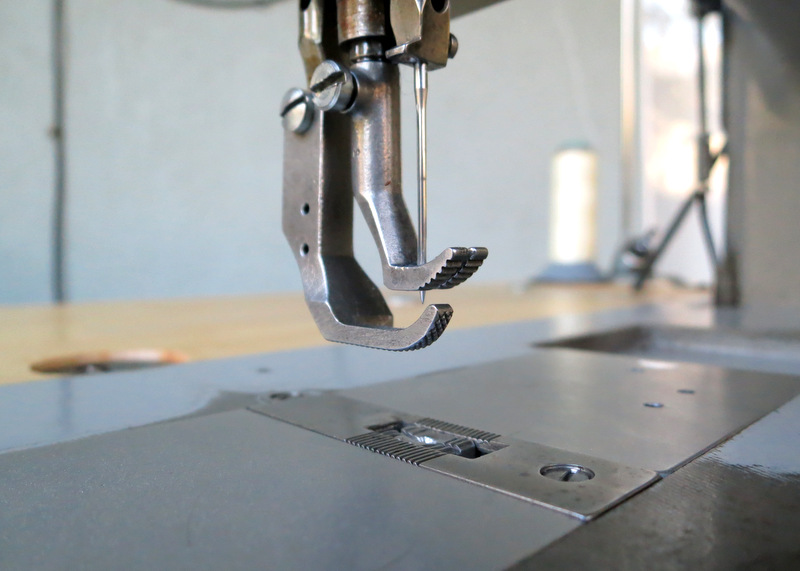
Adler 167-GK-373 Compound Feed Walking Foot Machine
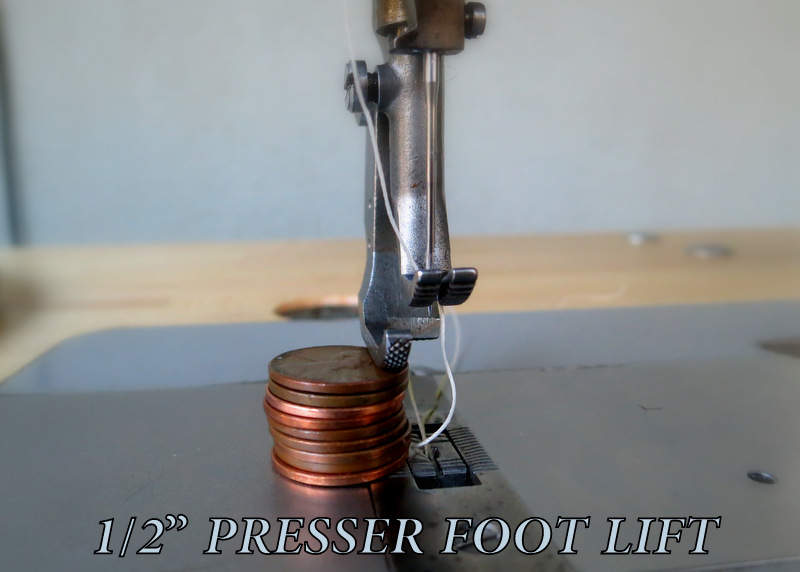
- 1/2" Presser Foot Lift
- 6 stitches per inch w/ Reverse
- 207 top / 138 bobbin max thread size
- timed for 135x17 industrial needles
- Large Capacity Bobbins with Horizontal Rotary Hook
- Safety Clutch Mechanism to Protect Machine During Jam
- On the fly adjustable alternating foot lift
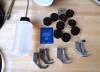
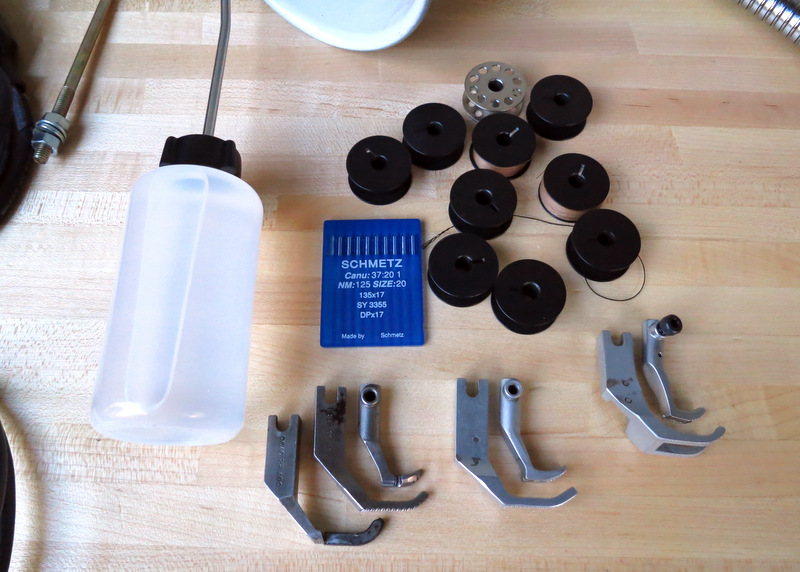
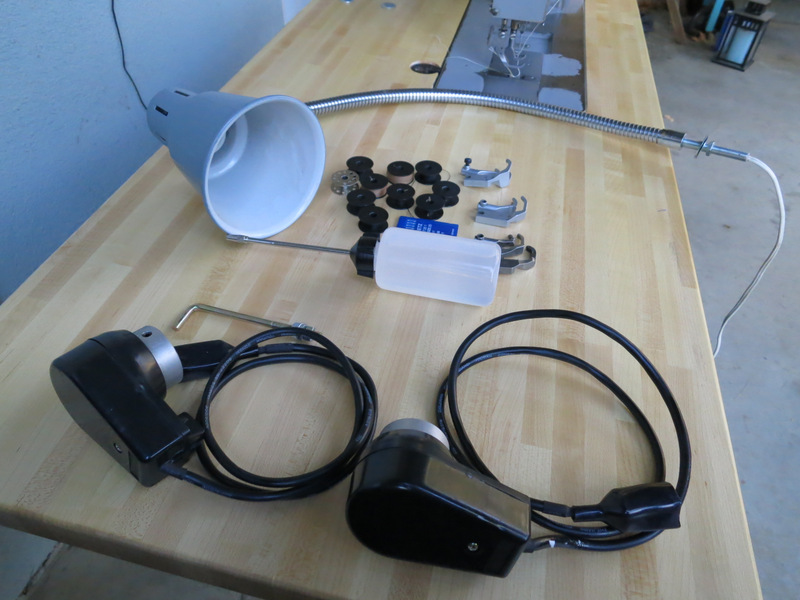
INCLUDES:
- Adler Sewing Machine
- Hardrock Maple Table w/ Enduro Motor w/ Needle Positioner, New Bobbin Winder, Dual Thread Stand, Gooseneck Lamp on Caster Wheels
- (10) Alder Bobbins
- Variety of Feet (Left/Right Zipper Foot, Piping Foot, Standard Foot
- (10) Schmetz 135x17 Needles in a variety of sizes
- 4oz Long Spout Oiler
- Spare Needle Positioner for Motor
Asking $999

-
The guide was ~$65 USD Shipped. The guide you want is KG1245

http://www.kwokhing.com/pfaff/
It comes with a 14mm roller guide and a straight "T" guide.
-
I ordered the edge guide designed for the Pfaff 1245. It bolted straight onto the back of my Adler 167. My Pfaff 145 didn't have the threaded holes so I drilled/tapped the back for M5 bolts. I really like the guide and am about to order 2 more of them.
I don't think you'll have any issues with mounting the pfaff 1245 model on your singer but you'll likely have to tap the back of the machine. Pretty painless process and well worth it.

-
ERIC -- YOU ARE THE MAN! Thank you, as always, for the phenomenal and generous input!
-
Hey Guys! So I'm in the process of restoring a Brother LS2-837 and beyond some missing parts have noticed a particularly loose bobbin basket. I'm in the process of ordering all the missing/damaged parts for the machine and am wondering if this bobbin basket is going to give me any issues.
If you guys think it is I will add a hook assembly to my order.
Does this seem abnormally loose?
-
I'll join the party, lol. Sign me up
-
The software you want is the last one in that list. http://www.amazon.com/gp/aw/d/B004KSV34K/ref=mp_s_a_1_4?qid=1378764706&sr=8-4π=AC_SX110_SY165 It's $200.
I don't think you can embroider larger than 4x4 on the brother SE400.
You won't be able to embroider a hat that is pre assembled. There isn't any way to secure it in the hoop. You need a speciality embroidery machine for that.
-
Looks like a Singer 99k, which is a 3/4 size machine. The attachment are the standard Singer variety, buttonholer, ruffler, rolled hem foot, etc. Most of them will be of no use to you except for perhaps the Buttonholer. The Singer straight stitch machines with button hole attachments make incredible buttonholes. I gave my mother a Singer 15-91 with a button hole attachment for her birthday earlier this year and the thing she was most excited about was the attachment, lol.
I'd pass on the machine if I were you. If you're going to get a vintage singer home machine I'd suggest a Singer 15-91 or a 15-125. You should be able to get one in running condition for under $100 but inspect the wiring from the motor. It'll likely be rotted so that's something you might want to replace.
This is the machine you want:

-
I have a 201-2 (direct drive motor version) and use it everyday. I love it so much that I even have a backup should anything ever happen to my main 201. I have run 69 threads through the 201 without issue. Will the 201 handle 69 & two layers for 4-5 oz ? I don't know but depending on the price it might be worth picking up anyway.
I also have a few 15-91's (class 15 machines) and they're reported to work better with heavier weight thread. With a vertical bobbin case and oscillating hook I can understand why it would be better in theory but I don't personally notice a difference between my 201s and 15-91s
Here's what a Class 15 machine looks like:

-
I highly recommend a Brother SE400. I've had mine for almost 2 years and haven't had a single problem with it. Comes with a bunch of different feet, an embroidery attachment, 67 stitches, auto thread cutting and some other extras. The embroidery feature is great and I use it often. Realize though that if you want to embroider your own logos you'll need digitizing software to convert the images to a format that the embroidery machine can recognize. This goes for any embroidery machine and the programs and not cheap at all. Hundreds of dollars if I recall.
As great as this machine is for lightweight fabrics it strains to sew through thicker material. I wouldn't even think about trying to sew leather. I use my Singer 201 for 85% of my lightweight tasks, then the Brother SE400 for the 15%. I also have a Pfaff and an Adler that I use for leather and heavyweight materials.
I paid $360 2 years ago. It's even cheaper now at $300: http://www.amazon.co...y/dp/B003AVMZA4
Here's some examples of embroidery with the Brother SE400:

-
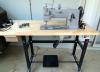
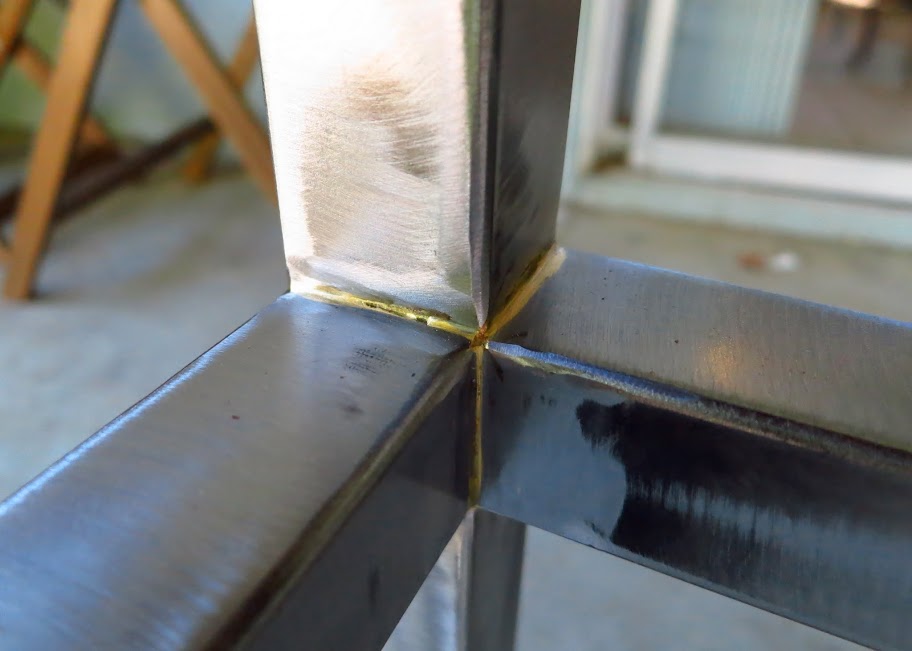
Well, I enjoyed making the last table so much that I decided to make another one, but this time with nicer wood and more robust legs. I ended up brass brazing 1 1/4" square steel tubing for the legs and getting a 1.5" black walnut 20"x48" top and routed it out for my Adler 167. Super excited about this one. The walnut looks spectacular in person.
I was hoping I could get a little input from you guys regarding the footpedal. I've been throwing some ideas around on how to install the foot pedal but I'm still undecided. I'd prefer a non-permanent solution. If you have any ideas please share.
Thanks guys!!

-
Definitely agree with the posts above. Also, I'd suggest a leather needle if you don't have it. I just ordered a swing away binder from China (http://www.kwokhing.com/) for $30. Cost as much to ship it as it did to buy the thing but we'll see how it works. Tor did a great writeup about his. I've been using a magnetic edge guide for a year and it's served me well for straight lines (like collars) but the swing away should be good for following edges for curvy items like sheaths, holsters, etc.
-
I had a similar problem on a machine that I purchased used. Shredded thread and skipped stitches are typically indicators that the height of the needlebar is incorrect. Most likely it's set too high so the hooked is cutting the threading rather than grabbing the loop. That or the needle bar height is way too low. Either way -- needlebar height problem I'd assume. Take it back.
-
I'll play --
Industrials:
Singer 111WSV71 w/ Clutch
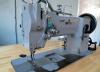
Pfaff 145-H4 w/ Enduro SM645-1P Servo Motor
Adler 167-GK373 w/ Clutch Motor
Domestics:
(2) Singer 201-2
(3) Singer 15-91
Singer 221 (Featherweight)
Wilcox & Gibbs Chainstitcher (~1890s w/ motor from the 30's)
Harris "B." Handcrank Shuttle Bobbin
Brother SE400
Singer Overlock
 w
w
-
Eric, you posted this video?! I watched the video, in it's entirety, a month ago and was saying to myself "damn, this guy knows his stuff" -- I posted a comment on the video back then too, lol. I'd love to see a whole series of similar vids!
-
18 minutes?! That's insane. The jacket looks phenomenal too. Thanks for sharing!
-
4). Also I cannot seem to decrease the tension on my pressure foot? I tried loosening the thumb screw all the way but it doesn't seem to make a difference. Any advice?
I have the same machine. I too noticed the pressure on the presser foot is very high...and even when one loosens it all the way it is difficult to feed a material in reverse IF you are using THICK materials. No problems with the thin stuff though.
I know this thread is over a year old but I ran into the same issue recently after acquiring a 145H4. The presser foot tension is extremely, extremely high. I was almost going to sell the machine and just use my Alder 167 but thanks to the help of Tor and some reviewing of the parts schematic I think I have a solution. I figured I would post it here just incase anyone else in the future encounters the same issue and is in search of some help.
There are two springs that control the presser foot tension on the H4, one is external of the outer foot bar and one is inside of the bar. The thumb screw on the top only compresses the inner spring, which compared to much strong outer spring does almost nothing. Here was my fix:
The black protrusion that comes up out of the machine is held in place with a set screw located on the back of the machine. Remove that screw and grab a pair of pliers. Put a drop of oil and slowly twist the black protrusion back and forth while pulling up until you've exposed out about 1cm. You could probably go even higher but if you're going to check through the set screw hole to make sure that the set screw is still going to contact the cylinder. This reduces the pressure pretty dramatically and now the thumb screw actually changes the tension.
I'm going to see if I can find another spring with the same dimensions and replace it entirely but for now this works. Perhaps a spring from a Singer 111W? If anyone has suggestions I'm all ears. Thanks!

-
An Alder 167-373 has come up for sale locally for $600 complete with table/clutch motor, etc. I've had a really tough time finding info on the machine. Seems like there are generally positive things to be said regarding grey model Adler's but there isn't much pricing info beyond that. I'm considering picking it up but am also looking at purchasing a new Chandler 406RB1. I already have custom build table and a Enduro servo motor so all I really need is the machine head.
Curious to hear what people think about the machine compared to say a vintage Consew 226 and a newer Tacsew T111 or Chandler 406
Thanks guys!
-
-
Thanks for the feedback guys
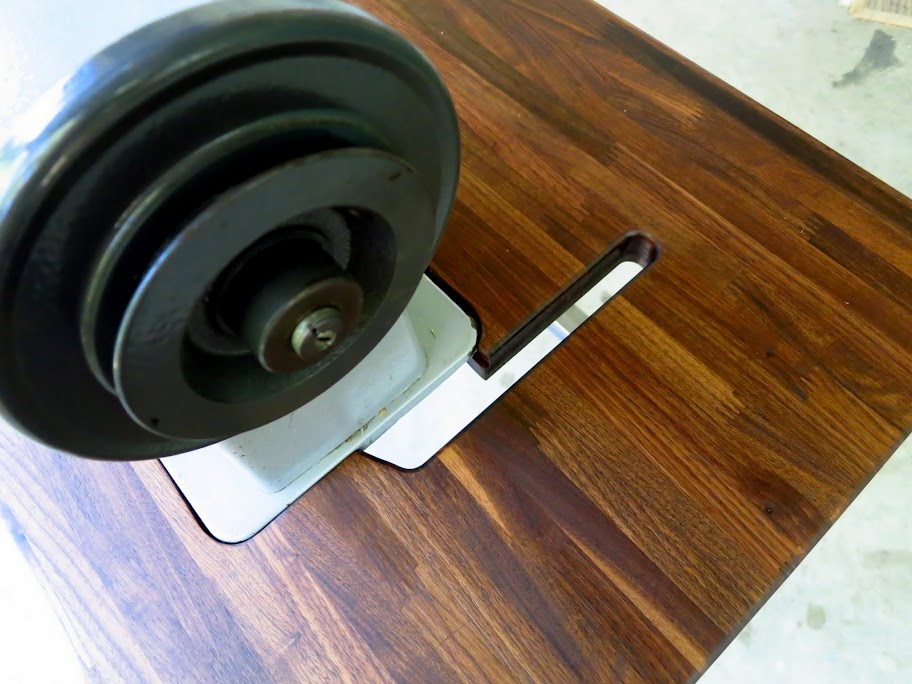
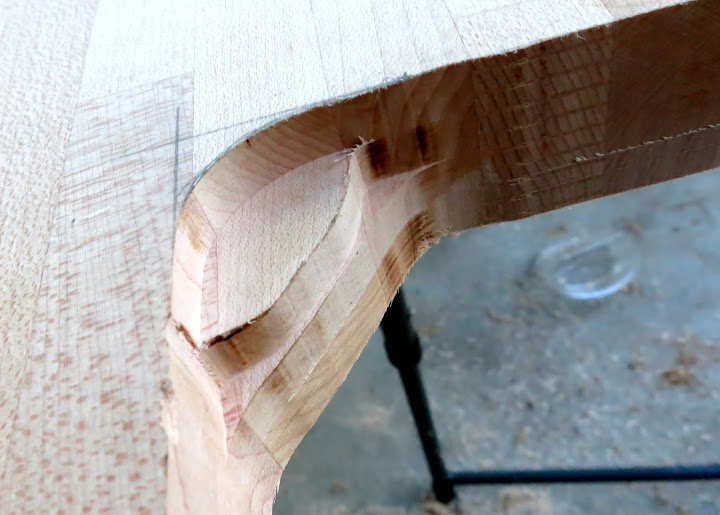
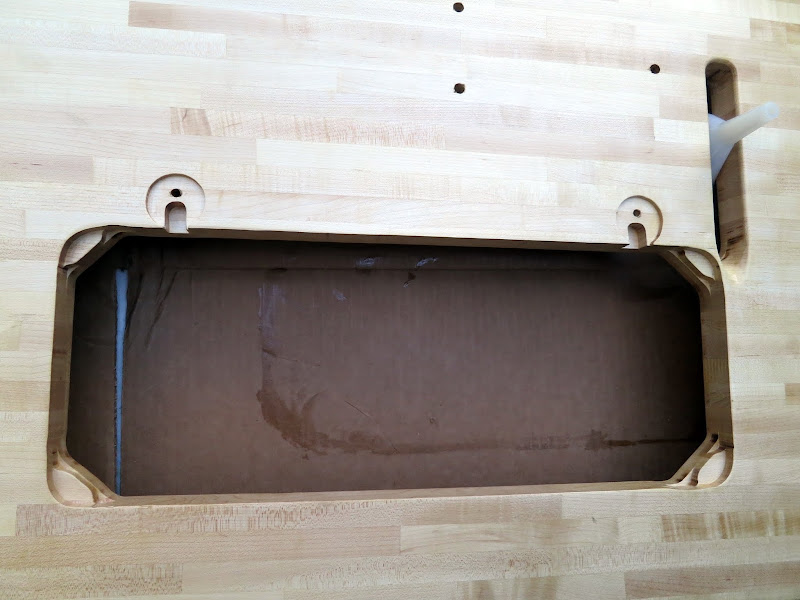
 I just finished taking the router to all the edges to put a smooth but subtle rounded edge on all the corners and cleaning up the belt cut out a little more. Going to give it a final sanding before I apply a couple coats of poly to it.
Schtoink-- I like your idea about lining the inside with felt to act as a "dust catcher". Very clever. I'll give it a shot with some grey felt and some spray adhesive and see how it works out.
Trox, Schtoink -- The original table had leather pads that the machine rested upon. I thought about reusing them but they were pretty thick (>1/4") and thought it was overkill. I'm going to use either some felt of some 1/8" closed cell foam on each of the tabs. I almost forgot about the hinges so I'm going to route those out real quick as well.
I took photos of everything at each step so that a first timer could follow along if they wanted to try it for themselves. I'll post a link to that album when I'm completely finished with the project.
-
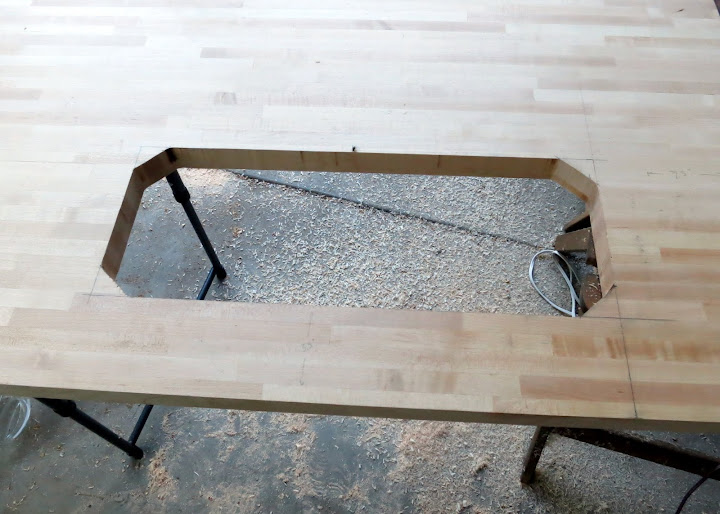
Just wanted to thank everyone once more for their input. Thank you to all of those that steered me away from the IKEA 1" pine and encouraged me to go with a solid hardwood top, I'm really glad I listened to you all and went with it. I picked up my 25"x48"x1.5" maple top last week for $95 out of the door and got to work on it this weekend. Here are a few snap shots for those interested. I'm going to clean up the belt cutout today, route a soft rounded edge all the way around the top and polyurethane it this afternoon.
I'm still undecided about the legs but I might weld the old legs back together and use that for the time being. I'll post pics when finished.
Thanks again guys! Great community here.
-
Jeremy, I wish you never would have directed me to "woodcrafters"!! THey have the table tops but unfortunately are too long -- BUT -- they have a lot of other interesting stuff there. I have a feeling my wallet is going to lighten up a bit--plus there's one 30 minutes away from me.
I did a little more searching and found a place a hour north of me that makes and sells these table tops in a variety of thickness and sizes. I'm going to go for a 24"x48"x1.375" hard rock maple for $88 (!!!). For another $50 I can get a dark walnut in the same size. HMMMMmmmmmm, is it worth it? Lol.
-
Boy am I flip flopping on this project!
Alright, so I'm going to forget about the ikea table and trying to brace it. You guys have convinced me and I'm fairly certain I'll thank you for it.
Massive, thanks so much for the info on framing solid wood. Clearly I'm a noobie at wood working. Second, thank you for the link to that table top. That is EXACTLY what I was looking for -- hardwood, "workbench look" and 1 3/4" thick. I might actually go for the smaller table size (24"x36"x1.75") as well.


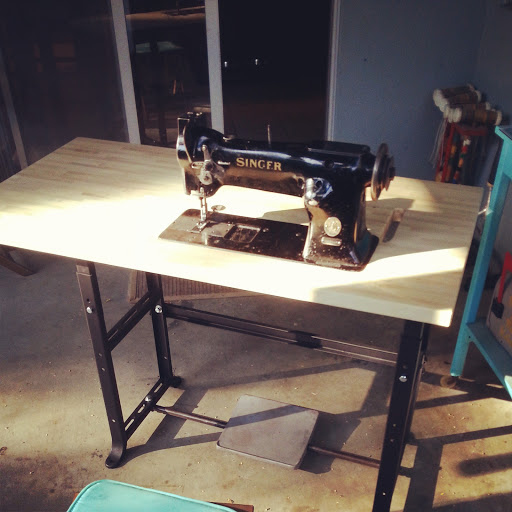
Adler 167-Gk-373 Walking Foot Sewing Machine W/ Digital Servo & Hardrock Maple Table + Accessories
in Old/Sold
Posted
SOLD. Thanks guys!