


Constabulary
-
Posts
5,687 -
Joined
-
Last visited
Content Type
Profiles
Forums
Events
Blogs
Gallery
Posts posted by Constabulary
-
-
it for sure will get a decal - who do you think I'am?
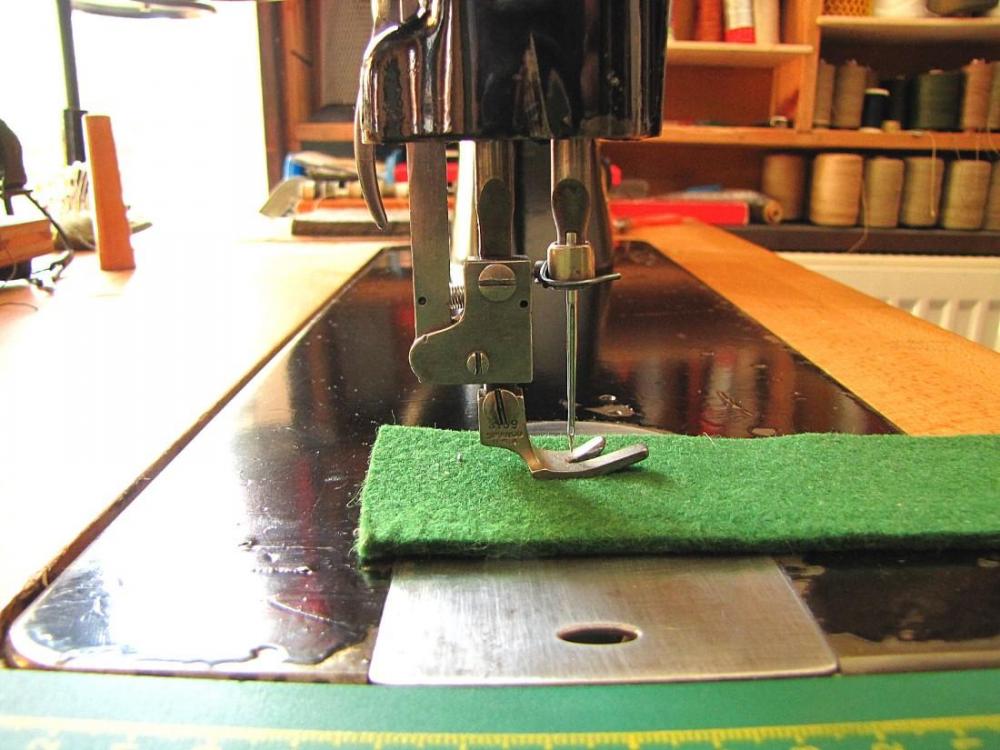
 NB thread guide is back on too - found a couple of NOS guides.
Did some testing yesterday - max. material thickness it can handle is 6.5mm - 7mm then the jump foot stops working but it still sews. But you cannot block the jump foot to stay static (as on Adler 4 / 5 machine) so practically this thickness is the max.. Maybe I can tweak it a bit more but I doubt!
-
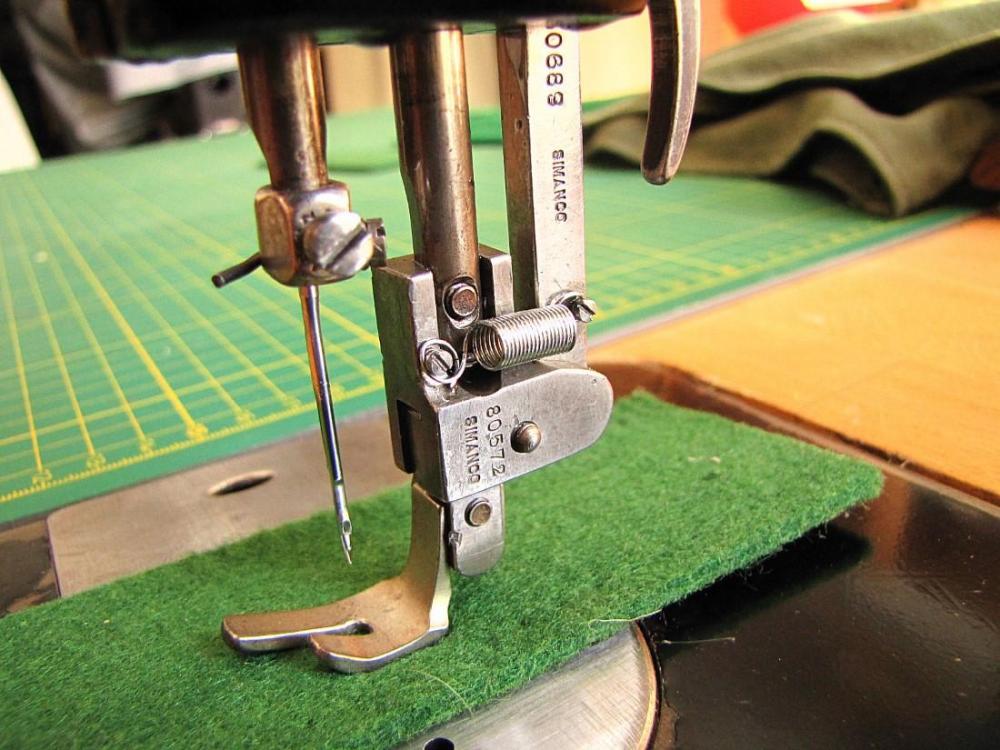
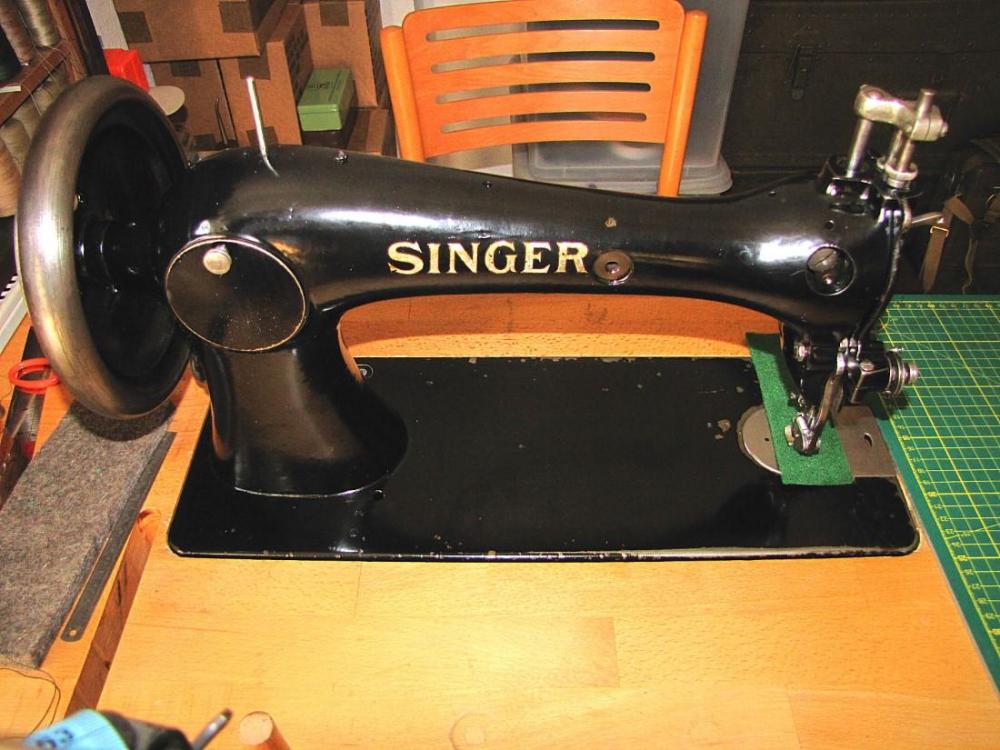
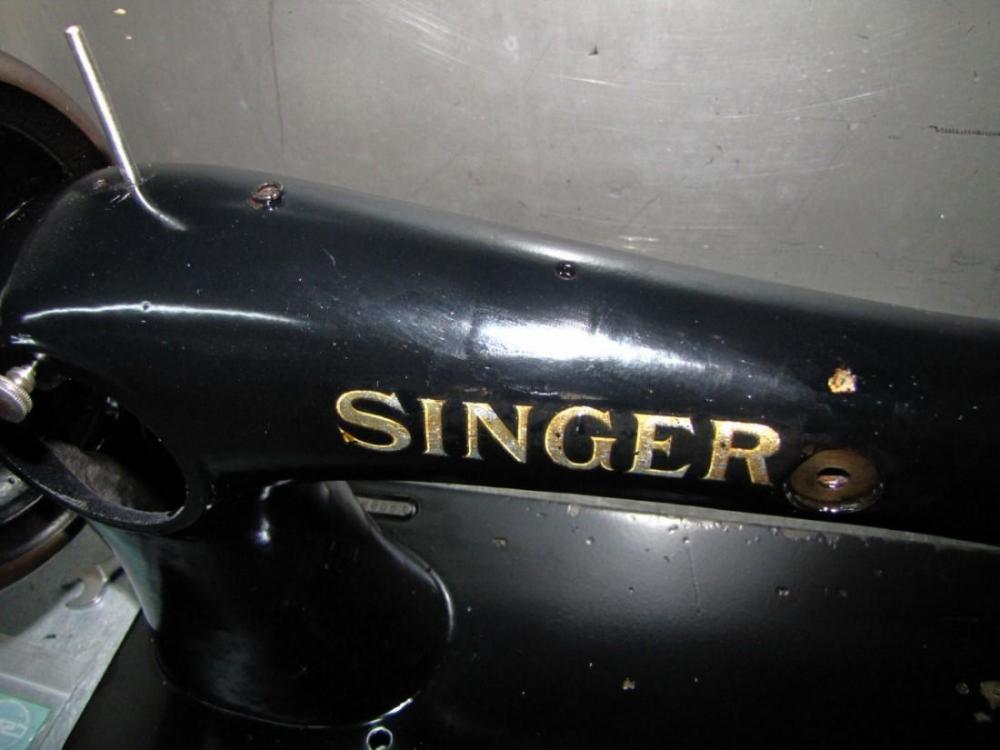
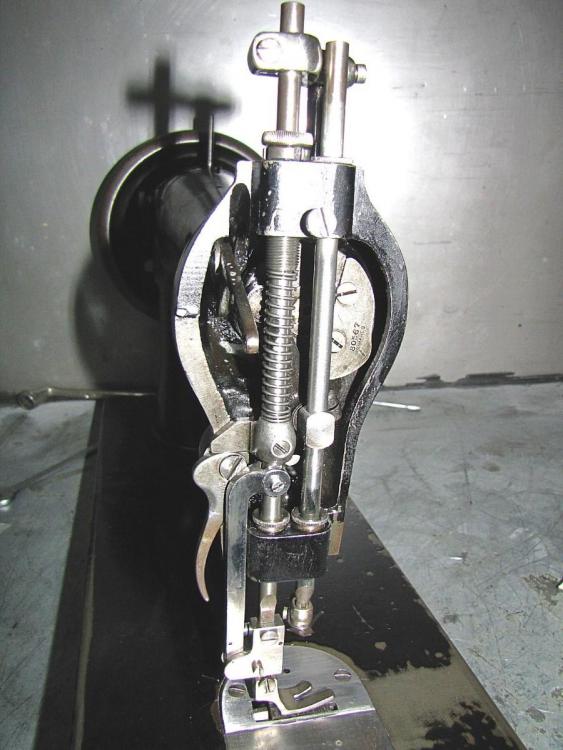
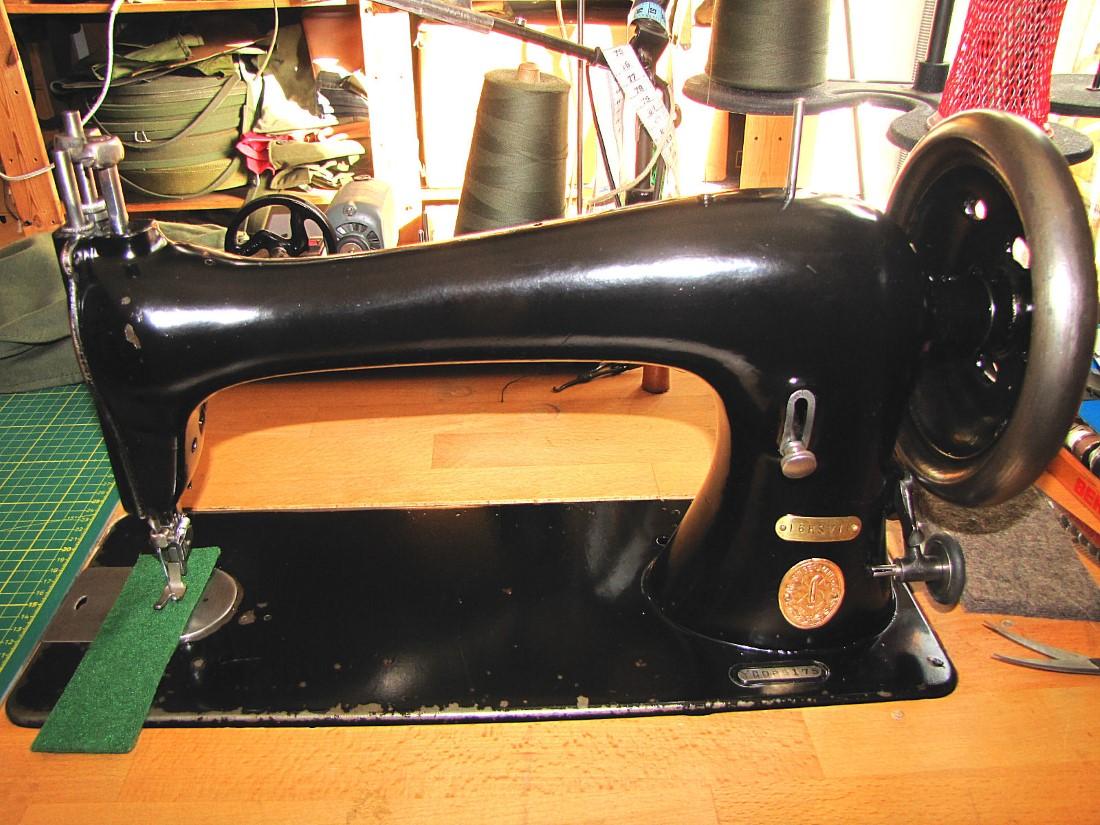
few more close up´s in it´s "natural environment" - I like the 1st picture with the nice SIMANCO stamps. Kinda starting to like this old sucker


-
Thanks a lot! I know it´s not everybody cup of tea what I´m doing and how I doing it but my aim always is haveing a machine I like to look at and I like to work with. I do not like to look at and work with filthy looking machines.
30 minutes ago, Scoutmom103 said:Very nice. Looking good. Do you mind sharing what the hot "washing soda solution" consists of? It did a very nice job cleaning up some very gummed up parts.
Thanks
Well just 60°C water and some washing soda - nothing else.
") I just pour in the washing soda "by feeling" (rather too much than too less). It really removes a lot of gunk! But be careful with the decals it may damage the decals. Different brushes are helpful and Scotch Brite scroub sponges and metal sponges will remove the very sticky gunk.
39 minutes ago, mikesc said:
I just pour in the washing soda "by feeling" (rather too much than too less). It really removes a lot of gunk! But be careful with the decals it may damage the decals. Different brushes are helpful and Scotch Brite scroub sponges and metal sponges will remove the very sticky gunk.
39 minutes ago, mikesc said:Looking pretty, although some may find the pics of completely disassembled sewing machine "innards" somewhat traumatic..;)..Reminds me of some old VW air-cooled manual pages from the 60s and 70s. Or old Giles cartoons from the same period.
btw..looking at the 3rd pic your 1st post in that group..your machine's creatine levels may be a bit high
Nothing at all against the grey..your grey machines look quite "distinguished"..drab green I would not be so keen on were you to "experiment", but then given what you sew..
Agree with dikman..you are definitely getting good at this")
I do not take apart the machine copletely - always just as much as necessary. Especially when parts are pinned I do not touch them as long as they are not badly worn.
What you mean with creatine level?
-
few more...

-
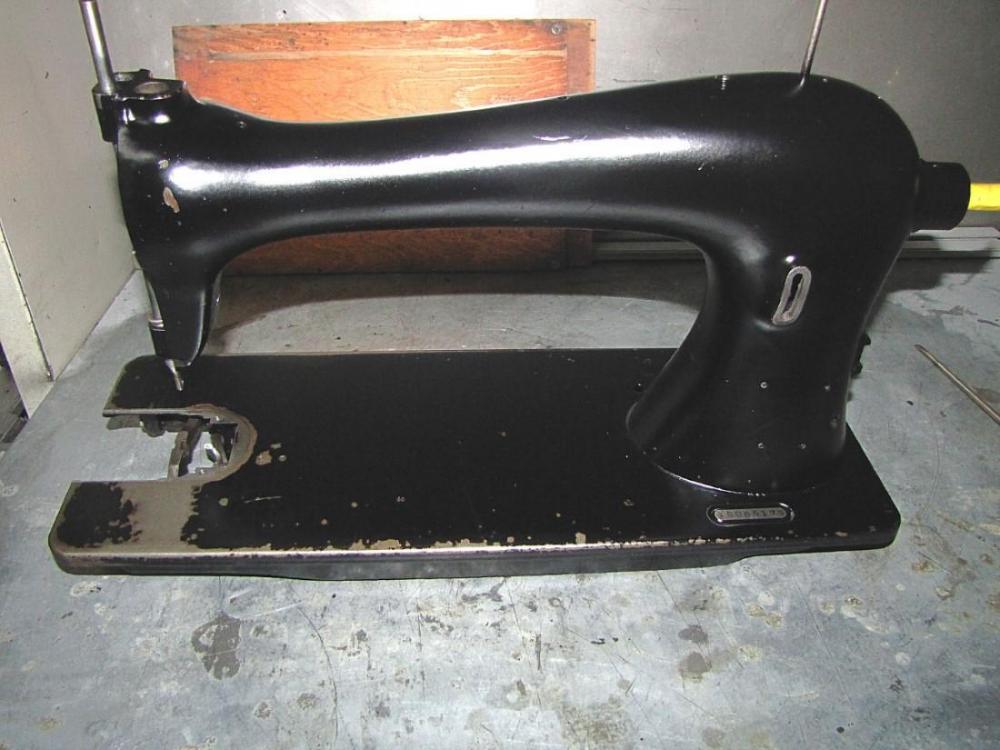
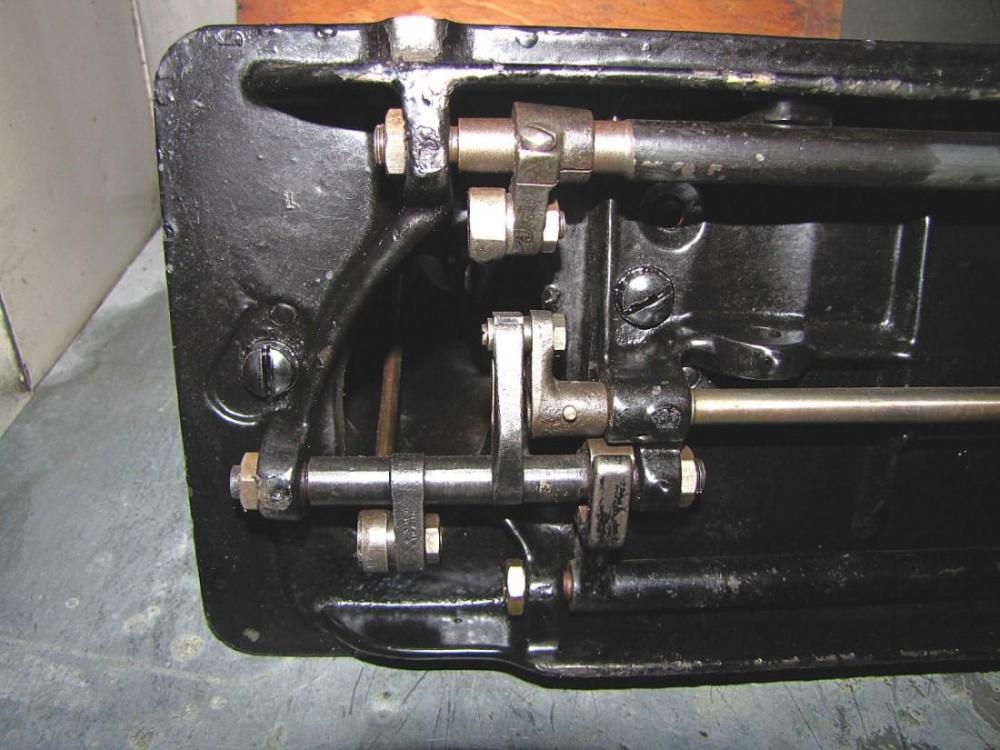
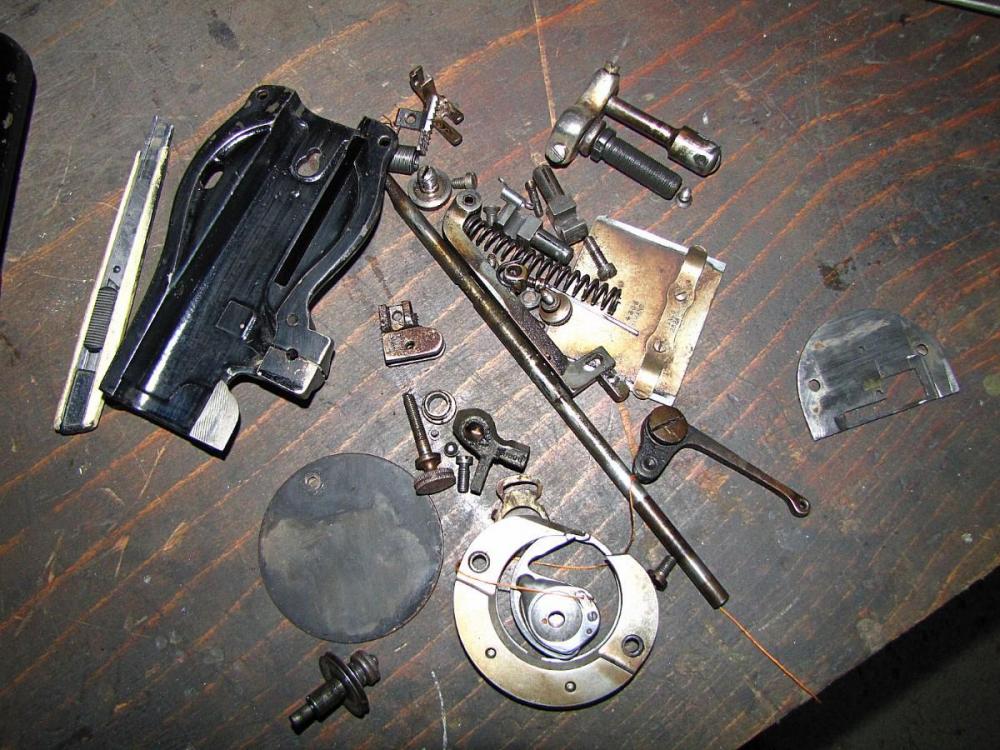
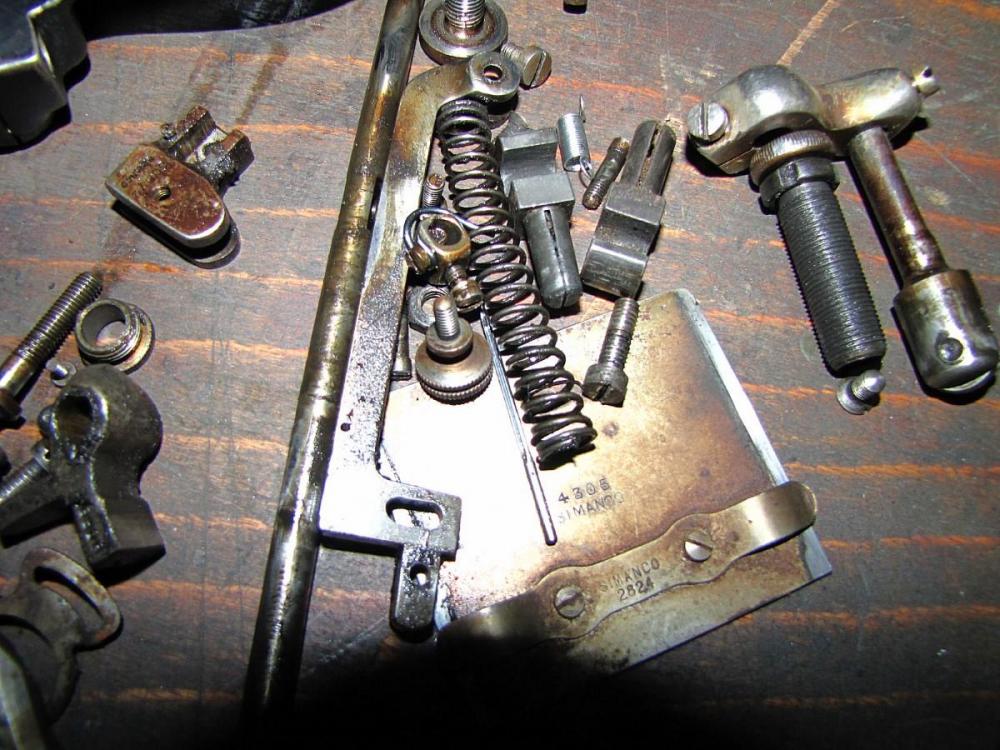
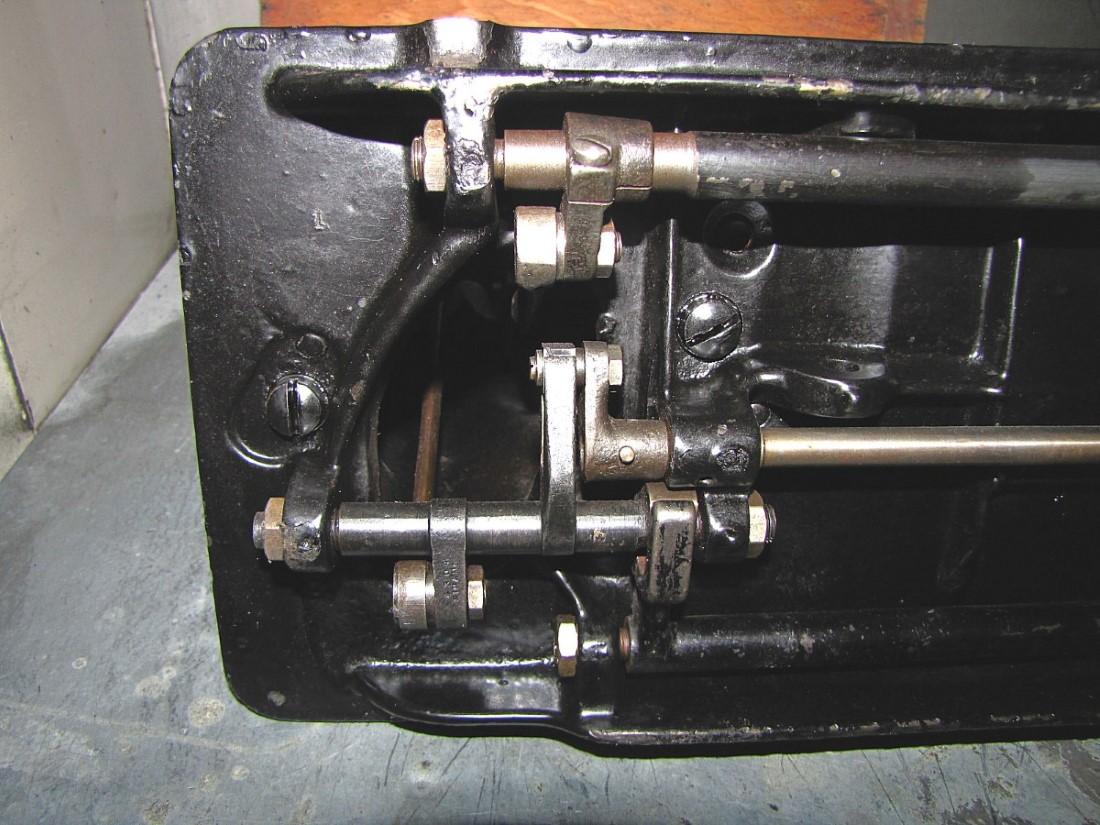
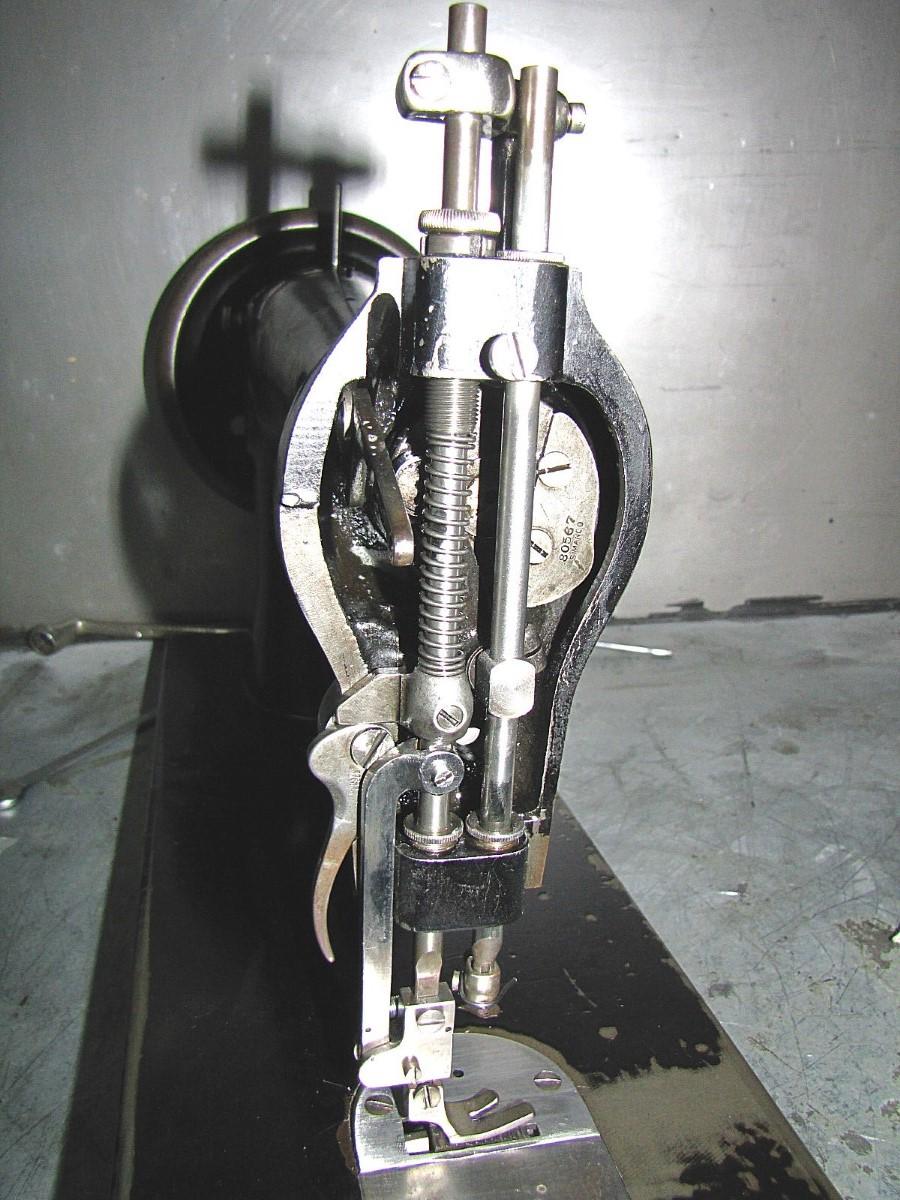
Parts removed and parts cleaned


-
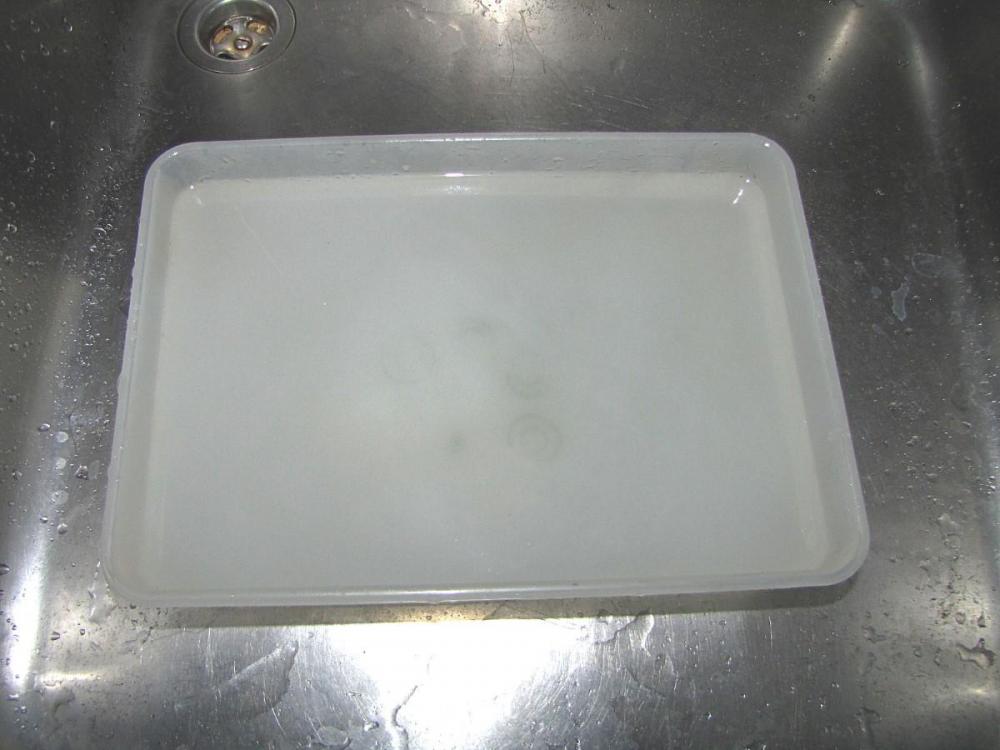
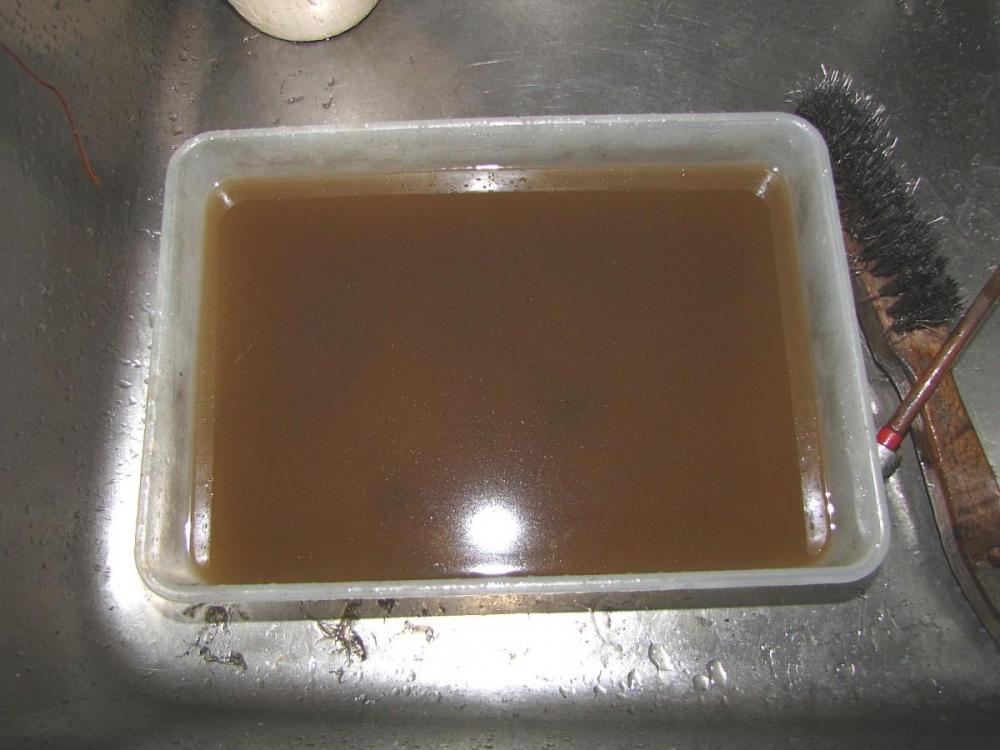
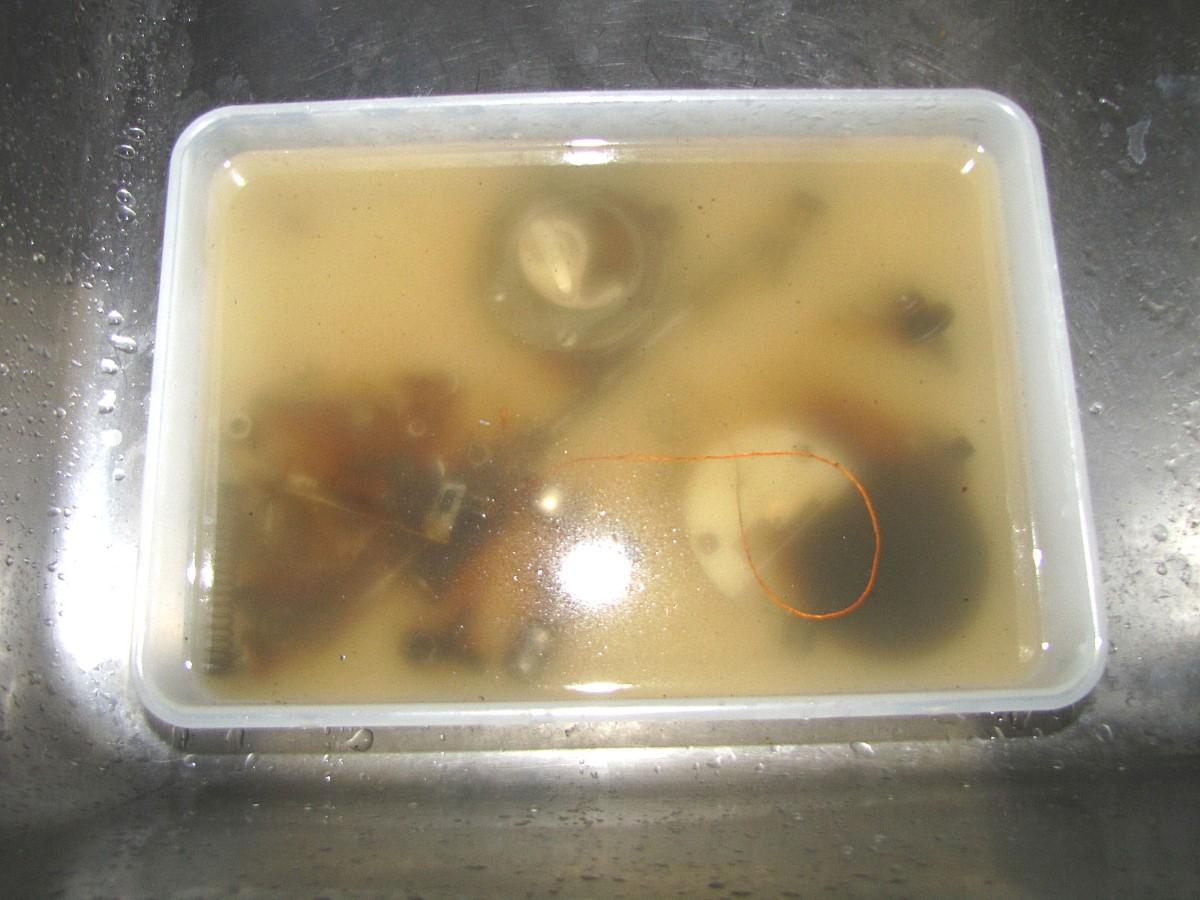
Cleaned everything, removed all the gunk and dirt crust from the parts.... I washed off everything (inside and outside) with hot a washing soda solution - that worked very well. See first 3 pictures. Clean / fresh solution, then with the added parts after a few minutes and the last pic shows the dirty solution - thats just from the parts shown in the following post.
I filled the ugly big paint chip with epoxy (see pics in 1st post). Someone put an 2nd odd pin on the ridge and thats why the paint chipped there - its not lined up with he "original" pin to the right and I think its bubba'ed
 . For those who do not like my grayish silver paint jobs I decided to keep it black this time and I kept the original decal on the backside. Front decal was mainly worn off so not worth keeping the remains I think. Put some clear black paint coat on so it looks a bit more even now. I still have some original Singer decals so maybe I´ll try to add one of them on the front side....

-
Some pictures would be nice.
Could well be that just the needle bar is stuck. I´d also check the bobbin case & the hook and see if some old thread is blocking mechanisms. Oil the machine and maybe put some drips of kerosene / Diesel, paint thinner, benzine or other mineral spirit / solvent in the oil spots and to all moving parts (especially needle bar guides) and jiggle the hand wheel a bit hack and forth.
-
Beside the casting design I´d say if both are H3 (the number following the H describes the foot lift) and have a similar subclass I would say 595 is gear shaft driven and 1295 is belt driven (meaning the connection between upper and lower shaft) other than than compare manuals and parts list because the Pfaffs often have an odd subclass number you have to decipher (if that matters). You should find manuals and parts list by doing a google search.
-
Jimi - thats just because of the earth's curvature
I fortunately mainly had luck with chinese parts, except that they once have sent left toe instead of right toe feet but it was so cheap I didn´t even complain. I agree - its a gamble but there are some "good parts dealers" on Ebay who sell sewing machine parts only (always check what else they sell) so they pretty much know what they do (and sell). But a complete machine - well I was thinking of that too but didn´t dare! And being honest, I have found all my machines used so there is no real demand but a 227R / 153w clone is what I wouldn´t mind to own - and a Singer 97 (but no clones available
)
Joke aside - I agree with AMUCKART. If sewing machine and their mechanics are not what you are "used to" it could end up as a big loss. I would rather check with a dealer or try to find something used. Don´t get me wrong - I´m not saying it will a fail in general but chances are high!
-
Does it act like this when you have removed the complete shuttle race? You know what I mean - remove shuttle race and hook and check again. Just to see if it really is the shuttle race....
-
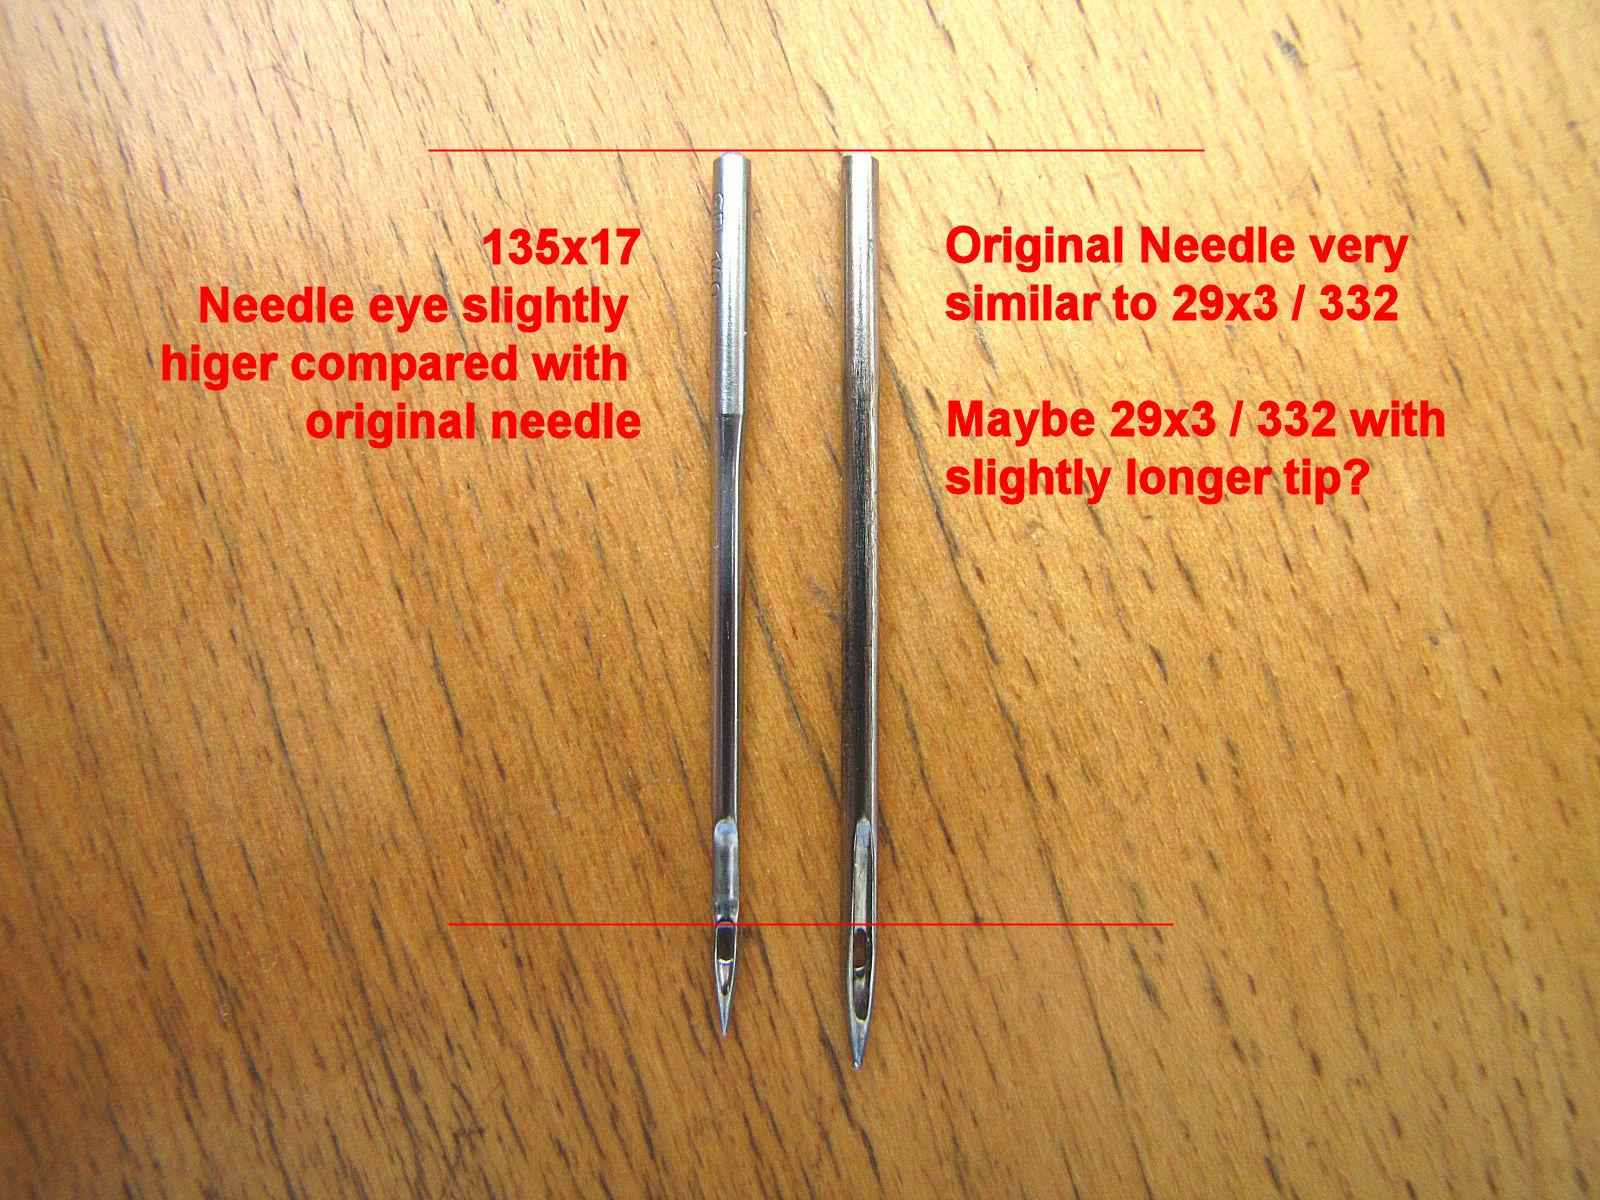
Right, thread guide on clamp is missing - I think it' s broken off. It´s present on the pictures in my 1st post. Will check if I have a replacement. 135x17 works 81 is longer as you said. I just have checked the Sys. 81 needles I have. I will stick to 135x17.
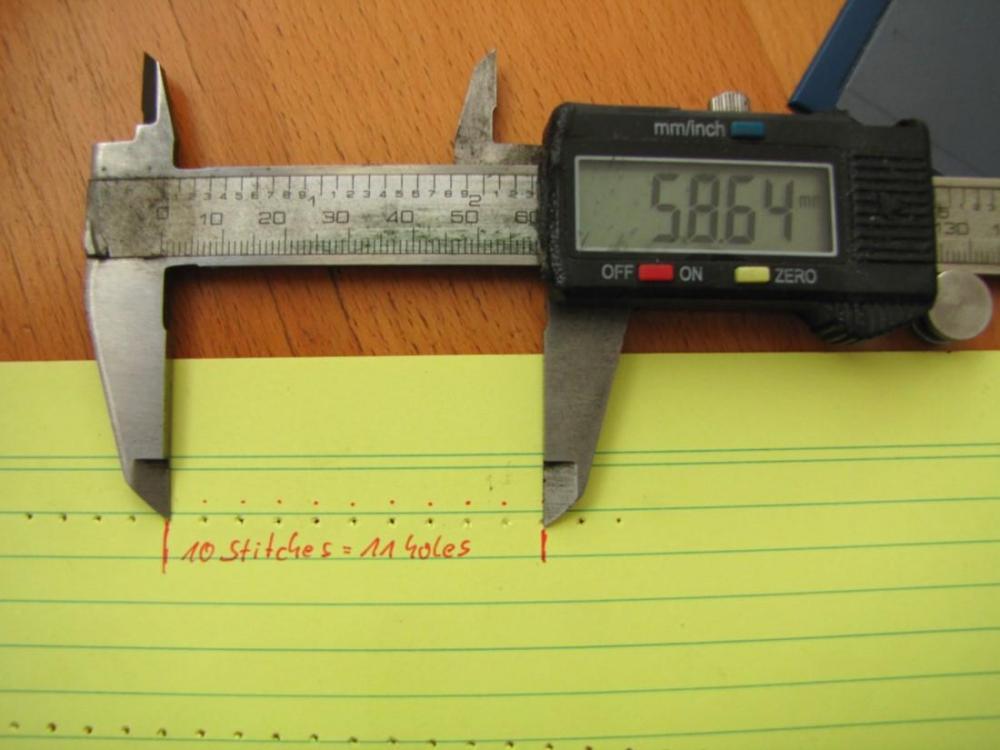
Pretty long stitch length for this machine class I´d say. It comes close to 6mm

EDIT:
Thread guide replaced - thanks for the hint.
-
Yep - the135x17 needle works well.
Machine works very well, really nice stitches with 140 needle and #25 Aman RASANT thread. Check spring needs to be replaced (oddly bent) but still works. Sooo - I will clean it, replace the check spring and then... I don´t know...
A quick video of the 1st sewing attempt after I don´t know how many years or decades.
-
Measure twice - cut once...

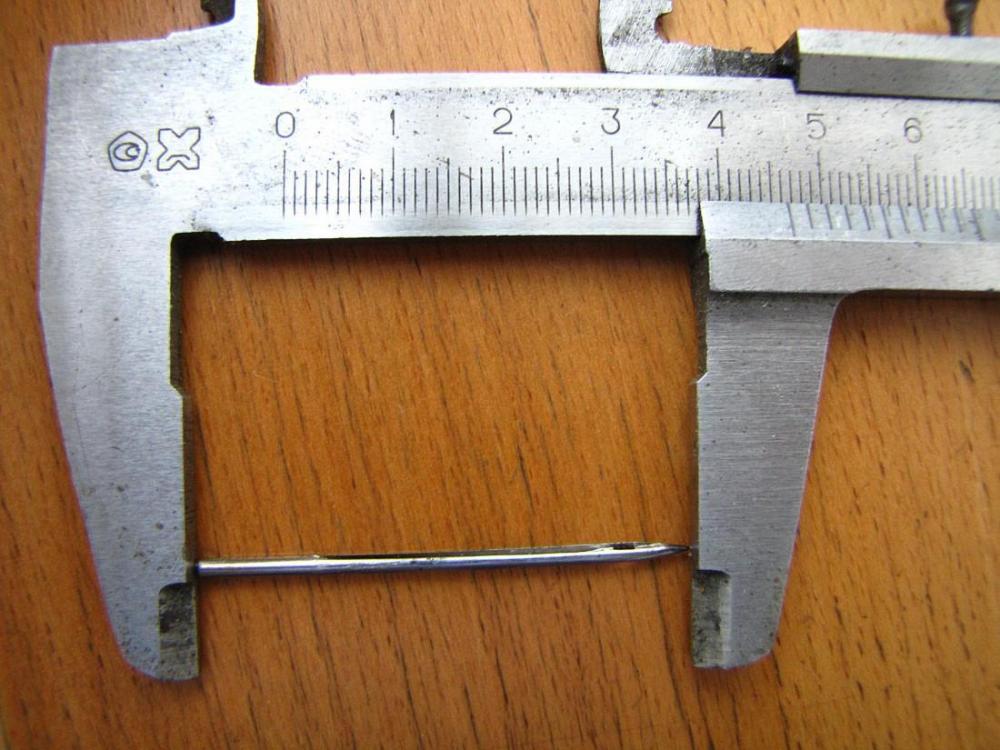
Always good to compare needles direly and not just by measurements. The orig. needle seems to be something like 29x3 / 332 but with a longer tip. The needle eye is almost in the same position as on 135x17 / 135x16 (just a tad higher here) - so it should work. So no junk box diving today.
First test sewing later today....

-
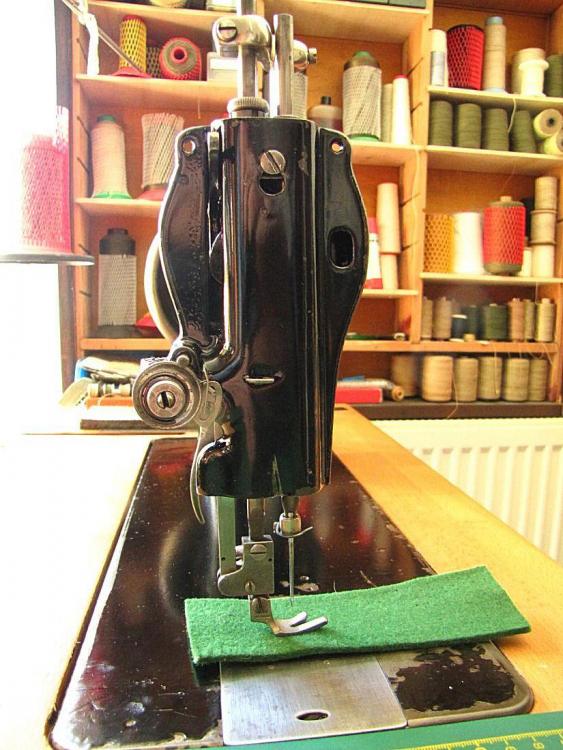
still checking things - todays "challenge": the needle Naaa easy task, right? NOPE!
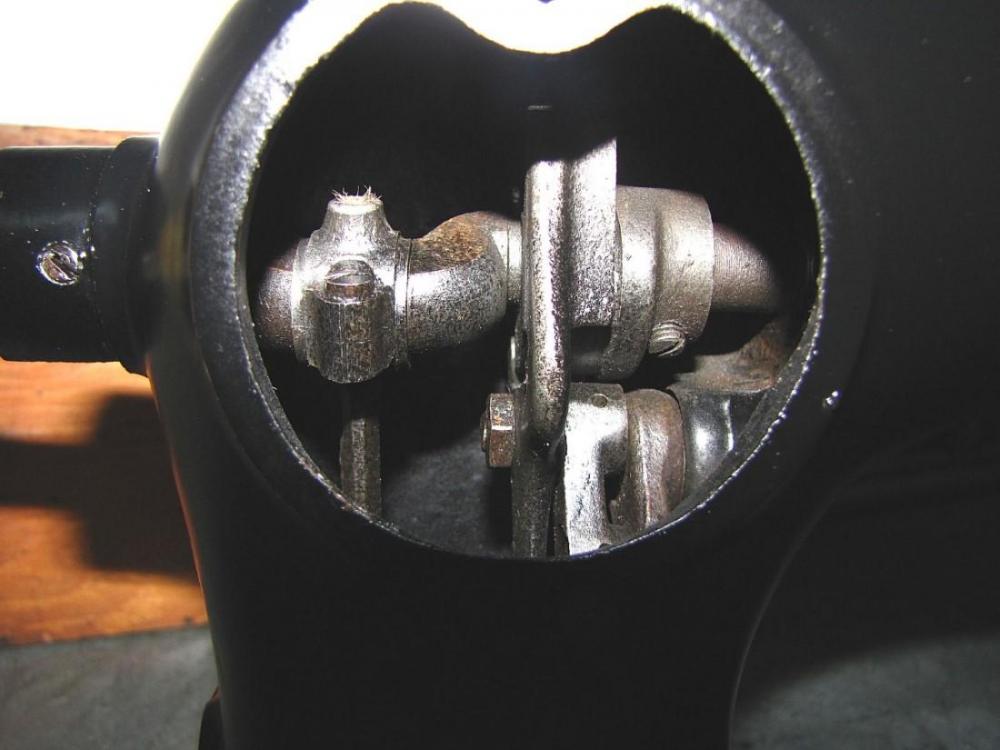
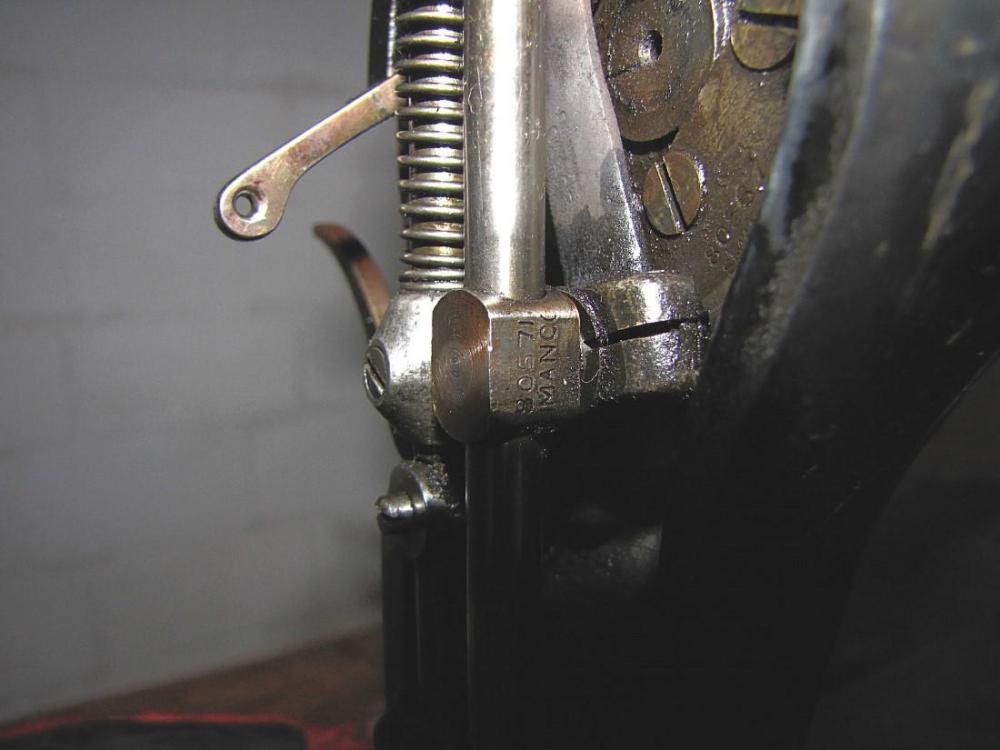
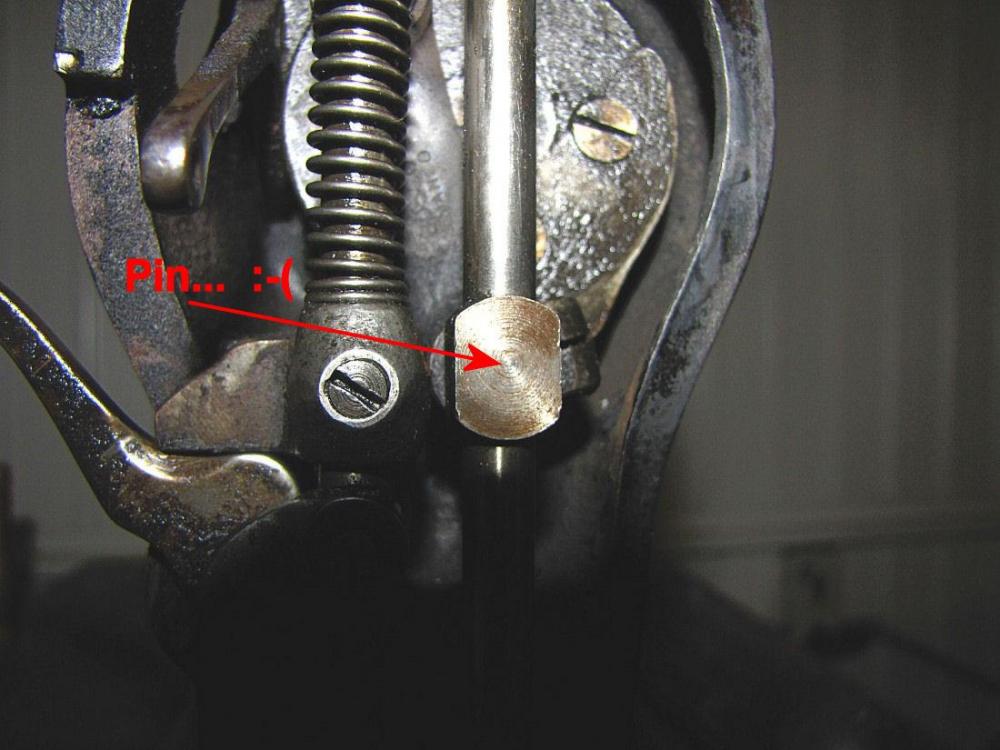
Fortunately one original needle was insert... took a measure... hmmm odd needle system (46.5mm long)... so I thought I set it to 135x17 - as always - easy task I thought... removed some dirt from the NB connector and was looking for the set screw... none on the front, none left, none right - WTF - how did they do this?
Taking a very close look at the front side of the NB connector I figured this freakin needle bar is pinned

What was todays challenge:
the needlefinding a needle bar connector for the 7.2mm NBI guess a 31K part with # 24041 could fit - hope I have something similar. But the other end of the connector has to fit to the NB connecting link - hoping Singer didn´t put in another "Special Part" in here (have to check the #) So today we are diving through some junk boxes
-
The Guesstimeter is always right - not matter if thickness or length or even volume (cubic guesstimeter)
-
Scroll down here:
https://www.sewingwishlist.com/pfaff-industrial-manuals.html
or maybe try Pfaff 491:
https://www.manualslib.de/manual/354966/Pfaff-491.html
-
I have no idea what a NS797 sewing machine is - please post some pictures.
This is what comes to my mind in therms of vintage Singer machines for the shoe trade (just to give you options).
Singer 236G has a top and bottom driven feed (has a 2nd built in motor that drives the top roller foot by a small V-belt)
Singer 52w is a 2 needle post bed machine so it produces 2 parallel seams with approx 2 distance.
Singer 110w / 110K is a very nice gear driven flat bed machine will roller feed dog. It has 3 pre set stich length (all rather short) - maybe you like this video
https://www.youtube.com/watch?v=GrykrTMM7sk
-
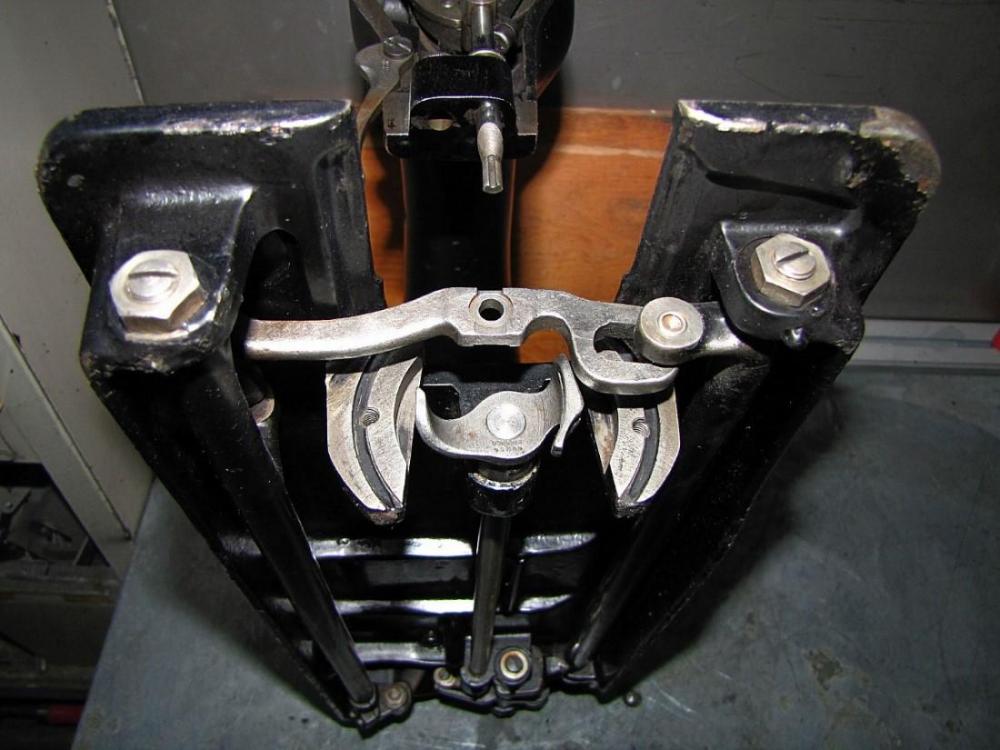
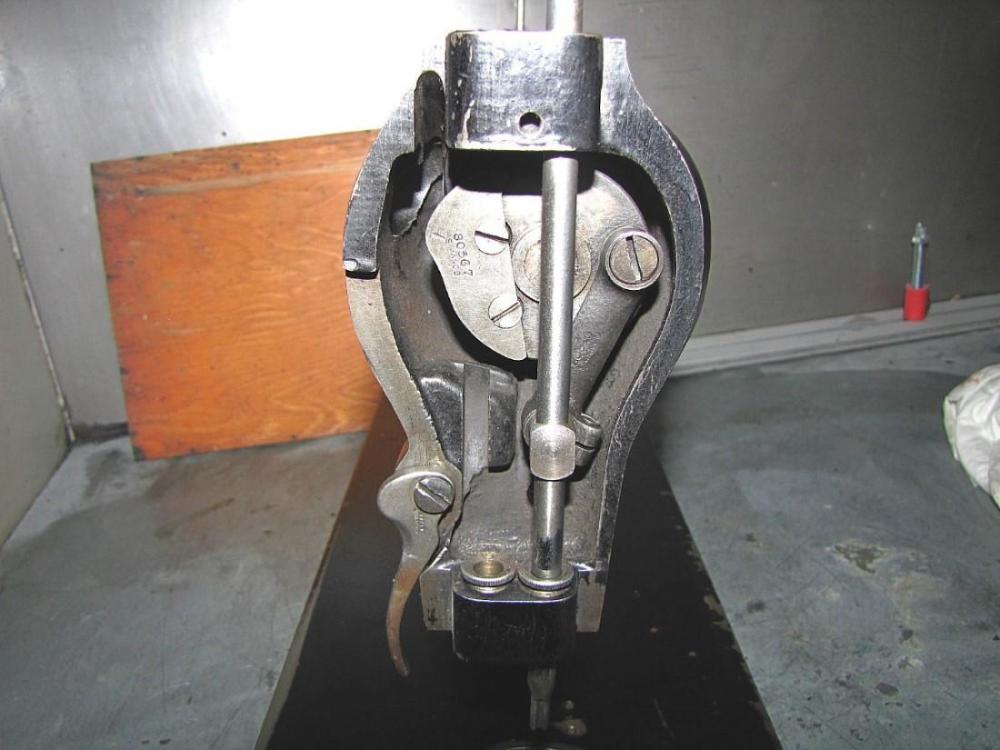
Top feed (material feeding by a mechanically driven and mainly toothed presser foot) and jump foot are different. The jump foot goes forward with the feed dog but is not driven mechanically. They are usually spring loaded and jump back at the end of the stitch cycle. Advantage of the jump foot and top feed compared with the plain static presser foot is that there is no friction between the material and the presser foot and the foot puts permanent pressure on the material so thats a safer material feeding especially when when you have multiple layers of slick material like faux leather or the like. They also can be adjusted to "climb" over raised seams. Singer, to my best knowledge, has called these feet "vibrating presser feet". But as always no one knows all machines and there might be differences or variants so this is just my explanation.
There are several different jump foot systems on "leather trade" machines. Some well known machines are Singer 132K6, Singer 45K89 or Adler 4, and 5 or Adler 104 and 105 (depends on subclass) and several others.
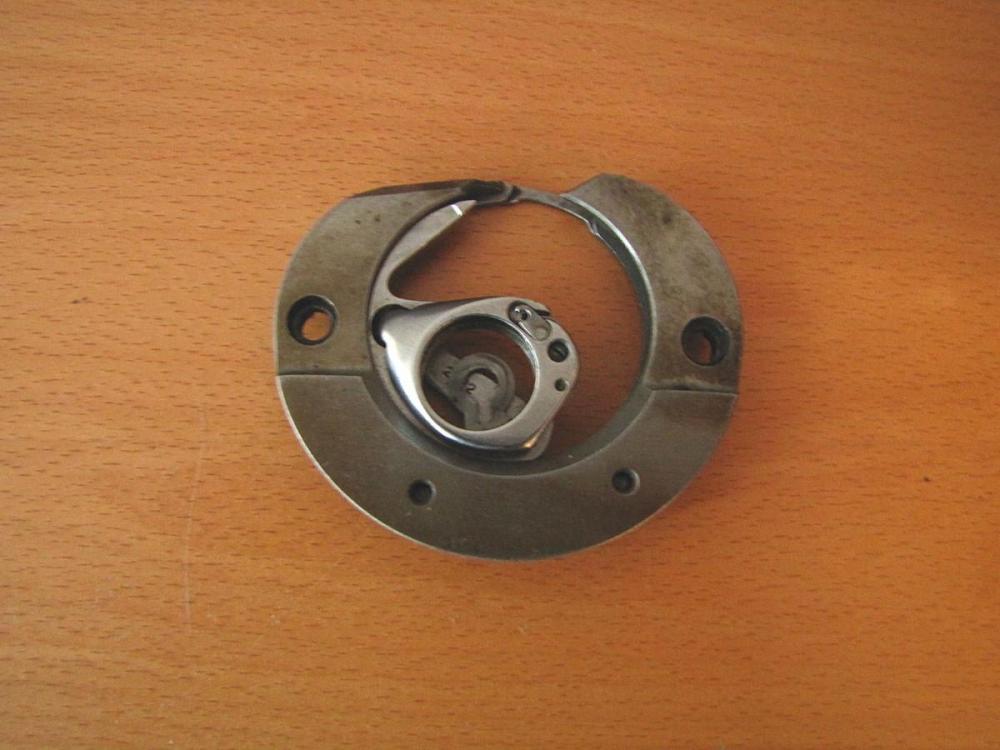
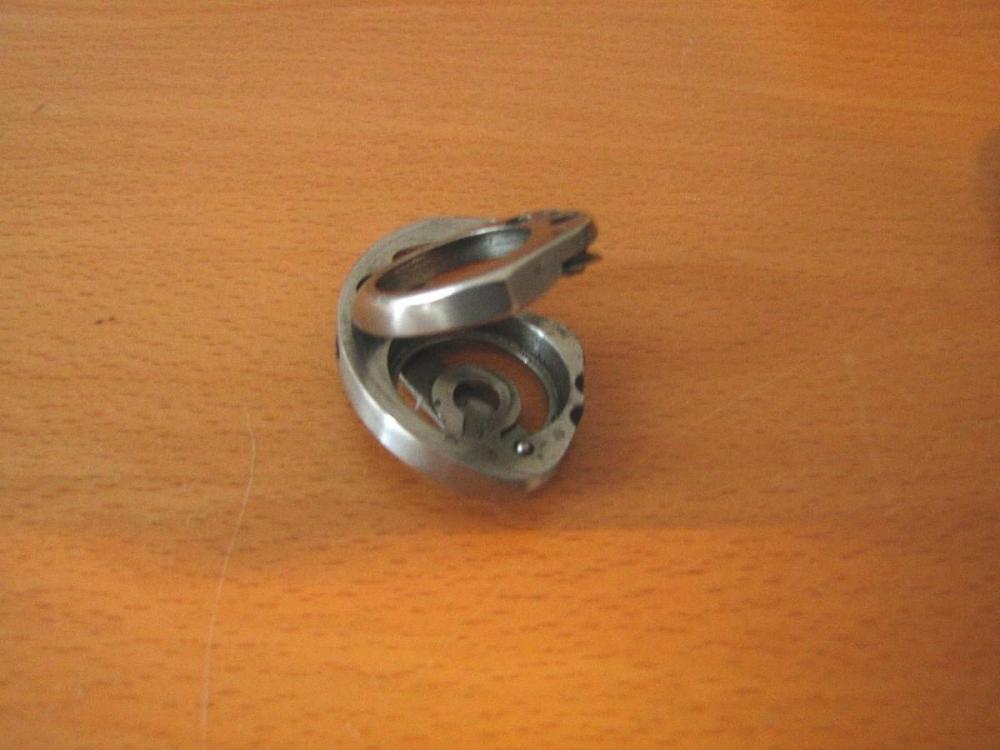
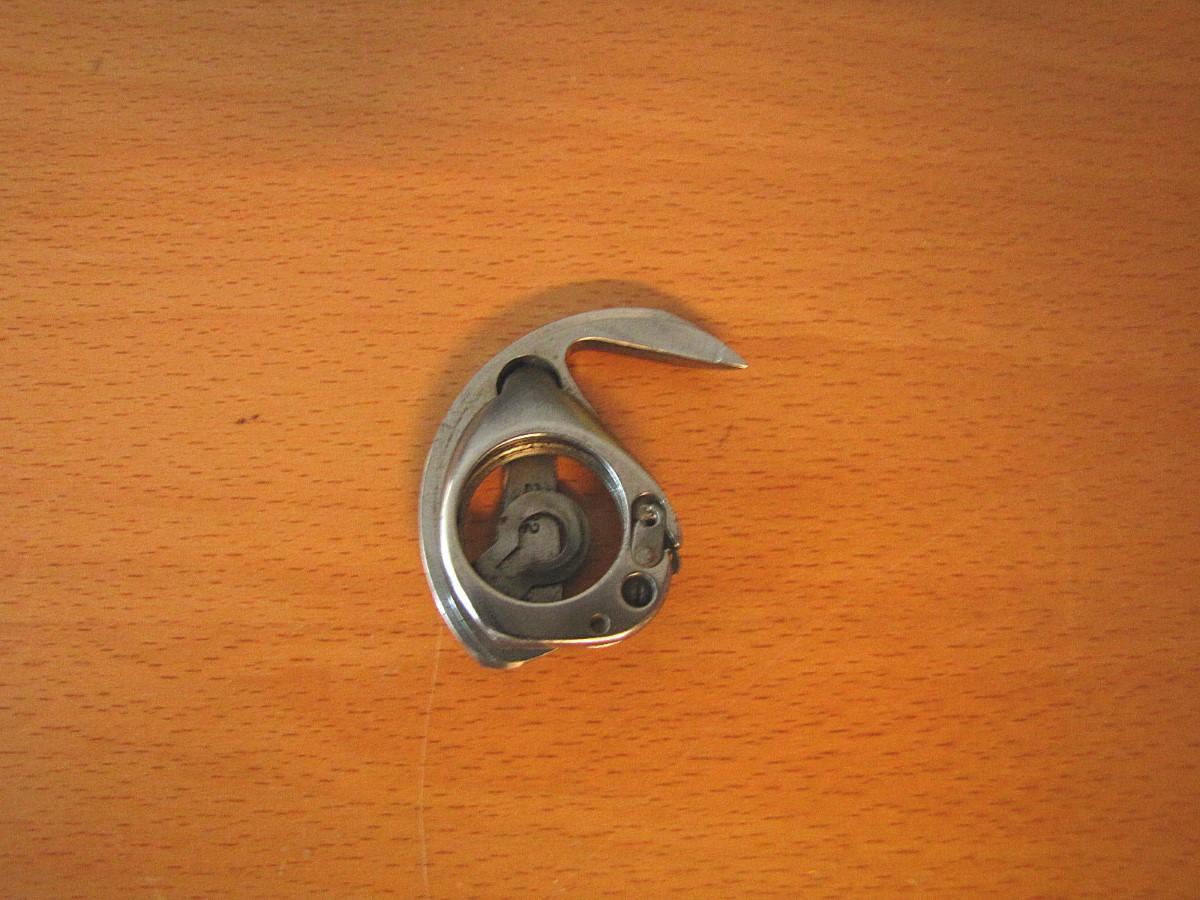
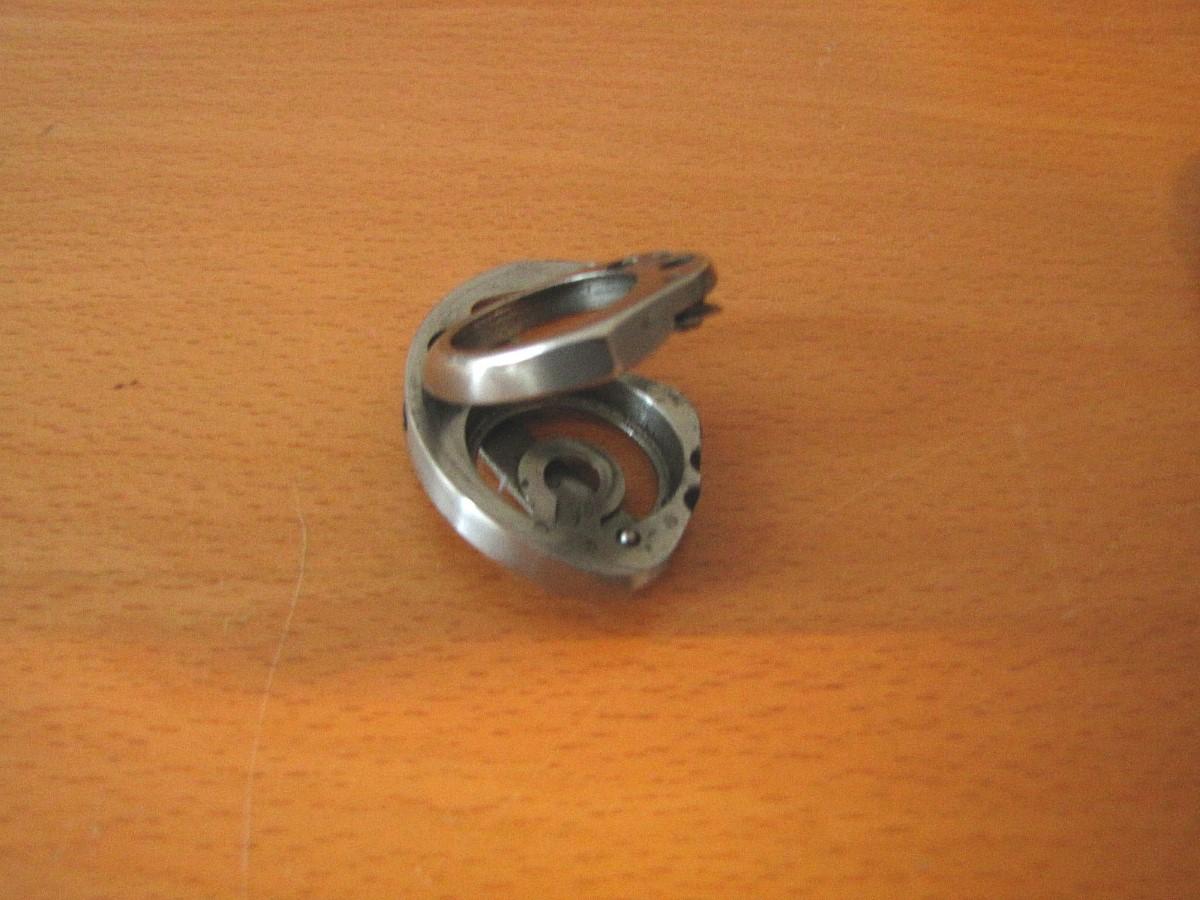
The long beak shuttle is a hook type with no bobbin case. The hook has a spring loaded "trap door" which holds the bobbin in place. Its is an oscillating hook like the CB hook but as far as I know (or guess) it can handle larger thread sizes but it has a smaller type bobbin f.i. compared with the Singer 15 or 31 type CB hook sewing machine.
This is a class 15 CB Hook (I have no CB machines so pic stole from the WWW)

And this is a long beak shuttle hook from the above Singer 16 machine

-
maybe an idea for a small foot print stand
https://leatherworker.net/forum/topic/72789-singer-45d91-restoration/?do=findComment&comment=552471
Or DIY a stand with Kee Lite tube system
Or out of black tubes:
Just some ideas ....
-
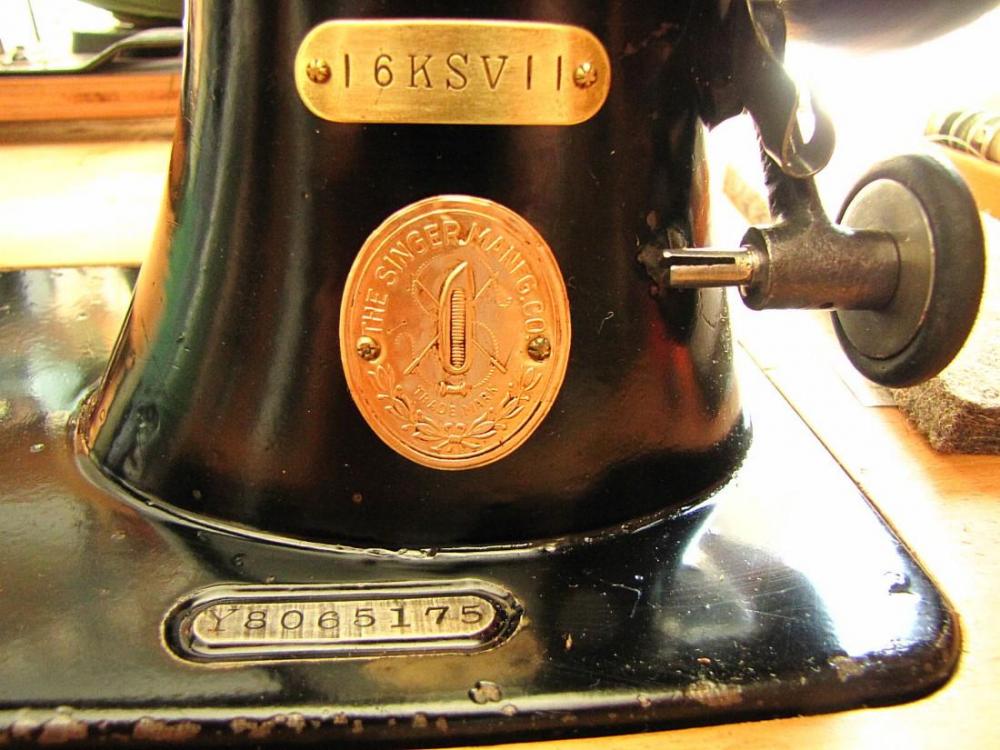
SV mean Special Variant / Special Version of what we think is a predecessor of later standard machines or machines with special technical features or special accessories that differ form the standard "off the shelf" models or the like.
-
-
Scroll down here to Pfaff 6 - maybe google translation will help you
https://www.naehmaschinenverzeichnis.de/verzeichnis-der-naehmaschinen/pfaff-bis-50er-jahre/
-
2 hours ago, CowboyBob said:
I've never seen a hopping foot one like this. Nice find!
I know thats why I bought it (+ the heavy fly wheel). If it was a plain 16K straight stitcher I wouldn't have bought it. Not even for parts. But this one is quite special. Well, it´s a SV machine.
-
well first of all that yellow thingy is quite annoying and disturbing - don´t what it is and why you shoot the Video with it. Also, seems you have no needle plate / throat plate on the machine - the machine will not sew properly w/o a needle plate / throat plate.
Please post pictures of your machine so we can try to see if some other parts are missing.


Trying to bring old iron back to life
in Leather Sewing Machines
Posted
It´s really worth it to keep old machines (not only sewing machines) alive or bringing them back to life - very rewarding! I´m not necessarily a green guy but I´m convinced that we have way to much junk products in our world today and we by far do not enough recycling so its a tiny bit of environmental protection too because things we restore don´t have to be produced new (under unknown circumstances) and shipped over the ocean just for using them for a short period of time. A lot of things are already there - just brush them up and use them again!
I can send you an instruction manual for the 108w20 when you send me your email address by PN.
It would also be nice to see what you are doing on your machines so if you have the time please open some restoration threads for your machines")