-
Posts
23 -
Joined
-
Last visited
Content Type
Profiles
Forums
Events
Blogs
Gallery
Everything posted by JollyJ
-
Would Appreciate Feedback On My Pancake Holster Pattern
JollyJ replied to JollyJ's topic in Patterns and Templates
Thanks EagleCrest. I made a mock up with scrap leather and did find that I had to make another line of stitching closer to the trigger. Then I had my friend take the mock up and use it for awhile to see what he thought. I suggested to him that I might need to stitch it even closer. He used it, agreed that I needed to make the stitching a bit tighter but otherwise loved it! Also, he did want the strap for just the extra safety. -
Actually, the plans in the document at the top of this thread are pretty close. Mine has two sets of rungs on the legs but otherwise looks like it might do the trick.
-

How To I Properly Apply Finish To My Leather Projects?
JollyJ replied to nicholas482109's topic in How Do I Do That?
I believe Billy said it all well. I'll just add that I would go with Neatsfoot - or possibly mink but I've never used it - rather than olive. Some conditions may cause the olive oil to become rancid and I don't think anyone would want that. -

Would Appreciate Feedback On My Pancake Holster Pattern
JollyJ replied to JollyJ's topic in Patterns and Templates
Thanks all! And I have a reply from a personal message I sent particle too! I will discuss your comments about the cant with my "guinea pig", Pat. I know he will appreciate the information from long time carriers and I'm betting he will then want to start with the 15 degree cant. I will post pictures once I make the holster so you can check out my finished work and give any additional pointers. Thanks again! Jeannie -

Would Appreciate Feedback On My Pancake Holster Pattern
JollyJ replied to JollyJ's topic in Patterns and Templates
No worries and still thank you, Michael (mlapaglia)! It was probably my references to six shooters because your comments were dead on for them. Thanks SteelcityK9Cop! That's the type of information I was looking for. Like I said, he's new to this, and I want to do my best for him. He's a fireman and EMT in our city and grew up with my oldest daughter. He's a good kid! Jeannie -

Would Appreciate Feedback On My Pancake Holster Pattern
JollyJ replied to JollyJ's topic in Patterns and Templates
Thanks so much! I wondered if leaving it straight might cause issues for him drawing the weapon since it's not hanging down from the belt as hoglegs do. I read in my research that the slanted belt slots would help pull the barrel toward the body but others said that it didn't make a big enough difference to worry about. Good to know they can get loose over time that way. I'll straighten them. I'm really appreciating all the good pointers! -

Would Appreciate Feedback On My Pancake Holster Pattern
JollyJ replied to JollyJ's topic in Patterns and Templates
Excellent point! I certainly didn't think of variation of the thickness from the slide side to the trigger side. Okay, so that makes sense to me. I'll be handstitching so no stitching foot has to be considered in marking the stitching line. Thanks so much!! Anything else I'm missing? -

Would Appreciate Feedback On My Pancake Holster Pattern
JollyJ replied to JollyJ's topic in Patterns and Templates
Thanks but, nope, I'm lost! For my stitching lines, I thought I was following particle's suggestion. "Regarding your stitch line, you want to offset it at least 1/2 the thickness of your firearm, plus maybe another 1/16" to 1/8". This helps allow for the thickness of the leather, as well as a molded sight channel." So the gun's thickness is 7/8". Half that would be 7/16" and I added 1/8" for the thickness of the leather (8-9 oz). So roughly 5/8" or actually 9/16" from the firearm on either side of the gun, since it is a pancake holster. Help! What am I missing about this? Thanks so much for commenting! Oh, and love that dowel idea for the sights!! -

Would Appreciate Feedback On My Pancake Holster Pattern
JollyJ replied to JollyJ's topic in Patterns and Templates
Thanks so much for your feedback! Now a few more questions... I'm asking about the cant because this is my friend's first concealed carry - first holster for that matter - so he really isn't sure either. I'm not able to help because the holsters I did in Montana were all straight draw because that's what my customers wanted for their six shooters. It would be nice to know the ideas behind the variations. Next, I'm all about getting the stitching line right so I really appreciate the feedback there! When I drew it, I measured the top of the slide which was almost 7/8" then I gave a little allowance for the leather I'm using - 8-9 oz - and measured 5/8" from the outline of the gun. Is that too much leeway for that thickness of leather? I could drop it back to 1/2" maybe? Thanks also for the comments on the grip. I think the grip I have drawn would work for my hand but I think you are right - it may be too small for his. And I'm confused by the mag release. I've heard it shouldn't be covered by the holster but then I see holsters that definitely cover it. The mag release on the gun is very stiff and I'm thinking the thick leather I'm using probably won't easily compress it but again, never had to worry about that type of thing before so I'm definitely in learning mode. He does want a thumbstrap and I'm still figuring out how I want to do that - hence the incomplete drawing of that portion of the holster - so thanks for the suggestion of incorporating it into the sweat shield. That was my inclination but just wasn't sure what to do there yet. Again, thanks for the feedback and if you have anything further to share, it will definitely be appreciated. Same for comments from anyone else! Jeannie -
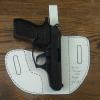
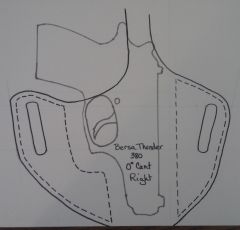
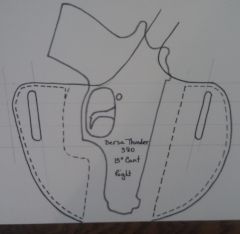
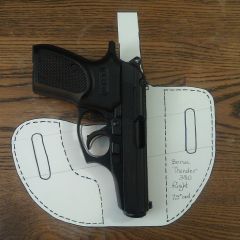
I would really appreciate feedback on the holster patterns I have attached. They are for a Bersa Thunder 380. Many years ago I had a leather business in Montana and made a lot of custom "cowboy" six shooter hogleg holsters. I never had reason to make a holster for an automatic weapon - or even a revolver - because out there it was open carry and well, it was the west. Also, the holsters were custom fit to each customer's gun. I can't even tell you what type of guns they were because my patterns just have the customer name on them. Now, after years of working a regular job to raise my family, I am getting back to doing leatherwork. I started with jewelry and bracelets, added messenger bags, purses and knife sheaths. Recently, a friend asked me to make a holster for his new gun. He agreed to be my guinea pig since it had been so long since I had made a holster and I had never made a concealed carry holster for an automatic weapon. So, here are the patterns I have drawn up. He is on the hefty side and thinks he would prefer no cant. I would also appreciate thoughts on that. Finally, any thoughts on the sweat shield/hammer strap would be appreciated. Pattern with no cant Pattern with 7.5 degree cant Pattern with 15 degree cant
-
From the album: Patterns
© Jeannie's Jems
-
From the album: Patterns
© Jeannie's Jems
-
From the album: Patterns
© Jeannie's Jems
-

Some Recent Holster Work
JollyJ replied to Ran's topic in Gun Holsters, Rifle Slings and Knife Sheathes
I agree! Excellent work! -
From the album: Workshop Tools
This is another view and you can see the lever at the bottom that is used to actuate the clamp. The lever moves forward and backward - backward to loosen the clamp and adjust your work then forward to hook it into the clamped position. The claw has several teeth allowing for the clamping of various weights of leather.© Jeannie's Jems
-
- leather horse
- stitching pony
-
(and 1 more)
Tagged with:
-
From the album: Workshop Tools
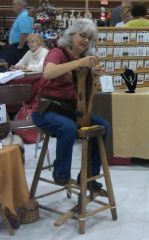
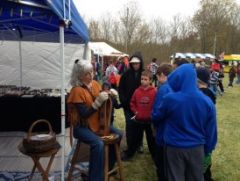
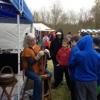
This photo is small but shows how I sit on the horse with my work held by the clamp so that my hands are free to stitch or lace.© Jeannie's Jems
-
- leather horse
- stitching pony
-
(and 1 more)
Tagged with:
-
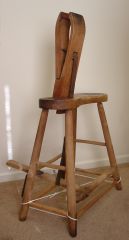
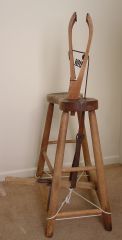
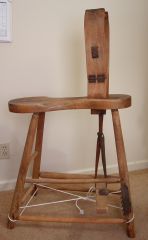
I know I am late to this party but thought you might like to see an original. I bought this leather horse, as I call it, when I was doing leatherwork in Montana in the late 1970s. At the time it was an antique, and now, 35 years later, it is still doing the job and doing it well. You can see that I currently have rope holding the legs in place because I take it apart to carry it to shows where I demonstrate handstitching. One poster here thought the plans for the horse looked very uncomfortable but I can tell you that I can sit on this horse for 8 hours or more and be perfectly comfortable.
-
From the album: Workshop Tools
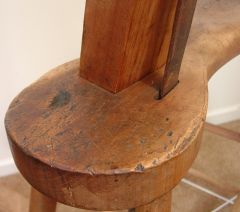
I purchased this leather horse in the late 1970s in Montana when it was already an antique. 35 years later, it is still in use! Notice the pock marks where it was obviously used for punching with an awl and the one especially deep hole.© Jeannie's Jems
-
- leather horse
- stitching pony
-
(and 2 more)
Tagged with:
-
From the album: Workshop Tools
I purchased this leather horse in the late 1970s in Montana when it was already an antique. 35 years later, it is still in use!© Jeannie's Jems
-
- leather horse
- stitching pony
-
(and 2 more)
Tagged with:
-
From the album: Workshop Tools
I purchased this leather horse in the late 1970s in Montana when it was already an antique. 35 years later, it is still in use!© Jeannie's Jems
-
- leather horse
- stitching pony
-
(and 2 more)
Tagged with:
-
From the album: Workshop Tools
I purchased this leather horse in the late 1970s in Montana when it was already an antique. 35 years later, it is still in use!© Jeannie's Jems
- 1 comment
-
- leather horse
- stitching pony
-
(and 2 more)
Tagged with:
-
Thanks for commenting! I was hoping someone would either yell ( ) at me for doing the wrong thing or give me some constructive criticism on my process. It's been 35 years since I did leatherwork and I'm trying to settle back in to it slowly but some of the supplies I used to use don't seem to be around any more. I never had to worry about my paint staying on way back when but now it just doesn't seem to work as well. I'm hoping the process I used will make the paint more lasting. While it was drying I did bend it a lot to try to prevent cracking. After it was dry, I also ran it through my fingers like you suggested. I finally put a very light coat of oil but not on the painted area and let it dry thoroughly. Then I followed up with some Aussie conditioner but again didn't put it directly on the painted area. I guess we'll see how it wears...
-
I made a handpainted bracelet using the following steps. What can I use to soften and waterproof it? 1. Cased the leather with water. 2. Dyed black with Eco Flo Professional Waterstain. (Really seems to make the leather stiff!) 3. Wet the leather again. 4. Roughed up the area to be painted. 5. Applied a Cova Color acrylic paint/water combination to prepare the area for the undiluted paint. 6. Applied two very light coats of undiluted paint. I let the paint dry between coats and I let the second coat dry for a couple days. Can I use Aussie leather conditioner on it to soften it and make it waterproof or at least water resistant? Will it hurt the paint? Thank you for any help you all can give me!!


