


Sovran81
-
Content Count
324 -
Joined
-
Last visited
Posts posted by Sovran81
-
-
A cheap supply for beeswax is the hardware store. The seals used for toilet bowls are made from beeswax. I get them for $1 each.
-
Great job!
Would you mind to share plans of this?
This was one of the throw together projects. I had no plans, but I can run you through the build. I used the videos on youtube of the tool in action to guestimate dimensions.
1. Take a piece of wood 1x4x8 and drill 2 holes(3/16) in each end about 2 inches deep.
2. Cut 1" at 90* off one end and 1" at 45* off the other end.
3. Drill the 4 holes in the main piece large enough to accept brass threaded inserts for 3/16" studs. The holes on the angled side need to be deep enough so the insert doesnt stick out on the angle.
4. I used a router and clamped blocks as a guide for the sliding groove but you could just cut a dado all the way across if you dont plan on placing the top studs on the same axis.
5. Use flat aluminum stock to make the fences. Aluminum hand machines easily. For the slots in the fences I drilled a series of holes then used a coping saw to connect the dots. File smooth. I then glued a strip of wood to the bottom to add a little height and give a bottom face that can be filed for clearance on bevel fence.
6. Place the fences on the main body and mark for top studs. Drill the holes for the top inserts. Glue and install inserts just below flush. Glue and drive in the end inserts so they are just below flush. Loctite and install the studs.
7. Install the end pieces and secure with wingnuts.
8. File a dado on the bottom of the bevel fence the length of the finger just deep enough for the leather to pass under. I filed it 1 mm deep. The corner of this dado needs to be square because it is the width guide when beveling.
To use the tool:
Cut your strands wide and stretch them.
Set up the square cut to cut just enough off to get the strand same width and pull strand through, trimming the outside curve of the strand.
Set up the bevel cut to remove just enough to get the bevel and pull strand through on the inside curve of the strand.
Reset bevel cut to give the finished width of strand and pull strand through on the outside curve of the strand.
My strands are normally about 120 ft long sized to the widest dimension of the strand. Then I cut the strands to length, choose my taper points(for whips) and run them through the bevel cut again starting at the first taper point. Then again at the next taper point. The steps at the taper points blend into the plait and can only be seen if you know what to look for. It seems like a lot of work but the tool allows such speed the entire process doesnt take very long at all. It takes me about 2 hrs to go from hide to 18 12foot finished strands ready to braid. (not including the stretching. I havent found a speedy way to stretch)
Here is the vid I used.
Hope that helps.
-
I use the Aussie strander then finish with a copy of Bevans tool design that I "borrowed". One of these days I will take the plunge to roo so I dont have to pre-stretch goat hide. I spend more time stretching the goat for final sizing then all the other operations combined.

http://leatherworker.net/forum/index.php?app=gallery&module=images§ion=viewimage&img=14791
-
I am currently using a mix of tallow, beeswax, pure soap, and glycerin. Being the cheap bastage that I am buying something I can make much cheaper is wasting leather money. LOL My current mix works nice and can be cut with water if it dries out a little but that is part of the problem. I have been trying to find a oil that will work well in the mix that will help prevent it from drying out completely in the leather. Recent google searching has told me the following. That almost all oils oxidize to different amounts depending on the size of the molecular chain and if it is a saturated or poly-unsaturated oil. Heat also plays a large part in it, but there is not much that can be done about that since we are dealing with a hydro-carbon based molecule and if heat isnt used in the processing of the oil it is used for pasteurizing food oils. All the science aside( most of which I have a hard time understanding let alone explaining) it seems the best oil for the application is coconut oil. Within the next few weeks I will make up a small test batch and report the results if anyone is interested.
-
Thank you Chuck for your insight.
-
I have often questioned the use of olive oil since it does oxidize. I dont want my leather to smell like raunchy olives. Anyone with experience in its use care to comment?
-
I just received my Cambell Bosworth/Randell splitter(a copy of the Osborn 86) I split a chrome tan strap down to .under .5 mill consistently the entire length of the strap in one pass. For wider pieces I would probably do it in 2-3 passes.
-
I think I saw this on the AWPA site but I dont recall for sure. The poster uses standard box cutter blades which are much cheaper and available everywhere. He places the blade between 2 plates of aluminum at a depth equal to the notches on the sides of the blade and holds it all together in a vice. Then using another plate of aluminum as a punch and a hammer strikes the exposed back of the blade sideways which snaps the blade off even with the plates of aluminum. He claims these blades work great in the Aussie strander and skivers. I hope this is what you were looking for. They are stiffer than shaving razors so it should fix your problem.
-
Thank you Ferg. Those are the exact ones I was referring to. Now i am going to go back through the forums they are listed in and figure out why I couldnt find them. LOL
-
I dont know alot but those rivets look very 'aged'. Is this normal in your area?
-
I would really like to see a forum where all tutorials whether they have been pinned or not are gathered. I stumbled across 2 tutorials about cutting and stamping oak leaves. Now for the life of me i can not find them again. I have checked all the pinned posts and searched tutorials with no luck.
Thanks
-
Willy I sent you a email.
-
There was a recent case I saw on a nature channel regarding a man in Alaska that was attacked by what appeared to be a brown bear. He shot the bear and following fish and game regulations informed the dept. The bear was confiscated pending species determination and record keeping. DNA testing proved it to not be a brown bear but a cross species of a protected animal. Mind you the bear was shot in self defense, but he has been informed that he faces heavy fines and possible imprisonment for killing a protected species that could only be determined by DNA testing. This is all before hide treatment. I can imagine the difficulties after tanning, dying and embossing as Catskin explained.
Good luck with the book. It sounds like you have artistic license here.
-
-
Nice work. Reminds me I have too many projects and never enough leather or time. :D
-
FWIW from the old grump; these are the style of gunbelt I primarily make. All are hand stitched @ 6 stitches per inch, the same as on the holsters. 7 cord waxed linen thread is used. Mike
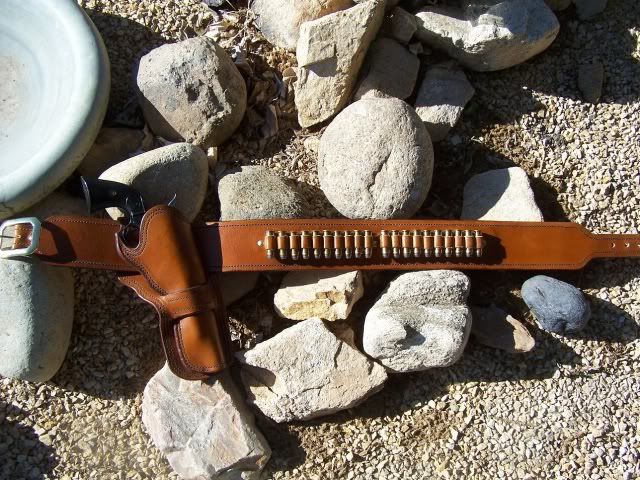
What size awl or hole do you use for that thread?
-
 pretty much says it all.
-
Thank you. Upon viewing the pic I said "WOW" which caused my other to look over my shoulder. We were able to get her jaw up off the floor, but I dont think her mouth will ever close again.
-
-
Interesting Louie. Perhaps I am doing something wrong, having learned it all on my own without any sort of m Ientor. I roughed out the strand then greased and stretched through a hook. Most of the stretch remained in the strand. My strand was 15 feet longer after the stretch. Then I oversize the strand and grease and stretch again. I get about another foot or two of strand here. Then final sizing, tapering and beveling. I plan on splitting after the first stretch. I really didnt get much relaxing, possibly because I saturated the strand with grease before and during stretching. By grease I am referring to dressing made from tallow, soap, beeswax and a touch of glycerin. Do you see an issue with my maddness? BTW love the new site.
Sorry OP hijacking not intended.
-
I saw a webpage somewhere that I cannot find now. It compared the cell structure of various leathers for strength. Roo was by far the strongest, while goat was stronger than cow. That being said, I bought a few veg tanned goat hides to try with. I agree 100% with Louie. It is very stretchy and needs to be prestretched quite a bit before doing anything else but roughing the strands out. I also noticed that the parts of the strand that stretched the most also got thicker (like the suede bunched up a little bit.) It seems to be plenty strong but now I am waiting on the arrival of a new splitter before I can braid with it. Hmmm maybe buying that goat was a blessing in disguise. :D
-
A few more questions. The Osborne 84 and 86 splitters. The 84 seems better built and by the price I guess it is. The 86 has an adjustment that uses scissor bars to move the roller. Has anyone had issues with inaccuracy of the split from one side being higher than the other from a single adjustment point?
The 84 and the Campbell keystone appear to be competitively priced. How do they compare in performance? Thanks again.
-
Beautiful work. Would you be willing to share the basic pattern? I like the way it contours the body.
-
Thanks folks. @ Jam I was looking at the 6 " model and I dont see a way of locking anything down by twisting the handle. Could that be an option only on the 8" model?
edit: nevermind. I found a picture of a copy of the 8" osborne, I understand what you mean now.
Beeswax-Oil Mix
in Dyes, Antiques, Stains, Glues, Waxes, Finishes and Conditioners.
Posted · Report reply
I know nothing about it so I did a quick google. With its high melting point and poor solubility in water or ethanol I think it would be hard to emulsify it into the dressing. On the other hand, one of its uses is the shiny coating on candies. so the question that comes to my mind is with its melting and solubility properties how do you ever get past the coating and get to the candy. So there is something I am missing with its use. Figure out how to emulsify it easily and it might work.