-
Posts
56 -
Joined
-
Last visited
Content Type
Profiles
Forums
Events
Blogs
Gallery
Store
Everything posted by Icho
-
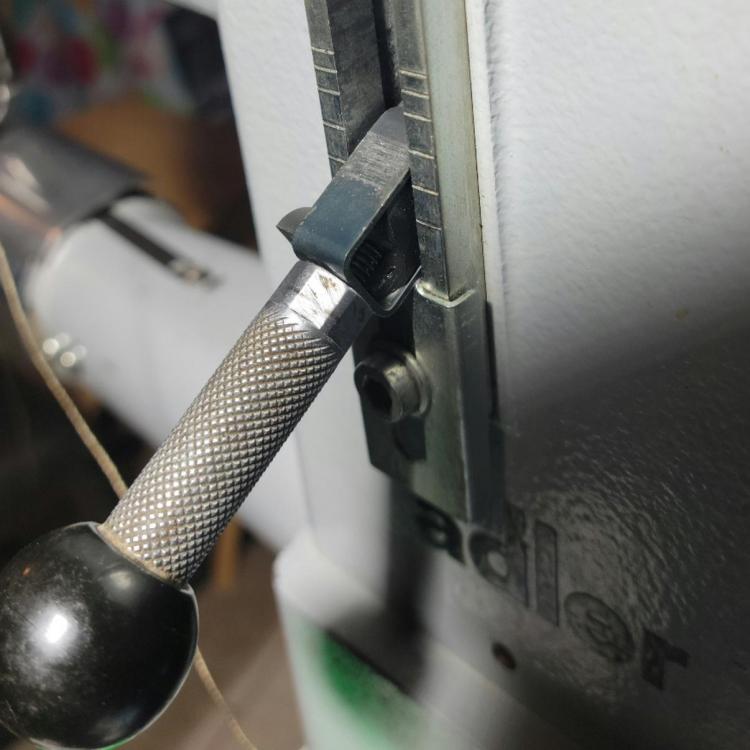
I did end up coming across a video for a pfaff that is the same idea. In the video for that particular machine he had to set the needle bar up 4mm and make sure the feed dog isn't moving. I know it is a different machine with different specs and I have to go with the service manual for my machine but I figured I'd just check. At 4mm up the feed dogs and needle bar did not move. Tomorrow I will bring it into spec according to the adler 269-373 service manual. I do already have all of the manuals printed out and organized in a binder. I did that the evening I brought the machine home. The other thing I in the video was what looks to be called the pressure piece. I noticed mine is broken on 1 side. See pic. I will look into getting a new one but if it ends up being a pain I may end up making one out of aluminum. Thank you for the help so far.
-
I'm not sure if I am checking it correctly but I turned the wheel until it is all the way down. When I lift the lever into reverse the needle and feed dog move back what looks to be the stitch length. So if I am checking and understanding it correctly it definitely needs to be adjusted.
-
I'm not sure if I am checking it correctly but I turned the wheel until it is all the way down. When I lift the lever into reverse the needle and feed dog move back what looks to be the stitch length.
-
Just wondering if anyone would happen to know how th adjust the reverse stitch length so that it matches the forward stitch length on an Adler 269-373. I've been searching and only found answers for other machines. I did see an old post from years ago about this but there was no solution so instead of restarting an old post I figured I'd start a fresh one.
-
I'm not sure if the capacity is the same between the 167 and 169 but on my 169 I was able to go thru about 10mm 1st attempt without making any adjustments. This is thinner thread than I would use ant pretty sure the needle was larger than it should have been and still did it like nothing was there.
-
Very nice machine and very nice work! I can't wait to finish tuning, cleaning, etc so I can actually get a feel for my machine and start on some projects. I have to wait until Tuesday... if I'm lucky Monday for some set screws and hopefully I will have all of the bugs worked out by then.
-
I may be missing it but I don't see anything about the motor or controller.
-
Thanks for the attempt. Looks like we got same results except I didn't see that one at auction. That motor and controller looks almost identical to mine but still no info attached to it. I've never came up with so little in a google search. My machine is actually an Adler. I'm guessing they won't know because I think the retailer possibly combines the head, table and motor so there is likely not a standard from Juki, Adler, etc. That's just what I'm thinking but I may send an email just in case.
-
Ah. OK. I was thinking motor clutch. I was able to sort out the machine itself. I have a feeling the previous owner had a pretty serious crash and knocked the timing out then couldn't get it to sew anymore. I had to clean it and set the timing and now it seems to be sewing good. I will possibly have to change the gear under the bobbin in the future but it is expensive. For now it is working nicely. Right now I'm trying to get info on the motor and controller but can't find anything online.
-
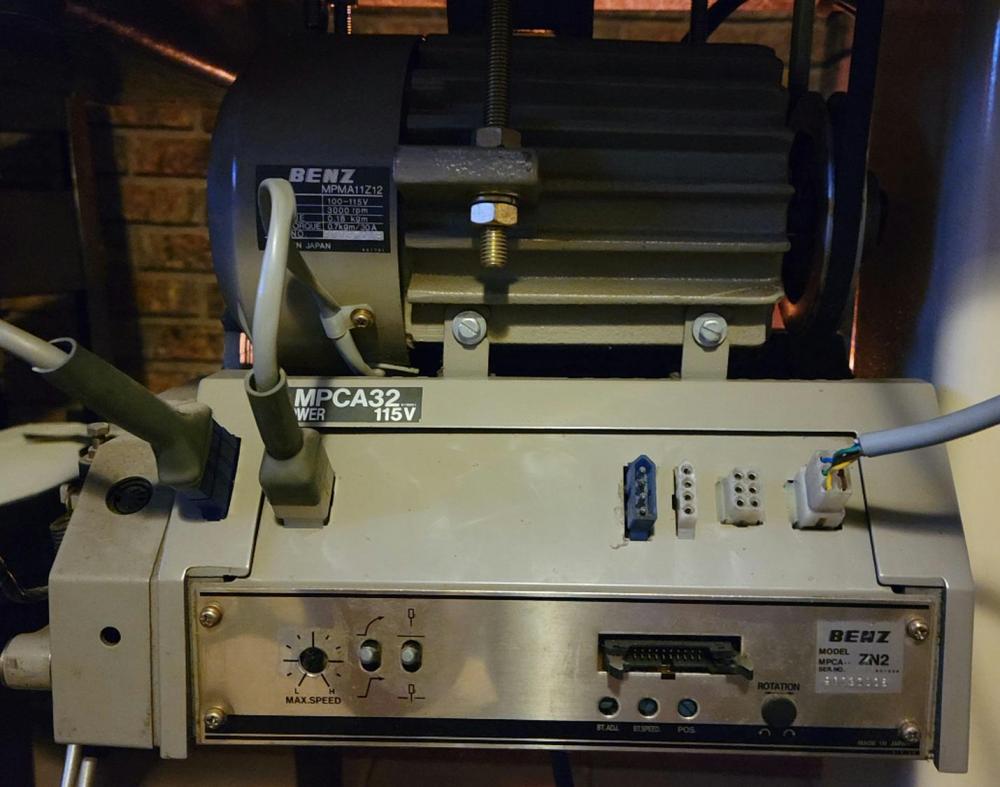
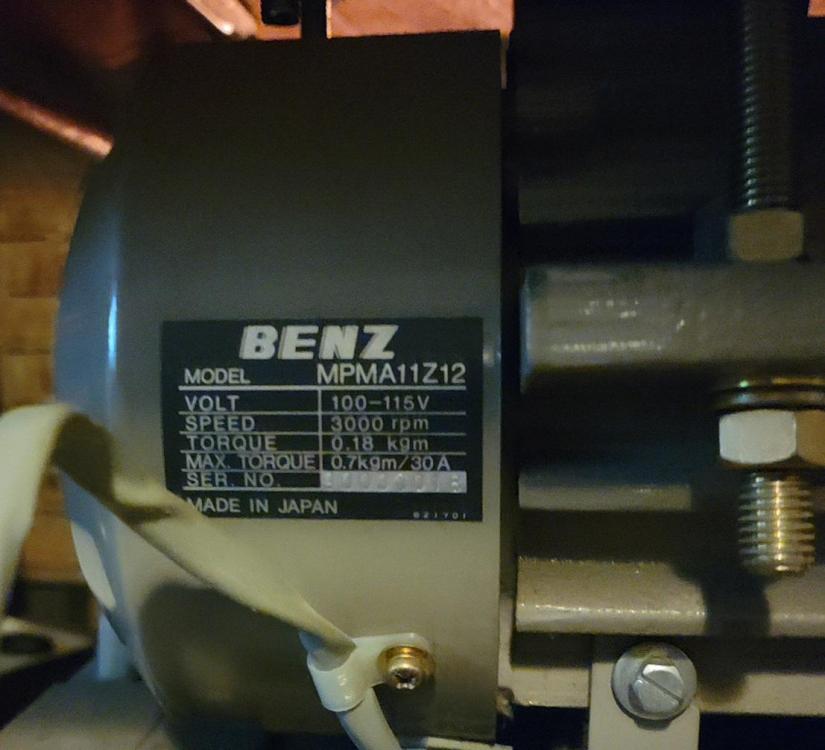
Hello all. I'm stuck. I am trying to get info on my motor and controller. I googled all names, numbers, codes, etc and nothing. Even if I can get info on what the switches and dials do...other than speed. I got that one with no supervision. Lol. Someone mentioned in my other post the other day that it is not a servo but I don't see a clutch and it doesn't spin unless I step on the pedal. Just wanted to add that it works but I just don't want to miss out on any settings or features. I can add more pics if needed. Thanks in advance.
-
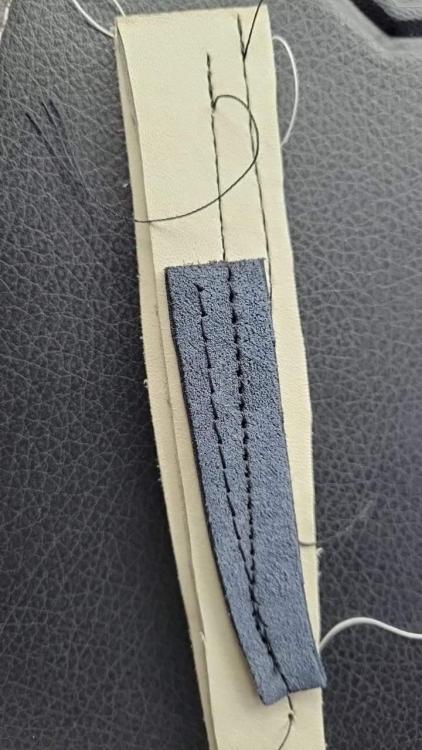
I've been working on the machine itself so far so I haven't gotten to seeing the bells and whistles of the motor and controls yet so this may be a dumb question but where is the clutch safety mechanism. I honestly haven't even noticed where the clutch is. I thought it would be on the front of the motor but I didn't see it. I just realized that I have a dial to set the speed. The good news is that it does sew now. I did a couple test stitches and it's looking really good. Tonight is hopefully the night I finish up the final assembly and clean up. Then I can get familiar with the machine and see if anything else needs attention. Here is my test stitch.
-
I had some tome to tinker with the machine today. I noticed the hook timing looked close but the distance from the hook to the needle was off. The hook would just go right my the needle string unless the string had a big loop. Then out of nowhere the wheel would keep getting stuck. Not binding but a solid stop. Then i would back it up and would stop again but in different spots. I tilted the head to take a look and didn't see anything. When i but it back upright i heard something fall and bounce off of the tiles. It was a small grub screw. I had no idea where it came from and im glad i wasn't on carpet because i would have never noticed it. It solved the problem of the wheel getting stuck. I watched a couple videos to get a feel of what I was going to see in the cylinder. Since I got my youtube degree on cylinder arm sewing machines, I slowly started taking pieces off. I wish there was a screw kit I can just buy for the machine. All of the screws are burned up from using improper drivers. I ended up noticing that there was a few grub screws on the gear for the bobbin carrier gear and 1 was missing so that mystery is solved. I think I will keep going so I can give it a good deep cleaning because there is a lot of crud in there but everything looks to be in good shape. Just dirty but thankfully oiled. About the hook being far away from the needle. I did adjust the gap and tried to sew again. I actually got a couple really bad stitches. It's a start. That is when I just couldn't stand to look at all of the crud and started taking it apart. That's it for now. I hope some of you find this interesting. I'm actually having fun with it and excited to get it stitch. Thanks for reading.
-
Thanks. Good to know. As of right now I am fine with the motor set up it has. Definitely something to consider in the future.
-
Update! First of all, thanks again to all that replied. You helped me spend my money. I got the machine. I am hoping it is a diamond in the rough. I got it out of my truck, down up the porch and down the first set of stairs and put it back together. Definitely a beast by myself. Here's a quick rundown of what I know. The seller told me that it likely has a timing issue. When I saw it I knew that it needs a cleaning and a tune up. I noticed other things like a couple added holes in the bobbin cover slide thing but that isn't going to affect the sewing, just snagging fabric. I will worry about that later. I am going to say cleaning again because even if it does sew I wouldn't start a project until it is cleaned, oiled and tuned. That said, I had to try to sew a piece of thin leather... it didn't. The needle picked up the bobbin thread but when I put the leather in, it is not picking up the bobbin thread with the leather in it so it is a no sew. I am not concerned at all yet. I just messed with it for less than an hour and I have an import patcher that I "adjusted" actually sews quite well so I know I can get this thing going. I can already tell that this machine is many steps up. That's it for me tonight but I attached pics of it back together so let me know what you thing. I paid $400CAD so $3.01... I mean approx $301USD. It is dirty, looks to be in pretty good shape over all and motor and mechanically sounds good... speaking of motor, is it a servo? I am thinking it may be but I don't really know what I am talking about. Let me know If I should start another thread if anyone is interested in coming on an adventure or if I should just keep this one going. Either way, I think it could help someone out in the future since I didn't really find a lot in info on this specific machine. Thanks again for all of the help so far
-
That's what I was hoping to hear. Thanks guys. I can't wait to go see the machine today. If all goes well I should be playing with it tonight. From the research I've done in the past day, they seem to be good and reliable machines. Feel free to add any other info that may be of interest to me. Thanks again for the info.
-
Thanks for the info. I'm sure khsew will come in handy if I get the machine. I did come across that duerkopp-adler page but I didn't see anything for max leather thickness. The machine I am looking at looks pretty much the same but older and an off white color. Can I assume it will be the same specs? I asked the seller about leather thickness and he said 1/8 but I'm thinking it should be capable of more than that but I don't know. I am going to take a look at it today but it is 2 hours away so that is why I am trying to get all of the info Ivan before I go. Also, he said it works as it should but may need a timing adjustment. I'm assuming that is not a big deal. Thanks again for the help so far.
-
Hello all. I'm looking at an adler 269-373 and while trying to get info on it I can't seem to find maximum leather thickness capacity. Also, are parts reasonably priced and available? Does anyone have one that can help me out? Knife sheaths is the thickest project but also do wallets and other similar projects. Thanks.
-
I'm pretty happy with the little patcher. I wasn't expecting much from it and I think it may have even surpassed my expectations. It will definitely be handy to have around. I'm hoping to be able to make it out to Toledo in a month or two. My wife is ok with me getting the CB3200. lol I am still trying to justify the cost to myself. It is definitely worth the money but I have to make sure I will be using it for more than just 3 - 6 sheaths per month. I'm pretty sure I will be able to make a few extra bucks doing other things with it and I'm even trying to convince my wife that she needs a hobby... one that involves using a sewing machine. The exchange rate is another hard thing to get over. It is an extra 30% more or less.
-
Ya. I'm surprised I even got it to stitch again let alone with the fishing line. I think the smaller thread it came with is #69 and i'm really hoping to get it to work with #138. I don't mind the small bobbin size as long as I can get at least 12 - 18 inches of stitch. I'm guessing stitches with this will commonly be 3 - 4 inches for me but I guess I will find out. I wiped out the threads against a rock on one of my hunting boots so I'm looking forward to trying this thing out when I feel a little bit more confident with the machine.
-
Hey, I haven't been around for a while but still trying to squeeze in time for my hobbies. A few weeks ago I ordered and received my patcher from China. Before I get into that I just wanted to say that I will likely be getting a CB3200 and this experience helped me decide to do it but that is probably a couple months away. So I know just about everyone here has at least seen pics of these patchers but here is a pic of mine anyway. From the beginning it didn't stitch all that good. The best I was able to get it is an inch or two of good stitch and then a really loose stitch or two and than back to good. I really wanted to try thicker thread and a larger needle but there wasn't a supplier anywhere close to me that had anything. I started thinking and came up with the idea of using the needle from my stitching awl. The shank was too big of a dia. but the main body was perfect. Since the needle was longer I was able to cut the shank off, grind a flat on the needle and it fit into the patcher. My next problem was thread. As I said I couldn't find it around my area anywhere. The most specialized sewing machine store around here had no industrial thread or needles and didn't even know much about sewing leather. Thick to them is a couple layers of canvas. So I went and picked up the thickest braided fishing line I could find. This is what I got. So now I have thread and needle I decided to make sure the needle would go thru the stitching motion without the thread and of course there was interference. I had to clear the path of the needle with a needle file. After I got it to work I cleaned it up, threaded the machine and gave it a go. All I have to say is birds nest. I battled that for a bit and decided to go back to the thread and needle that came with the machine since I knew it did kind of sew with the original. Now I had a birds nest with the original set up. I truly thought I had scrapped the machine. I left it for a couple days and got back to it today. I decided to take the lower machine apart and clean, deburr and polish the areas that looked like could use some TLC. Once it was ready to go back together I oiled it up, started assembling, set the timing, threaded is and tried it out again. I used the thread and needle that came with the machine since my main goal was to get it to work as a patcher again. A couple more adjustments with needle height and it started stitching again. At least as good as before I thought I scrapped it. A little more playing with tensions and this is what I got. Still not perfect but it is the best it has been so far. Ignore the larger holes and thread in the center of the sample. That is coming up. I still have to play around with it and get a little more familiar with it. Next I decided I wanted to see what it will do with the thicker fishing line and stitching awl needle so I threaded the machine and gave it a shot. After some tension adjustments, here it is. I still want to try out the #138 thread but at least I'm pretty sure I can get acceptable stitches with these two thread and needle set ups and I am pretty happy with the results. The worst thing about this is that the bobbin does not hold much thread. I can only get about 12 inches of stitch with the thick fishing line. This thread may not belong here but there was no section called "What not to do" so I figured this was the best place. Up until this little adventure I didn't even know how a sewing machine works. I am definitely not a sewing machine tech guy but now I have a bit of an understanding of the basics of tension, timing and overall what a sewing machine is all about mechanically. Turned out to be a great learning experience and it didn't even cost me any money since I still have a sewing machine that works. My next mission is to start getting the funds together for the CB3200 that is calling my name. Thanks for your time reading about my crazy little experiment and feel free to ask, comment, suggest and even criticize...just be nice. lol
-
My grinder has a VFD. 110v single phase in, 220v 3phase out. 1hp motor. Works great. Just a regular 110v single phase in, 220v 3phase out converter is about $100 more or less. I'm definitely not an electrician so that was just some research and consulting I had to do. I love the internet.
-
Thanks Eric. The 220v wouldn't be a problem. I have a 220v 2phase belt grinder running in my garage right now. I read Wizcrafts sticky before and didn't realize that there was a lot more in there than I originally thought. Thanks again guys for putting up with me. Lol. I will stick with my awl for now and continue researching and hopefully find a good deal on the right machine.
-
Hey guys. Sorry it took me so long to get back. Thanks for the replies. Sa said in the opening post this machine does have walking foot. As for the motor, considering it is 220v I would have never thought of it as very small. Anywhere I looked online the Pfaff 1295 is listed as an industrial machine. Here is another pic of the motor and electrical box. It does look to me that it is a servo motor. Since I am so far off on what is an industrial sewing machine for leather is there anything I can look for when searching thru sale listings that would make it capable of sewing up to 1/2" leather? Such as hp rating or anything else that can be spotted out. Like I said, I know pretty much nothing about sewing machines but I am trying to learn as much as I can because I am not a fan of the awl. Thanks so much for the help.
-
Well the guy got back to me and sent me some more pics. It is a very solid looking machine and I found out that it is 220v 3 phase which is a slight inconvenience but not a big deal. It also has air hook up. I never imagined a sewing machine would have air hook up. I know I should probably look at a machine that is more appropriate for what I am doing but it seems like such a good price that I am having a hard time forgetting about it.lol I may take a ride and check it out. Andrew, I really don't think the guy would be wiling to ship it to California but if I don't end up getting it I will definitely send you the info an all of the extra pics he sent me.
-
Well thanks for the replies. I called and emailed to get some info from the seller so I guess now I just have to wait. I figured the machine was worth a decent amount. Doing searches on that model I think the lowest price I found was about 1200.


