


gringobill
-
Posts
161 -
Joined
-
Last visited
Content Type
Profiles
Forums
Events
Blogs
Gallery
Posts posted by gringobill
-
-
That is stunning and I'm sure the new owner will be thrilled when they receive. We are our own worse critics!!
cj
Thanks, for the kind words!
Bill
-
thanks gringo that helps me alot i also have an old singer 31-15 and a 29k72 singer on a treadle base so i hope im covered with everhing i need now lol
With the Singer to sew thin stuff and the Boss for the heavy lifting you ought to be set up just right!!!! I think you'll really like the Boss!!!
Bill
-
from the owners of the tippman boss what is your honest opinon on the boss i just ordered one for making holsters and belts i know its got its quirks but every machine does
The Boss was the first machine I bought. IMHO, it was/is a great machine. I think it's pro's are first it's simplicity and the amount of control you have sewing with it. It is good for stitching holsters and belts (although it may not go down to as small needles and threads as some might like for stitching belts.) That's exactly what I used mine for. One small disadvantage (if your working by yourself,) is that you only have one hand to manipulate your work piece with, the other hand is busy working the handle. Another plus of the Boss is it's size and portability. It's very easy to move around and it doesn't take up a lot of space. Originally I would clamp mine to the front edge of my bench with a couple of Irwn hand clamps, which worked very well. When I wasn't using it I could put it somewhere out of the way.I ended up building a bench similar to what a stitching horse to mount it on and that was really handy.
As I hinted at, the main thing I wanted was the ability to sew thinner material with smaller thread and the Boss works better on heavier leather with bigger thread. I did use it to sew some light weight lining leather but it is somewhat limited there.
This is just one more example of what always seems to happen to me, I always need "one more tool," or something better and I ended up getting a Cobra Class 4 and I love it. Now my son has my Boss and uses it to make some holsters, sheaths and tack.
Like I said it's pretty simple machine as sewing machines go and I feel is a perfect machine to start out on in every regard. There is a bit of a learning curve but it's not too steep.
For what you are going to be using it for, I think you'll be really satisfied with the Boss, it's a great American made piece of equipment.
Good luck and enjoy!
Bill
-
Looks Good. Im sure you are your worst critic. I like the pattern you made.
Thanks, I appreciate that!
Bill
-
I once re-did a wallet 4 times before I got it right. Not because I didn't know how to do a wallet. But due to some inlay arrangement requested by the customer, and me trying this kind of arrangement for the first time, I ended with
1st - a too-thick wallet, then on to thinner chrome tan leather,
2nd - and it became too floppy, edges wouldn't burnish and doesn't take edge dye so well
3rd - re-designed the inlay and how the lining goes, went back to veg tan for the main body, but after running the prepared pieces through a friend's bell skiver, pieces came out skewed from the skiving action. Junked the pieces.
4th - finally used a splitter to split newly cut pieces and final product had the customer smiling ear to ear.
I lost money because of lost time, and material lost in attempts 1-3.
But I can't hold the customer responsible for it. Instead, I charged that expense under "tuition fees"
Nice job anyway. Just to let you know someone else shared that frustration before, and I'm sure many others.
Man, you are telling my story! Thanks for sharing thatf, I guess misery loves company!
I just did some stuff that I didn't think through like I should.
Initially I was going to make the gussets out of some thin veg tan. Got 'em all made, lined, ends finished and stitched, had the hardware on one of the for the shoulder strap. Then I got to feeling of them and think about how they were going to have to be shaped around the corners and I could see that was going to be a heck of a fight, if I could even get it done. Then I got to thinking how stiff they were and would continue to be and had to admit that was a bad idea. So back to the drawing board. I had some nice buffalo chrome tan that I had used in for a gusset in another project and made the gussets out of that and it feels great and looks great (IMHO,) and I think it will hold up well enough for the use this piece will get. Maybe I'll find a use for those original gussets down the road some where, they are 3'wide and 41'long.
I had the main piece stamped, dyed, and ready to line it with 2/3 oz veg tan. got the lining cut out and gave it a light coat of olive oil and a coat of Tan Coat. Glued it to the main piece. Then low and behold I got some kind of a stain around the hole in the lining for the latch/flap fastener. So I tried to remove it with oxalic acid. Another wreck! There was some kind of chemical reaction between the oxalic acid and either the tan coat or the olive oil and it turned brown. Keep in mind that I initially used a Q-tip to dab the bleach on the stain. So it looked bad but I thought maybe I could salvage the mess some way. the clean the finish off with denatured alcohol. That didn't work. So as a last ditch effort I used quite a bit of oxalic acid on the area and succeeded in totally messing it up. Soooooo, I had to tear the lining out, make another one only this time, I didn't use any oil on it (since it had never been cased or wet.) I gave it a couple of coats a Neat Lac before I ever started gluing it to the main piece. I wanted to make sure it was protected as much as possible. That time it worked, and ended up looking good! Note to self, no more oxalic acid on a finished piece.
So, those are a couple of the issues I ran into, there were some other!
Live and learn!
Bill
Looking at the process as paying "tuition," is a good way to look at it, the cost of learning.
-
Here are a few pics of my latest projects
Dang good lookin work!
-
Gringobill
Don't knock yourself out of the game that quick. You finished it and it looks better than some I have seen for sale by many others, so be proud! I have been wanting to make one for myself, after all I make leather products, but I am just too darn scared to take on such a big project (for me). Go on, keep talking about your project....and be proud.
Thank you sir, you are very kind! I have admired your work as well!
I was talking to another guy who had made a briefcase and he said, "the first one is always the hardest. It was definitely a learning experience, mainly the fabrication. I definitely learned some things to do on the next one!
Bill
-
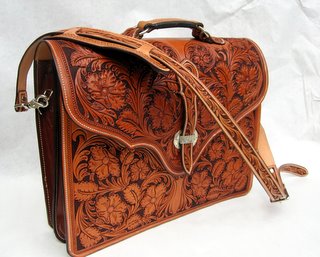
Well, I am always the one to throw cold water.
Your photos are a little small so difficult to see most. I think you selected a great pattern, doesn't matter if it is an original or not. Your work is excellent except for the Basket Weave. I hope your customer is not as picky as I. That is not a good job. Appears you didn't make a straight line mark, maybe you din't intend the weave to be straight, it should be "ALWAYS" in my opinion.
I also realize your photo may be a little skewed. If that is the case forget what I said above about your BW. LOL
ferg
I draw all my own patterns for better or worse. Hell, I put small pix on here so you couldn't really see all my mistakes!
As far as the basket weave goes, it's not as straight as I'd like either, and I did use some guidelines to start with. I don't think in reality it's quite as crooked as it looks in the photo, that panel is an outside pocket and I don't think it was laying perfectly flat when I took the photo. But again, I'm not really satisfied with the basket weave either.
-
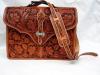
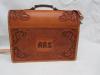
This is a briefcase that a man ordered for his daughter who just got her masters degree. I told him I was afraid it would be too big for a small lady but he was not to be confused by fact, his mind was made up.
It was one of those deals where the more I chewed it the bigger it got. It took forever to complete, I kept making mistakes and had to tear stuff apart and redo it. I did the silverwork also which added some time to the job.
Adding insult to injury I totally shot myself in the foot when I told him how much I would charge for it. I imagine I've lost money on the job. If I ever get an order for another one the customer better be sitting down when I give them the news!
Anyway this sucker is fixin' to be outta here and man am I glad!
Bill

-
Thanks Bill.
They looked good, until you could get close enough to smell the hide. My customer had that old hide for over 20 years, and it still smelled like a piss covered goat......But my customer is really Ranchy, and as far out into the high desert as his ranch is, only his dogs will have to worry about the smell.....It diddnt seem to bother him when he put them on....but it was all I could do to work on them in my shop.....
As for the antique..... I first died the brand in the center with Cordovan liquid die. Then added a very light coat of leat-lac to the yokes....let that dry for a couple hours, and then appied a coat of Sheridan Brown antique paste with a small piece of sheeps wool, and wiped it off immediately with a clean rag..... and that is the result....thanks for your comments Bill. Hope that Helps,
Happy Toolin'
Justin Alps
Justin, thanks for the reply. After you mentioned the "piss covered goat," that added a whole new demension to the chaps. If they smell that bad now I can't imagine what they and the old boy wearng them are gonna smell like the first time they get wet....I hope he's ridin a gentle horse!
Thanks for the recap on your finishing process. I do the exact same thing except I put on a coat of oil before the neatlac and that always makes the piece either a little darker or a lot darker. I use pure neatsfoot sometimes and have gone to trying extra light olive oil in an effort to keep the work from darkening. I would prefer that it look lighter like the yokes on your chaps.
I may try something with no oil and go straight to the neatlac resist. What brand of veg tan is that you used? I use mostly Hermann Oak and it turns a reddish color when I oil it. It is really a pretty nice color but sometimes I'd like to get a light color like you have there and let it get darker naturally with age.
Thanks again!
Bill
-
Here are a few pics of the woolys I just finished
Outstanding, They look way to pretty to wear out in the slop of winter! Maybe they need to be worn to the Saturday night dance? Your yokes look terrific. I really like the shading on your tooling, did you antique them. If you did I'm curious how you got it all to turn out light colored with just the accents in the stamping dark?
Awesome piece of work!
Bill
-
Yep, that oughta work!!! Like clod said somebody is gonna really be proud to have that!!
Bill
-
Well done, thanks for taking the time to share it.
What a simple and handy die!!!! I have made a couple myself and made it way more complicated and not nearly as user friendly as yours!! What a cool idea, thanks for sharing!
Bill
-
One way to make yourself a template is to take a piece of graph paper, figure out how wide you want your finished strap to be, draw those demsions on the graph paper then and fold it in half and draw your design along the outside edge (not where it's folded,) cut it out with scissors and then either make a better template or carefully use the graph paper. If you going to use it more than once it'll make your life easier if you make the finished product out of heavy paper, poster board, cardboard, manila folders are pretty good. Something that's stiff enough to trace around without it folding up on you.
-
Bill, thank you very much for taking time to leave a so interesting and professional reply about how to case properly a strap of leather as well as related to the use of swivel knife.
After watching my Jeremiah Watt's or Chan Geer DVDs I'm serously thinking that veg tan leather from US is different from Spanish one because the burnished imprints came out very easily while on the Spanish leather is quite impossible. Don't you think that US leather used for saddlery has a kind of polishing wax that made these imprints come out with certain ease?
Anyway I'll try to follow your instructions on casing leather in order to find out if spanish leather reacts in the same way after this casing proccess.
About Swivel Knife I think the only blade I have 1/4 is too thin for most flower designs so the result can not be as good as I pretend. Same thing is happening to me with beveling because I have only a beveler that is very appropriate for borders but not for vines or for parts inside the design wich need a more thin bevel.
I'm attaching a picture of my current tooling level. It can be seen two different styles: Spanish on the left side and Sheridan on the right.
Thanks again for all your help.

You're really making great progress, I czan see a lot of improvement in this sample of your work from the first one. Stay after it and keep practicing!
I believe you are right that there is probably a pretty big difference between Spanish veg tanned leather and the US version. I have no experience with Spanish leather at all although Spanish leather in general enjoys a very good reputation! There is probably a difference in the tanning process.
My hat is off to all of the people world wide, living in places where you don't have access to the resources and suppliers we have here in the US. It has to be huge challenge and expense trying to get the same supplies we take for granted and are trying to learn this US version of the craft. You have to really be motivated and committed to stay with it!
As far as your tools go, that may have something to do with your work. The 1/4" swivel knife blade is normally used for small intricate designs but can work for larger work. The width of the blade is less important than the thickness. Most all blades are close to the same thickness it's the width that varies. I primarily use a 3/8" blade for most of my designs and use a 1/4" blade for very small intricare work. I have a couple of 1/2' blades and rarely every use them. I t hink a lot of that is what one is used to and personal preference.
As far as your beveler goes, if you have one that is 1/4" wide or less you should be able to get by. If you had a 1/4" and a 1/8" bevelers they should allow you to do a good job on most designs. It doesn't look to me like the width of your beveler is causing you a problem.
Hope some of this is helpful, keep working at it, you are making great progess!
Felicidades,
Bill
-
This is my 4th. project. I started leathercrafting just three weeks ago so this is only another excercise to improve my tooling technique. First pic has been taken after carving, beveling and backgrounding. No finish or oil has been applied yet to the veg tan.
[/qu o
Here are a couple of thoughts I have.
I'm wondering if you had your work piece properly cased when you started tooling. Getting something cased properly is more art than science and is very important in getting good tooling results. It needs to start out really wet. Veg tan will turn a pretty dark brown. Let it set open air for awhile until all the surface moisture has soaked in or evaporated. Then put it in a plastic bag and then you can let it remain at room temperature or put it in the refridgerator for awhile. When you take the piece out of the plastic bag let it continue to dry out until it starts to return to it's normal color. It will be/needs to be cool to the touch. When the color of the piece is between the dark brown when it was wet and the pale color when you started you can begin swivel cutting and tooling. When veg tan is properly cased your tools (bevelers, pear shaders/thumb prints,) should leave a darker burnished imprint when you strike them.
The other thing is to make sure your swivel knife is sharp, all of the marks left from honing on the cutting edge need to be polished and stropped out. The cutting edge should be a bright mirror finish with no visible scratches. When using your swivel knife strop REALLY often, it will make a whole lot of difference in how your blade cuts through the leather. If it is dragging it needs to be stropped more or sharpened.
A critical point that separates floral carving from great floral carving are the finishing cuts, decorative cuts, or dress cuts. They need to start with a fine point as the cutting tip/edge of your blade enters the leather. Then the cut needs to immediately start to taper to a fine point. Learning how to make proper finishing or decorative cuts will make all the difference in the world in how your finished work looks. Look at example of excellent carving on this site and see how the finishing cuts look and learn how to copy those. Practice as much as you can with your swivel knife to perfect this technique.
Good luck, keep up the good work and have fun!
Bill
-
Where can you get parts for making paddle holster, hardware to attache the paddle to a leather holster
example attached
I've been buying some Uncle Mike's brand paddles from Midwest Shooter's Supply, Columbia, Mo. They are about $10 and they're "ok," but i'm not totally happy with them. They are really hard to get on and off and are not as sturdy as I'd like. One nice thing about them is they allow to adjust the height and angle of the holster. The service from Midwest is outstanding!
IMHO Galco paddles are the best I've seen but they would not sell me just the paddles. Maybe someone on the list knows a source for their paddles.
Bill
-
Thanks Keith. You've given me some great feedback. I can see most of what you've pointed out. I'm going to spend some more time tonight sitting down with your comments and really focusing on them. I really appreciate you taking the time to help me.
Dave
Just a couple of general comments to build on what Kieth said. Your design is generally good, it just needs a little tweaking.
All parts of a design need to be in proportion to each other, for example the stems and petals need to "match the size of your flowers," if that makes any sense. It looks to me like some of your stems and particularly your flower pods are a a little too small for the flower they are attached to. There is a chance they will look too "spindly," when finished they way they are now drawn.
Also the lines of the petal should all flow smoothly from where they come off the flower (as Kieth described) and flow and fade to a point on the edge of an imaginary circle outside the edge of the flower.
Most likely you will or can do this when you are cutting the petals with your swivel knife. All of my designs look better when they're cut in leather than on paper,
The end of those cuts forming the petals should gradually taper off to nothing at the end and not end abruptly. That's what makes a pattern flow gracefully.
Hopefully this makes some sense, it's kind of hard to describe. If I was a better hand with the computer I could put some graphics on your design to illustrate what Im saying but unfortunately that's over my head.
Bill
-
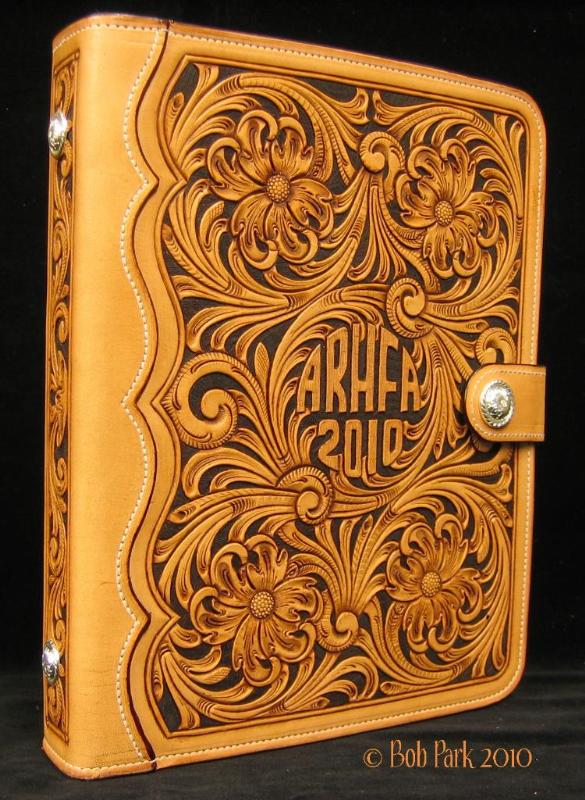
Here is a personal organizer which was made for a horse show roping award. All comments and critiques welcomed as always!
Happy Holidays!
Bobby

Awesome job Bobby.....as usual!!!! Hope you have a great New Year!
Bill
-
To start off, I think your workmanship is excellent and so is your design.
As far as the price, it's a handmade holster and I don't think a hunderd is too high. Building one is a lot of work takes a lot of time and you/we should get paid for it. Seems like I get more orders for holsters than anything and I really don't enjoy making them but I'm trying to learn to love it.....LOL! Yeah, there are a lot of less expensive holsters to be had out there but I don't thinkk they're custom made.
I am not an expert on pancakes but I have made several and looked at a bunch and from what I have seen they are typically made from softer, thinner leather than a "normal holster. Some I have seen that are well used/worn by law enforcement types are actually really soft an pliable after years of use. Some of them are just barely a loop to slide on your belt and stick a pistol in. Maybe a little more comfortable than sticking the pistol in ones waistband or in your belt. It seems like the designs run from that idea to much more sophisticated like yours.
One thing I did notice about yours that I think may defeat the idea of the pancake is that the middle seam looks like it runs pretty much down the center of the barrel. I think that the back of a pancake holster needs to lay flat against the hip and the wings curve around to fit the contour of the body for comfort. With the seam runnning the way it does on yours it looks to me like the backside of it might be uncomfortable if you have it cinched down on your belt all day. The "lump of the barrel is going to be pressing against the hip all the time when the holster is worn. I think others have made similar comments about the design and shape. I also think that if you build it so that the back is flat and the front is the part that is shaped to the contour of the pistol it will stay open with the pistol removed so doesn't need to be made out of thicker stiffer leather. On the ones I have made I use a thicker piece for the back and a thinner piece for the front.
I know it's a drag when you bust your fanny trying to do a good job and "get it right," and then you get dog piled on for your best effort. But I guess unless some "expert," teaches us how it's supposed to be done we're just floundering around out there trying to figure it out on our own. Don't be discouraged, once you get your process figured out you're going to turn out some killer work!
I'll attach a pic of one I made.

Good luck,
Bill
-
As far as mixing the solution, I have never worried about being really "exact." I'm using some wood bleach crystals from Home Depot which is oxalic acid.
I use about two rounded teaspoons in a quart of water. I have used warm tap water not "screaming hot."
My understanding is the reason for using warm/hot water is just to speed up the disolving into solution process.
When I have used these proportions there has been no settling out of excess crystals. I would be afraid that if excess crystals are settling out of the solution when you are mixing it you have a super saturated solution and I would be afraid that is too strong. A little of this stuff goes a long way.
I always swish the solution around in the jar each time before I used it.
Also in the proportions I use the solution works well in that it will clean off most all the spots and contamination that might end up on your project.
I think it's wise too err on the side of conservatism and start out with a weaker solution and if it isn't getting the job done gradually increase the strength.
I don't want the solution too strong. This stuff is not good for veg tanned leather and I consider it a "necessary evil," I think it takes out some of the natural oils in the leather. Too much will really dry to leather out and make it brittle.
In a perfect world I would be able to keep my work piece perfectly clean and pristine and would never have any "stuff," to clean off.
I apply it sparingly with a sheepskin patch.
In the strength I'm using it takes a minute or two for black spots I'm wanting to remove to go away. So I apply some of the solution to the spots ( I don't drench or soak the leather,) then wait until the area dries out and see if that does the trick. If not I keep cautiously reapplying until things are cleaned up.
I suppose it would be smart to put on a latex or vinyl glove to keep the solution off you fingers but I normally don't take the time to do that.
After I have cleaned the piece to my satisfaction and it is dry I apply a light coat of olive oil or neatsfoot to replace the oils removed from the wetting/casing/stamping/cleaning.
I hope this is helpful.
I've picked up here and there about how much crystals to so much water but can't recall anything noteworthy beyond that. Would someone run us through from the start? The ratio, hot or cold water, (I mixed it in screaming hot water and after it cools down, there's still some drop out). Then, how to work it, cloth, dauber, sponge? Any cleanup or dressing after or before dyeing? Wet leather, dry leather cleaning.............might need a pinned tutorial maybeso!
Terry
www.singletreeleather.com
-
I am new to leather working (about 9 days so far), and am having good luck with both a sheath and pancake holster design. I have read a lot on here, but I'm still having issues. First my process, then my problem...
After wet molding the holster and letting it dry overnight, I do a light Deglazing of the surface. Then I dye using Fiebing's USMC Black applied with sheepwool. I do basically two thorough coats in one sitting and let it dry. Then I buff the heck out of it. I do a light application of a leather lotion that I like (it's not any kind of finishing product), let it dry, and buff the heck out of it again. At this point the holster is basically looking how I like it. But then I apply a thin coat of Leather Balm with Atom Wax for a finishing coat, let that dry, and buff the heck out of it. At this point I notice a few spots where the color seems to be coming out, fading. It's mostly on high surfaces, areas that were probably touched/handled. Now, I am almost positive that this fading was not present before the Atom Wax. It happened with the sheath first, so I was almost expecting it with the holster I did later. Any suggestions?
Both the holster and the sheath look 95% awesome, aside from the faded areas. Now, when I wet molded the holster, I used a drop or two of soap to clean the surfaces, then I also Deglazed before dyeing. I always wear gloves when handling the leather from that point forward. I really doubt this is an issue of my hand oils or something being on the leather that is preventing the dye from taking. Again, any information or ideas would be awesome.
If I can get this sorted out, I'll post pics of my two new creations!
Hey there, you may have your problem straightened out by now......?
Dyeing something solid black is a challenge to begin with, I have seen a lot of discussion about it. It seems like some people may put on a base coat of a different color first before applying the black. I believe I have read that some of the holster manufacturers like Bianchi and Galco my dip their holsters rather than applying the dye by hand. That's a big commitment and expense if you are not a manufacturere!
I think cleaning with oxalic acid first is a good idea, also using a little oil to replace the oils in the leather removed by all the handling, water, and the bleaching.
Good luck!
Bill
-
Bill,
It depends on how much of the antique you want to pick up. I typically use Neat-lac immediately after I wipe off my antique. If you scrub really hard in a circular motion you are obviously going to take up more than if the Neat-lac is applied lightly. A trick that I have learned is if you want more color then antique it twice. Apply the antique, wipe it off, Neat-lac, let it dry and do it again. There is no rule that says you can only do it once. For that matter there is no rule that says you can't apply two different colors of antique to the same project. For example mahogany antique over the top of black antique gives an incredible dark cherry color.
Another thing that is going to determine what kind of color you get is how much oil you apply. If its lightly oiled chances are your color is going to be light. Nothing is wrong with light color, but you will have a tendency to get more vibrant color with a slightly heavier oiling. But on the flip side of that coin to much oil is not good for the leather and it darken the color to much.
Play with it, that is the best advice I can give. Try different things.
Ross Brunk
Ross, thanks for the input. I guess I will just experiment and see what happens.
You've got some good lookin' tack on yer website!!!!
Bill
-
I've been working on several belts. Had one all tooled and ready to finish.
Did the usual drill: a little clean up with oxalic acid, let it dry, a light coat of olive oil and let that dry, then a light coat of Neat Lac as a resist.
Then here's were things got off track.
I normally use Sheridan Brown or mahogany antique and after wiping off and buffing let it sit 24 hrs, then a coat of Tan Kote. Normally with those colors the Tan Kote takes off quite a bit of the antique, in fact if I'm not careful it will take most of it off
This time to try something different I used Dark Brown antique. Turns out that was a bad idea. After doing the normal steps, wiping off excess with a paper towel then with woolskin scraps and buffing it sure did look dark. Pretty extreme. But I decided all was not lost, I figured I could take a lot more off with the Tan Kote. So 24 hrs later I apply the Tan Kote and it sure didn't seem to remove near as much of the dark brown as I'd hoped it would.
So my question here is how long are you folks who use this same finishing process, (Hidepounder, Leather 1214, others....) letting the antique dry before you apply your final finish coat, Tan Kote or Neat Lac.
Maybe the dark brown is just too harsh for this process?
I may try to post a pic of the belt. It doesn't look bad, it's just that the guy who ordered it didn't want a lot of color on his belt. I may have to make him another belt and try to sell this one to somebody else?
Thanks,
Bill


Long Wallet
in Purses, Wallets, Belts and Miscellaneous Pocket Items
Posted
Heck of a job!!!!!!
From the sounds of it you hand stitched it all and it looks amazing, as in machine sewn or better. The whole thing just looks great!