jrmz
-
Posts
34 -
Joined
-
Last visited
Content Type
Profiles
Forums
Events
Blogs
Gallery
Store
Everything posted by jrmz
-
 thanks for the kind words. I appreciate it
 -
 Hi Tony, sorry about the late response. As to any instructions, I pretty much followed the tutorial on mug making that is pinned in the historical reenactment by Angster. the only difference is that I did not have such a big quantity of bee's wax or brewer's pitch to dunk the tankard in so I just coated the inside with several layers.
 -
From the album: timeline
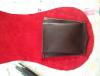
a shot of the interior. coming up with a pattern for an inner pocket prove to be a challenge in itself. i was going a tshirt style pocket and while i'm not completely satisfied with the results im okay with their functionality -
From the album: timeline
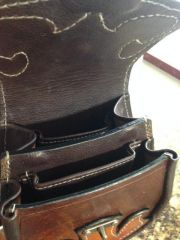
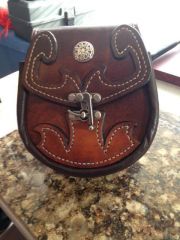
I bought a pretty inexpensive leather sporran that nobly sacrificed itself in order for me to understand how sporrans are made. originally, the sporran had only one gusset but I saw a double gusset sporran at a ren-fair and it made me curious. the project proved itself a challenge for which I wasn't completely ready. looking back at the design process I realize I made a lot of oversights. the most obvious ones are the corners of the front face not being covered by the flap, the swing clasp getting in the way of my stitching, a skewed shield to hold the chain in the back among others. so far, this is the most complicated project I've tackled but I think that it is a step in the right direction. I realized that what I really want to make are belt pouches. -
From the album: timeline
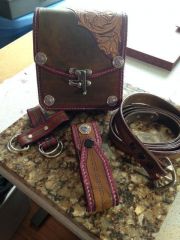
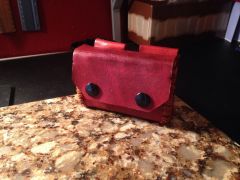
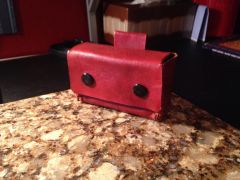
I made this set for my wife so she could use it with her costume at festivals and i'm pretty happy with the end results. this was my first time trying to make a pouch with a one-piece gusset and in retrospective, i should've used lighter leather for the gusset. Aside from a stray stitching groove (carefully hidden underneath the bezel for the rinestone) and a slightly skewed clasp, there weren't any major mistakes. She is happy, i'm happy Belt, pouch, flask holder and skirt lifters -
From the album: timeline
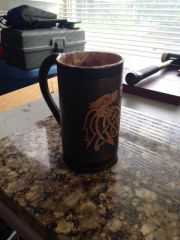
this one could've been a lot better. made a lot of mistakes: I did not use a welt on the handle and it made it to weak to hold the tankard and I used leather way too thin. It did work though, I used for one whole festival day without any leaks but the wax did crack in the inside. Will try to do a better one for the next festival. -
From the album: timeline
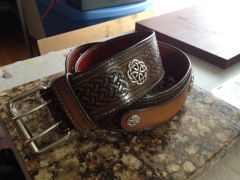
Mistakes and all, i'm very proud of this one. The stitching came out pretty even and the tooling ended up being decent. The small section that is not tooled is actually a snap that comes undone at opne end and lets me use sheaths with smaller belt loops. i thought that was pretty ingenious. the one mistake that still hurts me is that I did not give myself enough space for the buckle, I thought I was following the instructions closely but I didn't. Still, for once, I ended up with something that was pretty close to what I had in mind when I started. -
From the album: timeline
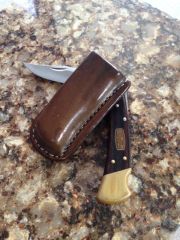
I wanted to give wet moulding another go so i went for a buck 110 sheath. The knife originally came with a black leather sheath but i've always like brown over black for accesories. The bottom corners came out a lot better than my prior projects which was about the only win in this project. The spacing from the stitch line to the edge is not consistent enough and i messed up the stitching groove on one side; my hand slipped i grooved in the wrong direction. Once again, the project ended up being functional but still not quite what i was going for. -
thanks for the reply, it really got me curious. the work looks really nice as in "tradition meets hi-tech" looking forward to the rest of the pieces
-
From the album: timeline
I got a card case and money clip kit from tandy to make one wallet for myself. I wanted to carry more card in it so I added one more layer. This was the first time I used dremel to even out the edges and it made a huge difference. All the stitching lines were evenly spaced from the edges. With this project I learned that I should try to get all the pieces from the same leather. I used a piece from my scraps bin and the front and back looking completely different from each other. lesson learned. I used this wallet for quite a while and the front face shows it. it has now been retired. -
From the album: timeline
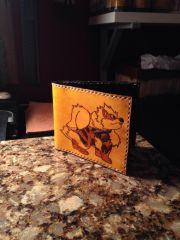
since i was making this wallet at the same time i was making the other one i made pretty much the same mistakes. -
From the album: timeline
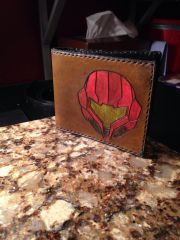
both of my younger brothers are really into videogames so wanted to give them something for Christmas with that on mind. at the tandy store that I usually go to, they keep the wallet liners close to the registers, one day I saw them while paying I thought they would make for a nice gift. in my head it was going to be a pretty simple project. cut a rectangle of leather, carve it, glue it and stitch it. it was quite so simple. I made the mistake of blindly trusting the cutting pattern they provide with the liner an lo and behold, it was a fraction of an inch too big, which I didn't realize until I had already glued it together. when stitching, the thread ended up way too close to the edges of the liner and chewed them up. at this point I wasn't aware that rubber cement and contact cement were two different things and it turns out that rubber cement was no the best thing to use to bond the two pieces together. it started delaminating at some spots. the only thing I was proud of was the use of fewer resist coats before antiquing. it gave a nice, warm yellow/orangy tone; appropriate since this happens to be a fire type pokemon. -
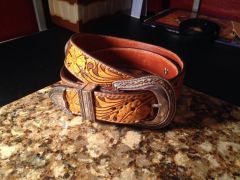
From the album: timeline
We always do a secret santa kind'a thing on christmas and for this year my recepient was my brother in law. he is a vet and a bit of a cowboy so i figured a western belt was appropriate. besides it was an excuse to try a different project. Al stholman's books were a godsend for this one. step by step instructions made it a pretty simple project. the only problems I had with it were that the craftaids for belts are a true measure while the leather straps sold at tandy are slightly smaller in order to fit in the buckles and again I applied too few coats of resist before the antique gel. hand stitching this one was a hell of a task but I discover that blisters and burns apart, the activity is quite relaxing. I slicked the flesh side with gum tragacanth in hopes that it would prevent the dye from bleeding. soo far so good. -
From the album: timeline
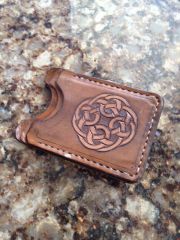
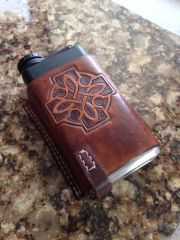
after the failure of the last flask holster i decided to try again. in order to avoid dealing with wet molding corners i decided to just remove them from the design altogether. I found about tandy's craftaids and thought i could do better than the celtic motif from the first holster. It just like painting by numbers!! first time using the antique gel; should've applied more coats of super sheen as a resist. all in all, I like how the colors came up. I wanted to have the holster sitting at an angle for a cross draw, but didn't think about the spacing needed for the bottom straps. originally I planned to have to bottom straps but the belt loop took too much space. the main body has two rows of stitching for two reasons: 1. aesthetics and 2. I put the first row too far from the flask which made it very loose so I added the second row to increase the tension -
what material did you use for the inlay in the bottom piece? or is it just stamped to look like a mesh???
-
From the album: timeline
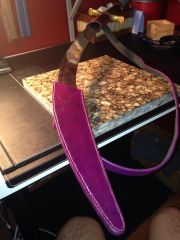
I got my girlfriend an early christmas present. A belly dancing sword, but it came with no way to carry it around for her shows so i thought maybe i could come up with something. I decided to make a sheath for only th tip of the sword for two reasons: the shape of the sword is kind weird (the tip of the sword is wider than the rest, and I didn't have enough leather to make a full piece. the strap is attached to a leather tube that when used, sits right underneath the hilt. the system is a bit awkward to use but it works, and it was the best I could come up with. My stitching is still really sloppy, I actually skipped a couple of holes without noticing. when trying to even out the three pieces of leather I cut too much on some sections and the stitching line ended too close to edges in some parts. again, functional but not quite right. -
From the album: timeline
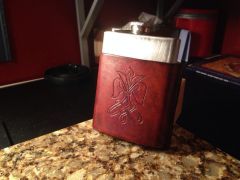
This flask holster was the first time i tried wet molding leather. it was also the first time i tried to hand stitch and also the first time i tried slicking the edges. first time I held a swivel knife as well. had a bunch of difficulties with this project. molding the bottom corners proved impossible, maybe because I didn't soak the leather long enough; I learned to use the edger and the slicker but I didn't use anything to effectively seal down the fibers, the edges were round but still kind 'a rough. I didn't case the leather properly and the swivel knife wasn't sharp so even a simple line drawing proved really difficult to carve. all in all, another functional project but not the end product was not really what I had in mind. -
From the album: timeline
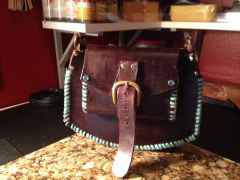
after the second pouch i realized that making stuff from scratch was fun so i kept the ball rolling. I wanted to make a purse for my then girlfriend (now wife) so i didnt have to carry all her stuff during the festival. filled with confidence from my second pouch I thought "how hard can it be?" Coming up with a functional gusset gave me nightmares for a whole week. every time I saw a purse, walking around in the street, at a store window, online, I even bought a couple second hand purses I would try to analyze and study them, and still couldn't wrap my head around the way they worked. I finally came up with an overly complicated 5 piece gusset that kept the bag together. I actually finished the purse right before the festival. during the festival I realized that I made a lot of mistakes: they dye started to bleed, the edges were fraying, the strap kept digging into her skin, couple of the rivets came loose and sections of my lacing became undone. The purse was functional but just barely. My girlfriend actually got a compliment on the purse, malfunctions and all, and boy, did it feel good. so I decided that as soon as we got back home I would do my homework and really get into the hobby. It was then that I found this place. a wealth of information and expertise just waiting for me to take advantage of it. -
From the album: timeline
after the first failure, i decided i could give it another go and do better this time around. I altered the pattern in order to make the pouch smaller, so the altoids tin didnt rattle around so much. a snuggier fit also meant that the snaps could close a lot easier since they had something to push against. I also added a second belt loop and moved the lacing closer to the edge which made the pouch sit closer to my body and thus easier to open. This one made me proud of myself. I created something functional from scratch; it wasnt pretty mind youm but it actually did what i wanted it to do. -
From the album: timeline
This was my first leather project. i wanted a simple pocuh to carry an altoids tin with a few small things for a ren fair. I started looking online to buy but most of what i saw was either wrong shape/right price or right shape/wrong price (for me at least). Trying to save a few bucks so i can have more to spend on booze at said festival i decided to make my own. I looked at images online to get ideas and watched tutorials. the result was a bit disappointing. I was too generous with the pattern and the tin rattled with every step, I laced the belt loop too low which made it awkward to open the pouch. -
I've been wanting to make a minimalist wallet like that for a while now. thank you for the pattern. Just a quick question, if I were to print it, what size would give me a full pattern to cut?
-
Thanks for the help man, I really appreciate it. I'll give it a shot.
-
And how would you attach the elastic? Rivets? Saddle stitch? The liner is pigskin if that makes a difference. I don't want the elastic to tear up when I stretch it. Thanks for the help
-
Thanks for the suggestion 25b. I might just use the elastic idea on the other liner of the sporran and that would work great with the smaller items I want to keep in the sporran like a pen, lip balm and a swiss army knife, but I want something to hold my wallet in place. For some unknown reason I found myself constantly reaching for it at the last festival I went to. I just don't want to fish for it when I need it.
-
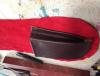
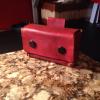
Hello everyone. I'm currently trying to make a sporran but I would like to have some inner organization in lieu of a black hole. the idea that I have in my head is to make a pocket similar in shape and size to that of regular t-shirts. So far, the best I've come up with is the design in the attached pictures but I'm still not too happy with it. Wondering if anyone can give me some pointers as to how improve the pattern and get rid of the exposed edges or if anyone already has a pattern they are willing to share with me. Thank you in advance