Search the Community
Showing results for tags 'belt'.
Found 250 results
-
Hey all, I got an order for a white belt, but have no idea where to source that sort of material without buying a whole hide. If anyone has any white full-grain veg tan or knows of where to get it, I would much appreciate the help!
-
 I am trying to reproduce an edge style that I like, not sure how to go about it though. I sanded down the edge but now I just have a rather ugly looking tan/grey edge without many loose fibers. How can I get the edge to look more like the reference photos? Those have a really nice raw frayed look and that great dark grey color that contrasts well with the black of the belt. My work in progress: https://imgur.com/a/dvh5fHu What I am aiming to achieve: https://imgur.com/a/09rb6ez Any help would be greatly appreciated!
 -
Great quality veg tan belt blanks for a steal! 1.5 inch width. ~55 inches long. 8-9 oz Asking $60 for 10. sell one belt and the lot pays for itself If you want more message me and I can cut a deal. I have a lot available Smooth black grain with no blemishes. The underside has no loose grain and is finished brown I’ve made a listing on my site here to keep things all in one place https://laszlosleather.shop/products/1-5in-belt-blanks-10x
-
I have a really nice single bend of Buffalo about 7-8 oz. I know I want to make lined belts with it so i bought 2-3 oz side veg tan to line it. My question is has anyone just lined the whole bend before cutting the strips? My idea is that this would create crisper edges and less waste.
-
 https://linksharing.samsungcloud.com/xKz0ZJjqTyKa
 -
Not only is the cutting edge fast, but even the sanding time will also be significantly reduced, so to speak, the closer the cutting edge is cut to the desired roundness, the more it reduces the sanding time and does not require coarse sandpaper to sand the round shape. Introduction of the product 1. The overall base is made of aluminum alloy with an anodized surface 2. The steel of the cutter head is made of DC53, with hardness treatment to 59-60°. 3. Each head is equipped with 12 sides of the blade, you can replace the blade by angle, which means you can use 12 sides of the new blade, simple and convenient, no need to sharpen the blade often. 4. The net weight of the whole machine is 2.4KG, length 28.5x width 13.8x height 7.8cm About the choice of belt width and thickness 1. The width of the trimmer is adjustable, the narrowest 13mm, the widest 80mm, both shoulder belt and waist belt can be used. 2. 3 # knife head specifications for 3-4.5 mm thickness of the belt strip, which is the most conventional range of belt thickness. (default send 3 # knife head) 4# blade specifications for 4.5-6 mm and above thickness of the belt strip 2 # knife head specifications for 2-3 mm and above the thickness of the belt strip. The grinding of the edge: When we use it for a long time, all the edges are not sharp, of course, all 12 edges are blunt is also takes a long time.
-
Hello, I have been making belts for a while and I have been struggling to machine stitch the keepers. I see some people using staples to avoid having to sew the keepers, but I would prefer to sew them using my machines. Does anyone sew their belt keepers with a sewing machine, if so, how do you do it? Thanks in advance.
-
Here are a few custom designs that I made to cut the tip/ends of leather belt straps.
-
This is one of my 1st belt press/punch that I made for leather belt straps. This is the Hole-Punch for the machine above!
-
As a Leather Artisan I have struggled with Edge-painting leather belt straps, so I engineered my own edge painting tools which work great and currently solved all my problems. Does anyone else have an alternative suggestions? I always love to hear and to learn from others and new techniques.
-
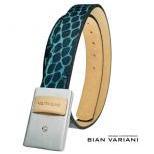
Custom made belt-press, tip cutter and heat press that I made. The biggest problem that I solved in this build is that I created custom alignment guides so I know where to exactly position the belt during the process. More pictures of my work is available at: https://www.instagram.com/varianibian/
-
I made my first leather belt. It was made out of Italian veg tanned 3.6-3.8mm leather, a brass buckle and keeper. I think it turned out pretty good.
-
 Hi all. Back again with the Juki 1541 with its issues. When I rotate the hand wheel it is fine and smooth up until the needle gets to its lowest point. It then becomes very stiff and I have to use a significant amount more force to continue the rotation. I have felt the belt and although it does feel tighter at this point in the rotation it still moves if poked. Here's a video showing the point where it becomes very stiff. https://i.imgur.com/SVInN6b.mp4 Is this normal? My previous thread about the hook not stopping in the same place I believe is caused by this. If I set my needle positioner to stop at the point shown in the video, sometimes it will continue the rotation and kinda bounce back. I thought this was due to backlash in the gears however I now wonder if its due to the stiffness. It seems to need more force to get past the "stiff" point and then this is too much and it carries on the rotation when it should have stopped. Any ideas?
 -
I have a slightly used Tippmann embosser for sale. This is a very nice unit well-built and hard to find. Machine allows you to do embossing, creasing and cutting. Comes with embossing wheel that is on the machine in the picture as well as the accessory pack shown in pictures. Table not included. Asking $950 plus shipping.
-
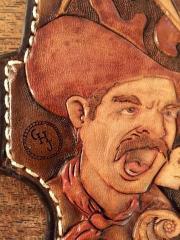
Commission from @outlawarchive That’s the Straight Satans patch on the back.
-
Hi, Can any one help me get the exact position of the holes in a 3 holes belt? I currently do 5 inch from the strap end for 5 holes. Also, what size should the hole punch be if the buckle pin is 4mm wide? I saw it in an hermes belt that they do 3 holes configuration but I’m finding to hard to what distance to punch the holes from either ends.
-
Hi everyone, I wanted to share that I have many new buckles for sale in my ETSY store https://www.etsy.com/ca/shop/ReliquariaMedieval . These are all authentic historical shapes, but the best part is, they are not the kind of designs you can find in the average craft store. I've been lucky enough to have a couple of fantasy armourers work with me and the buckles (and armour -wink!) look great. I've had some questions about the quality of these items - they are solid brass/bronze (depending on the amount of tin), very heavy and strong. They are cast pieces so each one is unique and you will see slight imperfections from the casting process. If there ever is a problem, I will always replace the broken piece (but of over 600 sales I've only had one broken piece). I would be honoured if you would consider using some of my items in your designs. -Ellaire Here's a couple more.
-
Hello all, new to the forum and new to Leatherworking in general. I have a couple questions about making my own suede weightlifting belt. First is if sandwiching veg tan between suede what's the best edge treatment? From what I've read Fiebings edge coat, Giardini or Fenice is the route I want to go. Second is what variety of weights should I use? For strength and rigidity should I use 9oz veg tan and 2 layers of 3-4oz suede or do 2 layers of 5-6oz veg tan and 2 layers of 2-3 oz suede. General thickness should be 1/4- 3/8". Attached is a picture of what I'm shooting for! Thank you for your time and feedback!
-
Hello guys, I'm a newcomer in the leather universe. My first acquisition is a natural veg tan belt. My concern is to start well with it, so I had few questions to target a nice patina over time. In the first place, do I need to use any kind of treatment before/during use ? Is it possible to accelerate aging process without reducing patina potential ? Have you any general warnings or advices ? Thanks by advance
-
Here is a video we did a couple weeks ago. We show how to find the middle of a belt to put a name in. Also, we talk about and show how to space letters. It is an hour long, but we have fun and answer some other questions. Customizing a Belt https://youtu.be/9-CfbHUnw1I
-
Not a hugely custom ordeal going on here, but I thought some ya might wanna see this very cool old buckle set. Made replacement belt to suit the buckle set. They said just "pitch" the old leather, but turns out I'm not too good at "pitching" what was a gift from husband to wife "back when"... they'll need to throw it out themselves if they don't want to keep it This is the "hers" version - "his" got shipped out due to we needed the space. Maybe they'll send us a pic of the two matching belts once they have the second one. Still need to hit the edges and apply some finish ...
-
 This is the first belt I ever made and it was for my son who is active currently. He really liked it and wears it daily. Cheers all!
 -
Hello, guys! So as a leatherworker, I thought I should be wearing a belt that I made... so I made one my style... thick. I used two pieces of 9 oz leather at 1.5 inches wide... do the math and you get an 18 oz thick belt. I glued the flesh sides together and then stitched it up so I have the smooth on both sides. It's like lining it with itself. It should last the rest of my life as well as my future kids and grandkids and so forth. It will also make a very good spanking strap. (Note: I did not make my dad one.) Comments/critique welcome. Oh, and before you ask, no, I didn't win the buckle. Thanks for looking! -Ryan
-
This was the first belt I stitched on the CB3200. Had to move the keeper closer than expected to stay off the letters when in center hole. Overall I like it. He was pretty dang excited about it. Cheers all!
-
I haven't really worked with leather before so I'm a bit out of my depth but I have an old belt that is starting to fall apart but it is quite important to me and I would like to be able to keep wearing it if possible. It isn't lined or anything it's just one piece of leather with stitching down the sides which is all starting to unravel. It also has a few surface cracks and the shape is quite warped. The best idea i have so far is to contact cement a thin backing onto it and then re-sew the edges. Is this going to be a lot harder than it looks or are there a lot of problems I'll probably run into? I'm fine with the sewing, cutting, detail work etc but have no experience with leather specifically and I really don't want to ruin it. I'm not really concerned with restoring its appearance as much as conserving its ability to hold my trousers up without breaking. If anyone has any helpful tips it would be greatly appreciated. Thanks!